之前看到Java Concurrent包中有个Condition接口。这个接口如今已经普遍用于线程通信, 使用方法主要依靠condition的await方法和signal方法,但这一对方法和Java经典的wait,notify方法对颇为相似。但这个新的方法对有什么好处呢,思考过后得出一句结论:减少无谓的唤醒。
于是写下这篇文章做个简单的笔记,文章首先简要介绍一下预备知识,但不打算详细说,毕竟重点仅放在condition上。介绍完毕后就是Condition的使用方法以及举例说明Condition好处在哪。
Java线程间的通信
Java 线程通信最常用的就是经典的三种:
- volatile 共享变量轮询
- synchronized 下使用object的wait,notify方法对
- ReentrantLock下使用condition的await,signal方法对
volatile 共享变量轮询, 核心代码如下
public class Main{
    volatile boolean shouldStop = false;
    Thread thread_1 = new Thread(){
           @Override
           public void run() {
               while(!shouldStop){
                   //do something
               }
           }
       };
       Thread thread_2 = new Thread(){
           @Override
           public void run() {
               try{
                   sleep(1000);
                   shouldStop = true;
               }catch (InterruptedException e){
                   e.printStackTrace();
               }
           }
        };
}
线程1和线程2通过共享shouldStop来决定是否停止工作,至于为什么要用volatile关键字,主要有两点:
- 强制共享变量修改时flush回主存
- 禁止cpu优化代码时的指令重排
具体的可以看这里 http://www.importnew.com/23535.html
synchronized中使用wait,notify方法对
虽然这个方法估计各位大佬都已经熟烂了,但为了和await,signal机制做对比,请允许我写一个生产者/消费者 模型来做说明。
public interface Buffer {
    void put(Integer integer) throws InterruptedException;
    Integer take() throws InterruptedException;
}
import java.util.ArrayList;

public class ClassicBuffer implements Buffer{
    private Object lock = new Object();
    private final static int CAPACITY = 1;
    private int count = 0;
    private ArrayList list = new ArrayList<>(CAPACITY);
    public ArrayList getList(){
        return list;
    }
    public  void put(Integer e) throws InterruptedException{
        if(e == null){
            return;
        }
        synchronized (lock) {

            try{
                while(count == CAPACITY){
                    lock.wait();
                    System.out.println("Classic_Put: "+Thread.currentThread());
                }
                list.add(e);
                count++;
                lock.notifyAll();
            }catch (InterruptedException exception) {
                // TODO: handle exception
                exception.printStackTrace();
            }
        }
    }
    public synchronized Integer take() throws InterruptedException{

        synchronized (lock) {

            Integer e = -1;
            try{
                while(count == 0){
                    lock.wait();
                    System.out.println("Classic_Take: "+Thread.currentThread() );
                }
                 e = list.get(count % CAPACITY);
                count --;
                lock.notifyAll();
                return e;
            }catch (InterruptedException exception) {
                // TODO: handle exception
                return e;
            }
        }
    }
}
这是用object的notify和wait来实现阻塞队列的核心代码,稍微解释一下代码含义。
阻塞队列实现Buffer接口,这个接口只有put和take两个方法, 容量大小为定义好的常量CAPACITY,这里是1,当前容量用count变量来统计。
生产者(put):
put的时候如果满足当前容量count 等于容量CAPACITY,那说明队列已经满了,不能再投放数据了,因此要用wait()来阻塞自己。如果容量未满,那么可以投放数据,一旦投放数据,队列就不为空,此时很有可能有一些消费者在阻塞等待队列不为空,因此这时候要唤醒这些等待的消费者。这里用的是notifyAll来做唤醒(个人觉得不应该使用notify,因为notify只会随机唤醒一条线程,如果有多条生产者线程会出现麻烦,后面会细细道来)。
消费者(take):
逻辑和生产者相似,如果当前容量count已经等于0,那么说明队列为空,没有数据,因此消费者需要wait自己来阻塞等待数据到来。如果容量不为空,那么消费者会取走一个数据,容量减少,因此队列此时一定不满,需要notifyAll来唤醒阻塞中的生产者。
另外: 生产者消费者只需要在runnable中实现调用这个阻塞队列的put/take就可以了,这部分的代码会在本文末章奉上。
ReentrantLock中使用condition 的await,signal方法对
import java.util.ArrayList;
import java.util.concurrent.ArrayBlockingQueue;
import java.util.concurrent.BlockingQueue;
import java.util.concurrent.locks.Condition;
import java.util.concurrent.locks.Lock;
import java.util.concurrent.locks.ReentrantLock;

public class ConditionBuffer implements Buffer{
    private Lock lock = new ReentrantLock();
    private Condition notEmpty = lock.newCondition();
    private Condition notFull = lock.newCondition();
    private final static int CAPACITY = 1;
    private int count = 0;
    private ArrayList list = new ArrayList<>(CAPACITY);
    public ArrayList getList(){
        return list;
    }
    public void put(Integer e) throws InterruptedException{
        if(e == null){
            return;
        }
        lock.lock();
        try{
            while(count == CAPACITY){
                notFull.await();
                System.out.println("Reentrant_put: "+Thread.currentThread());
            }
            list.add(e);
            count++;
            notEmpty.signal();
        }finally {
            lock.unlock();
        }
    }
    public Integer take() throws InterruptedException{
        lock.lock();
        while(count == 0){
            notEmpty.await();
            System.out.println("Reentrant_take: "+Thread.currentThread());
        }
        try{
            Integer e = list.get(count % CAPACITY);
            count --;
            notFull.signal();
            return e;
        }finally {
            lock.unlock();
        }
    }
}
这段代码的逻辑和上一段是一样的,不同的地方是使用ReentrantLock代替synchronized来做同步, 用condition代替object来做线程通信。
具体的使用方法跟object的wait,notify很相似,await和signal同样要在同步区中调用,并且使用ReentrantLock要记得手动unlock。稍微提一提ReentrantLock。
ReentrantLock是 Java concurrent包里实现的可重入锁机制。它和synchronized的主要区别是
ReentrantLock是在java层面上实现的,基于AQS(AbstractQueuedSynchronized)框架下使用自旋CAS机制实现,另外ReentrantLock扩展了很多额外的同步方法,比如公平锁,非公平锁,可中断锁,非阻塞锁。
而synchronized是基于JVM层面实现的,使用计数监视锁来做同步。
具体可以到这里看 http://hanhailong.com/
Condition比object通信好在哪
扯了那么多,终于来到做笔记的地方啦。再次说一遍好处:condition减少无谓的唤醒。
咱们现在开始把生产消费搞起,做一次测试。
生产者线程:
public class Producer implements Runnable{
    Buffer buffer;
    public Producer(Buffer buffer){
        this.buffer = buffer;
    }
    public void run(){
        try{
            while(true){
                buffer.put(1);
            }
        }catch (InterruptedException e) {
            e.printStackTrace();
            // TODO: handle exception
        }
    }
}
消费者线程
public class Consumer implements Runnable {
    Buffer buffer;
    public Consumer(Buffer buffer){
        this.buffer = buffer;
    }
    public void run(){
        try{
            while(true){
                buffer.take();
            }
        }catch (InterruptedException e) {
            e.printStackTrace();
            // TODO: handle exception
        }
    }
}
很简单对吧,仅仅是把实现好的阻塞队列注入到线程中。好,现在我们创建三条生产者线程,一条消费者线程。走起
public class Main {
    public static void main(String[] args){
        ClassicBuffer classicBuffer = new ClassicBuffer();
        ConditionBuffer blockBuffer = new ConditionBuffer();
        Thread thread_1;
        Thread thread_2;
        Thread thread_3;
        Thread thread_4;
        Consumer consumer;
        Producer producer;
        if(args[0].contains("classic")){
            consumer = new Consumer(classicBuffer);
            producer = new Producer(classicBuffer);
        }
        else{
            consumer = new Consumer(blockBuffer);
            producer = new Producer(blockBuffer);
        }
        thread_1 = new Thread(consumer);
        thread_2 = new Thread(producer);
        thread_3 = new Thread(producer);
        thread_4 = new Thread(producer);

        thread_1.start();
        thread_2.start();
        thread_3.start();
        thread_4.start();
    }
}
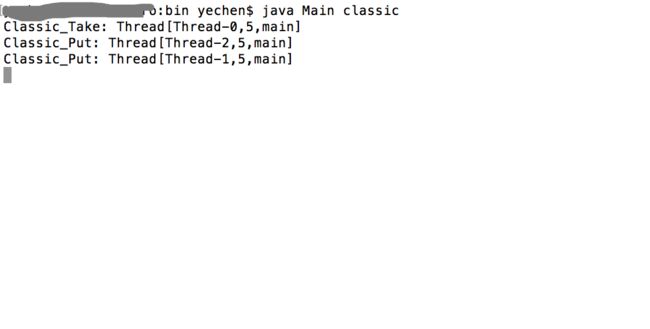
0号是来看看结果吧,先上condition的结果
因为队列只有1容量,出现了与预想中一样很均匀的线程切换: 一个生产者,一个消费者轮流切换,没有任何多余的线程唤醒。
再看object wait/notify的结果
是时候做分析了
我们先看回上面的object和condition实现的阻塞队列代码。再次贴一些关键的部分, 以生产者为例,
// ConditionBuffer.Put()
lock.lock();
try{
    while(count == CAPACITY){
        notFull.await();
        System.out.println("Reentrant_put: "+Thread.currentThread());
    }
    list.add(e);
    count++;
    notEmpty.signal();
}finally {
    lock.unlock();
}

//ClassicBuffer.Put()
synchronized (lock) {
try{
    while(count == CAPACITY){
        lock.wait();
        System.out.println("Classic_Put: "+Thread.currentThread());
    }
    list.add(e);
    count++;
    lock.notifyAll();
}catch (InterruptedException exception) {
// TODO: handle exception
    exception.printStackTrace();
    }
}
很明显,对比两个结果,object实现的结果比condition实现的结果每次多了两条无谓线程的切换,因为object每次是以notifyAll来唤醒的,所以所有等待中的线程,无论是生产者和消费者都要被唤醒。
但考虑到队列容量只有1,当生产者线程1完成数据插入时,它会把生产者线程2,3以及消费者线程0给唤醒,显然,生产者线程此时被唤醒之后做的唯一一件事就是判断容量是否等于1,由于此时生产者线程1刚刚完成插入,因此,2,3生产者发现容量等于1,再次进入wait,相当于他们这次醒来什么都没干,造成线程切换的浪费。
然而聪明的你们可能已经发现了"你这不公平!凭什么object要用notifyAll,而condition用的是signal并非是signalAll!"
好,好,先把刀放下,signal能够完成任务咱就不讨论用signalAll了,因为有快的方法就没有必要用慢的对吧。那我们讨论能不能用notify,把消费者所有的notifyAll改成notify,代码就不贴出来了,直接看结果。
咦?程序卡住不动了。为什么?
我们分析一下结果
- 程序刚进入,0号消费者启动: 队列容量0, 发现容量为0,阻塞自己。
- 生产者2号启动: 发现队列容量为0,插入数据,容量变为1。notify唤醒别的线程,然而很不幸,它唤醒了1号生产者。
- 生产者1号启动:发现队列容量为1,接着睡。
就这样结束了,再也没有别的线程能唤醒整个系统,因此卡死了。
但是为什么condition只用signal就可以,而不需要用signalAll呢?
因为condition只会唤醒获得相同条件锁的线程。也就是生产者唤醒的永远是消费者, 反之亦然。参考上面代码,生产者使用notEmpty.signal(),而它本身是以notFull.await()来阻塞自己的,所以生产者并不会唤醒生产者,消费者大家可以同样去分析。
好了,大概就是这样,如果有什么不满意的,欢迎讨论。


