目录
几何导入
区域处理
网格准备
攻角设置
嵌套区域融合
设置物理模型
设置材料特性
设置初始条件
设置边界条件
设置求解器
标量场(Scalar Scene)准备
收敛监控
运行仿真
结果可视化
攻角改变
清空并重运行仿真
结果可视化
总结
几何导入
-
加载一个模拟
文件地址为安装目录下的doc/startutorialsdata/compressibleFlow/data/airfoil_oversetParts.sim
另存到一个合适的地方
区域处理
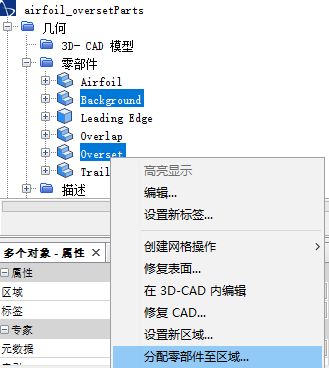
- 复选Background和Overset
- 右击选择Assign Parts to Regions(分配零部件至区域)....
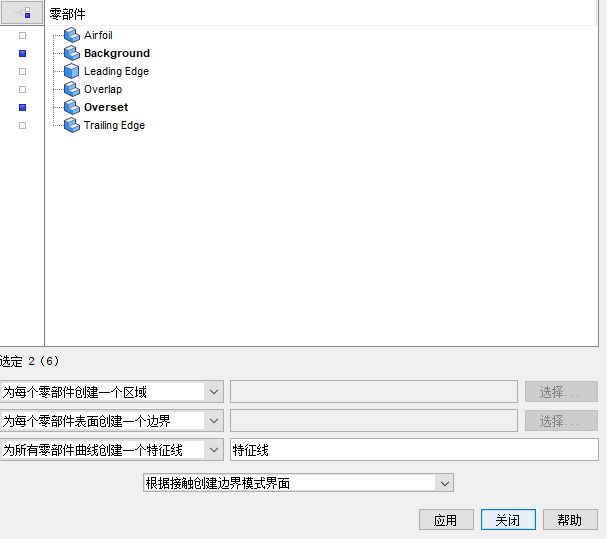
- 在对话框中选择Create a Region for Each Part(为每个零部件创建一个区域) for the Region Mode and Create a Boundary for Each Part Surface(为每个零部件表面创建一个边界) for the Boundary Mode.
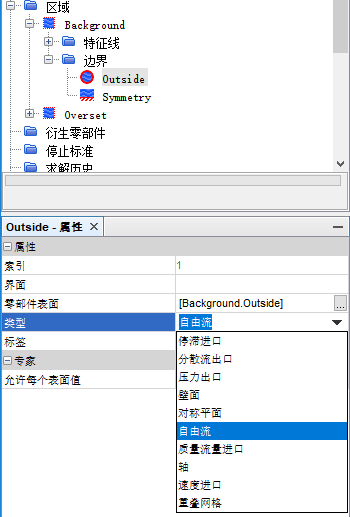
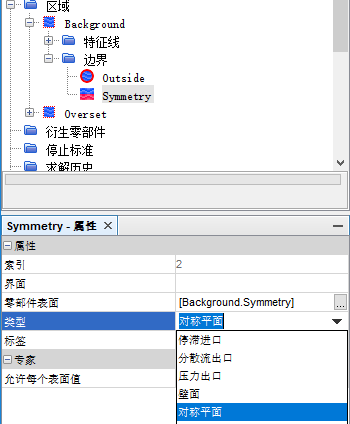
- 边界类型设置,Select the Regions > Background > Boundaries > Outside node and set the Type to Free Stream.
- Repeat this procedure for the Symmetry boundary, but set its type to Symmetry Plane.
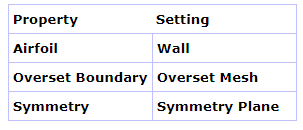
- 设置Overset节点下的边界
Airfoil->壁面
Overset Boundary->重叠网格
Symmetry->对称平面
网格准备
You create two Automated Mesh Operations to represent the Background and Overset regions.
The Automated Mesh Operations contain the same meshers, but use different mesh settings. It is important that, in the overlapping zone, which is defined by the Overset Boundary, mesh cells are of a comparable size in both meshes.
步骤:
- 设置Background网格
- 设置Overset网格
- 生成网格
设置Background网格
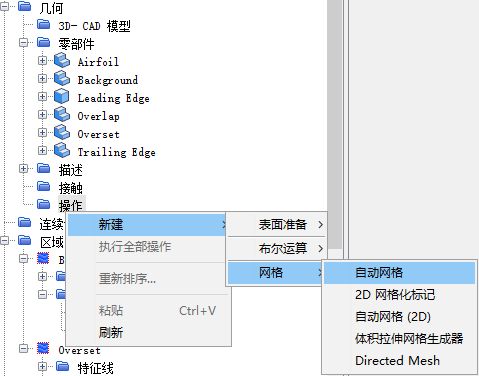
- Right-click the Geometry > Operations node and select New > Mesh > Automated Mesh.
- 网格生成器设置
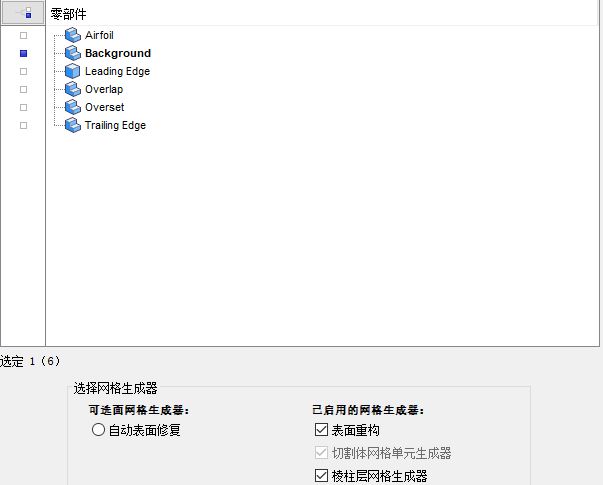
In the Create Automated Mesh Operation dialog:
a. Select Background from the Partslist.
b. Select the following meshers, in order:
Rename the Operations > Automated Mesh node to Background Mesh.
-
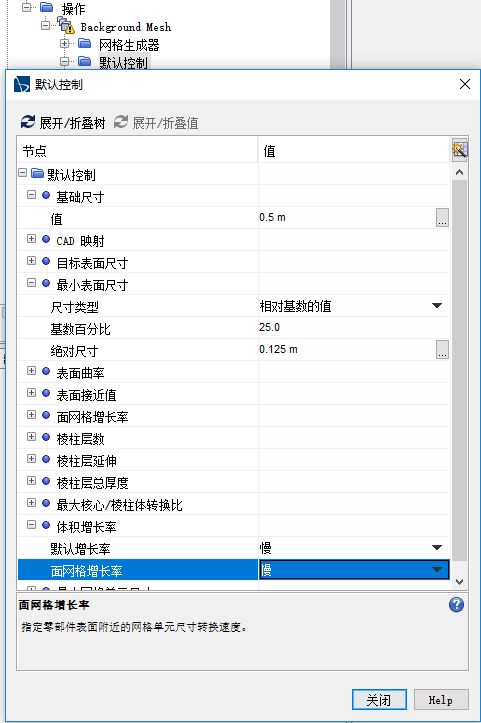
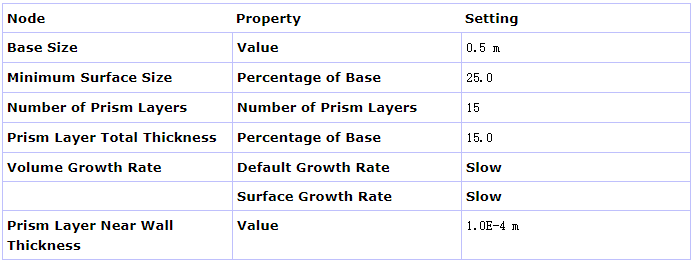
Edit the Operations(操作) > Background Mesh > Default Controls(默认控制) node and set the following properties:
-
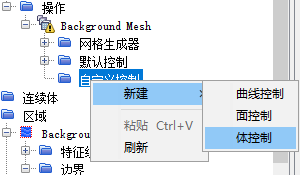
Right-click the Operations > Background Mesh > Custom Controls(自定义控制) node and select New > Volumetric Control(体控制).
-
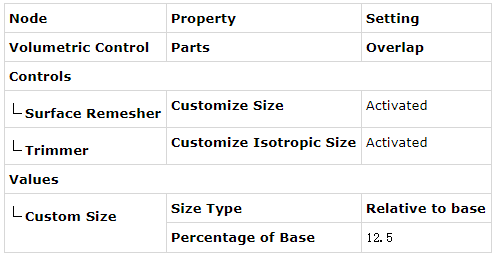
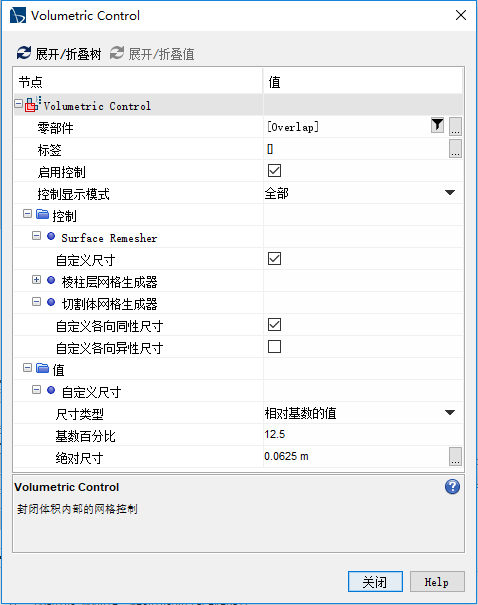
Edit the Volumetric Control node and set the following properties:
设置Overset网格
Copy and paste the Background Mesh node into the Operations node and rename the Copy of Background Mesh node to Overset Mesh.
对Background Mesh [ctrl+c]选择操作 [ctrl+v],将新生成的副本重命名为Overset MeshSelect the Operations > Overset Mesh node and set Input Parts(输入零部件) to Overset.
-
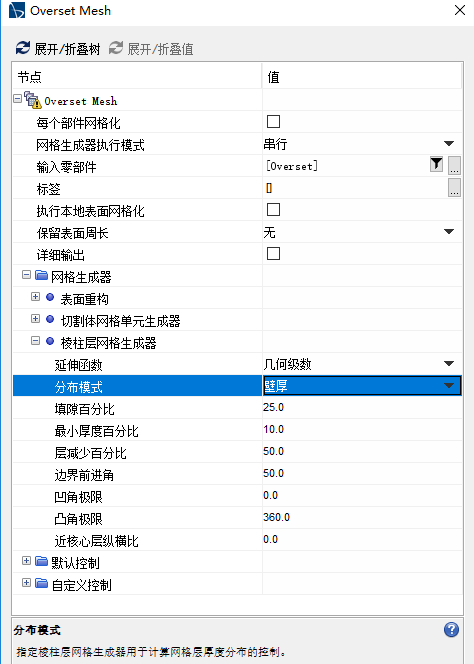
Select the Operations > Overset Mesh > Meshers(网格生成器) > Prism Layer Mesher(棱柱层网格单元生成器) node and set Distribution Mode(分布模式) to Wall Thickness(壁厚).
-
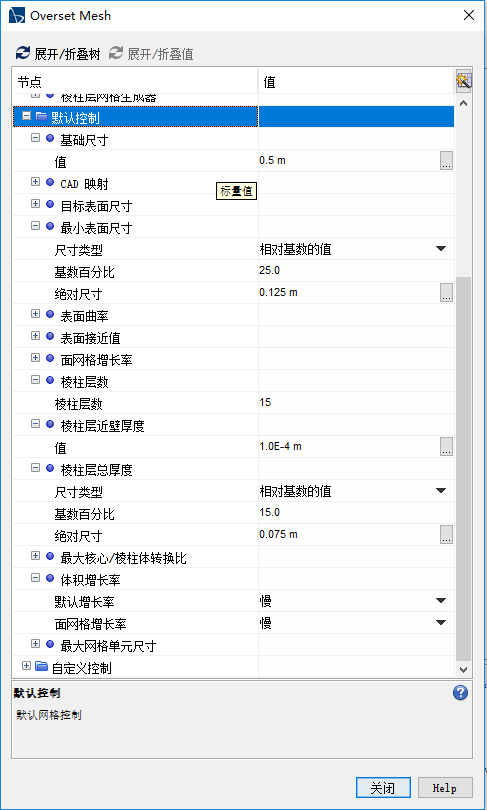
Edit the Operations > Overset Mesh > Default Controls(默认控制) node and set the following properties:
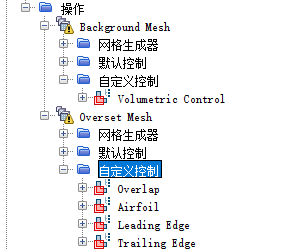
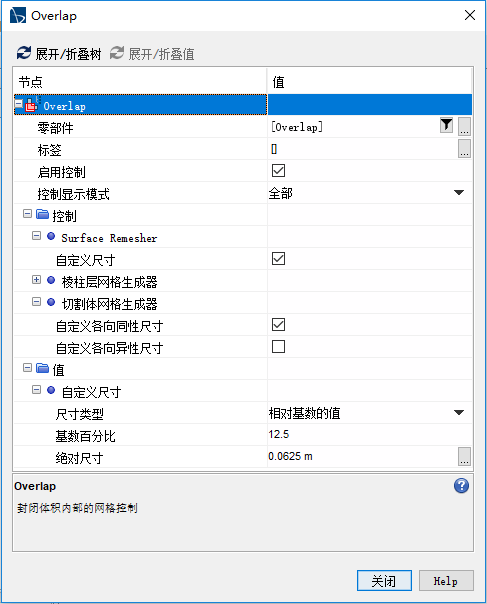
Rename the Operations > Overset Mesh > Custome Controls > Volumetric Control node to Overlap.
You can reuse the volumetric control that you created for the background mesh.-
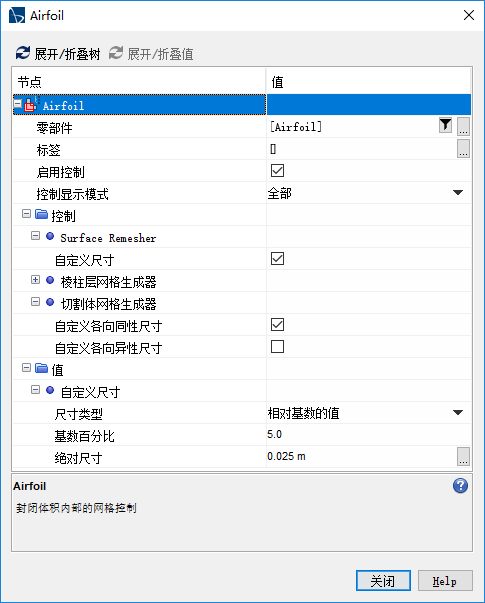
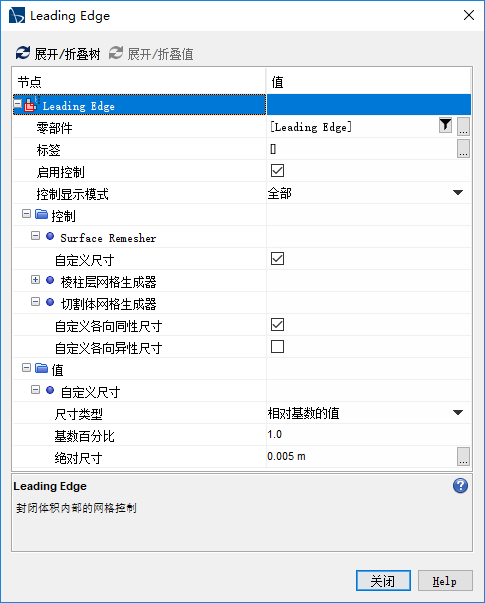
Following the same procedure as for the background mesh, create three additional new volumetric controls and give them the following names:
将第5步的Overlap复制三个副本,并重命名为
Airfoil.
Leading Edge.
Trailing Edge.
(以下7/8步可以直接拉到后面的图示看)
-
In the Controls node of all four volumetric controls, set the following properties:
-
For each volumetric control, select the following parts and the following values for Values > Custom Size:
生成网格(Generating the Mesh)
With both Automated Mesh Operations for the background mesh and the overset mesh set up, you generate the volume mesh. You then convert the mesh from 3D to 2D to simplify the solution.
To generate the mesh:
1.To build the volume mesh, click the Generate Volume Mesh button in the toolbar. This process can take a few minutes.
点击工具栏中的生成体网格按钮
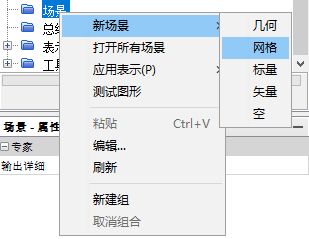
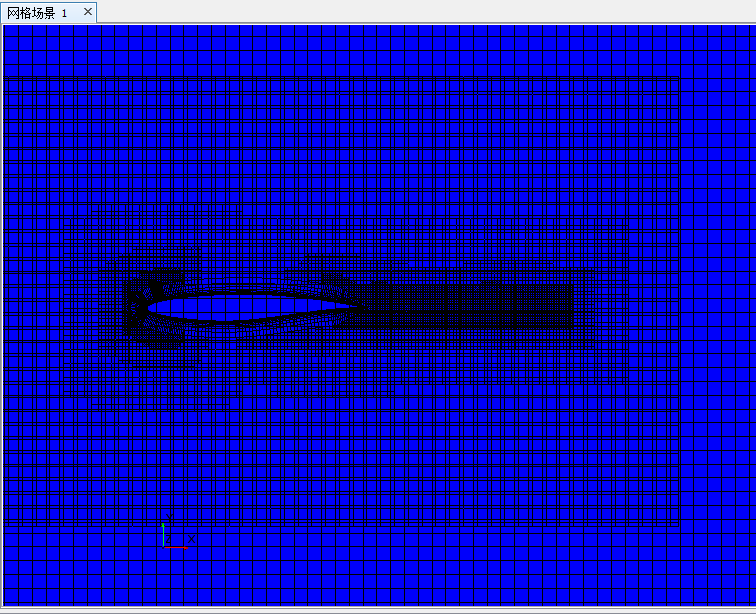
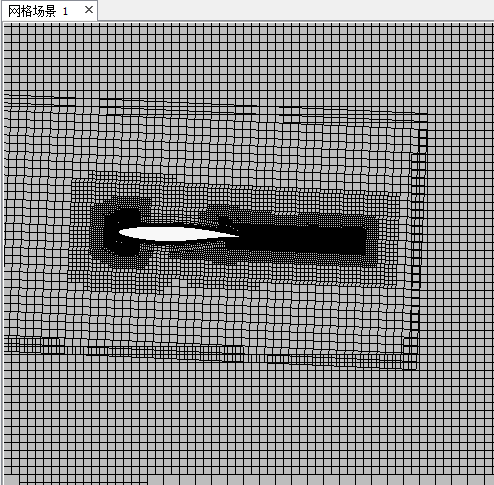
2.To view the mesh, create a mesh scene.
生成一个网格场景以查看网格
3.Zoom in on the Overset boundary to compare the cell size of the overset mesh to the background mesh at this boundary.
中键缩放,右键平移查看结果
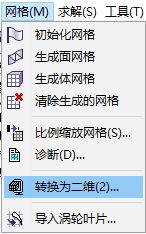
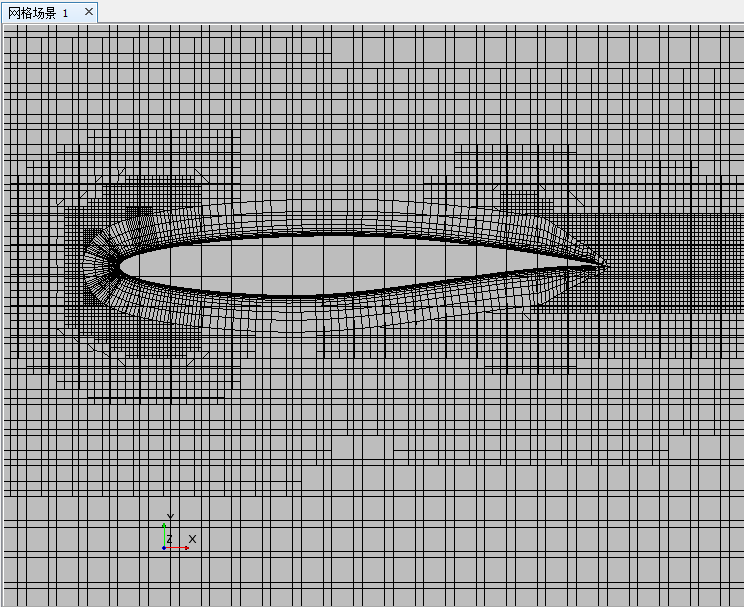
You can convert the mesh from 3D to 2D to simplify the solution.
将3D网格转换到2D网格
-
In the menu bar, select Mesh(网格) > Convert to 2D(转换为二维)
-
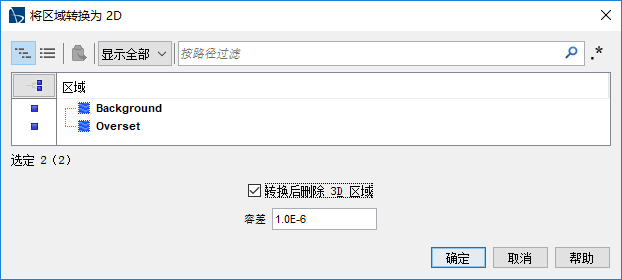
In the Convert Regions to 2D dialog, tick the Delete 3D regions after conversion option and click OK.
在将区域转换为2D对话框中勾选转换后删除3D区域
-
Save the simulation.
设置攻角Specifying Angle of Attack
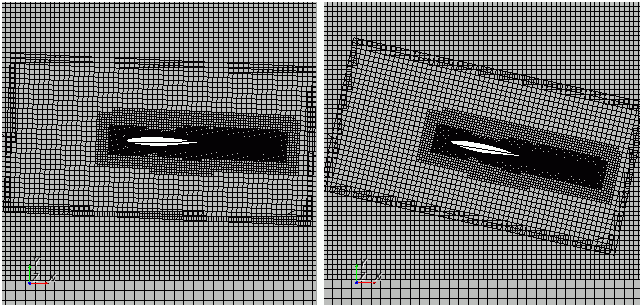
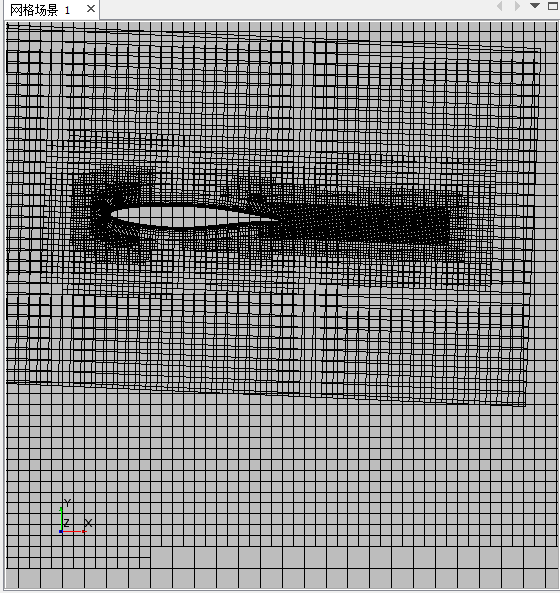
Rotate the Overset region to correspond to a 2.54° angle of attack of the airfoil.
将嵌套网格区域旋转到2.54°攻角。
The steps presented here demonstrate how using overset meshes allows you to change the relative position of bodies without the need to generate a mesh.
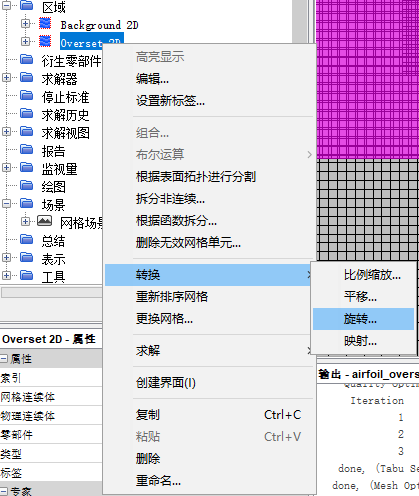
- Right-click the Regions > Overset 2D node and select Transform > Rotate
右击区域>Overset 2D选择变换>旋转
-
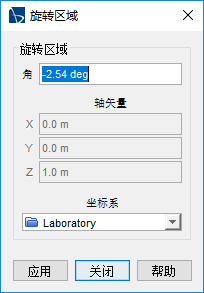
In the Rotate Regions dialog, set the Angle to -2.54 deg(注意这个deg).
-
Click Apply, and then click Close.
嵌套区域融合Coupling the Overset Region
Overset regions are coupled to the background region using the Overset Mesh interface.
Normally, this interface can be created before generating the background and overset meshes. To activate this interface feature, you must create a physics continuum. Current implementation requires that the background and overset regions use the same physics continuum. In this tutorial, you are creating the Overset Mesh interface after converting the mesh to 2D as this step deletes all previously created interfaces.
To create the interface:
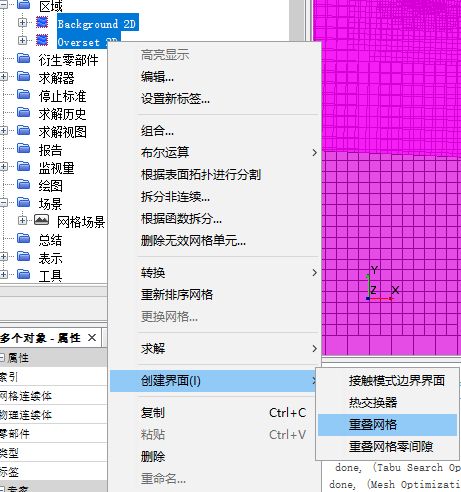
- Multi-select the Background 2D and Overset 2D regions.
复选Background 2D和Overset 2D - Right-click the selected regions and choose Create Interface > Overset Mesh.
右击依次选择创建界面>重叠网格
An Overset Mesh 1 node appears under the Interfaces. Use the default Distance Weighted Interpolation Option for the mesh coupling.
When you initialize the Overset Mesh interface, STAR-CCM+ chooses acceptor cells on the overset region. Cells in the background region that are overlapped by the overset region are deactivated.
分析嵌套网格Analyzing Overset Mesh
Display cell status in a scalar scene.
To analyze the mesh before running the simulation, initialize the Overset Mesh interface:
- Right-click the Interfaces node and select Initialize.
右击界面选择初始化
Notice that the background mesh within the airfoil part has been removed in Mesh Scene 1.
Analyze the overset mesh using the Overset Cell Status field function.
-
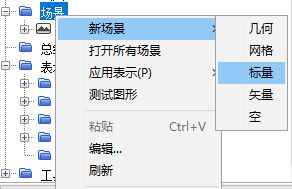
Create a scalar scene.
The Scalar Scene 1 display appears.
生成一个新场景>标量
-
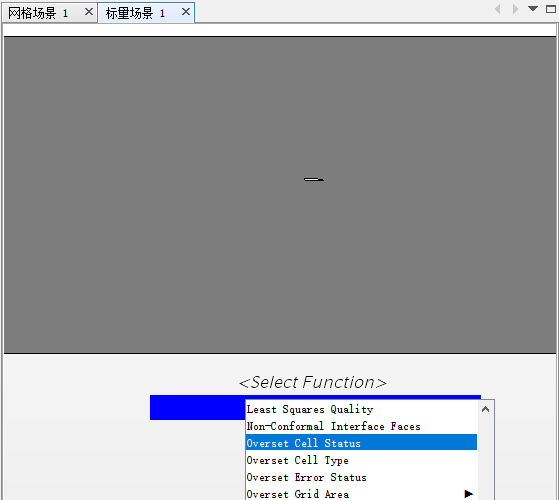
Right-click the scalar bar at the bottom of the display and select Overset Cell Status from the pop-up menu.
-
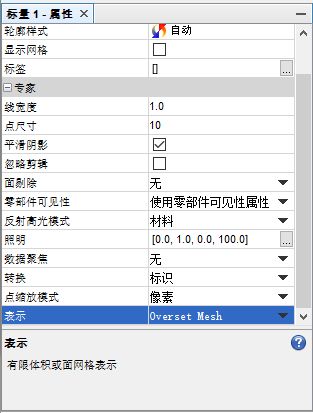
Select the Scalar Scene 1 > Displayers > Scalar 1node and set Representation to Overset Mesh.
选择标量场景 1>显示器>标量 1节点,讲表示设置为Overset Mesh
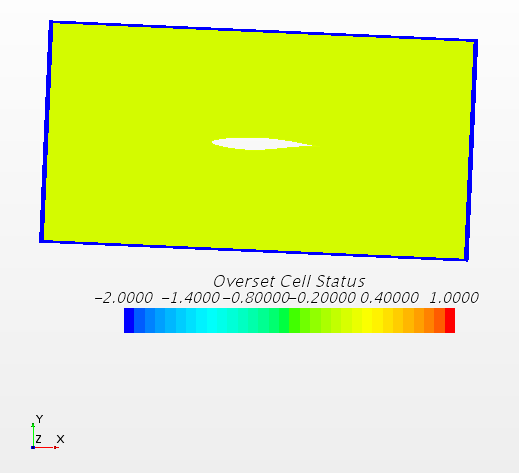
First look at the cell status in the overset region.
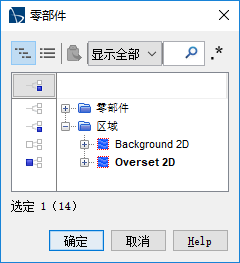
- Select the Scalar Scene 1 > Displayers > Scalar 1 > Parts node and tick the Overset 2D region in the Parts property.
选择标量场景 1>显示器>标量 1>零部件节点,只选择Overset 2D零件
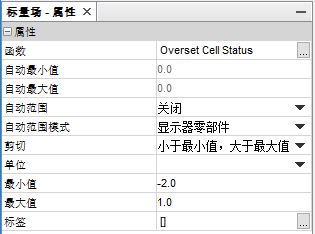
- Select the Scalar Scene 1 > Displayers > Scalar 1 > Scalar Field node and set the Min to -2.0 and the Max to 1.0.
Acceptor cells outline the overset region in blue.
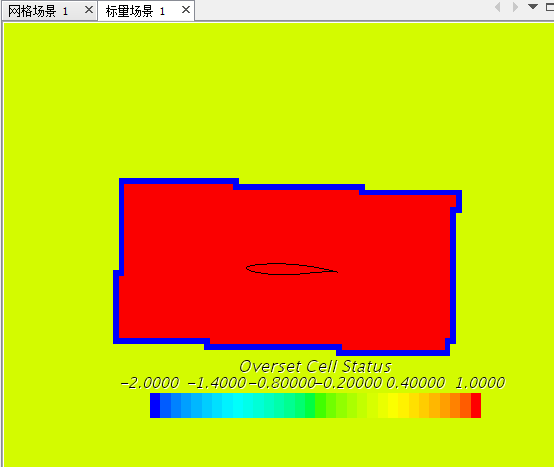
- To see the background region cell status, change the Parts to Background 2D within the Scalar Scene 1 > Displayers > Scalar 1 > Parts node.
The red cells in the background mesh are inactive.
设置物理模型Setting up Physics Models
Models define the spatial and temporal solution methods and the physical properties of the flow.
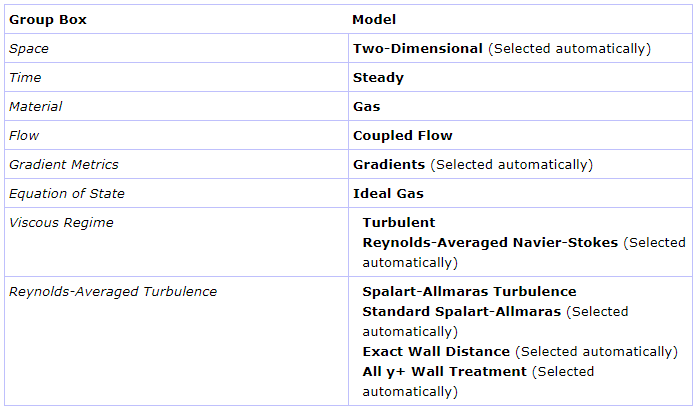
In this example, the flow is steady, turbulent, and compressible. Use the default Spalart-Allmaras Turbulence model and the ideal gas model. The analysis also uses the coupled solver, which is recommended for all supersonic and transonic compressible flows.
By default, a continuum called Physics 1 is created when the three-dimensional mesh is generated and a Physics 1 2D continuum is created when the mesh is converted to two-dimensional. You can delete the Physics 1 continuum, as only one is used in this simulation.
-
Delete the Continua > Physics 1 node.
To use a more appropriate name for the Physics 1 2D continuum:
删除Physics 1
-
Rename the Continua > Physics 1 2D node to Airfoil
将Physics 1 2D重命名为Airfoil
You can now choose the physics models for the continuum.
-
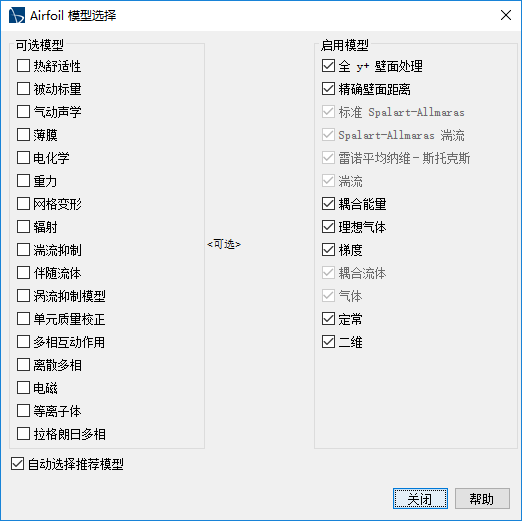
For the Airfoil continuum, select the following models, in order:
双击连续体>Airfoil>模型进行设置
- Click Close.
设置材料特性Setting Material Properties
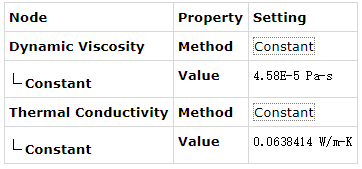
Set the Reynolds number to 6.5e6, changing the dynamic viscosity
Use the following steps:
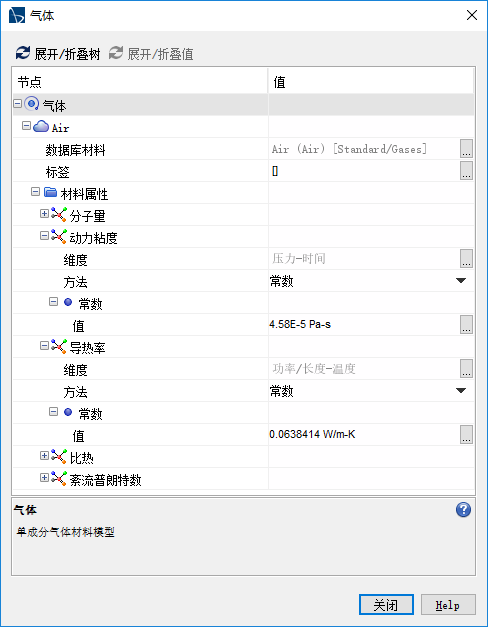
- Open the Continua > Airfoil > Models > Gas > Air node.
双击打开连续体>Airfoil>模型>气体 - Edit the Material Properties node and set the following properties:
设置初始条件Setting Initial Conditions
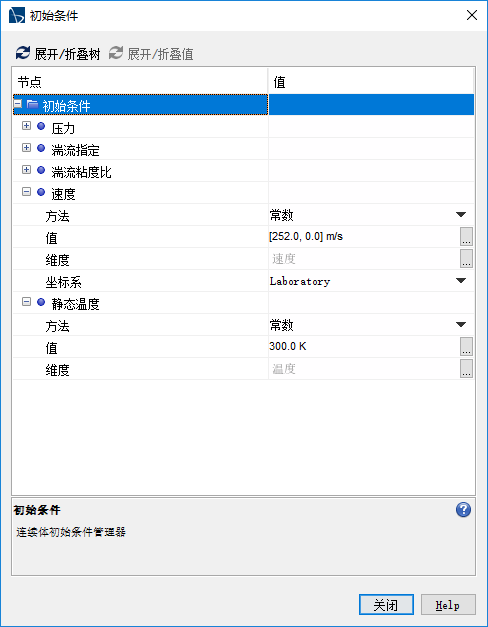
As in the Transonic Flow tutorial, initialize the velocity field to 250.0 m/s.
- Edit the Continua > Airfoil > Initial Conditions node and set the following properties:
双击打开连续体>Airfoil>初始条件
The default values for the remaining initial conditions are suitable for this tutorial.
设置边界条件Setting Boundary Conditions
Set the conditions at the boundaries of the airfoil and the domain.
The geometry used for this tutorial has only two boundaries for the physics:
A wall boundary representing the surface of the airfoil and defined in the Overset region.
A freestream boundary at the external edge of the entire solution domain defined in the Background region.
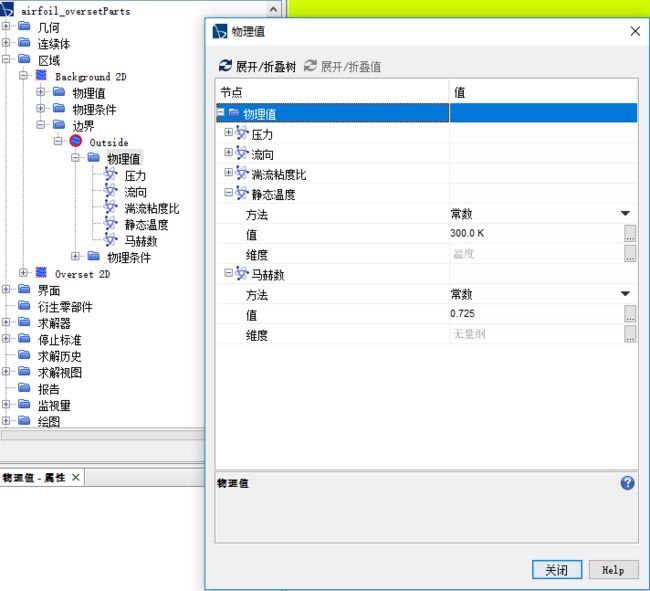
Set the freestream conditions on the outer perimeter of the Background region.
1.Edit the Regions > Background 2D > Boundaries > Outside > Physics Values node and set the following properties:
双击设置区域>Background 2D>边界>Outside>物理值
All other conditions for the freestream boundary and the default wall are suitable for this problem.
设置求解器Setting Solver Parameters
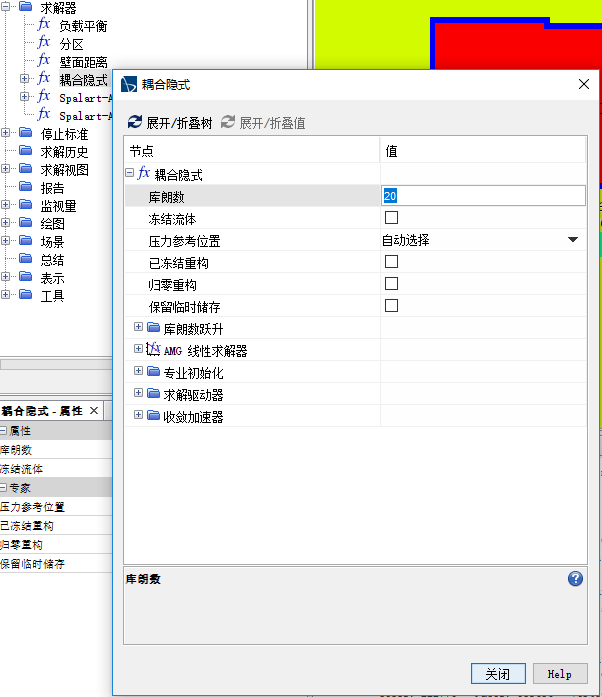
The simplicity of this problem allows a rapidly converging solution to be obtained using a larger Courant number.
In problems involving more complex geometries or physics, attempting to shorten the run time in this way may cause the solution to diverge.
To increase the Courant number:
-
Select the Solvers > Coupled Implicit node and set Courant Number to 20.0.
求解器>耦合隐式设置库朗数为20.0
Save the simulation.
准备标量场Preparing a Scalar Scene
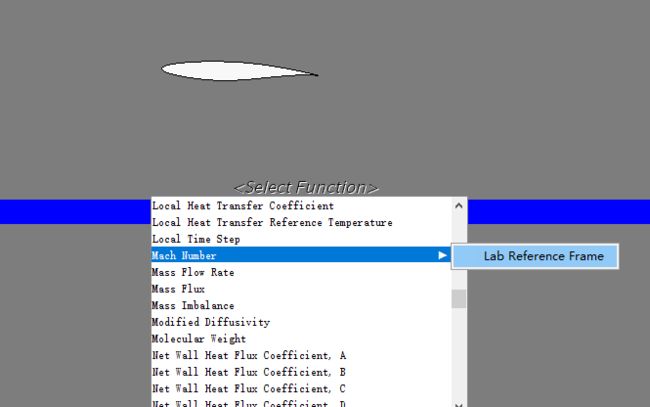
View the Mach number profile during the run to monitor the supersonic flow region above the airfoil.
Use the following steps:
1.Create a scalar scene.
A new Scalar Scene display appears.
右击并选择生成场景>新场景>标量
2.Right-click the scalar bar at the bottom of the display and select Mach Number > Lab Reference Frame from the pop-up menu.
3.Initialize the run by clicking Initialize Solution in the toolbar, then use the middle mouse button to zoom in on the airfoil in the center of the scalar scene.
在工具栏中点击初始化求解
4.To change the style of the Mach number contours, select the Scalar Scene 2 > Displayers > Scalar 1node and set Contour Style to Smooth Filled.
选择场景>标量场景2>标量1,将轮廓样式设置为平滑填充
收敛监控Monitoring Convergence
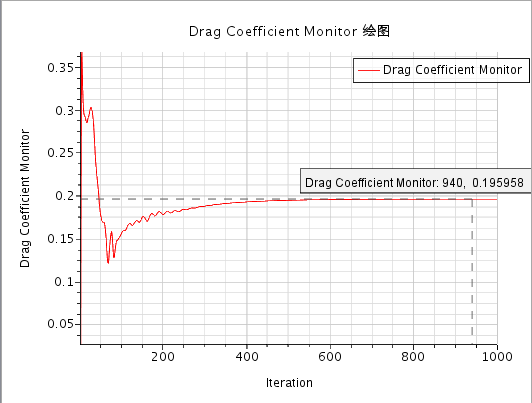
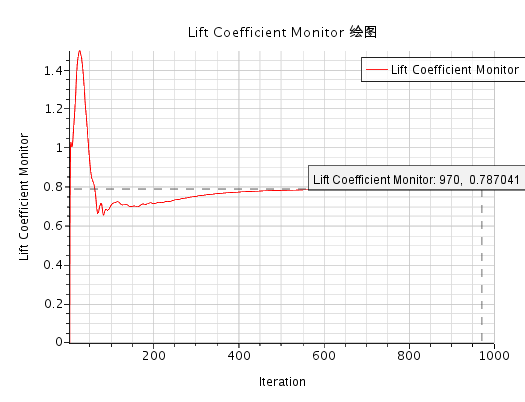
To determine when the problem has converged, plot the lift and drag coefficients.
Use the following steps:
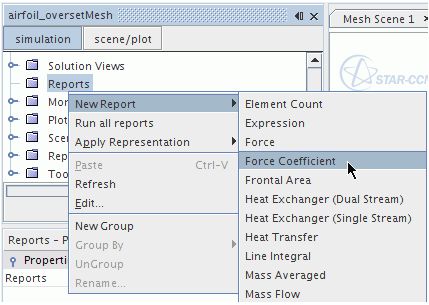
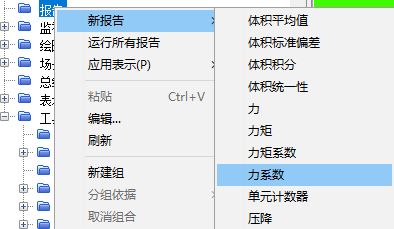
- Right-click the Reports node and select New Report > Force Coefficient.
右击报告选择新报告>力系数
A new report node named Force Coefficient 1 is created.
Rename this node Drag Coefficient
重命名为Drag Coefficient-
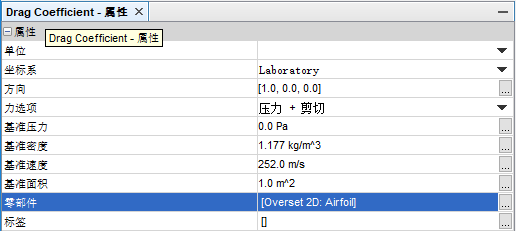
Select the Drag Coefficient node and set the following properties:
-
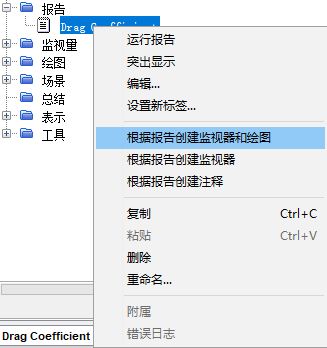
Right-click the Drag Coefficient node and select Create Monitor and Plot from Report.
右击Drag Coefficient选择根据报告创建监视器和绘图
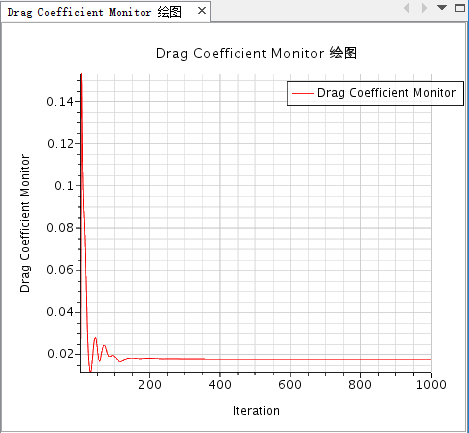
A new plot node appears named Drag Coefficient Monitor Plot.
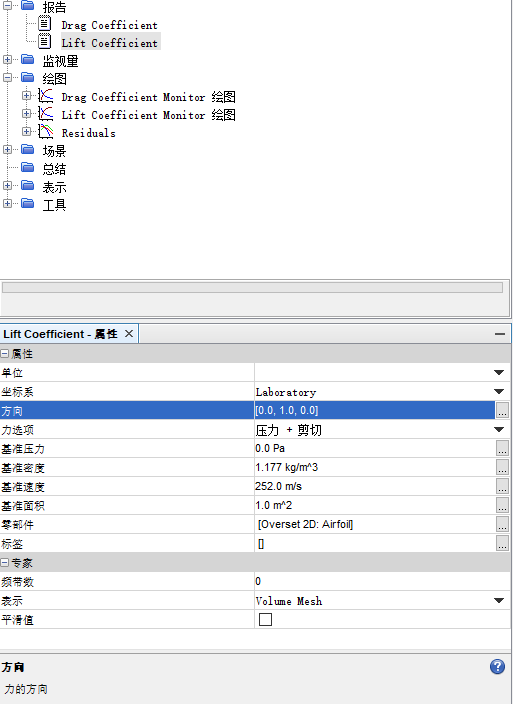
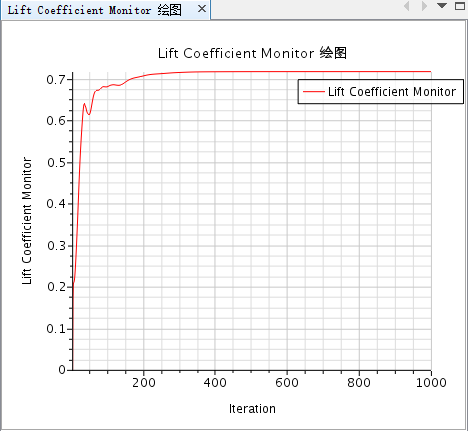
- Repeat the steps described above to create and display a plot for the lift coefficient. Use the same settings as for the drag coefficient except rename the report node Lift Coefficient and set its Direction property to [0.0, 1.0, 0.0]
重复前述步骤(可以直接复制粘贴)创建一个Lift Coefficient ,注意改方向
- Save the simulation.
运行仿真Running the Simulation
You are now ready to run the simulation.
Use the following steps:
1.Click Run in the toolbar.
点击工具栏中的运行
The Residuals display is created automatically and shows the progress of the solver.
During the run, it is possible to stop the analysis by clicking Stop in the toolbar. If you do halt the simulation, it can be continued later by clicking Run. If left alone, the simulation continues until 1000 iterations have been completed.
可以在停止标准>Maximum Steps中设置最大步数
2.Save the simulation after the solver has finished
结果可视化Visualizing the Results
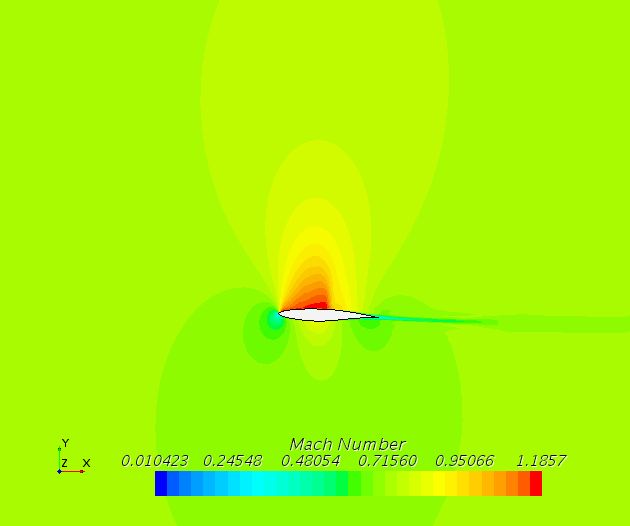
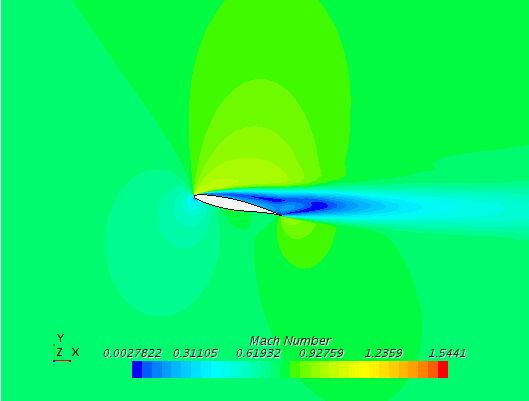
The Scalar Scene display shows the Mach number profile at the end of the run.
The profile shows the transonic flow around the airfoil, including the shock wave produced behind the supersonic region on the upper surface.
The lift and drag coefficient plots provide a check for convergence. As there is little variation in both monitors, it is reasonable to conclude that the solution has converged.
改变攻角Changing Angle of Attack
Rotate the overset mesh.
One advantage of using an overset mesh is being able to transform regions without having to remesh. If, for instance, you want to study the airfoil at a different angle of attack, you can rotate the Overset region by a different angle and rerun the simulation.
-
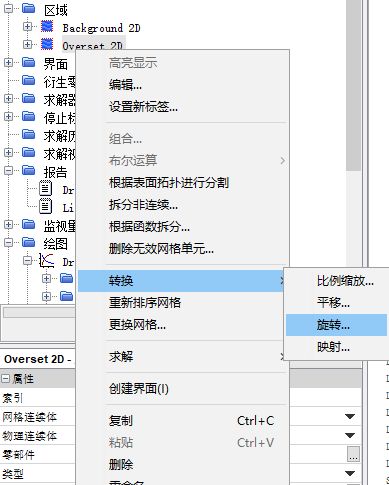
Right-click the Regions > Overset 2D node and select Transform > Rotate... .
右击区域>Overset 2D,选择转换>旋转
-
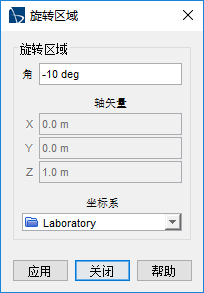
In the Rotate Regions dialog, set Angle to -10 deg(注意deg->°).
Click Apply.
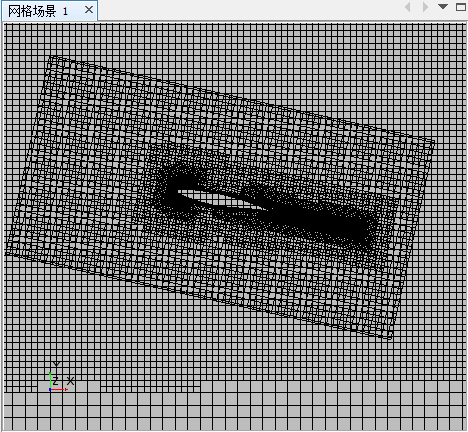
The transformed overset region must be completely within that refined part of the background region where the background mesh is of the same size as the overset mesh.
清空并重运行仿真Clearing and Rerunning the Simulation
Clear the solution and rerun the simulation using the same physics setup.
Use the following steps:
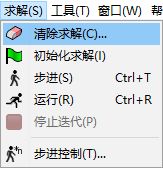
1.In the menu bar, select Solution > Clear Solution.
2.Click Run in the toolbar.
结果可视化Visualizing the Results
Re-examine the scalar scene.
The scalar scene solution is shown below. You can see that if the angle of attack is increased further, the steep adverse pressure gradient on the upper surface of the airfoil causes the flow to separate close to the leading edge, resulting in a large wake.
总结Summary
This Transonic Flow tutorial demonstrated how to use overset mesh to simulate transonic flow over an airfoil
This tutorial introduced the following features of STAR-CCM+:
Creating and analyzing an overset mesh for an airfoil problem.
Defining models for a compressible flow problem.
Defining the material properties required for the selected models.
Setting solver parameters for a steady-state run.
Analyzing results and convergence.
Modifying angle of attack.
