久之前,更新了QQ,除了又变大了一些占内存,没觉得有什么新奇的地方,直到有一天同事拿着手机来给我看这个底部按键的特效,握个草,有趣诶,这个东西。不过初出茅庐,并不知道怎么做。前些天,看见了文章分享了思路,琢磨了一下,花了一些时间看了自定义View方面的知识,勉强做出来了。
先来看看效果:
参考链接:还没整理好,过两天一起贴
开发测试工具:Android Studio 2.3.1
代码传送门:链接
1.原理:
班门弄斧,照样画葫芦,我也说一说这个原理,假装一波大神 —— 这个啊,很简单,一看就知道,应该是封装了一个自定义 ViewGroup ,里面有两个图层,在 onTouch 中,根据手指滑动的距离,两个图层的运动距离不同,达到上面的效果。
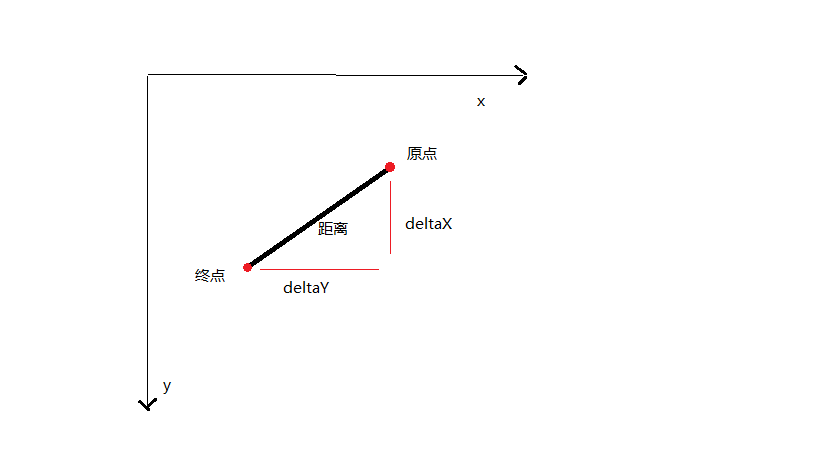
这里主要需要知道基本的三角函数知识就可以了。如下图,我们根据手指运动的距离和角度来计算两个图层 X、Y 的变化,具体计算方式,我们会在后面讨论。
2.自定义布局和属性
根据原理分析,我们可以发现这个自定义 View 主要由两个图层组成,而且通常会有 TextView,因此,我们选择利用自定义 ViewGroup ,将两个 ImageView 和一个 TextView 封装成一个 QQTabView。
// 自定义 View 布局
I---LinearLayout
I---FrameLayout
I---ImageView
I---ImageView
I---TextView
// 自定义属性
3.自定义 ViewGroup 第一步
在构造器中初始化布局、属性和计算必要的值:
// 初始化属性
TypedArray ta = context.obtainStyledAttributes(attrs, R.styleable.QQTabView, defStyleAttr, 0);
mTabWidth = ta.getDimension(R.styleable.QQTabView_qqtab_width, dp2px(60));
mTabHeight = ta.getDimension(R.styleable.QQTabView_qqtab_height, dp2px(60));
mTabRange = ta.getFloat(R.styleable.QQTabView_qqtab_range, 1);
mTabName = ta.getString(R.styleable.QQTabView_qqtab_name);
mTabAboveImg = ta.getResourceId(R.styleable.QQTabView_qqtab_imgsrc_above, R.drawable.above);
mTabBelowImg = ta.getResourceId(R.styleable.QQTabView_qqtab_imgsrc_below, R.drawable.below);
ta.recycle();// 不回收会导致app崩溃,连日志都没有 = =

// 初始化布局
mView = inflate(context, R.layout.view_qqtab, null);
mContainer = (ViewGroup) mView.findViewById(R.id.view_qqtab_container);
mTextView = ((TextView) mView.findViewById(R.id.view_qqtab_name));
mAboveImg = ((ImageView) mView.findViewById(R.id.view_qqtab_above_iv));
mBelowImg = ((ImageView) mView.findViewById(R.id.view_qqtab_below_iv));

// 计算拖动范围
mSmallRadio = 0.1 * Math.min(mTabWidth, mTabHeight) * mTabRange;
mBigRadio = 1.5 * mSmallRadio;

// 设置布局属性
setLayoutAndSize(mAboveImg);
setLayoutAndSize(mBelowImg);

// 设置图片和文字
mAboveImg.setImageResource(mTabAboveImg);
mBelowImg.setImageResource(mTabBelowImg);
if (!TextUtils.isEmpty(mTabName)) {
    mTextView.setVisibility(VISIBLE);
    mTextView.setText(mTabName);
}

// 设置默认排列方式
setOrientation(VERTICAL);
setGravity(Gravity.CENTER);

// 添加视图
addView(mView);
4.自定义 ViewGroup 第二步
测量子控件大小:onMeasure 方法
需要将所有子视图遍历获取总共的长宽,并通过 setMeasuredDimesion 来设置最终的大小。
@Override
protected void onMeasure(int widthMeasureSpec, int heightMeasureSpec) {
    super.onMeasure(widthMeasureSpec, heightMeasureSpec);

    int w = 0, h = 0;
    for (int i = 0; i < getChildCount(); i++) {
        View child = getChildAt(i);
        if (child.getVisibility() != GONE) {
            measureChild(child, widthMeasureSpec, heightMeasureSpec);
            LinearLayout.LayoutParams lp = (LayoutParams) child.getLayoutParams();
            int childWidth = child.getMeasuredWidth() + lp.leftMargin + lp.rightMargin;
            int childHeight = child.getMeasuredHeight() + lp.topMargin + lp.bottomMargin;
            w = w > childWidth ? w : childWidth;
            h += childHeight;
        }
    }
    final int sizeWidth = MeasureSpec.getSize(widthMeasureSpec);
    final int sizeHeight = MeasureSpec.getSize(heightMeasureSpec);
    final int modeWidth = MeasureSpec.getMode(widthMeasureSpec);
    final int modeHeight = MeasureSpec.getMode(heightMeasureSpec);
    Log.i(TAG, "setMeasuredDimension: width=" +((modeWidth == MeasureSpec.EXACTLY) ? sizeWidth : w)
            + ",height=" + ((modeHeight == MeasureSpec.EXACTLY) ? sizeHeight : h));
    setMeasuredDimension((modeWidth == MeasureSpec.EXACTLY) ? sizeWidth : w,
            (modeHeight == MeasureSpec.EXACTLY) ? sizeHeight : h);
}
5.自定义 ViewGroup 第三步
touch 事件处理:onTouchEvent
@Override
public boolean onTouchEvent(MotionEvent event) {
    switch (event.getAction()) {
        case MotionEvent.ACTION_DOWN:
            // 获取原点位置
            mLastY = event.getY();
            mLastX = event.getX();

            break;
        case MotionEvent.ACTION_MOVE:

            float deltaX = event.getX() - mLastX;
            float deltaY = event.getY() - mLastY;

            // 移动视图
            onEventMove(deltaX, deltaY);

            break;
        case MotionEvent.ACTION_UP:
            // 恢复原位
            setPosition(mAboveImg, 0, 0);
            setPosition(mBelowImg, 0, 0);
            break;
        default:
            break;
    }
    return super.onTouchEvent(event);
}
6.自定义 ViewGroup 第四步
计算移动距离和视图位置处理
// 根据移动的x y,移动视图
private void onEventMove(float x, float y) {
    int distance = (int) Math.sqrt(x * x + y * y);
    double angle = Math.atan2(y, x);
    if (distance > mSmallRadio) {
        setPosition(mAboveImg, mBigRadio, angle);
        setPosition(mBelowImg, mSmallRadio, angle);
    } else {
        setPosition(mAboveImg, 1.5 * distance, angle);
        setPosition(mBelowImg, distance, angle);
    }
}

private void setPosition(View view, double radio, double angle) {
    if (radio == 0) {
        view.setX(view.getLeft());
        view.setY(view.getTop());
        return;
    }
    view.setX((float) (view.getLeft() + radio * Math.cos(angle)));
    view.setY((float) (view.getTop() + radio * Math.sin(angle)));
}

