UIButton在我们的开发过程中是随处可见的,那么本人就其基本属性和用法进行了总结,具体如下:
UIButton继承自UIControl,所以UIControl的一些属性和方法对于UIButton来说适用。
1、按钮的创建#####
let btn: UIButton = UIButton()//没有样式
//let btns:UIButton =UIButton(type: UIButtonType)//有样式
//let button = UIButton(frame:CGRect(x:10, y:150, width:100, height:30))//简化创建方式
self.view.addSubview(button)
UIButtonType有以下类型
public enum UIButtonType : Int {
    case custom // no button type
    @available(iOS 7.0, *)
    case system // standard system button
    case detailDisclosure
    case infoLight
    case infoDark
    case contactAdd
    public static var roundedRect: UIButtonType { get } // Deprecated, use UIButtonTypeSystem instead
}
//使用
let  btn: UIButton = UIButton(type: .Custom)
2、UIButton设置字内容和颜色#####
UIButton所对应的状态有几种
 /**
     Normal          (默认状态)
     Highlighted    (高亮状态)点击按钮不放
     Disabled       (使能状态)就是是否可用状态-->禁用的状态才会显现
     Selected       (选中状态)通过selected属性设置
 */
//显示文字
button1.setTitle("普通状态", for: .normal)
button1.setTitle("高粱状态", for: .highlighted)
button1.setTitle("禁用状态", for: .disabled)
//显示文字颜色
button1.setTitleColor(UIColor.red, for: .normal)
button1.setTitleColor(UIColor.blue, for: .highlighted)
button1.setTitleColor(UIColor.cyan, for: .selected)
button1.setTitleColor(UIColor.cyan, for: .disabled)
//阴影文字颜色设置
button1.setTitleShadowColor(UIColor.cyan, for: .normal)
button1.setTitleShadowColor(UIColor.green, for: .highlighted)
button1.setTitleShadowColor(UIColor.brown, for: .disabled)
button1.setTitleShadowColor(UIColor.darkGray, for: .selected)
3、UIButton设置背景颜色和背景图片#####
//背景颜色
button2.backgroundColor = UIColor.orange
//背景图片    button4.setBackgroundImage(UIImage(named:"XXX"), for: .normal)
4、UIButton设置字体大小#####
button.titleLabel?.font = UIFont.systemFont(ofSize: 12)
5、禁用UIButton#####
button.isEnabled = false
button.isEnabled = true
6、设置圆角#####
button.layer.cornerRadius = 5
button.layer.masksToBounds = true
7、设置边框宽度/颜色#####
button.layer.borderWidth = 2
button.layer.borderColor = UIColor.red.cgColor
8、设置背景图片为圆角#####
buttonImage.setImage(UIImage(named:"1") , forState: UIControlState.Normal)
//设置背景图片为圆角
buttonImage.imageView?.layer.cornerRadius = 50

默认情况下按钮会被渲染成单一颜色;系统蓝
button.setImage(UIImage(named:"icon1"),forState:.Normal)  //设置图标
button.adjustsImageWhenHighlighted=false //使触摸模式下按钮也不会变暗(半透明)
button.adjustsImageWhenDisabled=false //使禁用模式下按钮也不会变暗(半透明)

也可以设置成保留图标原来的颜色
let iconImage = UIImage(named:"icon2")?.withRenderingMode(.alwaysOriginal)
button.setImage(iconImage, for:.normal)  //设置图标
button.adjustsImageWhenHighlighted = false //使触摸模式下按钮也不会变暗(半透明)
button.adjustsImageWhenDisabled = false //使禁用模式下按钮也不会变暗(半透明)
9、UIButton上图片和文字调整#####
UIButton上添加图片和文字,有时需要我们调整
方向为逆时针方向,上、左、下、右依次去设置的
btn.imageEdgeInsets =UIEdgeInsetsMake(top: CGFloat, left: CGFloat, bottom: CGFloat, right: CGFloat)

btn.titleEdgeInsets =UIEdgeInsetsMake(top: CGFloat, left: CGFloat, bottom: CGFloat, right: CGFloat)
实例如下:
//创建一个图片一个文字的按钮
let btn2: UIButton = UIButton(type: .Custom)
btn2.frame = CGRectMake(50, 100, 120, 35)
btn2.setImage(UIImage(named: "1"), forState: .Normal)
btn2.backgroundColor = UIColor.blackColor()
btn2.titleLabel?.font = UIFont.systemFontOfSize(20)
btn2.imageView?.contentMode = UIViewContentMode.ScaleAspectFit
btn2.setTitle("图片按钮", forState: .Normal)
//偏移量,分别为上下左右
btn2.imageEdgeInsets = UIEdgeInsetsMake(0, -50, 0, 0)
btn2.titleEdgeInsets = UIEdgeInsetsMake(0, -80, 0, 5)
btn2.setTitleColor(UIColor.whiteColor(), forState: .Normal)
btn2.adjustsImageWhenHighlighted = false
self.view.addSubview(btn2)
10、添加按钮的点击事件#####
按钮的触摸时间有以下类型
touchDown:单点触摸按下事件,点触屏幕
touchDownRepeat:多点触摸按下事件,点触计数大于1,按下第2、3或第4根手指的时候
touchDragInside:触摸在控件内拖动时
touchDragOutside:触摸在控件外拖动时
touchDragEnter:触摸从控件之外拖动到内部时
touchDragExit:触摸从控件内部拖动到外部时
touchUpInside:在控件之内触摸并抬起事件
touchUpOutside:在控件之外触摸抬起事件
touchCancel:触摸取消事件,即一次触摸因为放上太多手指而被取消,或者电话打断
button1.addTarget(self,action:#selector(methodName), for: .touchUpInside)
button1.addTarget(self, action:#selector(someMethod(button:)), for:.touchUpInside)
//上
    func methodName() {
        print("tapped")
    }

//下
    func someMethod(button:UIButton) {
        print("你是谁啊,其实就是一个按钮")
    }
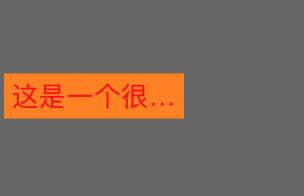
11、按钮文字过长时候的显示处理#####
我们创建一个按钮
let button = UIButton(frame:CGRect(x:20, y:50, width:130, height:50))
button.setTitle("这个是一长长长长长长长长长长的文字", for:.normal) //普通状态下的文字
button.setTitleColor(UIColor.white, for: .normal) //普通状态下文字的颜色
button.titleLabel?.lineBreakMode = .byTruncatingTail
button.backgroundColor = UIColor.orange
self.view.addSubview(button)
我们通过修改 button 按钮中 titleLabel 的 lineBreakMode 属性,便可以调整按钮在文字超长的情况下如何显示,以及是否换行。
其有以下几种样式可供选择,API的介绍也是简单明了
public enum NSLineBreakMode : Int {

    case byWordWrapping // Wrap at word boundaries, default

    case byCharWrapping // Wrap at character boundaries

    case byClipping // Simply clip

    case byTruncatingHead // Truncate at head of line: "...wxyz"

    case byTruncatingTail // Truncate at tail of line: "abcd..."

    case byTruncatingMiddle // Truncate middle of line:  "ab...yz"
}
2019年12月18日补充以下:
UIButton的图片文字布局
我们创建一个按钮且其同时拥有文字和图片属性,会按照系统的默认样式(左图片,右文字)显示。但是有的时候,我们会遇到其他的设计需求,比如:左文字有图片、上文字下图片、上图片下文字等。这个时候就需要我们自定义按钮的显示样式来满足复杂多变的设计需求了。
我自定义了一个按钮的extension来满足以上的功能,代码如下:
import Foundation
import UIKit

enum ButtonLayout {
    case leftImage
    case rightImage
    case topImage
    case bottomImage
}

extension UIButton {

    func setLayoutType(type: ButtonLayout){
        let image: UIImage? = self.imageView?.image
        switch type {
        case .leftImage:
            print("系统默认的方式")
        case .rightImage:
            self.imageEdgeInsets = UIEdgeInsets(top:0, left: (self.titleLabel?.frame.size.width)!, bottom: 0, right:-(self.titleLabel?.frame.size.width)!)
            self.titleEdgeInsets = UIEdgeInsets(top: 0, left: -(image?.size.width)!, bottom: 0, right: (image?.size.width)!)
        case .topImage:
            self.imageEdgeInsets = UIEdgeInsets(top:-(self.titleLabel?.frame.size.height)!, left: 0, bottom: 0, right:-((self.titleLabel?.frame.size.width)!))
            //图片距离右边框距离减少图片的宽度,距离上m边距的距离减少文字的高度
            self.titleEdgeInsets = UIEdgeInsets(top: ((image?.size.height)!), left: -((image?.size.width)!), bottom: 0, right:0)
        //文字距离上边框的距离增加imageView的高度,距离左边框减少imageView的宽度,距离下边框和右边框距离不变
        default:
            self.imageEdgeInsets = UIEdgeInsets(top: (self.titleLabel?.frame.size.height)!, left:0, bottom: 0, right:-((self.titleLabel?.frame.size.width)!))
            //图片距离上边距增加文字的高度  距离右边距减少文字的宽度
            self.titleEdgeInsets = UIEdgeInsets(top: -(image?.size.height)!, left: -(image?.size.width)!, bottom: 0, right: 0)
        }
    }
}
如果有更进一步的需求,比如设置文字和图片的间距等,可以在此基础之上添加响应的参数配置即可。
