在iPhone之初,4s的屏幕逻辑分辨率只有320*480,我们是不需要做屏幕适配的,但是到了如今,iPhone5,iPhone6s,iPhone 6s plus ,屏幕的逻辑分辨率已经大大的有所改变了.所以,作为程序猿的我们做的就是屏幕的适配工作.今天,我就重可视化和纯代码来说一下屏幕适配的问题.
| iPhone机型 | 屏幕分辨率 |
|---|---|
| iPhone4(s) | 320x480 |
| iPhone5c | 320x568 |
| iPhone5(s) | 320x568 |
| iPhone6 | 375x667 |
| iPhone6s(plus) | 375x667 |
可视化编程
可视化编程是适合独立开发,快速开发的一种形式,但是不利于后期的维护,可视化编程的屏幕适配主要是用到了AutoLayout的,当然了还有SizeClasses,今天我只谈一下我对AutoLayout的理解和认识.AutoLayout加起来比较简单,但是对于初学者而言,可能加约束加着加着就加错了,那么我们在加约束的期间要遵循什么的原则呢? 其实很简单,就是大小和位置,大小就是宽和高,位置就是x和y.下面我们看一个范例,看AutoLayout是如何实现屏幕适配的.
首先我们现在创建一个新的工程,然后在main.storyboard里面ViewController上面添加一View,并给它添加颜色
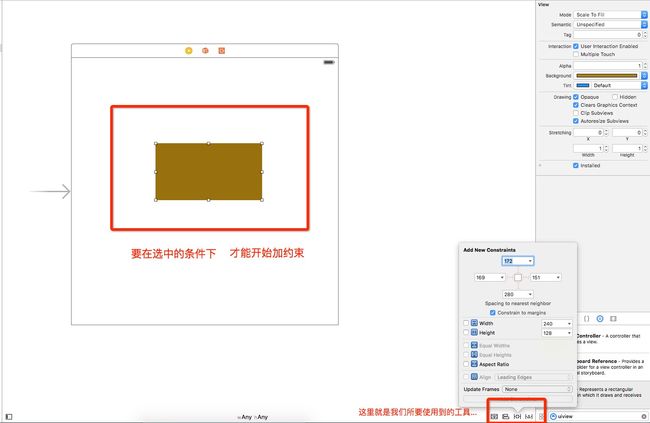
然后我们就选中这个View,我们用右下角的倒数第三个图标按钮给他添加约束.添加约束的工具栏如下.
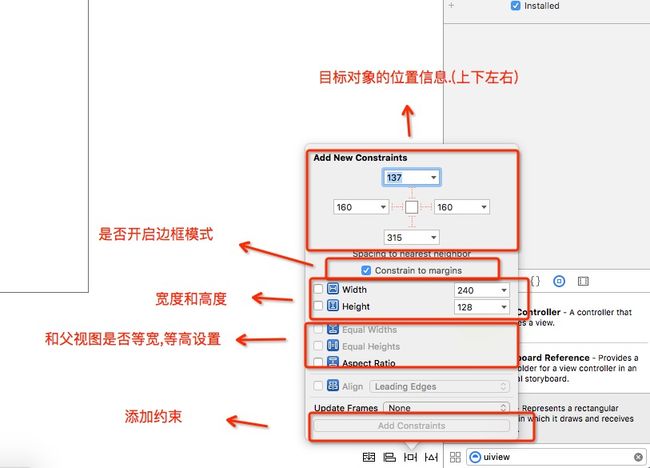
添加约束的原则就是如何固定一个对象!(从位置和大小入手)
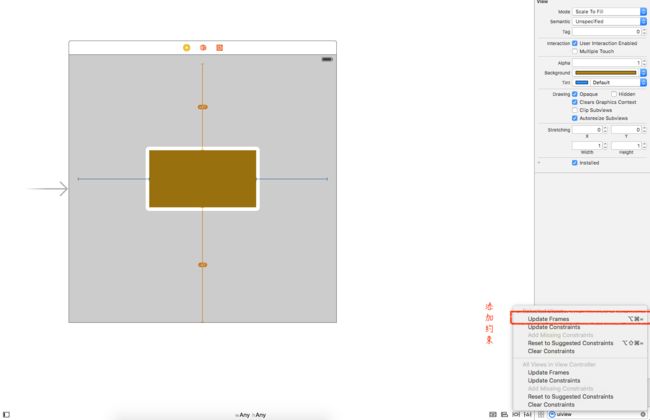
当我们添加完成约束之后,我们就要调整约束对象的位置.如下图使用右下角第四个图标把我们的约束添加到对象身上去.
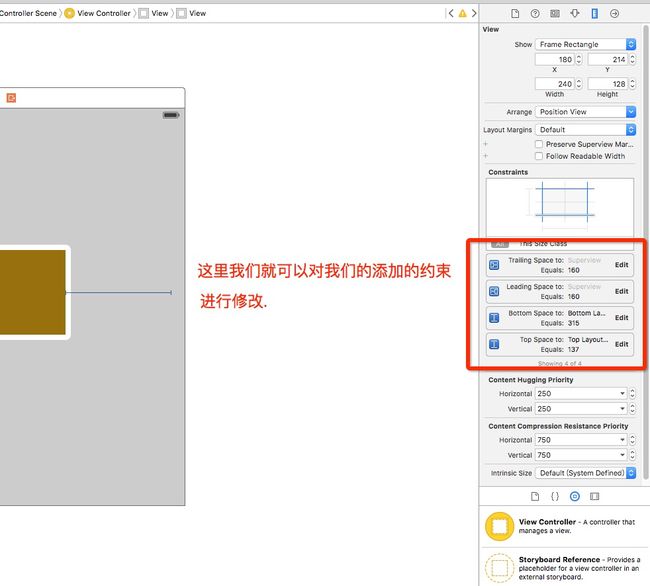
那么当我们不需要某个约束,或者想修改某个约束的时候,我们应该从哪里找到我们的约束条件呢?这里,我们要先选中要修改的对象.然后点击右边的菜单栏中的第五个图标按钮.
纯代码屏幕适配
对于纯代码的屏幕适配,一种方法就是计算相对距离.一种是AutoLayer + UIView ,还有一种是重量级的Masonry.
在一开始的时候,程序员做屏幕适配的时候,就是纯粹的和屏幕的大小做相对距离的计算.直到iOS6的时候出现了AutoLayer +UIView.再到后来的Masonry.
对呀我来说,可视化的时候我喜欢使用AutoLayer ,但是纯代码我更倾向于Masonry自动布局.我们先看一下使用AutoLayer +UIView是如何定义两个视图的.
- (void)viewDidLoad {
    [super viewDidLoad];


    UIView *myview = [[UIView alloc] init];

    myview.backgroundColor = [UIColor greenColor];

    UIView *redView = [[UIView alloc] init];

    redView.backgroundColor = [UIColor redColor];

    UIView *blueView = [[UIView alloc] init];

    blueView.backgroundColor = [UIColor blueColor];

    [myview addSubview:redView];

    [myview addSubview:blueView];

    [myview setTranslatesAutoresizingMaskIntoConstraints:NO];

    [redView setTranslatesAutoresizingMaskIntoConstraints:NO];

    [blueView setTranslatesAutoresizingMaskIntoConstraints:NO];

    NSMutableArray *tmpConstraints = [NSMutableArray array];

    //约束条件
    [tmpConstraints addObjectsFromArray:[NSLayoutConstraint constraintsWithVisualFormat:@"|-50-[redView(==100)]-30-[blueView(==100)]" options:0 metrics:nil views:NSDictionaryOfVariableBindings(redView,blueView)]];

    [tmpConstraints addObjectsFromArray:[NSLayoutConstraint constraintsWithVisualFormat:@"V:|-30-[redView(==30)]" options:0 metrics:nil views:NSDictionaryOfVariableBindings(redView)]];

    [tmpConstraints addObjectsFromArray:[NSLayoutConstraint constraintsWithVisualFormat:@"V:|-30-[blueView(==redView)]" options:0 metrics:nil views:NSDictionaryOfVariableBindings(blueView,redView)]];

    [myview addConstraints:tmpConstraints];

    self.view = myview;
}
Masonry
看到AutoLayer +UIView这么麻烦,那么对比Masonry就简单了许多.Masonry其实就是对AutoLayer +UIView的封装.
首先我们先导入我们的Masonry的库.
#import
然后,我们分情况写一下,当是一个视图扥时候,并且我们的视图要求是居中,并且视图大小是200 * 200,
MASConstraintMaker 就是我们的假约束的对象,是有如下属性的,我们可以根据这些属性给我们的目对象添加对应的约束.
@property (nonatomic, strong, readonly) MASConstraint *left;//左侧
@property (nonatomic, strong, readonly) MASConstraint *top;//上侧
@property (nonatomic, strong, readonly) MASConstraint *right;//右侧
@property (nonatomic, strong, readonly) MASConstraint *bottom;//下侧
@property (nonatomic, strong, readonly) MASConstraint *leading;//首部
@property (nonatomic, strong, readonly) MASConstraint *trailing;//尾部
@property (nonatomic, strong, readonly) MASConstraint *width;//宽
@property (nonatomic, strong, readonly) MASConstraint *height;//高
@property (nonatomic, strong, readonly) MASConstraint *centerX;//横向居中
@property (nonatomic, strong, readonly) MASConstraint *centerY;//纵向居中
@property (nonatomic, strong, readonly) MASConstraint *baseline;//文本基线
那么具体代码设置如下.
// 防止block中的循环引用
    __weak typeof (self) weakSelf = self;
    // 初始化一个View
    UIView *bgView = [[UIView alloc]init];
    bgView.backgroundColor = [UIColor redColor];
    [self.view addSubview:bgView];
    // 使用mas_makeConstraints添加约束
    [bgView mas_makeConstraints:^(MASConstraintMaker *make) {
        //设置视图中心在父视图的中心上
        make.center.equalTo(weakSelf.view);
        //设置视图的大小
        make.size.mas_equalTo(CGSizeMake(200, 200));
    }];
当是两个视图,我们需要做的是 2个view横向居中,第二个view距离第一个view间距为10
 UIView *view1 = [[UIButton alloc]init];
    view1.backgroundColor = [UIColor redColor];
    [self.view addSubview:view1];
    [view1 mas_makeConstraints:^(MASConstraintMaker *make) {
        make.size.mas_equalTo(CGSizeMake(90, 90));
        make.centerX.equalTo(weakSelf.view);
        make.top.width.offset(90);
    }];
    UIView *view2 = [[UILabel alloc]init];
    view2.backgroundColor = [UIColor yellowColor];
    [self.view addSubview:view2];
    [view2 mas_makeConstraints:^(MASConstraintMaker *make) {
        make.size.mas_equalTo(CGSizeMake(100, 100));
        make.centerX.equalTo(view1);
        make.top.equalTo(view1.mas_bottom).with.offset(20);
    }];
注意: 添加约束之前必须把约束对象添加到父视图上!!!
整体上来说,为什么选择Masonry,因为Masonry便于后期的维护.而且相比与AutoLayer +UIView 的方法更加的简便.希望通过这篇文章对大家的屏幕适配有所帮助
--->Masonry参考博客