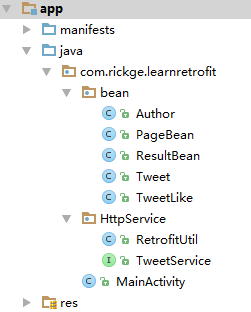
既然你已经想到了Retrofit,那么想必你也已经知道了OkHttp。Retrofit和OkHttp来自于同一家公司:Square。实际项目中我们经常会对OkHttp进行一次封装,然后再去使用。Square公司也对OkHttp做出了官方的封装,于是Retrofit2.0(英文意思:翻新、改型)就诞生了。。。那接下来我们就看看Retrofit怎么使用吧。Retrofit官方链接。
01 在Gradle中添加Retrofit的依赖库
compile 'com.squareup.retrofit2:retrofit:2.1.0'
compile 'com.squareup.retrofit2:converter-gson:2.1.0'
Retrofit为我们提供了以下Converter的类库,根据项目需要使用相应的Converter来进行序列化和反序列化。
Gson: com.squareup.retrofit2:converter-gson
Jackson: com.squareup.retrofit2:converter-jackson
Moshi: com.squareup.retrofit2:converter-moshi
Protobuf: com.squareup.retrofit2:converter-protobuf
Wire: com.squareup.retrofit2:converter-wire
Simple XML: com.squareup.retrofit2:converter-simplexml
Scalars (primitives, boxed, and String): com.squareup.retrofit2:converter-scalars
02 定义Http请求接口
Retrofit turns HTTP API into a Java interface
下面是两个完整的请求路径,
http://bmob-cdn-8458.b0.upaiyun.com/2017/02/08/13a6c06c40a866bb80e8373a6fceb9f6.json
http://bmob-cdn-8458.b0.upaiyun.com/2017/02/08/52e5798640f46ff2803867f5199c92cf.json
我们把其中一个URL拆分成三部分:
BaseUrl: http://bmob-cdn-8458.b0.upaiyun.com/
path: 2017/02/08/
fileName: 13a6c06c40a866bb80e8373a6fceb9f6.json
于是你就明白了下面的接口,每个方法返回的是我们的Call对象。
public interface TweetService {
    // {fileName}相当于一个占位符,@PATH指的是通过参数填充路径,
    @GET("2017/02/08/{fileName}")
    Call>> listTweetLike(@Path("fileName") String fileName);

    @GET("2017/02/08/{fileName}")
    Call>> listTweet(@Path("fileName") String fileName);
}
03 创建Retrofit 对象
这里我们使用单例模式来获得Retrofit对象。同时你也可以看到刚才分拆的BaseURL。
public class RetrofitUtil {
    private static volatile RetrofitUtil retrofitUtil = null;
    private Retrofit retrofit = null;

    private RetrofitUtil(){
        retrofit = new Retrofit.Builder()
                // 设置BaseURL
                .baseUrl("http://bmob-cdn-8458.b0.upaiyun.com/")
                // 增加返回值为Gson的支持(以实体类返回)
                .addConverterFactory(GsonConverterFactory.create())
                .build();
    }

    private static RetrofitUtil getInstance(){
        if(retrofitUtil == null){
            synchronized (RetrofitUtil.class){
                if(retrofitUtil == null){
                    retrofitUtil = new RetrofitUtil();
                }
            }
        }
        return retrofitUtil;
    }

    public static Retrofit getRetrofit(){
        return getInstance().retrofit;
    }
}
04 发起网络请求
使用Retrofit对象创建一个TweetService 接口对象,也就是我们前面定义的那个接口,调用相应的方法来得到我们的Call对象。这时我们使用Call对象就可以发出网络请求了。
private void getTweetLikeAsync() {
        // retrofit.create(TweetService.class) 这里采用的是Java的动态代理模式来创建TweetService接口对象
        TweetService tweetService = RetrofitUtil.getRetrofit().create(TweetService.class);
        // 调用相应的方法来得到Call对象
        // 并且我们在这里把想要访问的具体数据文件名传了进来,于是Call就能获得完整的请求路径:BaseURL + path + fileName。
        Call>> callTweetLike = tweetService.listTweetLike("13a6c06c40a866bb80e8373a6fceb9f6.json");
        Call>> callTweet = tweetService.listTweet("52e5798640f46ff2803867f5199c92cf.json");
        // call.enqueue() 发起网络请求,请求成功后执行回调方法的逻辑处理。
        callTweetLike.enqueue(new Callback>>() {
            @Override
            public void onResponse(Call>> call, Response>> response) {
                ResultBean> resultBeanTweetLike = response.body();
                Log.i("MainActivity Async", resultBeanTweetLike.toString());
            }

            @Override
            public void onFailure(Call>> call, Throwable t) {
            }
        });

        callTweet.enqueue(new Callback>>() {
            @Override
            public void onResponse(Call>> call, Response>> response) {
                ResultBean> resultBeanTweet = response.body();
                Log.i("MainActivity Async", resultBeanTweet.toString());
            }

            @Override
            public void onFailure(Call>> call, Throwable t) {
            }
        });
    }
05 同步请求
上面的列子是一个异步请求,下面是一个同步网络请求的例子,所以需要放在子线程执行。
private void getTweetLikeSync() {
        new Thread(new Runnable() {
            @Override
            public void run() {
                TweetService tweetService = RetrofitUtil.getRetrofit().create(TweetService.class);
                Call>> callTweetLike = tweetService.listTweetLike("13a6c06c40a866bb80e8373a6fceb9f6.json");
                Call>> callTweet = tweetService.listTweet("52e5798640f46ff2803867f5199c92cf.json");

                try {
                    Response>> responseTweetLike = callTweetLike.execute();
                    ResultBean> resultBeanTweetLike = responseTweetLike.body();
                    Log.i("MainActivity Sync", resultBeanTweetLike.toString());

                    Response>> responseTweet = callTweet.execute();
                    ResultBean> resultBeanTweet = responseTweet.body();
                    Log.i("MainActivity Sync", resultBeanTweet.toString());
                } catch (IOException e) {
                    e.printStackTrace();
                }
            }
        }).start();
    }
06 源码
下载地址
