前言
前些天研究自定义控件特意研究了下UI的绘制流程
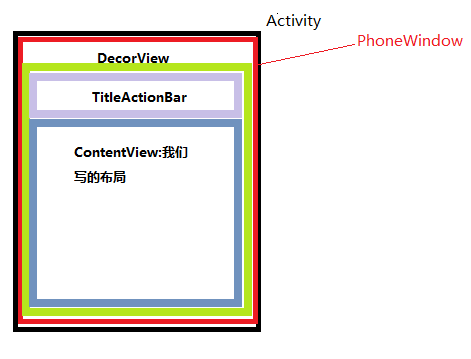
1.首先说下Activity加载后的显示的View图
2.然后我们从setContentView(R.layout.activity_main)入手,调用了Activity中的
public void setContentView(@LayoutRes int layoutResID) {
getWindow().setContentView(layoutResID);//1
initWindowDecorActionBar();
}
3.getWindow()拿到的是Window的实现类PhoneWindow
4,然后我们看PhoneWindow中的源码的setContentView
--------------------------------------------------------------------------------------
public void setContentView(int layoutResID) {
// Note: FEATURE_CONTENT_TRANSITIONS may be set in the process of installing the window
// decor, when theme attributes and the like are crystalized. Do not check the feature
// before this happens.
if (mContentParent == null) {
installDecor();//在这里创建了一个DecorView(继承自FrameLayout)2
}
……
mLayoutInflater.inflate(layoutResID, mContentParent);//初始化我们自己的布局 6
}
------------------------------------------------------------------------------
//decorView的具体创建过程
private void installDecor() {
if (mDecor == null) {
mDecor = generateDecor();//生成一个DecorView 3
mDecor.setDescendantFocusability(ViewGroup.FOCUS_AFTER_DESCENDANTS);
mDecor.setIsRootNamespace(true);
if (!mInvalidatePanelMenuPosted && mInvalidatePanelMenuFeatures != 0) {
mDecor.postOnAnimation(mInvalidatePanelMenuRunnable);
}
}
if (mContentParent == null) {
mContentParent = generateLayout(mDecor);//得到布局文件 4
}
----------------------------------------------------------------------------------------
protected ViewGroup generateLayout(DecorView decor) {//进行加载布局得到decorview中包含title和我们contentview的布局 5
View in = mLayoutInflater.inflate(layoutResource, null);
decor.addView(in, new ViewGroup.LayoutParams(MATCH_PARENT, MATCH_PARENT));
mContentRoot = (ViewGroup) in;
}
----------------------------------------------------------------------------------
由此我们可以看出Activity加载View的流程是getWindow().setContentView(layoutResID)-->
installDecor()-->generateDecor()生成一个DecorView对象-->generateLayout(mDecor)得到DecorView加载的包括title和我们自己写的布局的也就是rootview-->generateLayout(DecorView decor)得到rootView-->mLayoutInflater.inflate(layoutResID, mContentParent)加载我们自己的布局
View的绘制
1.View的绘制执行measure,layout,draw三个执行流程
View类中
measure:测量自己多大,如果是ViewGroup的话会同时测量子控件
layout:摆放子控件的位置
draw:绘制
从View.java类的源码中看到:
1.view的requestLayout()方法开始,递归不断的往上找父容器,最终找到DecorView
2.执行DecorView的ViewRootImp类中的performTransversal()方法
3.performTranversal(){
// Ask host how big it wants to be
performMeasure(childWidthMeasureSpec, childHeightMeasureSpec);
performLayout(lp, desiredWindowWidth, desiredWindowHeight);
performDraw();
}
然后执行相应的measure,layout.draw方法,当是Viewgroup会调用相应的view的measure,layout,draw,当是View的时候调用measure,layout,draw然后执行想用onmeasure,onlayout,ondraw来进行相应的绘制
再说一下View的measure的测量规格MeasureSpec
1.mode
1)EXACTLY:精确的,例如我们写的一个确定值50dp
2)AT_MOST:根据父容器当前的大小,结合你指定的尺寸参考值来考虑你应该是多大尺寸,需要计算(Match_parent,wrap_content就是属于这种)
3)UPSPECIFIED:最多的意思。根据当前的情况,结合你制定的尺寸参考值来考虑,在不超过父容器给你限定的只存的前提下,来测量你的一个恰好的内容尺寸。用的比较少,一般见于ScrollView,ListView(大小不确定,同时大小还是变的。会通过多次测量才能真正决定好宽高。)
2.value:宽高的值
