大闸蟹的软工结对作业
17373192 段正旭 16005001 陈卓
一、项目信息
| 项目 | 内容 |
|---|---|
| 本作业属于北航 2020 年春软件工程 | 博客园班级连接 |
| 本作业是本课程结对项目作业 | 结对项目作业 |
| 我在这个课程的目标是 | 提高软件开发能力、团队协作能力,积累两人协作的经验 |
| 这个作业在哪个具体方面帮助我实现目标 | 体验结对编程,在交流中共同进步 |
| 教学班级 | 005 |
| 项目代码 | https://github.com/804035184/Intersection2 |
二、PSP
| PSP2.1 | Personal Software Process Stages | 预估耗时(分钟) | 实际耗时(分钟) |
|---|---|---|---|
| Planning | 计划 | ||
| · Estimate | · 估计这个任务需要多少时间 | 20 | 20 |
| Development | 开发 | ||
| · Analysis | · 需求分析 (包括学习新技术) | 120 | 240 |
| · Design Spec | · 生成设计文档 | 30 | 30 |
| · Design Review | · 设计复审 (和同事审核设计文档) | 30 | 60 |
| · Coding Standard | · 代码规范 (为目前的开发制定合适的规范) | 60 | 60 |
| · Design | · 具体设计 | 40 | 60 |
| · Coding | · 具体编码 | 120 | 120 |
| · Code Review | · 代码复审 | 120 | 120 |
| · Test | · 测试(自我测试,修改代码,提交修改) | 240 | 240 |
| Reporting | 报告 | ||
| · Test Report | · 测试报告 | 40 | 40 |
| · Size Measurement | · 计算工作量 | 20 | 30 |
| · Postmortem & Process Improvement Plan | · 事后总结, 并提出过程改进计划 | 20 | 60 |
| 合计 | 860 | 1080 |
三、看教科书和其它资料中关于 Information Hiding,Interface Design,Loose Coupling 的章节,说明你们在结对编程中是如何利用这些方法对接口进行设计的。
Information Hiding:信息隐藏对于程序的开发有着重要的意义。信息隐藏通过封装等手段使得类内部的敏感信息不会轻易被外部探查或修改,可以提高程序的安全性。对于类具体的细节进行封装,只留给对外的接口,使得使用者无需知道内部的实现模式,这对于程序的开发效率,合作效果也都有着不小的作用。
在本次作业中,由于一个类(例如直线类,我采取的是标准式来存储 )的属性会被频繁的使用(其他图形的与直线求交点的方法会调用该直线的属性),故将未将属性设置为私有。但对于整个项目而言,由于计算模块封装称了dll,与ui模块之间实现了信息的不互通,ui模块无法直接访问计算模块的变量,只需要调用预留好的接口即可,也算是在另一种意义上实现了信息的隐藏。
Interface Design&Loose Coupling:我认为这两者其实是一致的。松耦合是接口设计的目的,接口设计是达到松耦合的手段。对接口进行设计,达到松耦合,那么使用者就可以只根据接口的描述来使用,无需知道内部的具体实现,这可以大大节省时间,并增加软件的可读性。
在本次作业中,我对于计算模块进行了封装,只提供出增加图形、求解交点等几个接口,UI只需要按照接口要求调用即可,这样UI与计算模块便可以独立开来,两者的结构都会更加清晰,联系起来会更加简易,并且可以很荣哟与其他的计算模块与UI进行关联。
4. 计算模块接口的设计与实现过程
几何对象的表示
上次作业中,由于直线与圆无明显的联系,故我采用结构体来表示,但本次作业新增了射线与线段,射线与线段明显与直线有联系,可以看作是特殊的有界的直线,故采用继承的方式。分别建立直线类与圆类,射线类与线段类继承直线类。对于交点的存储,本次作业中采用pair
对于几何对象,采用vector进行存储,交点采用set进行存储。
交点的求解
上次作业,参考上次作业的求解方法,在本次作业中依旧使用类似的方法,在类中编写与其他几何对象计算交点的方法。
在计算交点之前,还需要判断交点是否存在。判断直线与直线是否平行的方法,依旧采取上次作业中提到的方法,比较\(A1*B2\)与\(A2*B1\)是否一致。直线与圆则采取圆心到直线的距离与半径的关系,圆与圆采取比较圆心距离与两圆半径之间的关系。线段与射线当作直线来考虑。考虑到double的精度问题,在判断相等时采取\(fabs(a-b)<1e-10\)的方式进行判断。
直线与直线的平行判断
bool isteresect(Line l)
	{

		if ((fabs((A * l.B - B * l.A)-(0)) < 1e-10))
		{

			if ((fabs((A *l.C) - (l.A * C)) < 1e-10)) {
				throw LinesameException();
			}
			return false;
		}
		else
		{
			return true;
		}
	}
直线与圆的切判断:
bool line_cycle_pos(Line l)
	{
		double length = abs((l.A * x + l.B * y + l.C)) / (sqrt(l.A * l.A + l.B * l.B));
		if (fabs(length - r) < 1e-10) {
			return true;
		}
		else if (length > r)
		{
			return false;
		}
		else
		{
			return true;
		}
	}
圆与圆的关系判断:
bool cycle_cycel_pos(Cycle c)
	{
		double length = sqrt((c.x - x) * (c.x - x) + (c.y - y) * (c.y - y));
		if ( (x == c.x && y == c.y && r == c.r)) {
			throw CirclesameException();
		}
		if (fabs(length - (r + c.r)) < 1e-10 || fabs(length - fabs(r - c.r)) < 1e-10) {
			return true;
		}
		else if (length > r + c.r||length
求解交点的方式依旧采取上次作业的方式,关于线段与射线,采取上次作业所述求解方法得到交点后,还需判断交点是否在线段或射线上,具体做法为对求解出的点进行范围判断,同时还需要考虑到斜率不存在的情形。由于线段与射线与其他图形求解得到的结果可能不存在,故在返回值中增加标记位用来描述此解是否存在。
直线与射线求解:
pair, int> Line::intersect(Ray r) {
	double x = (r.C * B - C * r.B) / (A * r.B - B * r.A);
	double y = (C * r.A - r.C * A) / (A * r.B - B * r.A);
	pair dot(x, y);
	if (r.x1 > r.x2 && r.x1 >= x) {
		pair, int> dot1(dot, 1);
		return dot1;
	}
	else if (r.x1 < r.x2 && r.x1 <= x) {
		pair, int> dot1(dot, 1);
		return dot1;
	}
	else if (r.x1 == r.x2 && r.x1 == x) {
		if (r.y1 > r.y2 && r.y1 >= y) {
			pair, int> dot1(dot, 1);
			return dot1;
		}
		else if (r.y1 < r.y2 && r.y1 <= y) {
			pair, int> dot1(dot, 1);
			return dot1;
		}
		else if (r.y1 == r.y2 && y == r.y1) {
			pair, int> dot1(dot, 1);
			return dot1;
		}
		else {
			pair, int> dot1(dot, 0);
			return dot1;
		}
	}
	else {
		pair, int> dot1(dot, 0);
		return dot1;
	}
}
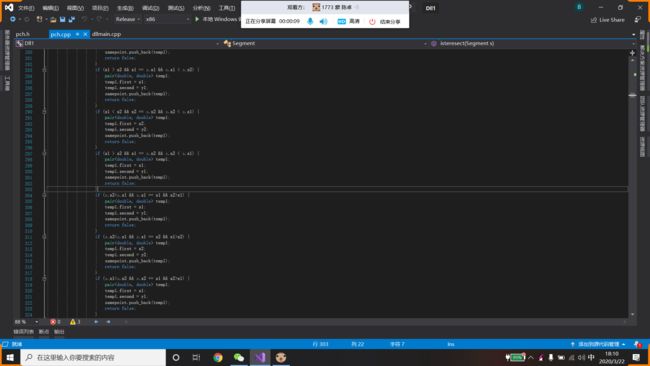
值得注意的是,线段与射线在共线的情况下依旧可能有解,这是与直线有着很大的区别,故需要对线段、射线的判断平行函数进行重写,维护一个全局变量用于存储这个可能存在的解。
线段与射线平行关系判断:
bool isteresect(Ray r) {
		if ((fabs((A * r.B - B * r.A) - (0)) < 1e-10))
		{

			if ((fabs((A * r.C) - (r.A * C)) < 1e-10)) {
				if (x1 != x2) {
					if (x1 < x2 && x2 == r.x1 && r.x1 < r.x2) {
						pair temp1;
						temp1.first = x2;
						temp1.second = y2;
						samepoint.push_back(temp1);
						return false;
					}
					if (x1 > x2 && x1 == r.x1 && r.x1 < r.x2) {
						pair temp1;
						temp1.first = x1;
						temp1.second = y1;
						samepoint.push_back(temp1);
						return false;
					}
					if (r.x2x1) {
						pair temp1;
						temp1.first = x1;
						temp1.second = y1;
						samepoint.push_back(temp1);
						return false;
					}
					if (r.x2x2) {
						pair temp1;
						temp1.first = x2;
						temp1.second = y2;
						samepoint.push_back(temp1);
						return false;
					}
				}
				else {
					if (y1 < y2 && y2 == r.y1 && r.y1 < r.y2) {
						pair temp1;
						temp1.first = x2;
						temp1.second = y2;
						samepoint.push_back(temp1);
						return false;
					}
					if (y1 > y2 && y1 == r.y1 && r.y1 < r.y2) {
						pair temp1;
						temp1.first = x1;
						temp1.second = y1;
						samepoint.push_back(temp1);
						return false;
					}
					if (r.y2y1) {
						pair temp1;
						temp1.first = x1;
						temp1.second = y1;
						samepoint.push_back(temp1);
						return false;
					}
					if (r.y2y2) {
						pair temp1;
						temp1.first = x2;
						temp1.second = y2;
						samepoint.push_back(temp1);
						return false;
					}
				}
				throw LinesameException();
			}
			return false;
		}
		else
		{
			return true;
		}
	}
交点的去重
采用set进行去重,重写了存储交点的pair
bool operator<(const pair& lhs, const pair& rhs)
{
	if (fabs(lhs.first - rhs.first) < 1e-10) {
		if (fabs(lhs.second - rhs.second) < 1e10) {
			return false;
		}
		else if (lhs.second - rhs.second == 0) {
			return false;
		}
		else if (lhs.second < rhs.second) {
			return true;
		}
		else {
			return false;
		}
	}
	else if (lhs.first - rhs.first == 0) {
		if (fabs(lhs.second - rhs.second) < 1e10) {
			return false;
		}
		else if (lhs.second - rhs.second == 0) {
			return false;
		}
		else if (lhs.second < rhs.second) {
			return true;
		}
		else {
			return false;
		}
	}
	else if (lhs.first - rhs.first < 0) {
		return true;
	}
	else {
		return false;
	}
}
由于篇幅有限,仅给出上述代码
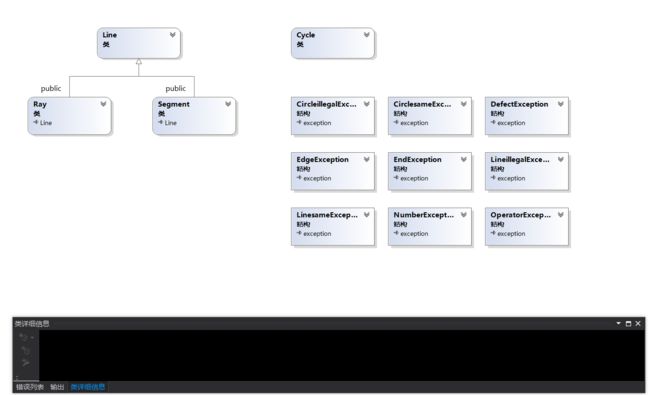
五、阅读有关 UML 的内容。画出 UML 图显示计算模块部分各个实体之间的关系(画一个图即可)。
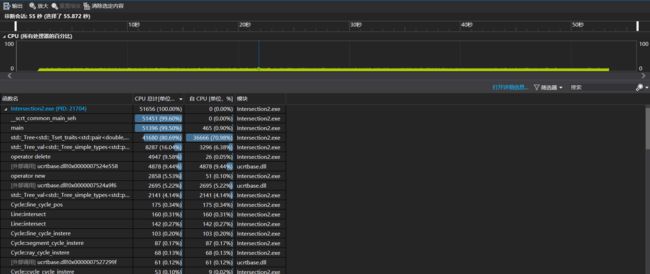
六、计算模块接口部分的性能改进。**记录在改进计算模块性能上所花费的时间,描述你改进的思路,并展示一张性能分析图(由VS 2015/2017的性能分析工具自动生成),并展示你程序中消耗最大的函数。
程序中消耗最大的为set的去重工作。曾经考虑过使用unordered_set来代替set,但是在换成unordered_set编写hash函数时遇到了有效数字以及精度问题和冲突问题,最终还是决定使用set来保证正确性。
七、看 Design by Contract,Code Contract 的内容,描述这些做法的优缺点,说明你是如何把它们融入结对作业中的。
Design by Contract,Code Contract与我们oo课接触到的jml类似,都是通过先决条件,后置条件与不变条件保证正确性的措施。
优点有:
1.消除二义性,使得程序更加准确;
2.明确接口的功能,使得使用者更加清晰;
3.有利于分工合作;
4.方便程序的复用。
缺点有:
1.复杂的程序约束内容过多,编写起来过于复杂;
2.大大增加代码量。
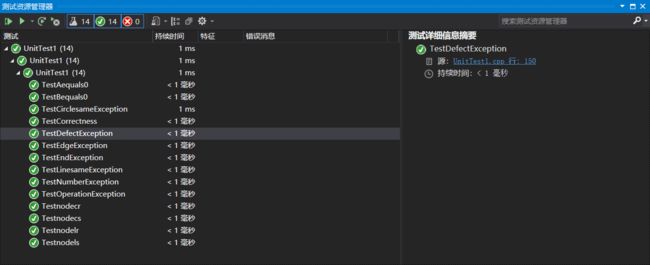
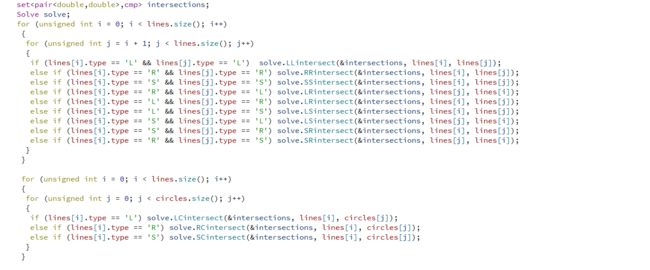
八、计算模块部分单元测试展示。展示出项目部分单元测试代码,并说明测试的函数,构造测试数据的思路。并将单元测试得到的测试覆盖率截图**,发表在博客中。要求总体覆盖率到 90% 以上,否则单元测试部分视作无效。
对于程序正确性、各个方法的正确性,斜率不存在等特殊情况以及各种异常进行了测试。
这是其中一个测试正确性的函数
TEST_METHOD(TestCorrectness)
		{
			set> Array_dot;
			Line l1 = Line(-1, 4, 5, 2);
			Cycle c1 = Cycle(3, 3, 3);
			Ray r1 = Ray(2, 5, -1, 2);
			Segment s1 = Segment(2, 4, 3, 2);
			pair, int> dot1 = l1.intersect(r1);
			if (dot1.second == 1) {
				Array_dot.insert(dot1.first);
			}
			dot1 = l1.intersect(s1);
			if (dot1.second == 1) {
				Array_dot.insert(dot1.first);
			}
			pair, pair> dot2 = c1.line_cycle_instere(l1);
			Array_dot.insert(dot2.first);
			Array_dot.insert(dot2.second);
			pair, pair>, pair> dot3 = c1.ray_cycle_instere(r1);
			if (dot3.second.first == 1) {
				Array_dot.insert(dot3.first.first);
			}
			if (dot3.second.second == 1) {
				Array_dot.insert(dot3.first.second);
			}
			dot1 = r1.intersect(s1);
			if (dot1.second == 1) {
				if (r1.x1 < r1.x2) {
					if (r1.x1 <= dot1.first.first) {
						Array_dot.insert(dot1.first);
					}
				}
				else if (r1.x1 > r1.x2) {
					if (r1.x1 >= dot1.first.first) {
						Array_dot.insert(dot1.first);
					}
				}
				else {
					if (r1.y1 > r1.y2) {
						if (r1.y1 >= dot1.first.second) {
							Array_dot.insert(dot1.first);
						}
					}
					else if (r1.y1 < r1.y2) {
						if (r1.y1 <= dot1.first.second) {
							Array_dot.insert(dot1.first);
						}
					}
				}

			}
			Assert::AreEqual(5, (int)Array_dot.size());
		}
这是斜率不存在的测试
TEST_METHOD(TestAequals0)
		{
			Line l1 = Line(0, 0, 1, 1);
			Ray r1 = Ray(1, 0, 2, 0);
			pair, int> dot1 = l1.intersect(r1);
			Assert::AreEqual(0, (int)dot1.first.first);
			Assert::AreEqual(0, (int)dot1.first.second);
			Assert::AreEqual(0, (int)dot1.second);
		}
对各种异常的测试采取读入预先写好的存在错误的文件的方式
TEST_METHOD(TestOperationException) {
			auto func = [] {test("input1.txt"); };
			Assert::ExpectException(func);
			/*try {
				test("input1.txt");
			}
			catch (OperatorException& e) {
				Assert::AreEqual("Operation Exception", e.what());
			}*/
		}
		TEST_METHOD(TestEndException) {
			auto func = [] {test("input2.txt"); };
			Assert::ExpectException(func);
			/*try {
				test("input2.txt");
			}
			catch (EndException& e) {
				Assert::AreEqual("End Exception", e.what());
			}*/
		}
		TEST_METHOD(TestDefectException) {
			auto func = [] {test("input3.txt"); };
			Assert::ExpectException(func);
			/*try {
				test("input3.txt");
			}
			catch (DefectException& e) {
				Assert::AreEqual("Defect Exception", e.what());
			}*/
		}
		TEST_METHOD(TestNumberException) {
			auto func = [] {test("input4.txt"); };
			Assert::ExpectException(func);
			/*try {
				test("input4.txt");
			}
			catch (NumberException& e) {
				Assert::AreEqual("Number Exception", e.what());
			}*/
		}
代码覆盖率
单元测试
九、计算模块部分异常处理说明。**在博客中详细介绍每种异常的设计目标。每种异常都要选择一个单元测试样例发布在博客中,并指明错误对应的场景。
设计了如下异常
| 错误类型 | 输入(其中一种) | 描述 |
|---|---|---|
| 操作符错误 | 2 L 0 0 1 1 Z 0 0 -1 -1 | 操作符出入错误 |
| 有多余字符 | 2 C 1 1 1 C 1 1 1 L 1 1 1 0 | 几何对象超出数目 |
| 缺少字符 | 2 L 1 1 1 1 | 缺少几何对象或数字 |
| 数字格式错误 | 1 L 10000 1000a 1 1 | 数字格式错误 |
| 数字越解 | 1 L 10000000 1 1 0 | 输入数字超过100000范围 |
| 直线重复 | 2 L 1 1 0 0 L 0 0 1 1 | 直线出现重合导致无数交点,射线与线段的无数交点情形也算作此异常 |
| 圆重复 | 2 C 1 1 1 C 1 1 1 | 圆重复导致无数交点 |
| 直线非法 | 1 L 1 1 1 1 | 直线的两个端点相同构不成直线 |
| 圆非法 | 1 C 1 1 0 | 圆的半径非法 |
| UI崩溃异常 | UI崩溃 |
输入的异常会在文件输出并且反馈行号。ui异常会弹出窗口。
十、界面模块的详细设计过程。在博客中详细介绍界面模块是如何设计的,并写一些必要的代码说明解释实现过程。
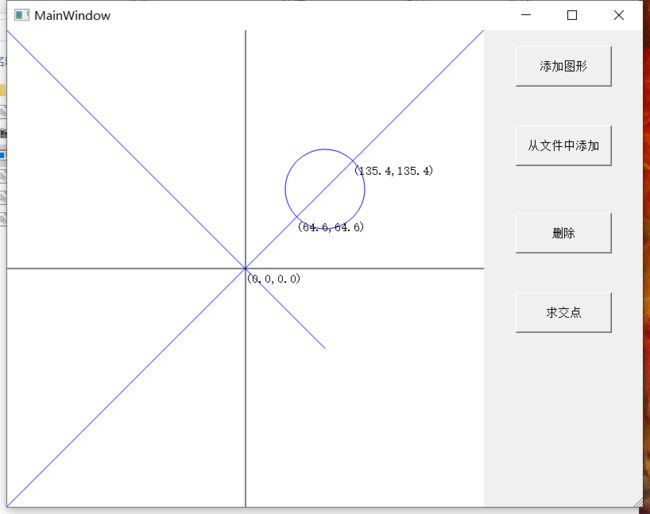
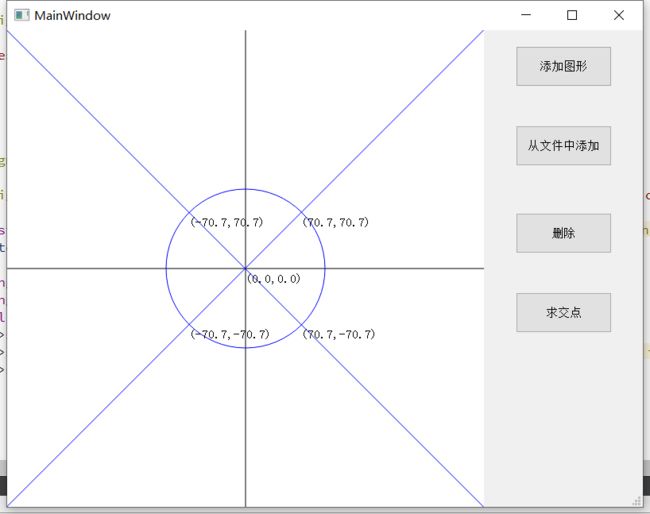
界面模块我们使用Qt进行编写,由于Qt的窗格是以左上角为原点,向下为y轴正方向,所以需要重新绘制一个坐标系。我们圈了600*600区域为坐标系,同时绘制了x轴和y轴。之后设置了4个按钮,分别为添加图形、从文件中添加、删除、求交点。
添加图形时会弹出一个新窗格来输入图形类型和点坐标,确定后进行绘制,并调用core模块的接口函数返回当前交点集合并存储。从文件中添加也是同理,只不过输入的数据是从文件中读取。
信息发送与接收的部分代码
void MainWindow::on_pushButton_clicked()
{
    dialog1=new Dialog;
    connect(dialog1,SIGNAL(sendData(int,QString,QString,QString,QString,QString)),this,SLOT(receiveData(int,QString,QString,QString,QString,QString)));
    dialog1->show();
}
void MainWindow::receiveData(int type,QString name,QString x1,QString y1,QString x2,QString y2)
{
    if(type==0){
        Paint_Line(x1.toDouble(),y1.toDouble(),x2.toDouble(),y2.toDouble());
    }
    else if(type==1){
        Paint_Ray(x1.toDouble(),y1.toDouble(),x2.toDouble(),y2.toDouble());
    }
    else if(type==2){
        Paint_Segment(x1.toDouble(),y1.toDouble(),x2.toDouble(),y2.toDouble());
    }
    else if(type==3){
        Paint_Cycle(x1.toDouble(),y1.toDouble(),x2.toDouble());
    }
}
绘制直线的代码
void MainWindow::Paint_Line(double x1,double y1,double x2,double y2)
{

    intersect_point=input_line(std::make_pair(std::make_pair(x1,y1),std::make_pair(x2,y2)));
    QPainter painter(&image);
    QPen pen;
    pen.setColor(Qt::blue);
    painter.setPen(pen);
    painter.setRenderHint(QPainter::Antialiasing, true);
    if(x1==x2)
    {
        painter.drawLine(QPointF(pointx0+x1,0),QPointF(pointx0+x2,600));
    }
    else if(y1==y2)
    {
        painter.drawLine(QPointF(0,pointy0-y1),QPointF(600,pointy0-y2));
    }
    else{
        double k=(y2-y1)/(x2-x1);
        double b=y1-k*x1;
        painter.drawLine(QPointF(0,-1*(-300*k+b)+pointy0),QPointF(600,-1*(300*k+b)+pointy0));
    }
}
从文件读取的代码
void MainWindow::on_pushButton_3_clicked()
{
    QString filename;
    filename=QFileDialog::getOpenFileName(this,tr("文件"),"",tr("text(*.txt)"));
    if(!filename.isNull())
    {
        QFile file(filename);
        if(!file.open(QFile::ReadOnly|QFile::Text))
        {
            QMessageBox::warning(this,tr("error"),tr("read file error:&1").arg(file.errorString()));
            return;
        }
        QTextStream in(&file);
        while(!in.atEnd())
        {
            QString line=in.readLine();
            QList list;
            list=line.split(' ');
            if(list[0]=="L")
            {
                Paint_Line(list[1].toDouble(),list[2].toDouble(),list[3].toDouble(),list[4].toDouble());
            }
            else if(list[0]=="R")
            {
                Paint_Ray(list[1].toDouble(),list[2].toDouble(),list[3].toDouble(),list[4].toDouble());
            }
            else if(list[0]=="S")
            {
                Paint_Segment(list[1].toDouble(),list[2].toDouble(),list[3].toDouble(),list[4].toDouble());
            }
            else if(list[0]=="C")
            {
                Paint_Cycle(list[1].toDouble(),list[2].toDouble(),list[3].toDouble());
            }
        }
    }
}
删除时需要清空当前坐标系中的几何图形和交点坐,并调用core模块中的接口函数清除core中已有的几何图形。
void MainWindow::on_pushButton_2_clicked()
{
    QList array_label=this->findChildren();
    for(int i=0;iclear();
    }
    delete_all();
    image.fill(Qt::white);
    Paint();
    update();
}
求交点时,直接根据存储的坐标信息在图上setText即可。
void MainWindow::on_pushButton_4_clicked()
{
    std::set>::iterator it;
    for(it=intersect_point.begin();it!=intersect_point.end();it++)
    {
        QString x=QString::number((*it).first,'f',1);
        QString y=QString::number((*it).second,'f',1);
        QLabel *text=new QLabel(this);
        text->setText("("+x+","+y+")");
        text->setGeometry(300+(*it).first,300-(*it).second,100,25);
        text->show();

    }
}
十一、界面模块与计算模块的对接。详细地描述 UI 模块的设计与两个模块的对接,并在博客中截图实现的功能。
在dll中封装接口供ui调用
IMPORT_DLL std::set> solve(std::vector, std::pair>>> line, std::vector, int>>> circle);
IMPORT_DLL bool if_line_same(std::pair, std::pair> a, std::pair, std::pair> b);
IMPORT_DLL bool if_circle_same(std::pair, double> c1, std::pair, double> c2);
IMPORT_DLL std::set> input_line(std::pair, std::pair> line1);
IMPORT_DLL std::set> input_ray(std::pair, std::pair> ray1);
IMPORT_DLL std::set> input_segment(std::pair, std::pair> segment1);
IMPORT_DLL std::set> input_circle(std::pair, double> circle1);
IMPORT_DLL long main1(int argc, char* argv[]);
IMPORT_DLL void delete_all();
在Qt的.pro工程中加入如下两行代码
LIBS+=D:/softwareproject/Gui3/untitled/core.lib
INCLUDEPATH +=D:/softwareproject/Gui3/untitled/pch
并将core.dll文件放在和intersect.exe同一目录下,即可在Qt工程中正常调用接口函数。
十二、描述结对的过程,提供两人在讨论的结对图像资料(比如 Live Share 的截图)。关于如何远程进行结对参见作业最后的注意事项。
十三、看教科书和其它参考书,网站中关于结对编程的章节,说明结对编程的优点和缺点。同时描述结对的每一个人的优点和缺点在哪里(要列出至少三个优点和一个缺点)。
| 结对编程 | 我 | 伙伴 | |
|---|---|---|---|
| 优点 | 1.两个人合作效率更高;2.可以互相学习,共同进步;3.减少思维漏洞,减少bug | 认真,负责,专注,坚韧 | 接受新知识很快,效率高,代码能力强,思考问题全面 |
| 缺点 | 1.可能受时空条件制约;2.交流与磨合有一定时间代价; | 缺乏C++编程经验,略有腼腆 | 略有腼腆 |
十四、松耦合
与17373167,17373349组进行了交换
于我们两组预先并没有商量好统一的接口名字,导致并不能无任何修改的使用对方的core模块,所以在ui上我们需要修改文件名和接口名。并且由于返回的数据类型也不一样,所以需要新建一个合适的容器来存储他们的接口函数返回的交点坐标。
使用其他组的计算模块成功运行
