参考地址
SSH三大框架的整合思想
-
web应用的三层为:
1.1 web层,(struts2),Struts2框架用的最多的是action
1.2 service层(spring),spring中用的最多的是IoC和AOP,把对象的创建交给Spring进行管理
1.3 dao层(hibernate),hibernate则是用来操作数据库,进行CRUD
-
哪么这三个框架应该是如何整合呢?
思想是两两整合:
2.1 struts2和Spring进行整合
 2.1.1 在struts中action的创建交给Spring进行创建,但是要注意action是多实例的。

 2.1.2 要注意导入spring整合Struts2的jar包
2.2 hibernate和Spring进行整合
 2.2.1 hibernate中的核心类是SessionFactory,这里要把SessionFactory的创建交给Spring进行管理

 2.2.2 Hibernate的核心文件中进行了数据库信息的配置,这里也要交给Spring进行处理

 2.2.3 为Dao对象配置持久层的Spring提供的Template

 2.2.4 注意导入Spring整合DAO层的ORM包
Struts2和Spring整合的具体步骤
把Struts2的action交给Spring进行管理
-
实现过程
2.1 导入用于整合的jar包
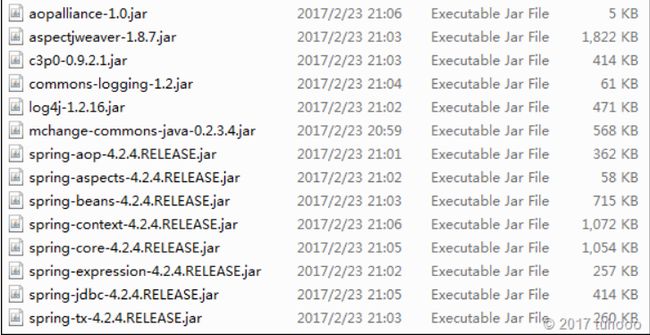
2.1.1 导入Spring单独使用需要的jar包
2.1.2 导入Struts2中所需的最少jar包,就是在Struts2项目解压之后的 apps中有一个blank项目,将其中的jar包导入进来即可
2.1.3 Spring为了整合Struts还需要额外再导入一个jar包
3.创建Action
package com.action;

import com.opensymphony.xwork2.ActionSupport;

public class UserAction1 extends ActionSupport {
    @Override
    public String execute() throws Exception {
        // TODO Auto-generated method stub
        return null;
    }
}
4.创建Strut2的核心配置文件,位置在src下面,名称是struts.xml
- 在web.xml中配置struts2的过滤器
  spring_struts2

    index.html
    index.htm
    index.jsp
    default.html
    default.htm
    default.jsp


        struts2
        org.apache.struts2.dispatcher.ng.filter.StrutsPrepareAndExecuteFilter


        struts2
        /*
至此,上面四步已经将Struts2的环境配置好了,然后就是来配置Spring了
导入Spring整合Web项目的jar包,也就是监控项目启动的监听器所在的jar包。
-
创建Spring的核心配置文件并在其中引入约束
这个约束配置的比较多,可以直接拿过来使用的。
(本人习惯命名为applicationContext.xml)
- 把action交给Spring进行配置
  1
  2
  3
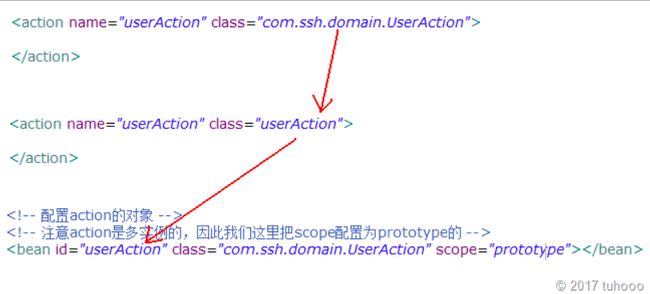
这里使用注解的方式替代以上代码即可, 在UserAction中加入@Component和@Scope("prototype")的注解,但是使用注解别忘了在Spring的核心配置文件中添加 扫描注解的配置
但是如果Struts2和Spring像这样分别配置了Action的话,这样就不起作用了,这里的做法就是不在Struts2的配置文件struts.xml中写全路径,因为这样就不是从Spring中取出来的,这里将Struts2中Action的配置改为:
此处将class的值与bean的id的值保持一致
- Spring监听器的配置(web.xml中配置)
    contextConfigLocation

    classpath:applicationContext.xml


    org.springframework.web.context.ContextLoaderListener
-
测试准备
10.1 所需的为Struts2的核心配置文件:struts.xml
10.2 Spring的配置文件:bean.xml
10.3 项目的配置文件:web.xml
10.4 Struts2的UserAction类
10.5 在UserAction中对UserService的调用
10.6 UserService中对UserDao的调用
10.7 UserDao类的编写
struts.xml
web.xml
  ssh_intergration

        struts2
        org.apache.struts2.dispatcher.ng.filter.StrutsPrepareAndExecuteFilter


        struts2
        /*


    contextConfigLocation

    classpath:applicationContext.xml


        org.springframework.web.context.ContextLoaderListener


    index.html
    index.htm
    index.jsp
    default.html
    default.htm
    default.jsp
UserDao.java
package com.dao;

import org.springframework.beans.factory.annotation.Autowired;
import org.springframework.orm.hibernate5.HibernateTemplate;
import org.springframework.stereotype.Component;
import org.springframework.transaction.annotation.Transactional;

import com.pojo.User;

@Component
public class UserDao {

    public void add() {

        System.out.println("userDao add ......");
    }
}
UserService.java
package com.service;

import org.springframework.beans.factory.annotation.Autowired;
import org.springframework.stereotype.Component;

import com.dao.UserDao;

@Component
public class UserService {
    @Autowired
    private UserDao userDao;

    public void add() {
        userDao.add();
        System.out.println("UserService add .....");
    }
}
UserAction.java
package com.action;
import org.springframework.beans.factory.annotation.Autowired;
import org.springframework.context.annotation.Scope;
import org.springframework.stereotype.Component;
import com.opensymphony.xwork2.ActionSupport;
import com.service.UserService;
//通过注解的方式 相当于 11.测试结果
Hibernate和Spring整合的具体步骤
这里也要解决两个问题:
把Hibernate中的核心配置文件中数据据库的配置交给Spring来管理
把Hibernate中SessionFactory的创建也是交给Spring来管理的
-
下面来看看具体的步骤:
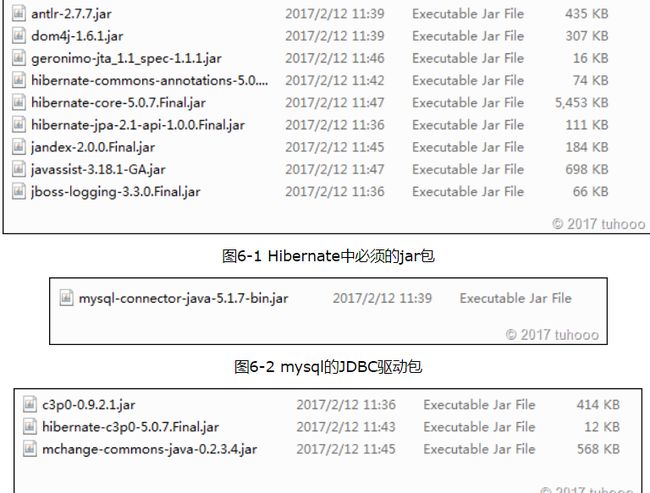
3.1 导入Hibernate的jar包
3.3 搭建Hibernate环境
3.3.1 创建一个实体类:User.java
package com.pojo;


public class User {

    private int uid;

    public int getUid() {
        return uid;
    }

    public void setUid(int uid) {
        this.uid = uid;
    }

    public String getUsername() {
        return username;
    }

    public void setUsername(String username) {
        this.username = username;
    }

    public String getPassword() {
        return password;
    }

    public void setPassword(String password) {
        this.password = password;
    }

    private String username;

    private String password;
}
3.3.2 创建User.java的hibernate映射文件user.hbm.xml
        org.hibernate.c3p0.internal.C3P0ConnectionProvider

        5

        20

        120

        3000


        4
3.3.3 applicationContext.xml
                classpath*:/com/*.hbm.xml


                org.hibernate.dialect.MySQLDialect
                true
                true
                update
3.3.4 创建user.hbm.xml
3.3.5 测试
UserDao
package com.dao;

import org.springframework.beans.factory.annotation.Autowired;
import org.springframework.orm.hibernate5.HibernateTemplate;
import org.springframework.stereotype.Component;
import org.springframework.transaction.annotation.Transactional;

import com.pojo.User;

@Component
// 开启事务 ( 需要配置 )
@Transactional
public class UserDao {
    @Autowired
    private HibernateTemplate hibernateTemplate;
    public void add() {
        User user = new User();
        user.setUsername("阿部多瑞");
        user.setPassword("666");

        hibernateTemplate.save(user);
        System.out.println("userDao add ......");
    }
}
这里HibernateTemplate是5的版本 测试之后再数据库中生成了表及数据代表成功


