大家在学习entityframework的时候,都知道那linq写的叫一个爽,再也不用区分不同RDMS的sql版本差异了,但是呢,高效率带来了差灵活性,我们
无法控制sql的生成策略,所以必须不要让自己缺乏好的工具去监控sql,本篇给大家介绍的三种监控手段Log和SqlServer profile,ef profile。。。
一:Log监控
这个属于entity framework自带的一个Action方法,它给大家带来了不错的用户体验,我们可以将其输出放到控制台,又或者写入到记事本中。。。这
里我就通过EDM来生成codefirst,可以看到如下的Database的Log定义,然后大家就可以给他灌入一个带string参数的Action方法,比如Console.WriteLine。
 //
        // 摘要:
        //     Set this property to log the SQL generated by the System.Data.Entity.DbContext
        //     to the given delegate. For example, to log to the console, set this property
        //     to System.Console.Write(System.String).
        //
        // 备注:
        //     The format of the log text can be changed by creating a new formatter that derives
        //     from System.Data.Entity.Infrastructure.Interception.DatabaseLogFormatter and
        //     setting it with System.Data.Entity.DbConfiguration.SetDatabaseLogFormatter(System.Func{System.Data.Entity.DbContext,System.Action{System.String},System.Data.Entity.Infrastructure.Interception.DatabaseLogFormatter}).
        //     For more low-level control over logging/interception see System.Data.Entity.Infrastructure.Interception.IDbCommandInterceptor
        //     and System.Data.Entity.Infrastructure.Interception.DbInterception.
        public Action<string> Log { get; set; }
 1     static void Main(string[] args)
 2         {
 3             using (SchoolDB2Entities dbContext = new SchoolDB2Entities())
 4             {
 5                 dbContext.Database.Log = Console.WriteLine;
 6
 7                 dbContext.Students.Add(new Student()
 8                 {
 9                     StudentName = "jack123"
10                 });
11
12                 dbContext.SaveChanges();
13             }
14         }
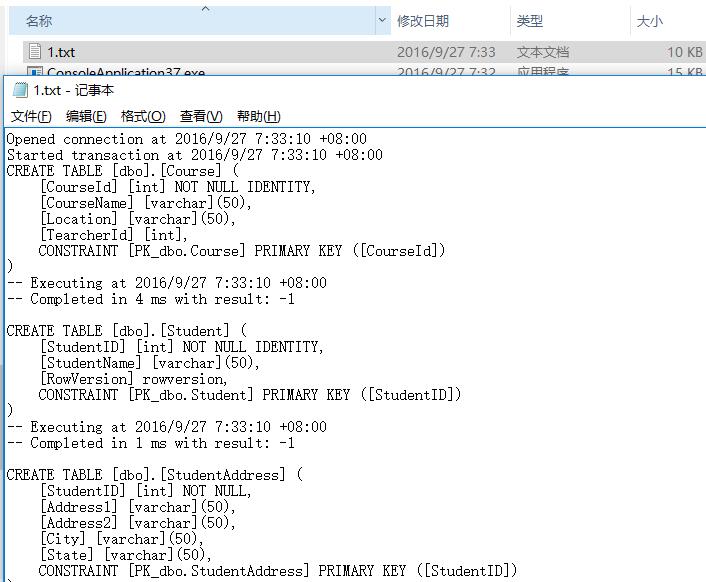
由于codefirst初始化生成之时内容太多,无法一一显示出来。。。为了方便可灌入自定义方法AppendLog,比如将其灌入到File中。。。
二:SqlServer Profile
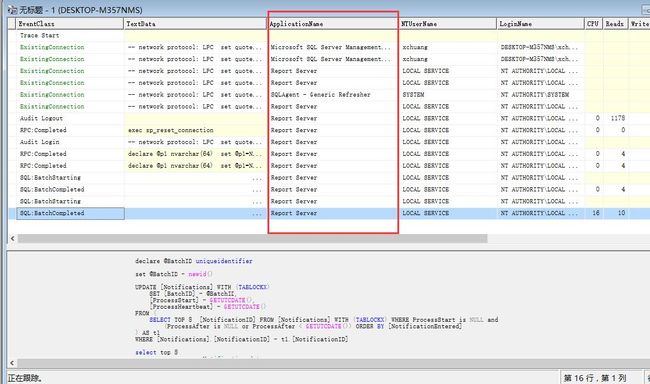
可以看到SqlServer Profile是放在sqlserver层面上的监控,可以监控到各种sql如何流入到sqlserver中,但是如果你默认开启的话,会看到很多与
ef无关的操作,比如下面这样:
那更好的方式是怎么过滤呢? 其实也很简单,我们只需要在ef的connectionstring中塞入一个App标记,然后在sqlserver profile上面进行筛选就可以了。
第一步:在connectionstring中加入applicationName
  <connectionStrings>
    <add name="SchoolDB2Entities" connectionString="data source=.;initial catalog=SchoolDB2;integrated security=True;MultipleActiveResultSets=True;App=EntityFramework" providerName="System.Data.SqlClient" />
  connectionStrings>
第二步:在SqlProfile中筛选ApplicationName=EntityFramework的所有记录
ok,这样我们就配置好了,接下来我们将codefirst跑起来,可以清清楚楚的看到,现在的profile中仅仅只有EntityFramework标记生成的sql语句了。
三:Entity Framework Profile
首先这个是一款商业软件,免费试用期是30天,不过网上还是能够搜索到各种破解版,废话不多说,我们通过nuget下载一下:
PM> Install-Package EntityFrameworkProfiler
正在尝试收集与目标为“.NETFramework,Version=v4.6”的项目“ConsoleApplication37”有关的程序包“EntityFrameworkProfiler.3.0.3103”的相关依赖项信息
正在尝试解析程序包“EntityFrameworkProfiler.3.0.3103”的依赖项,DependencyBehavior 为“Lowest”
正在解析操作以安装程序包“EntityFrameworkProfiler.3.0.3103”
已解析操作以安装程序包“EntityFrameworkProfiler.3.0.3103”
正在将程序包“Microsoft.Web.Infrastructure.1.0.0”添加到文件夹“c:\users\xchuang\documents\visual studio 2015\Projects\ConsoleApplication37\packages”
已将程序包“Microsoft.Web.Infrastructure.1.0.0”添加到文件夹“c:\users\xchuang\documents\visual studio 2015\Projects\ConsoleApplication37\packages”
已将程序包“Microsoft.Web.Infrastructure.1.0.0”添加到“packages.config”
已将“Microsoft.Web.Infrastructure 1.0.0.0”成功安装到 ConsoleApplication37
正在将程序包“WebActivatorEx.2.0.5”添加到文件夹“c:\users\xchuang\documents\visual studio 2015\Projects\ConsoleApplication37\packages”
已将程序包“WebActivatorEx.2.0.5”添加到文件夹“c:\users\xchuang\documents\visual studio 2015\Projects\ConsoleApplication37\packages”
已将程序包“WebActivatorEx.2.0.5”添加到“packages.config”
已将“WebActivatorEx 2.0.5”成功安装到 ConsoleApplication37
正在将程序包“EntityFrameworkProfiler.3.0.3103”添加到文件夹“c:\users\xchuang\documents\visual studio 2015\Projects\ConsoleApplication37\packages”
已将程序包“EntityFrameworkProfiler.3.0.3103”添加到文件夹“c:\users\xchuang\documents\visual studio 2015\Projects\ConsoleApplication37\packages”
已将程序包“EntityFrameworkProfiler.3.0.3103”添加到“packages.config”
正在执行脚本文件“c:\users\xchuang\documents\visual studio 2015\Projects\ConsoleApplication37\packages\EntityFrameworkProfiler.3.0.3103.0\tools\Install.ps1”
已将“EntityFrameworkProfiler 3.0.3103.0”成功安装到 ConsoleApplication37
PM>
下载完之后,再看一下packages文件夹中的子文件夹EntityFrameworkProfiler.3.0.3103.0,找到一个叫做efprof.exe的程序,这个就是要开启的监控。
打开软件后,大家可以自己注册一下,生成一个licence的xml,然后大家就可以看到这样的一个牛逼的界面了。。。。
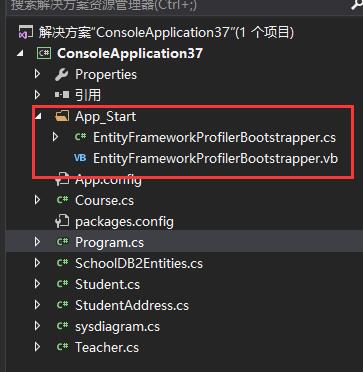
更加牛逼的是,会在我们的Main函数中注入一段开启逻辑,并且在App_Start中生成了一个cs,一个vb文件,如下:
 1     class Program
 2     {
 3         static void Main(string[] args)
 4         {App_Start.EntityFrameworkProfilerBootstrapper.PreStart();
 5
 6             using (SchoolDB2Entities dbContext = new SchoolDB2Entities())
 7             {
 8                 dbContext.Database.Log = AppendLog;
 9
10                 dbContext.Students.Add(new Student()
11                 {
12                     StudentName = "jack123"
13                 });
14
15                 dbContext.SaveChanges();
16             }
17         }
18
19         static void AppendLog(string str) => System.IO.File.AppendAllText(Environment.CurrentDirectory + "\\1.txt", str, Encoding.Default);
20     }
既然代码都生成好了。。。那就留给我要做的事情就是Ctrl + F5了。
可以看到,efprofile可以抓拍到各种create table语句,包括各种面板信息: Application Statistics,Analysis,Duration等等。。。最重要的我们还能看到
“Query plan”,比如下面我构造一个相对比较复杂的sql语句:
 1 class Program
 2     {
 3         static void Main(string[] args)
 4         {
 5             App_Start.EntityFrameworkProfilerBootstrapper.PreStart();
 6
 7             using (SchoolDB2Entities dbContext = new SchoolDB2Entities())
 8             {
 9                 var query = (from n in dbContext.Students
10                              from m in dbContext.StudentAddresses
11                              where n.StudentID == m.StudentID
12                              group n.StudentID by n.StudentName into g
13                              select new { g.Key, count = g.Count() }).ToList();
14
15                 dbContext.SaveChanges();
16             }
17         }
18     }
然后执行一下,看看efprofile监视到db中是如何生成query plan的快照的。。。
好了,三种方式基本上就是这样了,现在的您是不是会监视自己ef中的sql流转了呢?


