〖TensorFlow2.0笔记26〗YOLOV2目标检测算法以及实战!
| YOLOV2目标检测算法以及实战! |
文章目录
- 一. YOLOV2算法介绍
- 1.1. YOLOV2提升1
- 1.2. YOLOV2提升2
- 1.3. YOLOV2提升3
- 1.4. YOLOV2总结
- 二. YOLOV2算法实战之Dataset
- 2.1. 数据集构成
- 2.2. 解析图像的XML文件
- 2.3. 构建DB(拼接成Tensorflow的Dataset对象)
- 2.4. 可视化DB(一张图像)
- 2.5. 数据增强(data augumentation)
- 三. YOLOV2算法实战之Compose labels
- 3.1. GT box介绍
- 3.2. 批量GT box合并以及批量Generator
- 3.3. GT box可视化
- 四. YOLOV2算法实战之Model
- 4.1. Darknet-19网络结构
- 4.2. 网络初始化
- 4.3. 网络输出可视化
- 五. YOLOV2算法实战之Loss
一. YOLOV2算法介绍
1.1. YOLOV2提升1
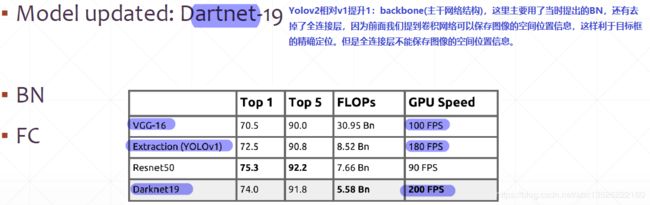
Yolov2相对Yolov1的提升点之一:
1.2. YOLOV2提升2
Yolov2相对Yolov1的提升点之二:
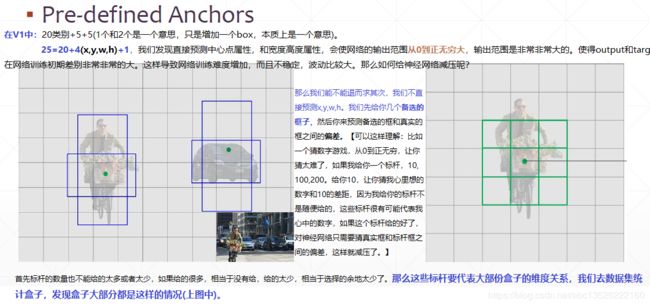
Which anchor is the best?
1.3. YOLOV2提升3
- Yolov2相对Yolov1的提升点之三:
1.4. YOLOV2总结
Yolov2相对Yolov1的有3个改进
- 主干网络的改进;
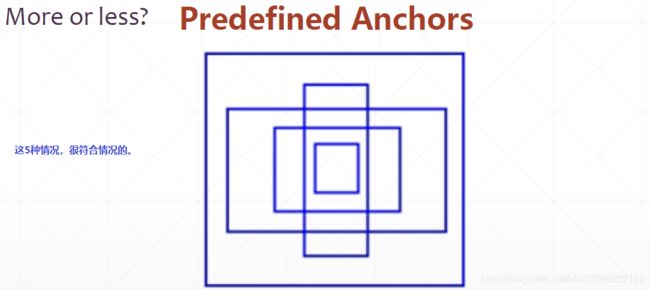
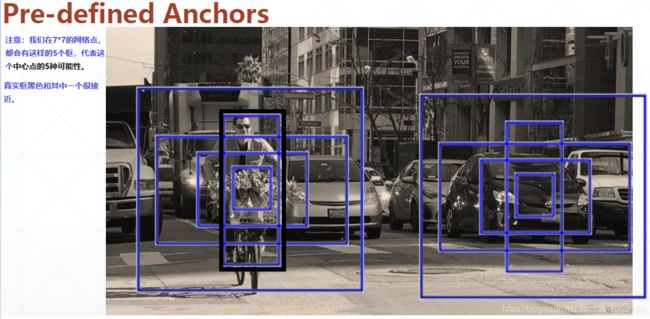
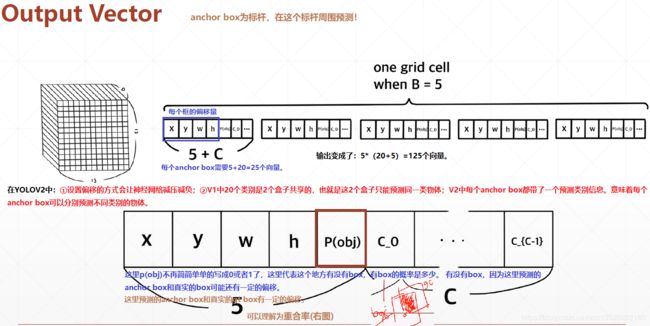
- anchor box共5个标杆的改进;
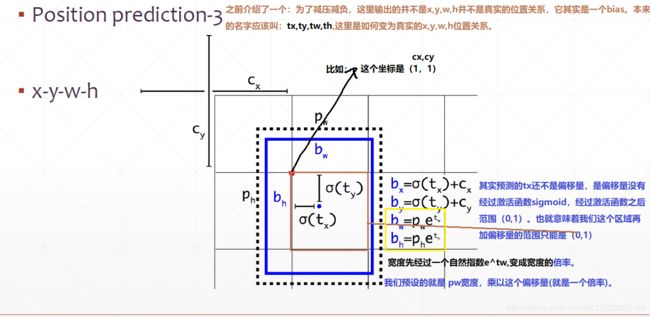
- 输出形式的改进,这里输出的是一个偏移。体现
x,y坐标上就是x,y坐标的一个偏移。体现在w,h宽高就是w,h宽高的倍率的差距;
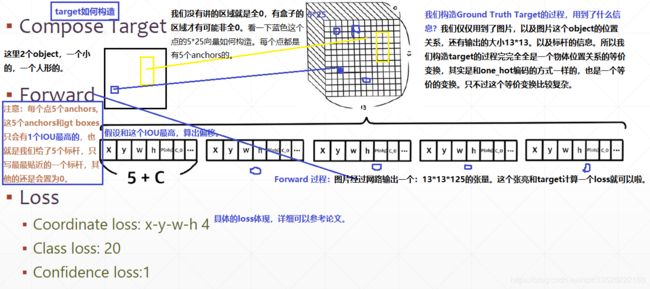
- 注意: 我们在构造Target的过程中,首先我们给了5个标杆anchor box,我们只写真实目标框和5个anchor box的IOU最高的那个,其它的还是设置为0,如上图所示。
- Yolov2的测试:
二. YOLOV2算法实战之Dataset
2.1. 数据集构成
-----data #数据集目录
----------train #训练集(116个样本)
---------------annotation
---------------image
----------val #测试集(4个样本)
---------------annotation
---------------image
训练集(有2个类别甜菜和杂草):
验证集:

2.2. 解析图像的XML文件
#%%
# 温馨提示:目标检测是非常非常复杂的任务,建议使用6GB以上的显卡运行!
import os,glob
os.environ['TF_CPP_MIN_LOG_LEVEL'] = '2'
import numpy as np
import tensorflow as tf
from tensorflow import keras
tf.random.set_seed(2234)
np.random.seed(2234)
# Shift+Enter可以运行(这里使用的VScode编辑器)
# tf2
# %%
print(tf.__version__)
print(tf.test.is_gpu_available())
# %%
import xml.etree.ElementTree as ET #这个库专门用来解析xml文件的。
def parse_annotation(img_dir, ann_dir, labels):
# img_dir: image path
# ann_dir: annotation xml file path
# labels: ('sugarweet', 'weed')杂草和甜菜。
# parse annotation info from xml file
"""
根节点
X2-10-0.png
512
512
3
""
imgs_info = []
max_boxes = 0 # 保存当前数据集中,objects最多的一个数字。
# for each annotation xml file遍历
for ann in os.listdir(ann_dir):
tree = ET.parse(os.path.join(ann_dir, ann)) # xml文件变为tree对象。
img_info = dict() # img_info保存到字典中去
boxes_counter = 0 # 记录当前图片的box数量。
img_info['object'] = [] # 对xml对象节点进行遍历,
for elem in tree.iter():
if 'filename' in elem.tag: # 如果当前节点的名字有filename
img_info['filename'] = os.path.join(img_dir,elem.text)
if 'width' in elem.tag:
img_info['width'] = int(elem.text)
assert img_info['width'] == 512 # 这里我们做了一个简化,我们所有的图片都是512*512,真实场景中需要把图片缩放到一致。
if 'height' in elem.tag:
img_info['height'] = int(elem.text)
assert img_info['height'] == 512
if 'object' in elem.tag or 'part' in elem.tag:
# x1-y1-x2-y2-label,前4个box,左边,最后一个类别。
object_info = [0,0,0,0,0]
boxes_counter += 1
for attr in list(elem): # 遍历当前对象的子节点。
if 'name' in attr.tag:
label = labels.index(attr.text) + 1 #对类别编码,sugarweet返回1,weet返回2。目标检测一般从1开始,0留个背景信息。
object_info[4] = label
if 'bndbox' in attr.tag:
for pos in list(attr):
if 'xmin' in pos.tag:
object_info[0] = int(pos.text)
if 'ymin' in pos.tag:
object_info[1] = int(pos.text)
if 'xmax' in pos.tag:
object_info[2] = int(pos.text)
if 'ymax' in pos.tag:
object_info[3] = int(pos.text)
img_info['object'].append(object_info)
imgs_info.append(img_info) # filename, w/h/box_info
# (N,5)=(max_objects_num, 5)
if boxes_counter > max_boxes:
max_boxes = boxes_counter # 比最大的max_boxes要打,刷新为最新的峰值。
# the maximum boxes number is max_boxes,假设当前图片中最大的目标个数为40个。
# [b, 40, 5] 创建numpy数组:张数,最多boxes,坐标加类别;这里直接写出来某一张图片最大的目标数字是40
boxes = np.zeros([len(imgs_info), max_boxes, 5]) ################################### 初始化为全0
print(boxes.shape)
imgs = [] # filename list
for i, img_info in enumerate(imgs_info):
# 把每一张图片中的objects变为numpy类型的数组。[N,5]N为目标个数。
img_boxes = np.array(img_info['object']) # 对列表封装成numpy类型。
# overwrite the N boxes info
boxes[i,:img_boxes.shape[0]] = img_boxes # 这里只写出boxes的前N列。
imgs.append(img_info['filename']) # 图片名字列表信息。
print("图片名字:\n", img_info['filename'])
print("object的boxes信息:\n", boxes[i,:5]) # 打印测试一下,依次打印当前图片名字,以及图片中objects的boxes信息。
print("=======================================================================")
# imgs: list of image path
# boxes: [b,40,5]
return imgs, boxes
# %%
obj_names = ('sugarbeet', 'weed')
imgs, boxes = parse_annotation('data/train/image', 'data/train/annotation', obj_names)
运行结果(部分):
C:\Anaconda3\envs\vs_tf2\python.exe C:/zhang/codes/my_yolov2/main.py
2.0.0
True
(116, 40, 5)
图片名字:
 data/train/image\X-10-0.png
object的boxes信息:
 [[  1. 170.  75. 321.   1.]
 [112. 214. 232. 325.   1.]
 [256. 177. 370. 341.   1.]
 [452. 211. 512. 316.   1.]
 [466. 385. 488. 403.   2.]]
=======================================================================
图片名字:
 data/train/image\X-10-1.png
object的boxes信息:
 [[ 89. 206. 243. 317.   1.]
 [272. 213. 453. 372.   1.]
 [178.  85. 192. 100.   2.]
 [  0.   0.   0.   0.   0.]
 [  0.   0.   0.   0.   0.]]
=======================================================================
图片名字:
 data/train/image\X-110-0.png
object的boxes信息:
 [[233.  61. 250.  69.   2.]
 [  1. 153.  50. 292.   1.]
 [100. 164. 209. 317.   1.]
 [261. 167. 426. 304.   1.]
 [  0.   0.   0.   0.   0.]]
=======================================================================
2.3. 构建DB(拼接成Tensorflow的Dataset对象)
# 预处理函数,完成
def preprocess(img, img_boxes):
    # img      : string
    # img_boxes: [40, 5]
    x = tf.io.read_file(img)                        # 通过路径读取图像
    x = tf.image.decode_png(x, channels=3)          # 图像数值范围:0~255
    x = tf.image.convert_image_dtype(x, tf.float32) # 自动把数值压缩到:0~1
    return x, img_boxes

def get_dataset(img_dir, ann_dir, batchsz):
    # 这个目的是构建TensorFlow的Dataset对象。
    # imgs的shape: [b]; boxes shape: [b, 40, 5]
    imgs, boxes = parse_annotation('data/train/image', 'data/train/annotation', obj_names)
    db = tf.data.Dataset.from_tensor_slices((imgs, boxes)) # 构建数据集对象
    db = db.shuffle(1000).map(preprocess).batch(batchsz).repeat()
    print('db Images:', len(imgs))
    return db

train_db = get_dataset('data/train/image', 'data/train/annotation', 4)
print(train_db)
运行结果:
C:\Anaconda3\envs\vs_tf2\python.exe C:/zhang/codes/my_yolov2/main.py
2.0.0
True
boxes shape: (116, 40, 5)
db Images: 116
((None, None, None, 3), (None, 40, 5)), types: (tf.float32, tf.float64)>

Process finished with exit code 0
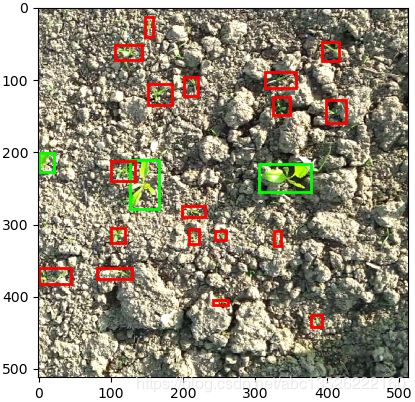
2.4. 可视化DB(一张图像)
注意: bounding box的2个坐标是左上角和右下角。
## 1.3 可视化DB,这里可视化一张
from matplotlib import pyplot as plt
from matplotlib import patches

def db_visualize(db):
    # db   shape: [b, 512, 512, 3]
    # imgs_boxes: [b, 40, 5]
    imgs, imgs_boxes = next(iter(db))
    img, img_boxes = imgs[0], imgs_boxes[0]
    f, ax1 = plt.subplots(1)  # 创建一张图
    ax1.imshow(img)          # 显示图片[512, 512, 3]
    for x1, y1, x2, y2, l in img_boxes: # [40, 5],显示box
        x1, y1, x2, y2 = float(x1), float(y1), float(x2), float(y2) # 变为浮点数
        w = x2-x1
        h = y2-y1

        # 判断类别信息
        if l==1: # green for sugarweet
            color = (0, 1, 0) # 绿色
        elif l==2:
            color = (1, 0, 0) # 红色,RGB,因为是0~1的范围。
        else: # ignore invalid boxes
            break

        rect = patches.Rectangle((x1, y1), w, h, linewidth=2,
                                 edgecolor=color, facecolor='none') # 绘制矩形框,左上角坐标,长宽。
        ax1.add_patch(rect) # 添加矩形框到图像上面

# %%
db_visualize(train_db)
plt.show()
运行结果:

2.5. 数据增强(data augumentation)
注意: 这里我们的数据集是比较少的,做数据增强有利于增加图片的数量,我们可以对图片旋转、添加噪声、视角变换、色彩度的变换。这里变换的时候和图片分类是不一样的,因为如何变换图片的类别信息是不变的,但是我们对于框的位置信息是发生变化的,例如图片旋转90度,框子也要跟着旋转90度。
# %%
# 1.4 数据增强模块
# 这个标准的库专门用来做数据增强的,而且支持目标检测box跟着旋转的操作,所以不需要自己写代码。
# 图片和框可以同时旋转。
import imgaug as ia
from imgaug import augmenters as iaa

def augmentation_generator(yolo_dataset):
    '''
    Augmented batch generator from a yolo dataset
    Parameters
    ----------
    - YOLO dataset

    Returns
    -------
    - augmented batch : tensor (shape : batch_size, IMAGE_W, IMAGE_H, 3)
        batch : tupple(images, annotations)
        batch[0] : images : tensor (shape : batch_size, IMAGE_W, IMAGE_H, 3)
        batch[1] : annotations : tensor (shape : batch_size, max annot, 5)
    '''
    for batch in yolo_dataset:
        # conversion tensor->numpy
        img = batch[0].numpy()
        boxes = batch[1].numpy()
        # conversion bbox numpy->ia object
        ia_boxes = []
        for i in range(img.shape[0]):
            ia_bbs = [ia.BoundingBox(x1=bb[0],
                                     y1=bb[1],
                                     x2=bb[2],
                                     y2=bb[3]) for bb in boxes[i]
                      if (bb[0] + bb[1] + bb[2] + bb[3] > 0)]
            ia_boxes.append(ia.BoundingBoxesOnImage(ia_bbs, shape=(512, 512)))
        # data augmentation
        seq = iaa.Sequential([
            iaa.Fliplr(0.5),
            iaa.Flipud(0.5),
            iaa.Multiply((0.4, 1.6)),  # change brightness
            # iaa.ContrastNormalization((0.5, 1.5)),
            # iaa.Affine(translate_px={"x": (-100,100), "y": (-100,100)}, scale=(0.7, 1.30))
        ])
        # seq = iaa.Sequential([])
        seq_det = seq.to_deterministic()
        img_aug = seq_det.augment_images(img)
        img_aug = np.clip(img_aug, 0, 1)
        boxes_aug = seq_det.augment_bounding_boxes(ia_boxes)
        # conversion ia object -> bbox numpy
        for i in range(img.shape[0]):
            boxes_aug[i] = boxes_aug[i].remove_out_of_image().clip_out_of_image()
            for j, bb in enumerate(boxes_aug[i].bounding_boxes):
                boxes[i, j, 0] = bb.x1
                boxes[i, j, 1] = bb.y1
                boxes[i, j, 2] = bb.x2
                boxes[i, j, 3] = bb.y2
        # conversion numpy->tensor
        batch = (tf.convert_to_tensor(img_aug), tf.convert_to_tensor(boxes))
        # batch = (img_aug, boxes)
        yield batch


# %%
aug_train_db = augmentation_generator(train_db)  # 数据增强后的aug_train_db,参数train_db没有做数据增强的。
db_visualize(aug_train_db)
plt.show()
三. YOLOV2算法实战之Compose labels
3.1. GT box介绍
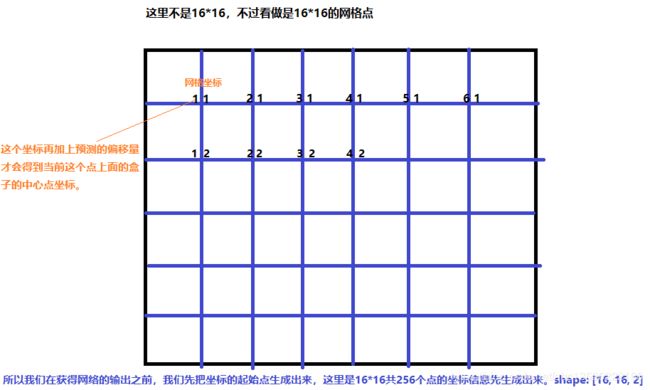
注意: 网络输出是 16 × 16 16 \times 16 16×16 的feature map,每个网格有 5 5 5 个anchor box,并且每个anchor box信息用长度为 7 7 7 的向量表示,所以输出格式为: [ b , 16 , 16 , 5 , 7 ] [b, 16, 16, 5, 7] [b,16,16,5,7],它是一个 5 5 5 维的张量表示,这个长度为 7 7 7 的向量表示为中心点坐标 x , y x, y x,y,宽度和高度 w , h w, h w,h,置信度(这个网格有没有box的置信度) c o n f conf conf,类别信息2类,共有 2 + 2 + 2 + 1 = 7 2+2+2+1=7 2+2+2+1=7。此外目标值Targe 也是相同shape的输出值,也是 [ b , 16 , 16 , 5 , 7 ] [b, 16, 16, 5, 7] [b,16,16,5,7] 这样 5 5 5 维的张量,但是实际中我们拿到的box是 [ b , 40 , 5 ] [b, 40,5] [b,40,5] 这样的 3 3 3 维张量,所以我们接下来的工作就是完成我们实际拿到的box到Target目标值的转换。
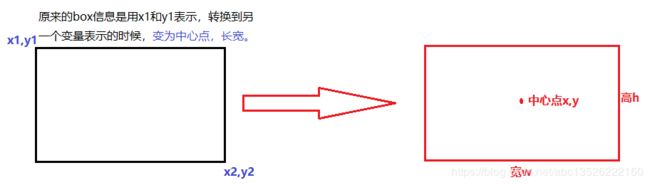
这里 [ 40 , 5 ] [40,5] [40,5], x 1 − y 1 − x 2 − y 2 − l = > x − y − w − h − l x_1-y_1-x_2-y_2-l => x-y-w-h-l x1−y1−x2−y2−l=>x−y−w−h−l 的转换表示为如下,这里转换的目的是因为网络的输出也是预测中心点坐标,宽和高。不会预测左上角和右下角这2个坐标信息。
# %%我们先定义一组超参数
IMGSZ = 512 #图片大小
GRIDSZ = 16 #网格划分多少
ANCHORS = [0.57273, 0.677385, 1.87446, 2.06253, 3.33843, 5.47434, 7.88282, 3.52778, 9.77052, 9.16828] # 提供的5个anchor的宽和高。
ANCHORS_NUM = len(ANCHORS)//2
# %% 我们把每个图片的box信息写入到网格中间去。
def process_true_boxes(gt_boxes, anchors):
# gt_boxes: [40,5]
# 512//16=32,可以理解为从512*512的特征下采样到16*16的特征。
scale = IMGSZ/GRIDSZ
anchors = np.array(ANCHORS).reshape(ANCHORS_NUM, 2) # 封装成numpy数组 # [5,2]
# mask for object 每个网格点是否有box中心点落在该区域
detector_mask = np.zeros([GRIDSZ, GRIDSZ, 5, 1]) #5表示ANCHOR_NUM, 1表示当前网格点是否有真实的box落到该区域。
#x-y-w-h-l
matching_gt_box = np.zeros([GRIDSZ, GRIDSZ, 5, 5])
# [40,5] x1-y1-x2-y2-l => x-y-w-h-l
gt_boxes_grid = np.zeros(gt_boxes.shape)
# DB: tensor => numpy 首先把tenosorflow中的转成numpy
gt_boxes = gt_boxes.numpy()
for i,box in enumerate(gt_boxes): # [40,5]
# box: [5], x1-y1-x2-y2-l
# 512大小映射到=> 16,所以这里需要除以一个倍率。
x = ((box[0]+box[2])/2)/scale # 中心点坐标
y = ((box[1]+box[3])/2)/scale # 中心点坐标
w = (box[2] - box[0]) / scale # 宽
h = (box[3] - box[1]) / scale # 高
# [40,5] x-y-w-h-l
gt_boxes_grid[i] = np.array([x,y,w,h,box[4]]) # 中心坐标,宽,高,类别
if w*h > 0: # valid box 这个位置是有box的。
# 这里假设 x,y: 7.3, 6.8,这就代表在横坐标第8个格子,纵坐标第7个格子。
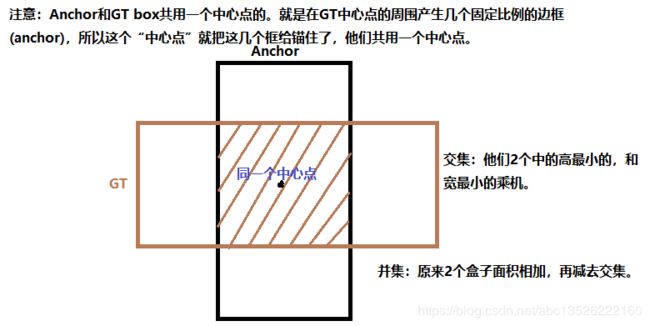
######### 这里需要主要对于当前区域的5个anchor我们不知道这5个哪个和真实的最接近。
######### 我们来计算交并比
best_anchor = 0
best_iou = 0
for j in range(5):
interct = np.minimum(w, anchors[j, 0]) * np.minimum(h, anchors[j, 1])
union = w * h + (anchors[j, 0] * anchors[j, 1]) - interct
iou = interct / union
if iou > best_iou: # best iou
best_anchor = j
best_iou = iou
# found the best anchors
if best_iou > 0: # 加一个判断
x_coord = np.floor(x).astype(np.int32) # 地板函数,取x的整数部分。找格子
y_coord = np.floor(y).astype(np.int32) # 也是地板函数
# 这里注意一下张量的组织方式是:[b,h,w,5,1],先在哪一个网格对应的位置有box写上1(重合率最高的那个anchor);
# 也就是其他anchor位置都是写上0.
detector_mask[y_coord, x_coord, best_anchor] = 1
# 这里注意一下张量的组织方式是:[b,h,w,5,x-y-w-h-l]
matching_gt_box[y_coord, x_coord, best_anchor] = np.array([x, y, w, h, box[4]])
# 以上完成的内容就是如下:
# 完成[40,5]的张量变为 => 张量[16,16,5,5] 最后1个5位位置和类别。
# matching_gt_box shape : [16,16,5,5]
# detector_mask shape : [16,16,5,1]
# gt_boxes_grid shape : [40,5] 坐标类型转换,左上角,右下角变为中心点,高宽。
return matching_gt_box, detector_mask, gt_boxes_grid
3.2. 批量GT box合并以及批量Generator
# %%
# 2.2 回顾一下db对象是做过数据增强的generator,这个函数也是产生generator,可以给你给tensorflow用来做训练用。
def ground_truth_generator(db):

    for imgs, imgs_boxes in db:
        # imgs: [b,512,512,3]
        # imgs_boxes: [b,40,5]

        batch_matching_gt_box = []
        batch_detector_mask = []
        batch_gt_boxes_grid = []

        # print(imgs_boxes[0,:5])

        b = imgs.shape[0]  # 图片的数量,一个batchsz大小的。
        for i in range(b): # for each image
            ################# 调用上面写好的函数,转换格式。
            matching_gt_box, detector_mask, gt_boxes_grid = process_true_boxes(imgs_boxes[i], ANCHORS)
            batch_matching_gt_box.append(matching_gt_box)
            batch_detector_mask.append(detector_mask)
            batch_gt_boxes_grid.append(gt_boxes_grid)
        ###### [b,16,16,5,1]表示:b张图片,每张图片16*16的网格,每个网格有5个anchor box,每个anchor box的0或者1表示是否有GT box存在。
        detector_mask = tf.cast(np.array(batch_detector_mask), dtype=tf.float32)
        # [b,16,16,5,5] x-y-w-h-l
        matching_gt_box = tf.cast(np.array(batch_matching_gt_box), dtype=tf.float32)
        # [b,40,5] x-y-w-h-l
        gt_boxes_grid = tf.cast(np.array(batch_gt_boxes_grid), dtype=tf.float32)

        ###### [b,16,16,5] 因为需要用来分类,需要提取额外的类别信息。
        matching_classes = tf.cast(matching_gt_box[...,4], dtype=tf.int32)
        ###### [b,16,16,5,3] 做一个one_hot编码
        matching_classes_oh = tf.one_hot(matching_classes, depth=3)
        ######注意==== 网络输出7位格式:x-y-w-h-conf-l1-l2,depth=3这里由于:label1和label2并不是互斥的,有可能都为0,
        ###### 因此在做one_hot编码的时候,需要编码为3类,但是只取后2类,这样有可能l1,l2都有可能为0的。
        ###### [b,16,16,5,2]
        matching_classes_oh = tf.cast(matching_classes_oh[...,1:], dtype=tf.float32) # 这里只取后2位。


        # imgs:                 [b,512,512,3]
        # detector_mask:        [b,16,16,5,1]
        # matching_gt_box:      [b,16,16,5,5]
        # matching_classes_oh:  [b,16,16,5,2]
        # gt_boxes_grid:        [b,40,5]
        yield imgs, detector_mask, matching_gt_box, matching_classes_oh,gt_boxes_grid
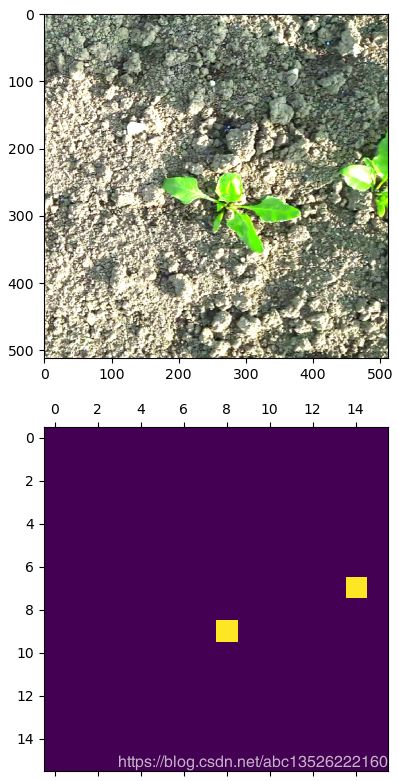
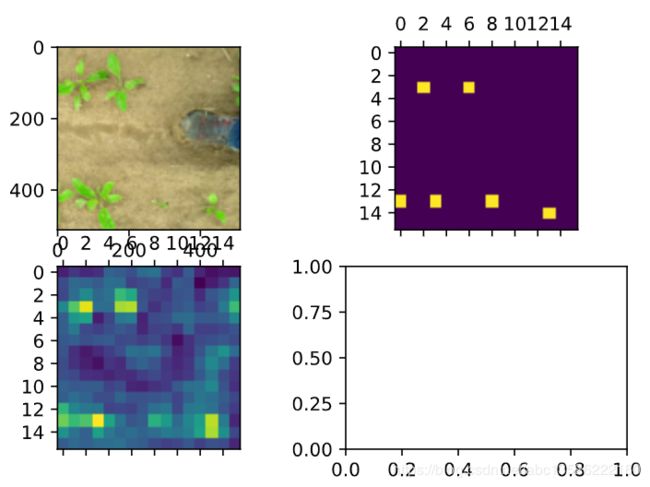
3.3. GT box可视化
这里我们可视化一下detector_mask,看看有没有object。看看当前网格有没有object。
# %%
# 2.3 visualize object mask
# train_db -> aug_train_db -> train_gen
train_gen = ground_truth_generator(aug_train_db)

img, detector_mask, matching_gt_box, matching_classes_oh,gt_boxes_grid = \
    next(train_gen) # 带batchsz
img, detector_mask, matching_gt_box, matching_classes_oh, gt_boxes_grid = \
    img[0], detector_mask[0], matching_gt_box[0], matching_classes_oh[0], gt_boxes_grid[0] # 不带batch

fig,(ax1,ax2) = plt.subplots(2,figsize=(5,10))
ax1.imshow(img)
# [16,16,5,1] => [16,16,1]
mask = tf.reduce_sum(detector_mask, axis=2)
ax2.matshow(mask[...,0]) # [16,16]
plt.show()
四. YOLOV2算法实战之Model
4.1. Darknet-19网络结构
Darknet-19网络结构
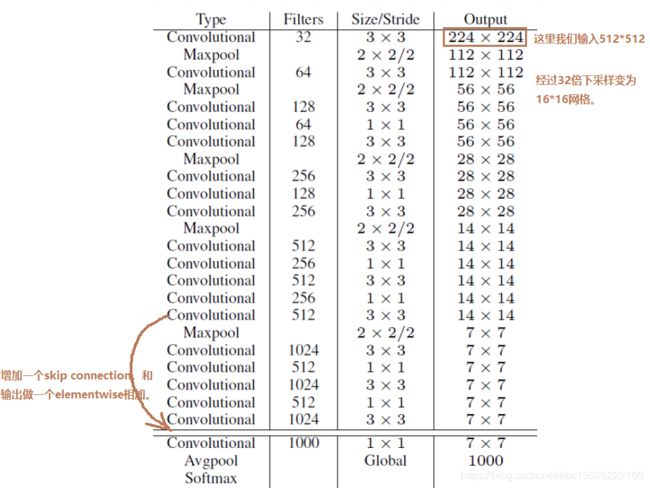
这里首先测试一下输出
# 3.1
from tensorflow.keras import layers
import  tensorflow.keras.backend as K

input_image = layers.Input((512,512, 3), dtype='float32')  # 创建一个输入层
# unit1
x = layers.Conv2D(32, (3,3), strides=(1,1), padding='same', name='conv_1', use_bias=False)(input_image) # 这里就是要介绍的方法,我们先创建一个类,然后再加括号表示通过这个类。
x = layers.BatchNormalization(name='norm_1')(x)
x = layers.LeakyReLU(alpha=0.1)(x)

x = layers.MaxPooling2D(pool_size=(2,2))(x)

output = x
# create model
model = keras.Model(input_image, output)
x = tf.random.normal((4, 512, 512, 3))
out = model(x)
print('out: ', out.shape)
输出shape信息:
out:  (4, 256, 256, 32)

Process finished with exit code 0
网络输出测试:
from tensorflow.keras import layers

import  tensorflow.keras.backend as K

# 这层先不管呢。
class SpaceToDepth(layers.Layer):

    def __init__(self, block_size, **kwargs):
        self.block_size = block_size
        super(SpaceToDepth, self).__init__(**kwargs)

    def call(self, inputs):
        x = inputs
        batch, height, width, depth = K.int_shape(x)
        batch = -1
        reduced_height = height // self.block_size
        reduced_width = width // self.block_size
        y = K.reshape(x, (batch, reduced_height, self.block_size,
                             reduced_width, self.block_size, depth))
        z = K.permute_dimensions(y, (0, 1, 3, 2, 4, 5))
        t = K.reshape(z, (batch, reduced_height, reduced_width, depth * self.block_size **2))
        return t

    def compute_output_shape(self, input_shape):
        shape =  (input_shape[0], input_shape[1] // self.block_size, input_shape[2] // self.block_size,
                  input_shape[3] * self.block_size **2)
        return tf.TensorShape(shape)

IMGSZ=512
# 3.1
input_image = layers.Input((IMGSZ,IMGSZ, 3), dtype='float32')  # 创建一个输入层
# unit1
x = layers.Conv2D(32, (3,3), strides=(1,1), padding='same', name='conv_1', use_bias=False)(input_image) # 这里就是要介绍的方法,我们先创建一个类,然后再加括号表示通过这个类。
x = layers.BatchNormalization(name='norm_1')(x)
x = layers.LeakyReLU(alpha=0.1)(x)

x = layers.MaxPooling2D(pool_size=(2,2))(x)

# unit2
x = layers.Conv2D(64, (3,3), strides=(1,1), padding='same', name='conv_2',use_bias=False)(x)
x = layers.BatchNormalization(name='norm_2')(x)
x = layers.LeakyReLU(alpha=0.1)(x)
x = layers.MaxPooling2D(pool_size=(2,2))(x)

# Layer 3
x = layers.Conv2D(128, (3,3), strides=(1,1), padding='same', name='conv_3', use_bias=False)(x)
x = layers.BatchNormalization(name='norm_3')(x)
x = layers.LeakyReLU(alpha=0.1)(x)

# Layer 4
x = layers.Conv2D(64, (1,1), strides=(1,1), padding='same', name='conv_4', use_bias=False)(x)
x = layers.BatchNormalization(name='norm_4')(x)
x = layers.LeakyReLU(alpha=0.1)(x)


# Layer 5
x = layers.Conv2D(128, (3,3), strides=(1,1), padding='same', name='conv_5', use_bias=False)(x)
x = layers.BatchNormalization(name='norm_5')(x)
x = layers.LeakyReLU(alpha=0.1)(x)
x = layers.MaxPooling2D(pool_size=(2, 2))(x)

# Layer 6
x = layers.Conv2D(256, (3,3), strides=(1,1), padding='same', name='conv_6', use_bias=False)(x)
x = layers.BatchNormalization(name='norm_6')(x)
x = layers.LeakyReLU(alpha=0.1)(x)

# Layer 7
x = layers.Conv2D(128, (1,1), strides=(1,1), padding='same', name='conv_7', use_bias=False)(x)
x = layers.BatchNormalization(name='norm_7')(x)
x = layers.LeakyReLU(alpha=0.1)(x)

# Layer 8
x = layers.Conv2D(256, (3,3), strides=(1,1), padding='same', name='conv_8', use_bias=False)(x)
x = layers.BatchNormalization(name='norm_8')(x)
x = layers.LeakyReLU(alpha=0.1)(x)
x = layers.MaxPooling2D(pool_size=(2, 2))(x)

# Layer 9
x = layers.Conv2D(512, (3,3), strides=(1,1), padding='same', name='conv_9', use_bias=False)(x)
x = layers.BatchNormalization(name='norm_9')(x)
x = layers.LeakyReLU(alpha=0.1)(x)

# Layer 10
x = layers.Conv2D(256, (1,1), strides=(1,1), padding='same', name='conv_10', use_bias=False)(x)
x = layers.BatchNormalization(name='norm_10')(x)
x = layers.LeakyReLU(alpha=0.1)(x)

# Layer 11
x = layers.Conv2D(512, (3,3), strides=(1,1), padding='same', name='conv_11', use_bias=False)(x)
x = layers.BatchNormalization(name='norm_11')(x)
x = layers.LeakyReLU(alpha=0.1)(x)

# Layer 12
x = layers.Conv2D(256, (1,1), strides=(1,1), padding='same', name='conv_12', use_bias=False)(x)
x = layers.BatchNormalization(name='norm_12')(x)
x = layers.LeakyReLU(alpha=0.1)(x)

# Layer 13
x = layers.Conv2D(512, (3,3), strides=(1,1), padding='same', name='conv_13', use_bias=False)(x)
x = layers.BatchNormalization(name='norm_13')(x)
x = layers.LeakyReLU(alpha=0.1)(x)

###################################### for skip connection 这里的短接线 ######################################
skip_x = x   #shape: [b,32,32,512]
###################################### for skip connection 这里的短接线 ######################################


x = layers.MaxPooling2D(pool_size=(2, 2))(x)

# Layer 14
x = layers.Conv2D(1024, (3, 3), strides=(1, 1), padding='same', name='conv_14', use_bias=False)(x)
x = layers.BatchNormalization(name='norm_14')(x)
x = layers.LeakyReLU(alpha=0.1)(x)

# Layer 15
x = layers.Conv2D(512, (1, 1), strides=(1, 1), padding='same', name='conv_15', use_bias=False)(x)
x = layers.BatchNormalization(name='norm_15')(x)
x = layers.LeakyReLU(alpha=0.1)(x)

# Layer 16
x = layers.Conv2D(1024, (3, 3), strides=(1, 1), padding='same', name='conv_16', use_bias=False)(x)
x = layers.BatchNormalization(name='norm_16')(x)
x = layers.LeakyReLU(alpha=0.1)(x)

# Layer 17
x = layers.Conv2D(512, (1, 1), strides=(1, 1), padding='same', name='conv_17', use_bias=False)(x)
x = layers.BatchNormalization(name='norm_17')(x)
x = layers.LeakyReLU(alpha=0.1)(x)

# Layer 18
x = layers.Conv2D(1024, (3, 3), strides=(1, 1), padding='same', name='conv_18', use_bias=False)(x)
x = layers.BatchNormalization(name='norm_18')(x)
x = layers.LeakyReLU(alpha=0.1)(x)

# Layer 19
x = layers.Conv2D(1024, (3, 3), strides=(1, 1), padding='same', name='conv_19', use_bias=False)(x)
x = layers.BatchNormalization(name='norm_19')(x)
x = layers.LeakyReLU(alpha=0.1)(x)

# Layer 20
x = layers.Conv2D(1024, (3, 3), strides=(1, 1), padding='same', name='conv_20', use_bias=False)(x)
x = layers.BatchNormalization(name='norm_20')(x)
x = layers.LeakyReLU(alpha=0.1)(x)
# shape x: (4, 16, 16, 1024)

# Layer 21
###################################### for skip connection 这里的短接线 ######################################
skip_x = layers.Conv2D(64, (1, 1), strides=(1, 1), padding='same', name='conv_21', use_bias=False)(skip_x)
skip_x = layers.BatchNormalization(name='norm_21')(skip_x)
skip_x = layers.LeakyReLU(alpha=0.1)(skip_x)
###################################### for skip connection 这里的短接线 ######################################
skip_x = SpaceToDepth(block_size=2)(skip_x)

# concat拼接操作
# [b,16,16,1024], [b,16,16,256],=> [b,16,16,1280]
x = tf.concat([skip_x, x], axis=-1)

# Layer 22
x = layers.Conv2D(1024, (3, 3), strides=(1, 1), padding='same', name='conv_22', use_bias=False)(x)
x = layers.BatchNormalization(name='norm_22')(x)
x = layers.LeakyReLU(alpha=0.1)(x)
x = layers.Dropout(0.5)(x)  # add dropout
# 最终我们要得到的输出是:[b,16,16,5,7] => [b,16,16,35]

x = layers.Conv2D(5 * 7, (1, 1), strides=(1, 1), padding='same', name='conv_23')(x) #得到的shape:[b,16,16,35]

output = layers.Reshape((GRIDSZ, GRIDSZ, 5, 7))(x)          ####### reshape操作


# create model
model = keras.models.Model(input_image, output)
x = tf.random.normal((4, 512, 512, 3))
out = model(x)
print('out:', out.shape)
输出shape信息:
out: (4, 16, 16, 5, 7)
4.2. 网络初始化
# %%
# 3.2 权重初始化
class WeightReader:
    def __init__(self, weight_file):
        self.offset = 4
        self.all_weights = np.fromfile(weight_file, dtype='float32')

    def read_bytes(self, size):
        self.offset = self.offset + size
        return self.all_weights[self.offset - size:self.offset]

    def reset(self):
        self.offset = 4
weight_reader = WeightReader('yolo.weights')


weight_reader.reset()
nb_conv = 23

for i in range(1, nb_conv + 1):
    conv_layer = model.get_layer('conv_' + str(i))
    conv_layer.trainable = True

    if i < nb_conv:
        norm_layer = model.get_layer('norm_' + str(i))
        norm_layer.trainable = True

        size = np.prod(norm_layer.get_weights()[0].shape)

        beta = weight_reader.read_bytes(size)
        gamma = weight_reader.read_bytes(size)
        mean = weight_reader.read_bytes(size)
        var = weight_reader.read_bytes(size)

        weights = norm_layer.set_weights([gamma, beta, mean, var])

    if len(conv_layer.get_weights()) > 1:
        bias = weight_reader.read_bytes(np.prod(conv_layer.get_weights()[1].shape))
        kernel = weight_reader.read_bytes(np.prod(conv_layer.get_weights()[0].shape))
        kernel = kernel.reshape(list(reversed(conv_layer.get_weights()[0].shape)))
        kernel = kernel.transpose([2, 3, 1, 0])
        conv_layer.set_weights([kernel, bias])
    else:
        kernel = weight_reader.read_bytes(np.prod(conv_layer.get_weights()[0].shape))
        kernel = kernel.reshape(list(reversed(conv_layer.get_weights()[0].shape)))
        kernel = kernel.transpose([2, 3, 1, 0])
        conv_layer.set_weights([kernel])


layer = model.layers[-2]  # last convolutional layer
# print(layer.name) # conv_23
layer.trainable = True

weights = layer.get_weights()

new_kernel = np.random.normal(size=weights[0].shape) / (GRIDSZ * GRIDSZ)
new_bias = np.random.normal(size=weights[1].shape) / (GRIDSZ * GRIDSZ)

layer.set_weights([new_kernel, new_bias])
4.3. 网络输出可视化
#%%

model.load_weights('C:\\zhang\\codes\\yolov2-tf2\\weights\\ckpt.h5')

#%%
img, detector_mask, matching_gt_boxes, matching_classes_oh, gt_boxes_grid = next(train_gen)

img, detector_mask, matching_gt_boxes, matching_classes_oh, gt_boxes_grid = \
    img[0], detector_mask[0], matching_gt_boxes[0], matching_classes_oh[0], gt_boxes_grid[0]

# [b,512,512,3]=>[b,16,16,5,7]=>[16,16,5,x-y-w-h-conf-l1-l2]
y_pred = model(tf.expand_dims(img, axis=0))[0][...,4]
# [16,16,5] => [16,16]
y_pred = tf.reduce_sum(y_pred,axis=2)

fig, ((ax1, ax2), (ax3, ax4)) = plt.subplots(2, 2)
ax1.imshow(img)
# [16,16,5,1]=>[16,16]
ax2.matshow(tf.reduce_sum(detector_mask,axis=2)[...,0])
ax3.matshow(y_pred)
五. YOLOV2算法实战之Loss
输出shape信息:
# %%
from tensorflow.keras import losses
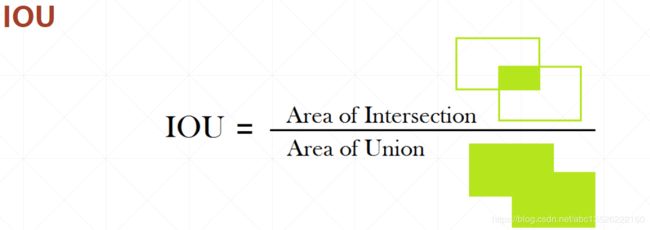
def compute_iou(x1,y1,w1,h1, x2,y2,w2,h2):
# x1...:[b,16,16,5]
xmin1 = x1 - 0.5*w1
xmax1 = x1 + 0.5*w1
ymin1 = y1 - 0.5*h1
ymax1 = y1 + 0.5*h1
xmin2 = x2 - 0.5*w2
xmax2 = x2 + 0.5*w2
ymin2 = y2 - 0.5*h2
ymax2 = y2 + 0.5*h2
# (xmin1,ymin1,xmax1,ymax1) (xmin2,ymin2,xmax2,ymax2)
interw = np.minimum(xmax1,xmax2) - np.maximum(xmin1,xmin2)
interh = np.minimum(ymax1, ymax2) - np.maximum(ymin1, ymin2)
inter = interw * interh
union = w1*h1 +w2*h2 - inter
iou = inter / (union + 1e-6)
# [b,16,16,5]
return iou
#%%
# 4.1 coordinate loss
def yolo_loss(detector_mask, matching_gt_boxes, matching_classes_oh, gt_boxes_grid, y_pred):
# detector_mask: [b,16,16,5,1]
# matching_gt_boxes: [b,16,16,5,5] x-y-w-h-l
# matching_classes_oh: [b,16,16,5,2] l1-l2
# gt_boxes_grid: [b,40,5] x-y-w-h-l
# y_pred: [b,16,16,5,7] x-y-w-h-conf-l0-l1
anchors = np.array(ANCHORS).reshape(5,2)
# create starting position for each grid anchors
# [16,16]
x_grid = tf.tile(tf.range(GRIDSZ),[GRIDSZ])
# [1,16,16,1,1]
# [b,16,16,5,2]
x_grid = tf.reshape(x_grid, (1,GRIDSZ,GRIDSZ,1,1))
x_grid = tf.cast(x_grid, tf.float32)
# [b,16_1,16_2,1,1]=>[b,16_2,16_1,1,1]
y_grid = tf.transpose(x_grid, (0,2,1,3,4))
xy_grid = tf.concat([x_grid, y_grid],axis=-1)
# [1,16,16,1,2]=> [b,16,16,5,2]
xy_grid = tf.tile(xy_grid, [y_pred.shape[0], 1,1,5,1])
# [b,16,16,5,7] x-y-w-h-conf-l1-l2
pred_xy = tf.sigmoid(y_pred[...,0:2])
pred_xy = pred_xy + xy_grid
# [b,16,16,5,2]
pred_wh = tf.exp(y_pred[...,2:4])
# [b,16,16,5,2] * [5,2] => [b,16,16,5,2]
pred_wh = pred_wh * anchors
# 统计box的数量,用来做平均。
n_detector_mask = tf.reduce_sum(tf.cast(detector_mask>0., tf.float32))
# [b,16,16,5,1] * [b,16,16,5,2]
#
xy_loss = detector_mask * tf.square(matching_gt_boxes[...,:2]-pred_xy) / (n_detector_mask+1e-6)
xy_loss = tf.reduce_sum(xy_loss)
wh_loss = detector_mask * tf.square(tf.sqrt(matching_gt_boxes[...,2:4])-\
tf.sqrt(pred_wh)) / (n_detector_mask+1e-6)
wh_loss = tf.reduce_sum(wh_loss)
################ 4.1 coordinate loss
coord_loss = xy_loss + wh_loss
################ 4.2 class loss
# [b,16,16,5,2]
pred_box_class = y_pred[...,5:]
# [b,16,16,5]
true_box_class = tf.argmax(matching_classes_oh,-1) ############### one_hot逆密码,转过来
# [b,16,16,5] vs [b,16,16,5,2]
class_loss = losses.sparse_categorical_crossentropy(true_box_class, pred_box_class, from_logits=True)
# [b,16,16,5] => [b,16,16,5,1]* [b,16,16,5,1]
class_loss = tf.expand_dims(class_loss,-1) * detector_mask # 插入维度。
class_loss = tf.reduce_sum(class_loss) / (n_detector_mask+1e-6) # n_detector_mask 有目标的数量。
################ 4.3 object loss 这个loss更加复杂
# nonobject_mask
# iou done!
# [b,16,16,5]
x1,y1,w1,h1 = matching_gt_boxes[...,0],matching_gt_boxes[...,1],matching_gt_boxes[...,2],matching_gt_boxes[...,3]
# [b,16,16,5]
x2,y2,w2,h2 = pred_xy[...,0],pred_xy[...,1],pred_wh[...,0],pred_wh[...,1]
ious = compute_iou(x1,y1,w1,h1, x2,y2,w2,h2)
# [b,16,16,5,1]
ious = tf.expand_dims(ious, axis=-1)
# [b,16,16,5,1]
pred_conf = tf.sigmoid(y_pred[...,4:5])
# [b,16,16,5,2] => [b,16,16,5, 1, 2]
pred_xy = tf.expand_dims(pred_xy, axis=4)
# [b,16,16,5,2] => [b,16,16,5, 1, 2]
pred_wh = tf.expand_dims(pred_wh, axis=4)
pred_wh_half = pred_wh /2.
pred_xymin = pred_xy - pred_wh_half
pred_xymax = pred_xy + pred_wh_half
# [b, 40, 5] => [b, 1, 1, 1, 40, 5]
true_boxes_grid = tf.reshape(gt_boxes_grid, \
[gt_boxes_grid.shape[0], 1, 1 ,1, gt_boxes_grid.shape[1], gt_boxes_grid.shape[2]])
true_xy = true_boxes_grid[...,0:2]
true_wh = true_boxes_grid[...,2:4]
true_wh_half = true_wh /2.
true_xymin = true_xy - true_wh_half
true_xymax = true_xy + true_wh_half
# predxymin, predxymax, true_xymin, true_xymax
# [b,16,16,5,1,2] vs [b,1,1,1,40,2]=> [b,16,16,5,40,2]
intersectxymin = tf.maximum(pred_xymin, true_xymin)
# [b,16,16,5,1,2] vs [b,1,1,1,40,2]=> [b,16,16,5,40,2]
intersectxymax = tf.minimum(pred_xymax, true_xymax)
# [b,16,16,5,40,2]
intersect_wh = tf.maximum(intersectxymax - intersectxymin, 0.)
# [b,16,16,5,40] * [b,16,16,5,40]=>[b,16,16,5,40]
intersect_area = intersect_wh[...,0] * intersect_wh[...,1]
# [b,16,16,5,1]
pred_area = pred_wh[...,0] * pred_wh[...,1]
# [b,1,1,1,40]
true_area = true_wh[...,0] * true_wh[...,1]
# [b,16,16,5,1]+[b,1,1,1,40]-[b,16,16,5,40]=>[b,16,16,5,40]
union_area = pred_area + true_area - intersect_area
# [b,16,16,5,40]
iou_score = intersect_area / union_area
# [b,16,16,5]
best_iou = tf.reduce_max(iou_score, axis=4)
# [b,16,16,5,1]
best_iou = tf.expand_dims(best_iou, axis=-1)
nonobj_detection = tf.cast(best_iou<0.6, tf.float32)
nonobj_mask = nonobj_detection * (1-detector_mask)
# nonobj counter
n_nonobj = tf.reduce_sum(tf.cast(nonobj_mask>0.,tf.float32))
nonobj_loss = tf.reduce_sum(nonobj_mask * tf.square(-pred_conf))\
/(n_nonobj+1e-6)
obj_loss = tf.reduce_sum(detector_mask * tf.square(ious - pred_conf))\
/ (n_detector_mask+1e-6)
loss = coord_loss + class_loss + nonobj_loss + 5 * obj_loss
return loss, [nonobj_loss + 5 * obj_loss, class_loss, coord_loss]
#%%
img, detector_mask, matching_gt_boxes, matching_classes_oh, gt_boxes_grid = next(train_gen)
img, detector_mask, matching_gt_boxes, matching_classes_oh, gt_boxes_grid = \
img[0], detector_mask[0], matching_gt_boxes[0], matching_classes_oh[0], gt_boxes_grid[0]
y_pred = model(tf.expand_dims(img, axis=0))[0]
loss, sub_loss = yolo_loss(tf.expand_dims(detector_mask,axis=0),
tf.expand_dims(matching_gt_boxes,axis=0),
tf.expand_dims(matching_classes_oh,axis=0),
tf.expand_dims(gt_boxes_grid,axis=0),
tf.expand_dims(y_pred,axis=0)
)