最简单的视音频播放示例5:OpenGL播放RGB/YUV
=====================================================
最简单的视音频播放示例系列文章列表:
最简单的视音频播放示例1:总述
最简单的视音频播放示例2:GDI播放YUV, RGB
最简单的视音频播放示例3:Direct3D播放YUV,RGB(通过Surface)
最简单的视音频播放示例4:Direct3D播放RGB(通过Texture)
最简单的视音频播放示例5:OpenGL播放RGB/YUV
最简单的视音频播放示例6:OpenGL播放YUV420P(通过Texture,使用Shader)
最简单的视音频播放示例7:SDL2播放RGB/YUV
最简单的视音频播放示例8:DirectSound播放PCM
最简单的视音频播放示例9:SDL2播放PCM
=====================================================
本文记录OpenGL播放视频的技术。OpenGL是一个和Direct3D同一层面的技术。相比于Direct3D,OpenGL具有跨平台的优势。尽管在游戏领域,DirectX的影响力已渐渐超越OpenGL并被大多数PC游戏开发商所采用,但在专业高端绘图领域,OpenGL因为色彩准确,仍然是不能被取代的主角。
OpenGL简介
从网上搜集了一些有关OpenGL简介方面的知识,在这里列出来。
开放图形库(英语:Open Graphics Library,缩写为OpenGL)是个定义了一个跨编程语言、跨平台的应用程序接口(API)的规范,它用于生成二维、三维图像。
OpenGL规范由1992年成立的OpenGL架构评审委员会(ARB)维护。ARB由一些对创建一个统一的、普遍可用的API特别感兴趣的公司组成。根据OpenGL官方网站,2002年6月的ARB投票成员包括3Dlabs、Apple Computer、ATI Technologies、Dell Computer、Evans & Sutherland、Hewlett-Packard、IBM、Intel、Matrox、NVIDIA、SGI和Sun Microsystems,Microsoft曾是创立成员之一,但已于2003年3月退出。
OpenGL仍然是唯一能够取代微软对3D图形技术的完全控制的API。它仍然具有一定的生命力,但是Silicon Graphics已经不再以任何让微软不悦的方式推广OpenGL,因而它存在较高的风险。在高端的图形设备和专业应用方面OpenGL占据着统治地位(Direct3D目前还不支持)。开放源码社区(尤其是Mesa项目)一直致力于提供OpenGL支持。
OpenGL渲染管线
下文也是网上看的,搞懂了一部分,但是由于3D方面基础不牢固有些方面还没有完全弄懂。
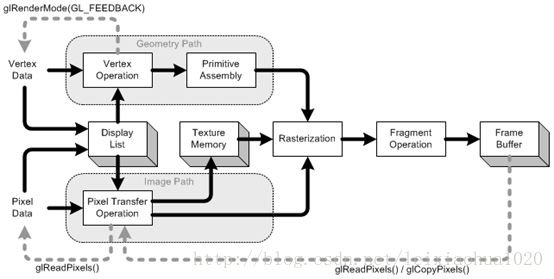
OpenGL渲染管线(OpenGL Pipeline)按照特定的顺序对图形信息进行处理,这些图形信息可以分为两个部分:顶点信息(坐标、法向量等)和像素信息(图像、纹理等)。图形信息最终被写入帧缓存中,存储在帧缓存中的数据(图像),可以被应用程序获得(用于保存结果,或作为应用程序的输入等,见下图中灰色虚线)。
Display List(显示列表)
显示列表是一组OpenGL命令,被存储(编译)起来用于后续的执行。所有数据,几何(顶点)数据和像素数据都可以存入显示列表。数据和命令缓存到显示列表中可以提高性能。
Vertex Operation(顶点处理)
顶点坐标和法线坐标经过模式视图矩阵从物体坐标系(object coordinates)转换为观察坐标系(eye coordinates)。若启用了光照,对转换后的定点和法线坐标执行光照计算。光照计算更新了顶点的颜色值。
Primitive Assembly(图元装配)
顶点处理之后,基本图元(点、线、多边形)经过投影矩阵变换,再被视见体裁剪平面裁剪,从观察坐标系转换为裁剪坐标系。之后,进行透视除法(除以w)和视口变换(viewport transform),将3d场景投影到窗口坐标系。
Pixel Transfer Operation(像素操作)
像素从客户内存中解包出来之后,要经过缩放、偏移、映射、箝拉(clamping)。这些处理即为像素转换操作。转换的数据存在纹理内存或直接经过光栅化转为片段(fragment)。
Texture Memory(纹理内存)
纹理图像载入到纹理内存中,然后应用到几何对象上。
Raterization(光栅化)
光栅化就是把几何(顶点坐标等)和像素数据转换为片段(fragment)的过程,每个片段对应于帧缓冲区中的一个像素,该像素对应屏幕上一点的颜色和不透明度信息。片段是一个矩形数组,包含了颜色、深度、线宽、点的大小等信息(反锯齿计算等)。如果渲染模式被设置为GL_FILL,多边形内部的像素信息在这个阶段会被填充。
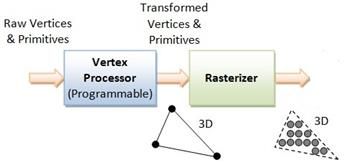
如上图中的三角形,输入三角形的三个顶点坐标以及其颜色,顶点操作会对三角形的顶点坐标以及法向量进行变换,颜色信息不需要经过变换,但光照计算会影响顶点的颜色信息。经过光栅化后,三角形被离散为一个个点,不在是三个坐标表示,而是由一系列的点组成,每个点存储了相应的颜色、深度和不透明度等信息。
Fragment Operation(片段操作)
这是将片段转为帧缓冲区中的像素要进行的最后处理。首先是纹理单元(texel)生成。一个纹理单元由纹理内存中的数据生成,然后应用到每个片段上。之后进行雾计算。 雾计算完成后,还要按序进行若干片段测试,依次为蒙板(scissor)测试,alpha测试,模版(stencil)测试,深度测试。最后,执行混合,抖动,逻辑操作和遮蔽操作,最终的像素存入framebuffer。
OpenGL与Direct3D的对比
有关视频显示的技术在《Direct3D》文章中已经有过叙述,在这里不再重复。在网上看了一下有关于他们不同点的文章,写得简单明了,在这里引用一下:
OpenGL与Direct3D的一点点对比
OGL比D3D好的地方:
OGL是业界标准,许多非Windows操作系统下还找不到D3D
OGL的色彩比D3D的要好,表面更光滑
OGL的函数很有规律,不像D3D的,都是指针method,函数名太长了!!
OGL是右手坐标系,这是数学里用惯了的.D3D虽然也可以改变成右手坐标系,但是需要d3dx9_36.dll的支持
OGL的常用Matrix,如WorldMatrix都封装好了,D3D要自己写。
OGL的绘图方式很灵活,而D3D的则要事先定义好FVF,要等所有信息写进Stream中才绘制。这就使它产生了VertexBuffer和IndexBuffer.好象微软嫌D3D的Buffer不够多?搞的多不好学??看人家OGL,哪里要这个东西?
D3D有好多版本,要是显卡不支持就废柴一垛了。而OGL从几年前就一直没变过,所以大部分显卡都支持。
还有,我发现D3D的半透明功能有很大的问题!!就是两个半透明的物体前后顺序的问题——前面的会被后面的挡住。
但是D3D也有比OGL好的地方:
D3D支持许多格式的图片文件,而OGL载入jpg都得自己写代码。
因为D3D是指针调用模式,所以做D3D的钩子有难度,从而增加了外挂的制作难度。
D3D是DirectX的成员。程序员要实现声音播放可以用DirectMusic,配套用总是好的,而OGL则只能画画
D3D是被微软大力推广的连接库。相反,微软则大力压制OGL(都是Microsoft参与研制出来的产品,待遇怎这么大?)
正因为此,D3D已成为中国大型游戏界的主流(我觉得他们是盲目跟风。其实国外很多游戏都是用OGL)
OpenGL视频显示的流程
使用OpenGL播放视频最简单的情况下需要如下步骤:1. 初始化
1) 初始化2. 循环显示画面
2) 创建窗口
3) 设置绘图函数
4) 设置定时器
5) 进入消息循环
1) 调整显示位置,图像大小在这里有一点需要说明。即OpenGL不需要使用Direct3D那种使用WinMain()作为主函数的程序初始化窗口。在Direct3D中是必须要这样做的,即使用Win32的窗口程序并且调用CreateWindow()创建一个对话框,然后才可以在对话框上绘图。OpenGL只需要使用普通的控制台程序即可(入口函数为main())。当然,OpenGL也可以像Direct3D那样把图像绘制在Win32程序的窗口中。
2) 画图
3) 显示
下面结合OpenGL播放YUV/RGB的示例代码,详细分析一下上文的流程。
在详述播放流程之前,再说一点自己学习OpenGL时候的一个明显的感觉:OpenGL的函数好多啊。OpenGL的函数的特点是数量多,但是每个函数的参数少。而Direct3D的特点和它正好反过来,函数少,但是每个函数的参数多。
1. 初始化
1) 初始化glutInit()用于初始化glut库。它原型如下:
void glutInit(int *argcp, char **argv);它包含两个参数:argcp和argv。一般情况下,直接把main()函数中的argc,argv传递给它即可。
在这里简单介绍OpenGL中的3个库:glu,glut,glew
glu是实用库,包含有43个函数,函数名的前缀为glu。Glu 为了减轻繁重的编程工作,封装了OpenGL函数,Glu函数通过调用核心库的函数,为开发者提供相对简单的用法,实现一些较为复杂的操作。
glut是实用工具库,基本上是用于做窗口界面的,并且是跨平台的。
glew是一个跨平台的扩展库。不是必需的。它能自动识别当前平台所支持的全部OpenGL高级扩展函数。还没有深入研究。
glutInitDisplayMode()用于设置初始显示模式。它的原型如下。
void glutInitDisplayMode(unsigned int mode)其中mode可以选择以下值或组合:
GLUT_RGB: 指定 RGB 颜色模式的窗口需要注意的是,如果使用双缓冲(GLUT_DOUBLE),则需要用glutSwapBuffers ()绘图。如果使用单缓冲(GLUT_SINGLE),则需要用glFlush()绘图。
GLUT_RGBA: 指定 RGBA 颜色模式的窗口
GLUT_INDEX: 指定颜色索引模式的窗口
GLUT_SINGLE: 指定单缓存窗口
GLUT_DOUBLE: 指定双缓存窗口
GLUT_ACCUM: 窗口使用累加缓存
GLUT_ALPHA: 窗口的颜色分量包含 alpha 值
GLUT_DEPTH: 窗口使用深度缓存
GLUT_STENCIL: 窗口使用模板缓存
GLUT_MULTISAMPLE: 指定支持多样本功能的窗口
GLUT_STEREO: 指定立体窗口
GLUT_LUMINANCE: 窗口使用亮度颜色模型
在使用OpenGL播放视频的时候,我们可以使用下述代码:
glutInitDisplayMode(GLUT_DOUBLE | GLUT_RGB );2) 创建窗口
glutInitWindowPosition()用于设置窗口的位置。可以指定x,y坐标。
glutInitWindowSize()用于设置窗口的大小。可以设置窗口的宽,高。
glutCreateWindow()创建一个窗口。可以指定窗口的标题。
上述几个函数十分基础,不再详细叙述。直接贴出一段示例代码:
glutInitWindowPosition(100, 100);
glutInitWindowSize(500, 500);
glutCreateWindow("Simplest Video Play OpenGL");
3) 设置绘图函数
glutDisplayFunc()用于设置绘图函数。操作系统在必要时刻就会调用该函数对窗体进行重新绘制操作。类似于windows程序设计中处理WM_PAINT消息。例如,当把窗口移动到屏幕边上,然后又移动回来的时候,就会调用该函数对窗口进行重绘。它的原型如下。
void glutDisplayFunc(void (*func)(void));其中(*func)用于指定重绘函数。
例如在视频播放的时候,指定display()函数用于重绘:glutDisplayFunc(&display);4) 设置定时器
播放视频的时候,每秒需要播放一定的画面(一般是25帧),因此使用定时器每间隔一段时间调用一下绘图函数绘制图形。定时器函数glutTimerFunc()的原型如下。
void glutTimerFunc(unsigned int millis, void (*func)(int value), int value);millis:定时的时间,单位是毫秒。1秒=1000毫秒。
(*func)(int value):用于指定定时器调用的函数。
value:给回调函数传参。比较高端,没有接触过。
如果只在主函数中写一个glutTimerFunc()函数的话,会发现只会调用该函数一次。因此需要在回调函数中再写一个glutTimerFunc()函数,并调用回调函数自己。只有这样才能实现反反复复循环调用回调函数。
例如在视频播放的时候,指定每40毫秒调用一次timeFunc ()函数:
主函数中:
glutTimerFunc(40, timeFunc, 0);而后在timeFunc()函数中如下设置。
void timeFunc(int value){
    display();
    // Present frame every 40 ms
    glutTimerFunc(40, timeFunc, 0);
}
这样就实现了每40ms调用一次display()。
5) 进入消息循环
glutMainLoop()将会进入GLUT事件处理循环。一旦被调用,这个程序将永远不会返回。视频播放的时候,调用该函数之后即开始播放视频。
2. 循环显示画面
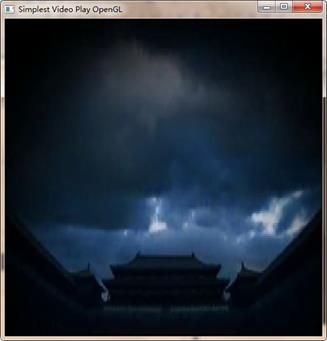
1) 调整显示位置,图像大小这一步主要是调整一下图像的大小和位置。如果不做这一步而直接使用glDrawPixels()进行绘图的话,会发现图像位于窗口的左下角,而且是上下颠倒的(当然,如果窗口和图像一样大的话,就不存在图像位于角落的问题)。效果如下图所示。
为了解决上述问题,需要调用有关的函数对图像进行变换。变换用到了两个函数:glRasterPos3f()和glPixelZoom()。
glRasterPos3f()可以平移图像。它的原型如下。
void glRasterPos3f (GLfloat x, GLfloat y, GLfloat z);其中x用于指定x坐标;y用于指定y坐标。Z这里还没有用到。
在这里介绍一下OpenGL的坐标。原点位于屏幕的中心。屏幕的边上对应的值是1.0。和数学中的坐标系基本上是一样的。屏幕的左下角是(-1,-1),左上角是(-1,1)。
例如我们使用glRasterPos3f(-1.0f,0.0f,0),图像就会移动至(-1,0),如下图所示。
glPixelZoom()可以放大、缩小和翻转图像。它的原型如下。
void glPixelZoom (GLfloat xfactor, GLfloat yfactor);其中xfactor、yfactor用于指定在x轴,y轴上放大的倍数(如果数值小于1则是缩小)。如果指定负值,则可以实现翻转。上文已经说过,使用OpenGL直接显示像素数据的话,会发现图像是倒着的。因此需要在Y轴方向对图像进行翻转。
例如:像素数据的宽高分别为pixel_w ,pixel_h ;窗口大小为screen_w,screen_h的话,使用下述代码可以将图像拉伸至窗口大小,并且翻转:
glPixelZoom((float)screen_w/(float)pixel_w, -(float)screen_h/pixel_h);结合上述两个函数,即“平移+翻转+拉伸之后”,就可以得到全屏的图像了,如下图所示。
PS:这个方法属于比较笨的方法,应该还有更好的方法吧。不过再没有进行深入研究了。
使用glDrawPixels()可以绘制指定内存中的像素数据。该函数的原型如下。
void glDrawPixels (
GLsizei width, GLsizei height,
GLenum format,
GLenum type,
const GLvoid *pixels);
该函数的参数的含义如下所示:
Width:像素数据的宽。
Height:像素数据的高。
Format:像素数据的格式,例如GL_RGB,GL_BGR,GL_BGRA等。
Type:像素数据在内存中的格式。
Pixels:指针,指向存储像素数据的内存。
例如绘制RGB24格式的数据,宽为pixel_w,高为pixel_h,像素数据存储在buffer中。可以使用如下代码。
glDrawPixels(pixel_w, pixel_h,GL_RGB, GL_UNSIGNED_BYTE, buffer);3) 显示
使用双缓冲的时候,调用函数glutSwapBuffers()进行显示。
使用单缓冲的时候,调用函数glFlush()进行显示。
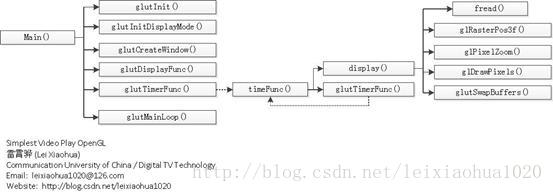
视频显示的流程总结
视频显示的函数调用结构可以总结为下图
代码
贴上源代码。
/**
 * 最简单的OpenGL播放视频的例子(OpenGL播放RGB/YUV)
 * Simplest Video Play OpenGL (OpenGL play RGB/YUV)
 *
 * 雷霄骅 Lei Xiaohua
 * [email protected]
 * 中国传媒大学/数字电视技术
 * Communication University of China / Digital TV Technology
 * http://blog.csdn.net/leixiaohua1020
 *
 * 本程序使用OpenGL播放RGB/YUV视频像素数据。本程序实际上只能
 * 播放RGB(RGB24,BGR24,BGRA)数据。如果输入数据为YUV420P
 * 数据的话,需要先转换为RGB数据之后再进行播放。
 * 本程序是最简单的使用OpenGL播放像素数据的例子,适合OpenGL新手学习。
 *
 * 函数调用步骤如下:
 *
 * [初始化]
 * glutInit(): 初始化glut库。
 * glutInitDisplayMode(): 设置显示模式。
 * glutCreateWindow(): 创建一个窗口。
 * glutDisplayFunc(): 设置绘图函数(重绘的时候调用)。
 * glutTimerFunc(): 设置定时器。
 * glutMainLoop(): 进入消息循环。
 *
 * [循环渲染数据]
 * glRasterPos3f(),glPixelZoom(): 调整显示位置,图像大小。
 * glDrawPixels(): 绘制。
 * glutSwapBuffers(): 显示。
 *
 * This software plays RGB/YUV raw video data using OpenGL. This
 * software support show RGB (RGB24, BGR24, BGRA) data on the screen.
 * If the input data is YUV420P, it need to be convert to RGB first.
 * This program is the simplest example about play raw video data
 * using OpenGL, Suitable for the beginner of OpenGL.
 *
 * The process is shown as follows:
 *
 * [Init]
 * glutInit(): Init glut library.
 * glutInitDisplayMode(): Set display mode.
 * glutCreateWindow(): Create a window.
 * glutDisplayFunc(): Set the display callback.
 * glutTimerFunc(): Set timer.
 * glutMainLoop(): Start message loop.
 *
 * [Loop to Render data]
 * glRasterPos3f(),glPixelZoom(): Change picture's size and position.
 * glDrawPixels(): draw.
 * glutSwapBuffers(): show.
 */

#include

#include "glew.h"
#include "glut.h"

#include
#include
#include

//set '1' to choose a type of file to play
#define LOAD_RGB24   1
#define LOAD_BGR24   0
#define LOAD_BGRA    0
#define LOAD_YUV420P 0

int screen_w=500,screen_h=500;
const int pixel_w = 320, pixel_h = 180;
//Bit per Pixel
#if LOAD_BGRA
const int bpp=32;
#elif LOAD_RGB24|LOAD_BGR24
const int bpp=24;
#elif LOAD_YUV420P
const int bpp=12;
#endif
//YUV file
FILE *fp = NULL;
unsigned char buffer[pixel_w*pixel_h*bpp/8];
unsigned char buffer_convert[pixel_w*pixel_h*3];

inline unsigned char CONVERT_ADJUST(double tmp)
{
	return (unsigned char)((tmp >= 0 && tmp <= 255)?tmp:(tmp < 0 ? 0 : 255));
}
//YUV420P to RGB24
void CONVERT_YUV420PtoRGB24(unsigned char* yuv_src,unsigned char* rgb_dst,int nWidth,int nHeight)
{
	unsigned char *tmpbuf=(unsigned char *)malloc(nWidth*nHeight*3);
	unsigned char Y,U,V,R,G,B;
	unsigned char* y_planar,*u_planar,*v_planar;
	int rgb_width , u_width;
	rgb_width = nWidth * 3;
	u_width = (nWidth >> 1);
	int ypSize = nWidth * nHeight;
	int upSize = (ypSize>>2);
	int offSet = 0;

	y_planar = yuv_src;
	u_planar = yuv_src + ypSize;
	v_planar = u_planar + upSize;

	for(int i = 0; i < nHeight; i++)
	{
		for(int j = 0; j < nWidth; j ++)
		{
			// Get the Y value from the y planar
			Y = *(y_planar + nWidth * i + j);
			// Get the V value from the u planar
			offSet = (i>>1) * (u_width) + (j>>1);
			V = *(u_planar + offSet);
			// Get the U value from the v planar
			U = *(v_planar + offSet);

			// Cacular the R,G,B values
			// Method 1
			R = CONVERT_ADJUST((Y + (1.4075 * (V - 128))));
			G = CONVERT_ADJUST((Y - (0.3455 * (U - 128) - 0.7169 * (V - 128))));
			B = CONVERT_ADJUST((Y + (1.7790 * (U - 128))));
			/*
			// The following formulas are from MicroSoft' MSDN
			int C,D,E;
			// Method 2
			C = Y - 16;
			D = U - 128;
			E = V - 128;
			R = CONVERT_ADJUST(( 298 * C + 409 * E + 128) >> 8);
			G = CONVERT_ADJUST(( 298 * C - 100 * D - 208 * E + 128) >> 8);
			B = CONVERT_ADJUST(( 298 * C + 516 * D + 128) >> 8);
			R = ((R - 128) * .6 + 128 )>255?255:(R - 128) * .6 + 128;
			G = ((G - 128) * .6 + 128 )>255?255:(G - 128) * .6 + 128;
			B = ((B - 128) * .6 + 128 )>255?255:(B - 128) * .6 + 128;
			*/
			offSet = rgb_width * i + j * 3;

			rgb_dst[offSet] = B;
			rgb_dst[offSet + 1] = G;
			rgb_dst[offSet + 2] = R;
		}
	}
	free(tmpbuf);
}

void display(void){
    if (fread(buffer, 1, pixel_w*pixel_h*bpp/8, fp) != pixel_w*pixel_h*bpp/8){
        // Loop
        fseek(fp, 0, SEEK_SET);
        fread(buffer, 1, pixel_w*pixel_h*bpp/8, fp);
    }

	//Make picture full of window
	//Move to(-1.0,1.0)
	glRasterPos3f(-1.0f,1.0f,0);
	//Zoom, Flip
	glPixelZoom((float)screen_w/(float)pixel_w, -(float)screen_h/(float)pixel_h);


#if LOAD_BGRA
	glDrawPixels(pixel_w, pixel_h,GL_BGRA, GL_UNSIGNED_BYTE, buffer);
#elif LOAD_RGB24
	glDrawPixels(pixel_w, pixel_h,GL_RGB, GL_UNSIGNED_BYTE, buffer);
#elif LOAD_BGR24
	glDrawPixels(pixel_w, pixel_h,GL_BGR_EXT, GL_UNSIGNED_BYTE, buffer);
#elif LOAD_YUV420P
	CONVERT_YUV420PtoRGB24(buffer,buffer_convert,pixel_w,pixel_h);
	glDrawPixels(pixel_w, pixel_h,GL_RGB, GL_UNSIGNED_BYTE, buffer_convert);
#endif
	//GLUT_DOUBLE
	glutSwapBuffers();

	//GLUT_SINGLE
	//glFlush();
}

void timeFunc(int value){
    display();
    // Present frame every 40 ms
    glutTimerFunc(40, timeFunc, 0);
}


int main(int argc, char* argv[])
{
#if LOAD_BGRA
	fp=fopen("../test_bgra_320x180.rgb","rb+");
#elif LOAD_RGB24
	fp=fopen("../test_rgb24_320x180.rgb","rb+");
#elif LOAD_BGR24
	fp=fopen("../test_bgr24_320x180.rgb","rb+");
#elif LOAD_YUV420P
	fp=fopen("../test_yuv420p_320x180.yuv","rb+");
#endif
	if(fp==NULL){
		printf("Cannot open this file.\n");
		return -1;
	}

    // GLUT init
    glutInit(&argc, argv);
	//Double, Use glutSwapBuffers() to show
    glutInitDisplayMode(GLUT_DOUBLE | GLUT_RGB );
	//Single, Use glFlush() to show
	//glutInitDisplayMode(GLUT_SINGLE | GLUT_RGB );

    glutInitWindowPosition(100, 100);
    glutInitWindowSize(screen_w, screen_h);
    glutCreateWindow("Simplest Video Play OpenGL");
	printf("Simplest Video Play OpenGL\n");
	printf("Lei Xiaohua\n");
	printf("http://blog.csdn.net/leixiaohua1020\n");
    printf("OpenGL Version: %s\n", glGetString(GL_VERSION));

    glutDisplayFunc(&display);
    glutTimerFunc(40, timeFunc, 0);

    // Start!
    glutMainLoop();

    return 0;
}
代码注意事项
1. 可以通过设置定义在文件开始出的宏,决定读取哪个格式的像素数据(bgra,rgb24,bgr24,yuv420p)。//set '1' to choose a type of file to play
#define LOAD_RGB24 1
#define LOAD_BGR24 0
#define LOAD_BGRA 0
#define LOAD_YUV420P 02. 窗口的宽高为screen_w,screen_h。像素数据的宽高为pixel_w,pixel_h。它们的定义如下。
//Width, Height
const int screen_w=500,screen_h=500;
const int pixel_w=320,pixel_h=180;
3. 注意显示方式的不同
BGRA,BGR24,RGB24这3种格式可以直接在glDrawPixels()中设置像素格式显示出来。而YUV420P是不能直接显示出来的。本文示例采用的方式是先将YUV420P转换成RGB24,然后进行显示。
运行结果
无论选择加载哪个文件,运行结果都是一样的,如下图所示。
下载
代码位于“Simplest Media Play”中SourceForge项目地址:https://sourceforge.net/projects/simplestmediaplay/
CSDN下载地址:http://download.csdn.net/detail/leixiaohua1020/8054395
注:
该项目会不定时的更新并修复一些小问题,最新的版本请参考该系列文章的总述页面:
《最简单的视音频播放示例1:总述》
上述工程包含了使用各种API(Direct3D,OpenGL,GDI,DirectSound,SDL2)播放多媒体例子。其中音频输入为PCM采样数据。输出至系统的声卡播放出来。视频输入为YUV/RGB像素数据。输出至显示器上的一个窗口播放出来。
通过本工程的代码初学者可以快速学习使用这几个API播放视频和音频的技术。
一共包括了如下几个子工程:
simplest_audio_play_directsound: 使用DirectSound播放PCM音频采样数据。simplest_audio_play_sdl2: 使用SDL2播放PCM音频采样数据。
simplest_video_play_direct3d: 使用Direct3D的Surface播放RGB/YUV视频像素数据。
simplest_video_play_direct3d_texture:使用Direct3D的Texture播放RGB视频像素数据。
simplest_video_play_gdi: 使用GDI播放RGB/YUV视频像素数据。
simplest_video_play_opengl: 使用OpenGL播放RGB/YUV视频像素数据。
simplest_video_play_opengl_texture: 使用OpenGL的Texture播放YUV视频像素数据。
simplest_video_play_sdl2: 使用SDL2播放RGB/YUV视频像素数据。


