神经网络学习(Octave转换为Python)
详细代码参考:github
训练3层神经网络实现手写数字识别功能
实例:
训练一个输入层400单元,隐藏层25单元,输出层10单元的简单神经网络,实现手写数字识别。
1.对原代码的更改
原Octave代码中,计算神经网络权重theta的自构函数fmincg太复杂,一时转换过来很麻烦,所以在原有代码的基础上,利用TensorFlow建立了一个3层的简单神经网络,逐步优化损失函数,得到权重和偏置,并将第一层中的损失函数theta1可视化。
对损失函数、梯度的验证还是在原有的代码基础上进行,只有在求Theta1和Theta2时,利用了TensorFlow。
2.载入数据
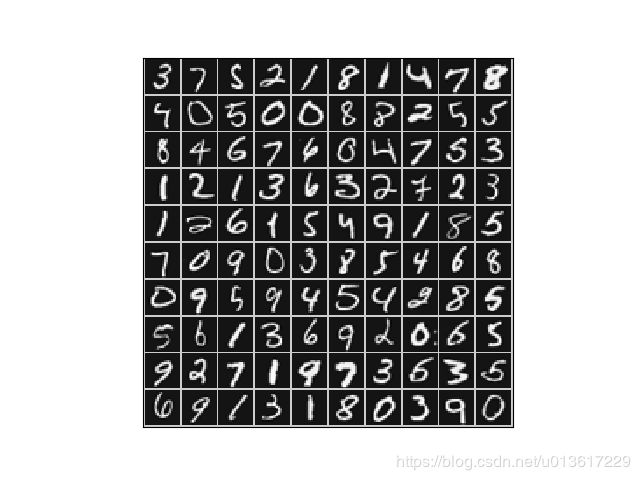
5000张图片中,随机选取100张进行绘制,每张中间设置一条1像素的白色边界,横向10张,纵向10张,如下图所示。由于每次都是随机,显示结果可能不一致。

参考代码:
def loadData(self, path):
	self.data = scio.loadmat(path)
	self.x = self.data["X"]  # (5000, 400)  # 原100训练
	self.y = self.data["y"]  # (5000, 1)
	index = random.sample([i for i in range(5000)], 100)  # 随机100个没有重复的数字
	self.pics = self.x[index, :]  # (100, 400)

# 为了能显示Theta1,对函数做了一点小修改
def display100Data(pics):
	example_width = int(np.sqrt(pics.shape[1]))  # 每张图片的宽
	example_hight = pics.shape[1] // example_width

	display_rows = int(np.sqrt(pics.shape[0]))  # 每行显示几张图片
	display_cols = pics.shape[0] // display_rows
	# print(pics[45, :])
	display_array = np.ones((1+display_rows*(example_hight+1), 1+display_cols*(example_width+1)))*200
	curr_ex = 0  # 当前每行张数
	for i in range(display_rows):
		for j in range(display_cols):
			if curr_ex >= pics.shape[0]:
				break
			max_val = np.max(np.abs(pics[curr_ex, :]))
			display_array[1+j*(example_hight+1):(j+1)*(example_hight+1), 1+i*(example_width+1):(i+1)*(example_width+1)] = \
				pics[curr_ex, :].reshape((20, 20)).transpose()/max_val*255
			curr_ex += 1

		if curr_ex >= pics.shape[0]:
			break
	plt.xticks([])
	plt.yticks([])
	plt.title("What the W1 look like from the NN Learning")
	plt.imshow(display_array, cmap='gray')
	plt.show()
3.神经网络构建
神经网络共3层,输入层,1层隐藏层,输出层:输入层401个输入(第1个为1), 隐藏层26个单元,输出层10个单元(对应着0-9),如下图

参考代码:
def nnCostFunction(self, theta, x, y, lamda):
	m = x.shape[0]
	theta1 = np.reshape(theta[:self.hidden_layer_size*(self.input_layer_size+1)], (self.hidden_layer_size, self.input_layer_size+1))
	theta2 = np.reshape(theta[self.hidden_layer_size*(self.input_layer_size+1)::], (self.num_labels, self.hidden_layer_size+1))
	y = self.handleYtoOne(y)
	a1 = np.hstack([np.ones((m, 1)), x])  # 5000, 401
	z2 = a1.dot(theta1.T)  # 5000*25
	a2 = self.sigmoid(z2)
	n = a2.shape[0]  # 5000
	a2 = np.hstack([np.ones((n, 1)), a2])  # 5000*26
	z3 = a2.dot(theta2.T)
	a3 = self.sigmoid(z3)  # 5000*10
上述代码中有个非常重要的地方,就是y = self.handleYtoOne(y)函数的应用。
因为在Octave中源代码使用了y = eye(num_labels)(y,:);一行代码,大体上是这样的:
如果y = [10,10,1,1,2,2,3,3,4,4,5,5,6,6,7,7,8,8,9,9]
那么上述得到的结果如下。因为Octave中索引一般都是从1开始,为了让索引和数值匹配,用10代表0。
   0   0   0   0   0   0   0   0   0   1
   0   0   0   0   0   0   0   0   0   1
   1   0   0   0   0   0   0   0   0   0
   1   0   0   0   0   0   0   0   0   0
   0   1   0   0   0   0   0   0   0   0
   0   1   0   0   0   0   0   0   0   0
   0   0   1   0   0   0   0   0   0   0
   0   0   1   0   0   0   0   0   0   0
   0   0   0   1   0   0   0   0   0   0
   0   0   0   1   0   0   0   0   0   0
   0   0   0   0   1   0   0   0   0   0
   0   0   0   0   1   0   0   0   0   0
   0   0   0   0   0   1   0   0   0   0
   0   0   0   0   0   1   0   0   0   0
   0   0   0   0   0   0   1   0   0   0
   0   0   0   0   0   0   1   0   0   0
   0   0   0   0   0   0   0   1   0   0
   0   0   0   0   0   0   0   1   0   0
   0   0   0   0   0   0   0   0   1   0
   0   0   0   0   0   0   0   0   1   0
4.计算损失函数和梯度
对损失函数进行了正则化,详细代码如下,为了详细,把每一层都拆分,略显臃肿。
def nnCostFunction(self, theta, x, y, lamda):
	m = x.shape[0]
	theta1 = np.reshape(theta[:self.hidden_layer_size*(self.input_layer_size+1)], (self.hidden_layer_size, self.input_layer_size+1))
	theta2 = np.reshape(theta[self.hidden_layer_size*(self.input_layer_size+1)::], (self.num_labels, self.hidden_layer_size+1))
	y = self.handleYtoOne(y)
	a1 = np.hstack([np.ones((m, 1)), x])  # 5000, 401
	z2 = a1.dot(theta1.T)  # 5000*25
	a2 = self.sigmoid(z2)
	n = a2.shape[0]  # 5000
	a2 = np.hstack([np.ones((n, 1)), a2])  # 5000*26
	z3 = a2.dot(theta2.T)
	a3 = self.sigmoid(z3)  # 5000*10

	J = np.sum(np.sum(-y*np.log(a3)-(1-y)*np.log(1-a3), axis=0))/m

	regularized1 = np.sum(np.sum(theta1[:, 1::]**2, axis=0))
	regularized2 = np.sum(np.sum(theta2[:, 1::]**2, axis=0))
	regularized = lamda/(2*m)*(regularized1 + regularized2)
	return J + regularized
利用反向传播计算梯度,该梯度值有两部分组成,Theta1部分和Theta2部分。
详细代码如下:
	def nnGradient(self, theta, x, y, lamda):
		m = x.shape[0]
		theta1 = np.reshape(theta[:self.hidden_layer_size*(self.input_layer_size+1)], (self.hidden_layer_size, self.input_layer_size+1))
		theta2 = np.reshape(theta[self.hidden_layer_size*(self.input_layer_size+1)::], (self.num_labels, self.hidden_layer_size+1))
		y = self.handleYtoOne(y)
		a1 = np.hstack([np.ones((m, 1)), x])  # 5000, 401
		z2 = a1.dot(theta1.T)  # 5000*25
		a2 = self.sigmoid(z2)
		n = a2.shape[0]  # 5000
		a2 = np.hstack([np.ones((n, 1)), a2])  # 5000*26
		z3 = a2.dot(theta2.T)
		a3 = self.sigmoid(z3)  # 5000*10

		delta3 = a3 - y
		delta2 = delta3.dot(theta2)
		delta2 = delta2[:, 1::]
		delta2 = delta2*self.sigmoidGradient(z2)  # 5000*25
		Delta1 = np.zeros(theta1.shape)
		Delta2 = np.zeros(theta2.shape)

		Delta1 = Delta1 + delta2.T.dot(a1)
		Delta2 = Delta2 + delta3.T.dot(a2)

		Theta1_grad = 1/m*Delta1
		Theta2_grad = 1/m*Delta2

		Regularized_T1 = lamda/m*theta1
		Regularized_T2 = lamda/m*theta2
		Regularized_T1[:, 0] = np.zeros((Regularized_T1.shape[0], ))
		Regularized_T2[:, 0] = np.zeros((Regularized_T2.shape[0], ))

		Theta1_grad += Regularized_T1
		Theta2_grad += Regularized_T2
		grade = np.hstack([Theta1_grad.flatten(), Theta2_grad.flatten()])
		return grade
5.梯度检查
在神经网络中,我们要最小化损失函数J, 而J是Theta的函数,我们在Theta周围找个很小的值e=0.0001,近似的计算下梯度,和步骤4中计算出的梯度进行简单的比较,如果差别不大,证明梯度求解没问题。原理公式如下:

参考代码:
def computeNumericalGradient(self, theta, x, y, lamda):  # (f(x+delta)-f(x-delta))/(2*delta)
	e = 0.0001
	numgrad = np.zeros(theta.shape)
	perturb = np.zeros(theta.shape)
	for i in range(theta.size):
		perturb[i] = e
		loss1 = self.nnCostFunction(theta - perturb, x, y, lamda)
		loss2 = self.nnCostFunction(theta + perturb, x, y, lamda)
		numgrad[i] = ((np.array(loss2) - np.array(loss1))/(2*e))
		perturb[i] = 0
	return numgrad

def checkNNGradients(self, lamda):
	self.input_layer_size = 3
	self.hidden_layer_size = 5
	self.num_labels = 3
	m = 5
	theta1 = self.debugInitializeWeights(self.hidden_layer_size, self.input_layer_size)
	theta2 = self.debugInitializeWeights(self.num_labels, self.hidden_layer_size)
	x = self.debugInitializeWeights(m, self.input_layer_size-1)
	y = 1 + np.mod([i+1 for i in range(m)], self.num_labels).T
	theta = np.hstack([theta1.flatten(), theta2.flatten()])
	cost = self.nnCostFunction(theta, x, y, lamda)
	grad = self.nnGradient(theta, x, y, lamda)
	numgrad = self.computeNumericalGradient(theta, x, y, lamda)
	# 求解最大奇异值
	diff = max((numgrad-grad)/(numgrad+grad))
	print(np.hstack([grad.reshape(-1, 1), numgrad.reshape(-1, 1)]))
	print("Relative Difference:", diff)
代码中求解到了最大奇异值,同时计算了相对差异,两个值的差异数量级小于1e-9,说明了两个值很接近,也证明了计算得到的梯度值是正确的。
6.利用TensorFlow建立神经网络
由于原代码中fmincg函数不好实现,所以利用TensorFlow来计算,同原码略有不同:
(1).原代码输入(5000, 401),tf中(5000, 400);
(2).权重的维度也简单的做了改变,Theta1:(26, 400)=>(25,400),Theta2(10, 26)=>(10, 25);
(3).损失函数更改为交叉熵;
(4).80%训练集,20%测试集。
网络结构:
X = tf.placeholder(tf.float32, [None, 400])
Y = tf.placeholder(tf.float32, [None, 10])

h1 = tf.Variable(tf.random_normal([400, 25]))
h2 = tf.Variable(tf.random_normal([25, 10]))

b1 = tf.Variable(tf.random_normal([25]))
b2 = tf.Variable(tf.random_normal([10]))


def neural_net(x):
	layer_1 = tf.add(tf.matmul(x, h1), b1)
	output_layer = tf.add(tf.matmul(layer_1, h2), b2)
	return output_layer
7.迭代训练
迭代训练100次,然后利用测试集对训练得到的模型进行验证。对于训练集,模型精度可以达到95%,使用测试集,模型精度达到89.5%,整体来说,还可以。吴老师给的参数,精度在96%,确实厉害。自己在调参的路上还需要继续努力和总结经验。
参考代码:
with tf.Session() as sess:
	sess.run(init)
	x1, y0 = loadData('ex4data1.mat')
	y1 = handleYtoOne(y0)
	index = random.sample([i for i in range(5000)], 4000)  # 80%training 20%testing
	train_x = x1[index, :]
	train_y = y1[index, :]
	test_x = np.delete(x1, index, 0)
	test_y = np.delete(y1, index, 0)

	for i in range(100):
		sess.run(train_op, feed_dict={X: train_x, Y: train_y})
		loss, acc = sess.run([loss_op, accuracy], feed_dict={X: train_x, Y: train_y})
		print("\r训练{}次: 损失函数{:.4f} | 精度{:.4f}".format(i, loss, acc), end="")  # 精度可达94%
	print("\nTest Accuracy:%.4f%%" % (sess.run(accuracy, feed_dict={X: test_x, Y: test_y})))  # 精度89.5%
	pics = sess.run(h1)
	display100Data(pics.T)
8.权重Theta1的可视化
Theta1的维度(400, 25),将它的400维reshape到20*20像素的图片,每行每列均5幅图。
如下图:

和吴老师的对比一下,相比而言,下图Theta1更好。根据下图,大体上应该知道隐藏层是粗略的去查找图像的一些笔画或者其他特征。
