之前总结了PNN,NFM,AFM这类两两向量乘积的方式,这一节我们换新的思路来看特征交互。DeepCrossing是最早在CTR模型中使用ResNet的前辈,DCN在ResNet上进一步创新,为高阶特征交互提供了新的方法并支持任意阶数的特征交叉。
以下代码针对Dense输入更容易理解模型结构,针对spare输入的代码和完整代码
https://github.com/DSXiangLi/CTR
Deep Crossing
Deep Crossing结构比较简单,和最原始的Embedding+MLP的模型结果相比,差异在于之后跟的不是全连接层而是残差层。模型结构如下
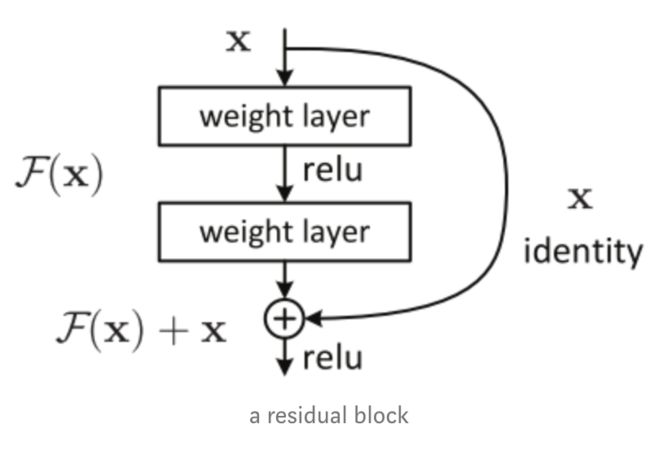
简单说说残差网络,基本的网络结构如下
残差网络解决了什么,为什么有效?这篇博客讲得很清楚,核心是解决网络退化的问题,既随着网络深度增加,网络的表现先是逐渐增加至饱和,然后迅速下降。这里的下降并非指过拟合。理论上如果20层的网络是最优解,那30层的网络会包含20层的网络,后面10层只需做恒等映射\(a^{l} = a^{l-1}\)即可,因此更多怀疑是MLP不易拟合恒等映射。而上述残差网络因为做了identity mapping,当\(F(a^{l-1}, w^l)=0\)时,就直接沿用上一层数据也就是进行了恒等变换。
那把ResNet放到CTR模型里又有什么特殊的优势呢?老实说感觉像是把那个时期比较牛的框架直接拿来用。。。不过能想到的一种是MLP学习的是高阶泛化特征,而ResNet做的identity mapping会保留更多的原始低阶特征信息,有点类似Wide&Deep又不完全是,因为输入已经是Embedding而不是原始的离散特征了。真棒又强行解释了一波。。。
代码实现
def residual_layer(x0, unit, dropout_rate, batch_norm, mode):
    # f(x): input_size -> unit -> input_size
    # output = relu(f(x) + x)
    input_size = x0.get_shape().as_list()[-1]

    # input_size -> unit
    x1 = tf.layers.dense(x0, units = unit, activation = 'relu')
    if batch_norm:
        x1 = tf.layers.batch_normalization( x1, center=True, scale=True,
                                               trainable=True,
                                               training=(mode == tf.estimator.ModeKeys.TRAIN) )
    if dropout_rate > 0:
        x1 = tf.layers.dropout( x1, rate=dropout_rate,
                               training=(mode == tf.estimator.ModeKeys.TRAIN) )
    # unit -> input_size
    x2 = tf.layers.dense(x1, units = input_size )
    # stack with original input and apply relu
    output = tf.nn.relu(tf.add(x2, x0))

    return output


@tf_estimator_model
def model_fn(features, labels, mode, params):
    dense_feature = build_features()
    dense = tf.feature_column.input_layer(features, dense_feature)

    # stacked residual layer
    with tf.variable_scope('Residual_layers'):
        for i, unit in enumerate(params['hidden_units']):
            dense = residual_layer( dense, unit,
                                    dropout_rate = params['dropout_rate'],
                                    batch_norm = params['batch_norm'], mode = mode)
            add_layer_summary('residual_layer{}'.format(i), dense)

    with tf.variable_scope('output'):
        y = tf.layers.dense(dense, units=1)
        add_layer_summary( 'output', y )

    return y
Deep&Cross
Deep&Cross带着Wide&Deep的风格,在保留全联接的Deep部分的同时,Deep&Cross借鉴了上述ResNet的思路,创新了显式的高阶特征交互方式。之前的模型要么像DeepFM直接依赖全连接层来捕捉高阶特征交互,要么像PNN,NFM,AFM先基于向量两两做内/外/element-wise乘积学习二阶交互特征,再依赖全联接层来学习更高阶的交互信息。两两交互式的方法很难扩展到更高阶,因为会存在维度爆炸的问题。
模型细节
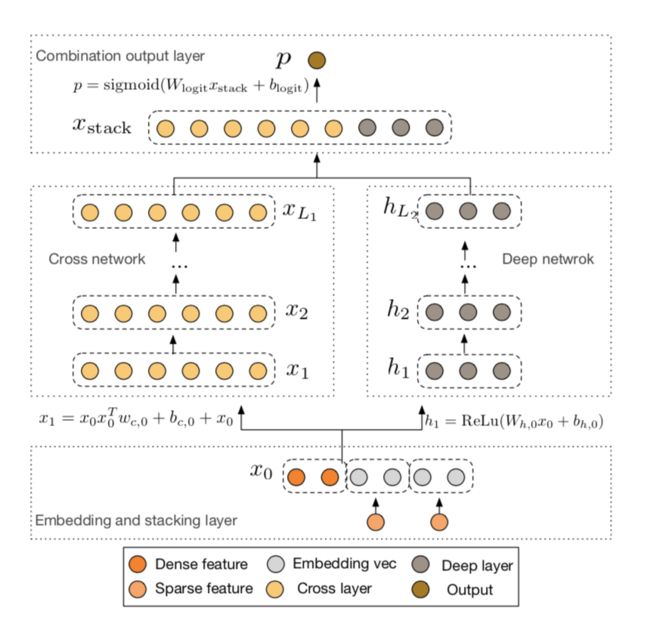
DCN的输入是Embedding和连续特征拼接而成的Dense输入,因为不像PNN,AFM等需要两两向量内积,因此对每个特征Embedding的维度是否一致没有要求,然后Cross部分和Deep部分共享输入,进行联合训练,最终把两个part进行拼接后预测ctr。模型结构如下
Deep部分没啥好说的和DeepFM,Wide&Deep一样就是多个全联接层用来学习泛化特征。Cross部分由多层的cross_layer组成,输入有N个特征,为简化Embedding维度统一是为K,每层cross_layer的计算如下
1. 特征共享:控制复杂度
特征共享的存在,保证了Cross每增加一层,新增的参数都是\(O(NK)\)
-
FM视角(式4): FM是每个离散特征共享一个隐向量v,向量交互的权重为隐向量内积,但这种操作只局限于两两交互。而Cross是Embedding的每一个元素和其余所有元素交互时共享一个权重w。(这里感觉cross直接用原始的one-hot也是可以的,只不过用Embedding可以进一步降低复杂度)
-
OPNN视角(式5): OPNN两两向量做外积得到\(N^2\)个\(K^2\)外积矩阵,拼在一起其实就是Cross不区分Field直接做外积得到的大外积矩阵。不过不像OPNN采用简单粗暴的sum_pooling来解决维度爆炸的问题,Cross采用每行共享一个权重的方式来降维。保留更多信息的同时保证了Cross-layer的复杂度不会随层数上升而上升, 每层的维度都是最初的\(NK\), 复杂度也是\(O(NK)\)
2. 多项式内核:任意阶数特征交互
为简化我们先忽略截距项,看下两层的cross-layer
会发现ResNet加上cross,类似于对输入向量进行了多项式计算,Cross的部分每深一层,就可以捕捉更高一阶的特征交互信息。因此高级特征交互信息的捕捉不再简单依赖MLP而是人为可控。同时ResNet的存在也保证了不会随着Cross的加深而导致模型过于泛化,因为最初的输入特征始终保留。
DCN已经很优秀,只能想到可以吐槽的点
- 对记忆信息的学习可能会有不足,虽然有ResNet但输入已经是Embedding特征,多少已经是泛化后的特征表达,不知道再加入Wide部分是不是会有提升。
代码实现
在上面参数共享讨论的两种视角,刚好对应到cross layer的两种计算方式。按照原始顺序Embedding先做外积再加权求和(特征共享中的OPNN视角),会需要存储巨大的临时矩阵,代码如下
def cross_op_raw(xl, x0, weight, feature_size):
    # (x0 * xl) * w
    # (batch,feature_size) - > (batch, feature_size * feature_size)
    outer_product = tf.matmul(tf.reshape(x0, [-1, feature_size,1]),
                              tf.reshape(xl, [-1, 1, feature_size])
                              )
    # (batch,feature_size*feature_size) ->(batch, feature_size)
    interaction = tf.tensordot(outer_product, weight, axes=1)
    return interaction
而通过调整向量乘积的顺序\((x_0 * x_l) *w \to x_0 * (x_l * w)\)我们可以避免外积矩阵的运算(特征共享中的FM视角),也就是paper中提到的利用\(x_0x_l^T\)是秩为1的矩阵特性。
def cross_op_better(xl, x0, weight, feature_size):
    # x0 * (xl * w)
    # (batch, 1, feature_size) * (feature_size) -> (batch,1)
    transform = tf.tensordot( tf.reshape( xl, [-1, 1, feature_size] ), weight, axes=1 )
    # (batch, feature_size) * (batch, 1) -> (batch, feature_size)
    interaction = tf.multiply( x0, transform )
    return interaction
完整代码如下
def cross_layer(x0, cross_layers, cross_op = 'better'):
    xl = x0
    if cross_op == 'better':
        cross_func = cross_op_better
    else:
        cross_func = cross_op_raw

    with tf.variable_scope( 'cross_layer' ):
        feature_size = x0.get_shape().as_list()[-1]  # feature_size = n_feature * embedding_size
        for i in range( cross_layers):
            weight = tf.get_variable( shape=[feature_size],
                                      initializer=tf.truncated_normal_initializer(), name='cross_weight{}'.format( i ) )
            bias = tf.get_variable( shape=[feature_size],
                                    initializer=tf.truncated_normal_initializer(), name='cross_bias{}'.format( i ) )

            interaction = cross_func(xl, x0, weight, feature_size)

            xl = interaction + bias + xl  # add back original input -> (batch, feature_size)
            add_layer_summary( 'cross_{}'.format( i ), xl )
    return xl
@tf_estimator_model
def model_fn_dense(features, labels, mode, params):
    dense_feature = build_features()
    dense_input = tf.feature_column.input_layer(features, dense_feature)

    # deep part
    dense = stack_dense_layer(dense_input, params['hidden_units'],
                              params['dropout_rate'], params['batch_norm'],
                              mode, add_summary = True)

    # cross part
    xl = cross_layer(dense_input, params['cross_layers'], params['cross_op'])

    with tf.variable_scope('stack'):
        x_stack = tf.concat( [dense, xl], axis=1 )

    with tf.variable_scope('output'):
        y = tf.layers.dense(x_stack, units =1)
        add_layer_summary( 'output', y )

    return y
CTR学习笔记&代码实现系列
https://github.com/DSXiangLi/CTR
CTR学习笔记&代码实现1-深度学习的前奏LR->FFM
CTR学习笔记&代码实现2-深度ctr模型 MLP->Wide&Deep
CTR学习笔记&代码实现3-深度ctr模型 FNN->PNN->DeepFM
CTR学习笔记&代码实现4-深度ctr模型 NFM/AFM
资料
- Gang Fu,Mingliang Wang, 2017, Deep & Cross Network for Ad Click Predictions
- Ying Shan, T. Ryan Hoens, 2016, Deep Crossing: Web-Scale Modeling without Manually Crafted Combinatorial Features
- https://blog.csdn.net/Dby_freedom/article/details/86502623
- https://zhuanlan.zhihu.com/p/80226180


