【Android】底部弹出的DialogFragment,支持从右向左push二级页面,自带弹出时折叠动画
前言
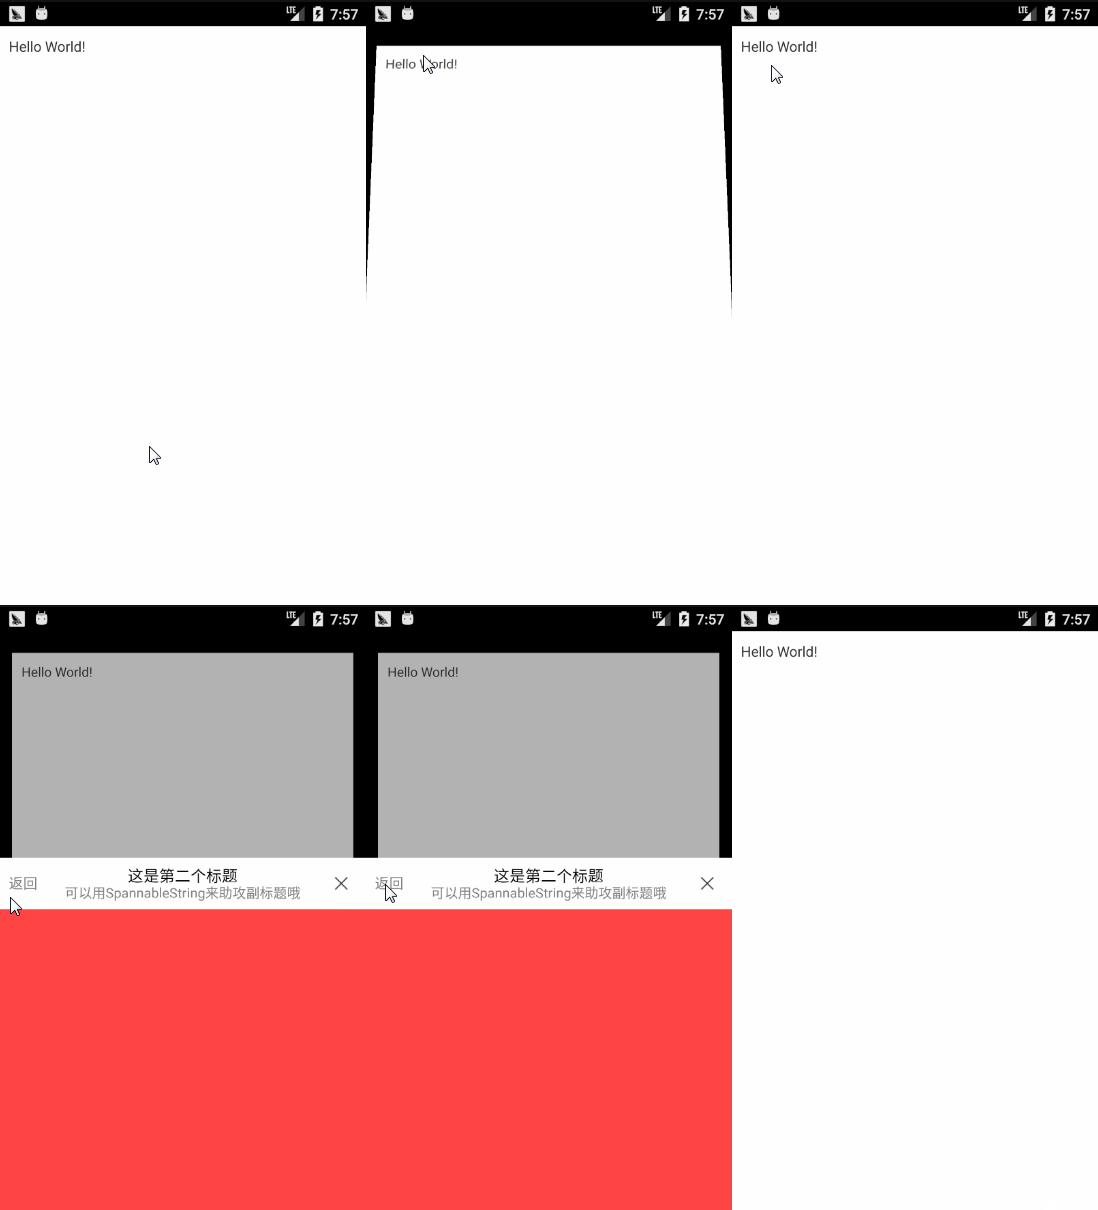
好久不见,今天来分享一个可能大家会用到的工具,然后打算持续集成开发优化,为大家做一个有人管理的第三方库,做到好用实用等等等等~哈哈哈,先看看效果图~

简介
嗯~没错的,就是这个从底部弹出的DialogFragment,然后我叫它是BottomSheet,当然通过效果图也看出来了,不仅仅是能从底部向上弹出,还能将Activity整体缩放,实现一个凹下去的效果,当然动画效果后期可以修改优化,到时候也可以大家自己去实现。
BottomSheet 其本质是DialogFragment,实现了从底部弹出的效果,并且自带将Activity缩放的一个动画效果(后期会更加丰富),可以实现在BottomSheet 中push(Fragment)的形式从右向做添加新的Fragment
主要功能
1.builder模式的超简单使用方式
2.自带标题,所有事件可控,所有标题内容可定制
3.通过push的方式添加Fragment,并且自带从右到左的push效果和从左到右的popUp效果。
4.BottomSheet 弹出时,自带外层Activity动画,可以定制。
5.目前更多功能还在测试开发阶段
项目地址:https://github.com/Blincheng/BottomSheet
集成导入(gradle)
1.Add the JitPack repository to your build file .Add it in your root build.gradle at the end of repositories:
allprojects {
        repositories {
            ...
            maven { url 'https://jitpack.io' }
        }
    }
2.Add the dependency
dependencies {
            compile 'com.github.Blincheng:BottomSheet:v0.3.2'
    }
其余集成方式请看:https://jitpack.io/#Blincheng/BottomSheet/v0.3.2
使用
基本使用
BottomSheetDialogInterface builder = new BottomSheetSettingsBuilder(MainActivity.this).build();
        builder.show();
注意:基本原则就是设置好所有的参数后build,最后再show();
push一个页面
builder.push(new FirstFragment(),new BottomSheetTitleSetting().setTitle("第一个标题"));注意:push(*)原则上应该在show之后调用,当然先push第一个页面,再show()在使用上也没什么问题。建议在show()之后push。我们来看看参数,void push(Fragment fragment, BottomSheetTitleSetting setting);第一个是页面的Fragment没疑问,然后第二个是一个BottomSheetTitleSetting,也就是说每个Fragment对应都有一个BottomSheetTitleSetting 来设置标题的内容,具体看下面的标题内容设置
返回一个页面
builder.popUp();说明:注意当一个页面都没push过的话调用是无效的,如果只有一个页面,直接调用会关闭BottomSheet,如果有2个以上,则会正常从左向右popUp页面。
设置外层Activity动画的开关
builder.setOpenWindowShrinkAnim(true)//设置最外层动画是否打开,默认开设置BottomSheet的高度(参数意义是占屏幕总高度的百分比,默认0.5)
builder.setContainerHeight(0.5f)设置BottomSheet显示后的回调
builder.addOnShowListeners(new DialogInterface.OnShowListener() {
                            @Override
                            public void onShow(DialogInterface dialog) {
                                //当打开Dialog后回调
                            }
                        })
注意:建议push第一个页面的push在这个
设置BottomSheet关闭后的回调
builder.setOnDismissListener(new BottomSheetDismissInterface() {
                        @Override
                        public void dismiss(DialogInterface dialog) {
                            //当关闭Dialog后回调
                        }
                    })
设置标题栏等事件的基本回调
builder.setBottomSheetEventCallBack(new BottomSheetEventCallBack() {
                        @Override
                        public void onLeftClicked(BottomSheetDialogInterface dialogInterface, int pageIndex) {
                            //标题栏左边按钮点击回调
                        }

                        @Override
                        public void onRightClicked(BottomSheetDialogInterface dialogInterface, int pageIndex) {
                            //标题栏右边按钮点击回调
                        }
                        @Override
                        public void onSupernatantClick(BottomSheetDialogInterface dialogInterface, int pageIndex) {
                            //点击空白部分回调
                        }
                    })
标题内容设置
首先要做的就是拿到这个BottomSheetTitleSetting setting = new BottomSheetTitleSetting();
设置标题内容
setting.setTitle("标题内容");注意是参数类型是CharSequence,也就是说TextView支持的,这边都支持。比如可以这样
setting.setTitle(BottomSheetTitleSetting.getSpannableString("这是一个两行的标题",
"可以用SpannableString来助攻副标题哦","#000000","#808080",46,40))设置是否隐藏标题
setting.setTitleVisible(true);设置标题的左右按钮的显示和隐藏
setting.setTitleButtonVisible(true,true);设置标题左右文本按钮的显示和隐藏
setting.setLeftTextVisible(false);
setting.setRightTextVisible(false);
说明:默认文本按钮都是隐藏的
其余的接口要的也有加了 ,如果真有其他特殊需求建议clone,然后我也会慢慢完善的,有任何问题欢迎大家及时提出来,现在正在测试阶段,希望大家一起来把这个事情做好。
实现过程
首先还是先感谢一下我们的雪晨帅哥(其实是我现在的老大,哈哈哈),他先是写了一个类似的控件在我们的官方项目中,然后经过很多波折,被N个开发同学改来改去。然后我就把自己的使用感觉结合自己的想法,重新开发了一个开源框架分享给大家。
废话不多说,我们继续。既然现在很多项目中都用到类似的效果,那我们为何不封装一下,让大家用的更加开心呢?实现思路:
1.用Dialog还是DialogFragment?
2.标题栏要封装吗?
3.push的动画是怎么实现好呢?
4.弹出时的折叠动画怎么实现(实现代码真的很少,但是路程很艰辛)
5.封装后怎么使用才方便?
好,接下来我们就根据我上面的几个问题来一一解答吧。
用Dialog还是DialogFragment?
其实很早很早Google就推荐大家用DialogFragment了,的确使用上很方便,android 3.0时被引入,是一种特殊的Fragment,用于在Activity的内容之上展示一个模态的对话框。如果对于DialogFragment使用不熟悉的小伙伴可以看看鸿洋的Android 官方推荐 : DialogFragment 创建对话框 相信大家都很喜欢他,哈哈哈~
这边有点特别的是我们不在DialogFragment中去创建对应的布局,而是通过Builder的形式来创建,所以,我们直接创建一个方法来设置布局:
public void setContentView(View contentView) {
        this.contentView = contentView;
        containerHeight = contentView.findViewById(R.id.sheet_viewpager_container).getLayoutParams().height;
        contentView.findViewById(R.id.sheet_background).setOnClickListener(this);
        contentView.findViewById(R.id.sheet_left_btn).setOnClickListener(this);
        contentView.findViewById(R.id.sheet_right_btn).setOnClickListener(this);
        contentView.findViewById(R.id.sheet_left_text).setOnClickListener(this);
        contentView.findViewById(R.id.sheet_right_text).setOnClickListener(this);
        mViewPager = (ViewPager) contentView.findViewById(R.id.sheet_viewpager_container);
        mViewPager.setOnTouchListener(new View.OnTouchListener() {
            @Override
            public boolean onTouch(View v, MotionEvent event) {
                return true;
            }
        });
        mViewPager.addOnPageChangeListener(new ViewPager.OnPageChangeListener() {
            @Override
            public void onPageScrolled(int position, float positionOffset, int positionOffsetPixels) {

            }

            @Override
            public void onPageSelected(int position) {
                currentIndex = position;
                initTitle(position);
            }

            @Override
            public void onPageScrollStateChanged(int state) {

            }
        });
        setViewPagerScroller(mViewPager);
        title_layout = contentView.findViewById(R.id.sheet_title);
        title_tv = (TextView) contentView.findViewById(R.id.sheet_title_text);
        title_left_tv = (TextView) contentView.findViewById(R.id.sheet_left_text);
        title_right_tv = (TextView) contentView.findViewById(R.id.sheet_right_text);
        title_left_btn = (ImageView) contentView.findViewById(R.id.sheet_left_btn);
        title_right_btn = (ImageView) contentView.findViewById(R.id.sheet_right_btn);
        title_line = contentView.findViewById(R.id.sheet_title_line);
    }
我们在这里才把所有要的东西找到,并且初始化,因为我们的Builder设计模式会有很多的参数可能需要变化,如果直接在DialogFragment中创建的话,很多因为可能还不确定。
标题栏要封装吗?
最后我想了想,大多数还是需要标题的,所以还是一起封装了,支持左边右边文本,ICON等,都有接口可以设置。直接看布局文件吧:
<RelativeLayout xmlns:android="http://schemas.android.com/apk/res/android"
    android:layout_width="match_parent"
    android:layout_height="match_parent">
    <View
        android:id="@+id/sheet_background"
        android:layout_width="match_parent"
        android:layout_height="match_parent"
        android:alpha="0.3"
        android:background="#000000"/>
    <android.support.v4.view.ViewPager
        android:id="@+id/sheet_viewpager_container"
        android:background="@android:color/white"
        android:layout_width="match_parent"
        android:layout_alignParentBottom="true"
        android:layout_height="240dp"/>
    <View
        android:id="@+id/sheet_title_line"
        android:layout_above="@id/sheet_viewpager_container"
        android:layout_width="match_parent"
        android:layout_height="0.2dp"
        android:background="@color/bottom_sheet_DDDDDD"/>
    <RelativeLayout
        android:id="@+id/sheet_title"
        android:layout_width="match_parent"
        android:layout_height="50dp"
        android:background="@android:color/white"
        android:layout_above="@id/sheet_title_line"
        android:gravity="center_vertical">

        <ImageView
            android:id="@+id/sheet_left_btn"
            android:layout_width="50dp"
            android:layout_height="match_parent"
            android:layout_alignParentLeft="true"
            android:scaleType="centerInside"
            android:src="@mipmap/icon_back" />

        <ImageView
            android:id="@+id/sheet_right_btn"
            android:layout_width="50dp"
            android:layout_height="match_parent"
            android:scaleType="centerInside"
            android:src="@drawable/bottom_sheet_right_back"
            android:layout_alignParentRight="true" />
        <TextView
            android:id="@+id/sheet_right_text"
            android:layout_width="wrap_content"
            android:layout_height="match_parent"
            android:paddingRight="10dp"
            android:paddingLeft="10dp"
            android:layout_centerVertical="true"
            android:visibility="gone"
            android:text="@string/bottom_sheet_right_close_text"
            android:gravity="center"
            android:textColor="@color/bottom_sheet_808080"
            android:layout_alignParentRight="true"/>
        <TextView
            android:id="@+id/sheet_left_text"
            android:layout_width="wrap_content"
            android:layout_height="match_parent"
            android:paddingRight="10dp"
            android:paddingLeft="10dp"
            android:visibility="gone"
            android:layout_centerVertical="true"
            android:text="@string/bottom_sheet_left_close_text"
            android:gravity="center"
            android:textColor="@color/bottom_sheet_808080"
            android:layout_alignParentLeft="true"/>
        <TextView
            android:id="@+id/sheet_title_text"
            android:layout_width="wrap_content"
            android:layout_height="wrap_content"
            android:layout_centerInParent="true"
            android:textSize="@dimen/text_size_46px"
            android:textColor="#000000"
            android:gravity="center"
            android:text="@string/app_name"/>
    RelativeLayout>
RelativeLayout>
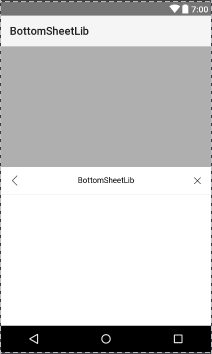
浏览一下缩略图哈

就是一个标题,一个ViewPager,所以说,下面一个问题顺便也解答了,肯定还是用ViewPager来实现push 的动效了。
封装后怎么使用才方便?
其实这个才是我要讨论的问题,也要深入研究,因为一个好的调用方式会非常巧妙的实现某种功能或者某个效果。然后BottomSheetSettingsBuilder闪亮登场,这是一个builder,请原谅我new的这种方式创建(尴尬脸),这边既然是buidler,那么说明要设置的所有东西都可以在这边设置。然后问题来了,那我们的标题的事件怎么设置呢?标题样式呢?如果我push第二个页面进来,那么标题是不是也要跟着变化,所以最后我将标题的控制放在了push接口里面public void push(Fragment fragment, BottomSheetTitleSetting setting)
也就是说,builder管理了所有的事情,包括标题的点击事件,空白部分的点击事件,唯一不在乎的事情就是标题的样式是在BottomSheetDialogInterface中完成的。
那么怎么开始写呢?一般来说我们应该是先写一个接口:
public interface BottomSheetDialogInterface {
    public void cancel();
    public void push(Fragment fragment, BottomSheetTitleSetting setting);
    public void popUp();
    public void show();
}
这个接口呢应该包含所有那些重要的事情,必须要去实现的,并且围绕着几个方法去管理整个过程。那当然,自然而然的是BottomSheetDialogFragment去实现它。我们分别来看看这4个接口方法中都做了什么。
1.最简单的cancel(),当然就是一个取消动画,然后把要做的其他比如说状态啊什么的都重置。
@Override
    public void cancel() {
        if(!isHidden()&&isShow) {
            isShow = false;
            contentView.findViewById(R.id.sheet_background).setAlpha(0.0f);
            contentView.findViewById(R.id.sheet_title).startAnimation(getSlideDownAnimation());
            contentView.findViewById(R.id.sheet_title_line).startAnimation(getSlideDownAnimation());
            TranslateAnimation s = getSlideDownAnimation();
            s.setAnimationListener(new Animation.AnimationListener() {
                @Override
                public void onAnimationStart(Animation animation) {}
                @Override
                public void onAnimationEnd(Animation animation) {dismiss();}
                @Override
                public void onAnimationRepeat(Animation animation) {}
            });
            contentView.findViewById(R.id.sheet_viewpager_container).startAnimation(s);
        }
    }
2.popUp()这个接口方法其实是用在有多个页面的时候,看内容也很简单,当fragments只有1个的时候直接调用cancel方法,如果2个时候就remove一个最后的fragment。然后刷新viewPager,并且移动到前一个fragment。
@Override
    public void popUp() {
        if(fragments.size() == 0)
            return;
        if(fragments.size() == 1){
            cancel();
            return;
        }
        if(fragments.size() > 1){
            bottomSheetTitleSettings.remove(bottomSheetTitleSettings.size()-1);
            fragments.remove(fragments.size()-1);
        }
        adapter.notifyDataSetChanged();
        mViewPager.setCurrentItem(fragments.size()-1);
    }
3.show()方法当然就是展示我们的BottomSheet啦~
@Override
    public void show() {
        if(mActivity != null&& mActivity instanceof FragmentActivity){
            if(isOpenWindowShrinkAnim){
                AnimationUtils.startZoomAnimation(mActivity,true);
            }
            new Handler().postDelayed(new Runnable() {
                @Override
                public void run() {
                    BottomSheetDialogFragment.super.show(mActivity.getSupportFragmentManager(), Config.BOTTOM_SHEET_DIALOG_FRAGMENT);
                    AlphaAnimation animation = new AlphaAnimation(0.0f, 1.0f);
                    animation.setDuration(500);//设置动画持续时间
                    animation.setInterpolator(new LinearInterpolator());
                    contentView.findViewById(R.id.sheet_background).startAnimation(animation);
                    contentView.findViewById(R.id.sheet_title).startAnimation(getSlideUpAnimation());
                    contentView.findViewById(R.id.sheet_title_line).startAnimation(getSlideUpAnimation());
                    contentView.findViewById(R.id.sheet_viewpager_container).startAnimation(getSlideUpAnimation());
                }
            },200);
        }else{
            throw new RuntimeException("Activity must be instanceof support.v4.app.FragmentActivity");
        }
    }
其实可以看到show()和cancel()中调用了一个外层动画是吧~咱们后面再好好讲讲这个3D动画的实现过程。
4.push()接口方法
@Override
    public void push(Fragment fragment, BottomSheetTitleSetting setting) {
        if(isShow){
            if(fragments.size() == 0){
                mViewPager.setAdapter(adapter = new BottomViewPagerAdapter(getChildFragmentManager(),fragments));
            }
            fragments.add(fragment);
            bottomSheetTitleSettings.add(setting);
            adapter.notifyDataSetChanged();
            mViewPager.setCurrentItem(fragments.size()-1);
            initTitle(fragments.size()-1);
        }else{
            fragments.add(fragment);
            bottomSheetTitleSettings.add(setting);
        }
}然后看了这4个方法,其实大家应该都差不多了解了整个BottomSheetDialogFragment内容,其实就是有一个ArrayList还有一个ArrayList 然后一个ViewPager来展示这些Fragment。当然为了不让ViewPager可以滑动,我们把ViewPager的滑动事件处理下:
 mViewPager.setOnTouchListener(new View.OnTouchListener() {
            @Override
            public boolean onTouch(View v, MotionEvent event) {
                return true;
            }
        });
貌似这是最简单的 处理方式了吧。然后我有点强迫症,ViewPager的滚动速度太快了,我就还想这么做,让他慢一点:
private void setViewPagerScroller(ViewPager viewPager) {

        try {
            Field scrollerField = ViewPager.class.getDeclaredField("mScroller");
            scrollerField.setAccessible(true);
            Field interpolator = ViewPager.class.getDeclaredField("sInterpolator");
            interpolator.setAccessible(true);

            Scroller scroller = new Scroller(mActivity, (Interpolator) interpolator.get(null)) {
                @Override
                public void startScroll(int startX, int startY, int dx, int dy, int duration) {
                    // 这里是关键,将duration变长或变短
                    super.startScroll(startX, startY, dx, dy, duration * 5);
                }
            };
            scrollerField.set(viewPager, scroller);
        } catch (NoSuchFieldException e) {
            // Do nothing.
        } catch (IllegalAccessException e) {
            // Do nothing.
        }
    }
说到这里,其实大家也能猜到,BottomSheetSettingsBuilder这个其实就是相当于一个中继器,先把需要的东西设置到builder中,然后在最后build的时候把所有的东西都设置给BottomSheetDialogFragment,最后再调用show();
这边有点细节,比如在我们的push(…)方法中
if(isShow){}else{
    fragments.add(fragment);
    bottomSheetTitleSettings.add(setting);
}
可以看到没有显示的时候其实没有做其他的事情,也没有刷新ViewPager。其实按理说我们应该先show()再push,甚至在View显示的回调中去push()这样保证所有的View都创建完成了再去刷新Viewp才是最保险的。当然,这些问题肯定是在我们考虑之中的,所以当我们的onViewCreated创建后,我们去调用了
if(mViewPager != null&&fragments.size()>0){
            mViewPager.setAdapter(adapter = new BottomViewPagerAdapter(getChildFragmentManager(),fragments));
            adapter.notifyDataSetChanged();
            mViewPager.setCurrentItem(fragments.size()-1);
            initTitle(fragments.size()-1);
        }
也就是说其实BottomSheet在使用过程中根本不用去考虑哪个方法先后,想干啥干啥,一步走到底就行。(别和我说build()方法的先后。。。那我说不过你。。。肯定打得过你)
折叠的3D动画的实现过程
其实去看Tag,之前的动画我就简单谢啦一个缩放而已,虽然很流畅,但是的确缺少新奇点~还被同事嘲讽了~(委屈脸)先看看京东的效果啊(随便点击一个商详选择配送地址就能看到这个效果,然后我打开Android版本的京东…很尴尬,这是歧视吗???竟然没有!)
实现思路
1.先从一个View上面去实现,然后再看看怎么实现我们的整个页面
2.这肯定是个3D动画了,有一个前后拉进的距离
3.多看看京东的效果(然后我点了N久的京东…)
4.封装,优化
先实现ImageView的动画吧
不多说,马上动手新建一个工程,放一个大大的ImangeView在我们的MAinActivity,然后开始探索。
继承Animation是我们的唯一出路
这动画效果肯定只能是来继承Animation了,那怎么实现呢?然后最终找到了它!就是
android.graphics.Camera这个相机并不是我们拍照用的相机,可以这么理解,我们看View的时候,头部在动,然后View其实也有不同的样子,那么这个Camera就是相当于我们手机的眼睛。我们适当移动它,那么在我们的手机上展现出来的效果就是你们想看到的3D效果。
本次主要用到一下几个方法:
mCamera.save();//保存当前Camera的状态
mCamera.rotateX();//绕X轴旋转
mCamera.rotateY();//绕Y轴旋转
mCamera.rotateZ();//绕Z轴旋转
mCamera.translate(x,y,z);//平移的方法,X/Y不多说,Z如果不为0就是向前向后平移,如果z>0 就是向Z轴的正方向平移z个单位,其实对于我们的视觉来讲就是缩小;如果z<0其实就是放大
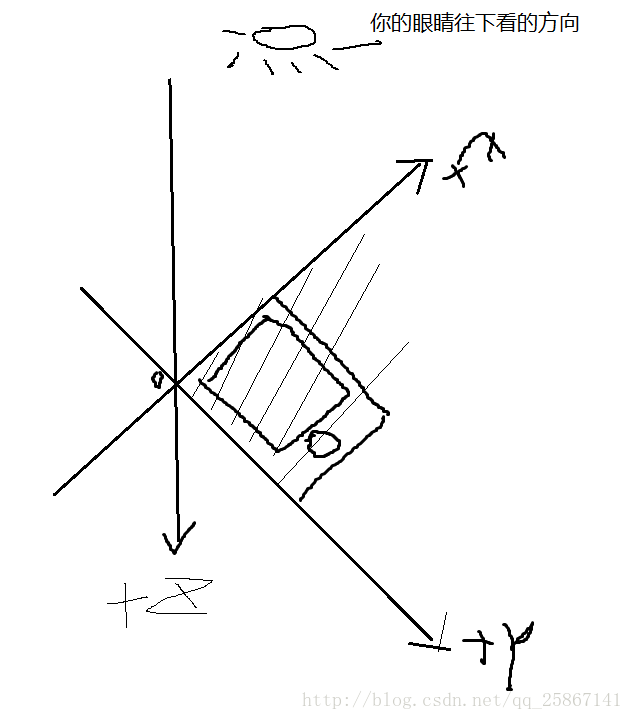
mCamera.rotateX(x);//绕X轴旋转x度其实坐标系应该是这样的,一开始手机是这样放着的。也就是说其实你调用任何一个旋转的方法,其实旋转的中心都是手机的左上角,很尴尬的一个事情。
看看关键的点
@Override
    protected void applyTransformation(float interpolatedTime, Transformation t) {
        mCamera.save();
        Matrix matrix = t.getMatrix();
        if(interpolatedTime < 0.5f){
            if(isOpen)//如果是打开状态,则当前时段一直保持缩小
                mCamera.translate(0,0,10*SCALE_CHANGE*(1-0.5f));
            mCamera.rotateX(SCALE_CHANGE*interpolatedTime);
        }else{
            if(isOpen)//如果是打开状态,从小变大
                mCamera.translate(0,0,10*SCALE_CHANGE*(1f-interpolatedTime));
            else//是关闭状态,从大变小
                mCamera.translate(0,0,10*SCALE_CHANGE*(interpolatedTime-0.5f));
            mCamera.rotateX((1-interpolatedTime)*SCALE_CHANGE);
        }
        mCamera.getMatrix(matrix);
        mCamera.restore();
        matrix.preTranslate(-width/2, -height/2);
        matrix.postTranslate(width/2, height/2);
    }
其实核心代码就真的只有这么几行~当然一开始我是各种调,各种领悟啊。。。
整个动画过程其实无非就是这样一个过程,先屏幕上半部分往里面折,然后下面部分再往里面折,同时在下面部分往里面折的过程的同时整个View都往Z轴正方向平移(其实Camera是往Z轴-方向移动,想想你的眼睛移动后的效果),也就是说缩小。
然后放大动画就是前半部分时间都是保持缩小的状态,然后在后面部分的时候再放大回到原来的大小即可。
那么我们用代码来拆分一下(applyTransformation这个方法不懂的先自学习啊哈~):
1.先考虑缩小动画:
我们先把整个动画拆分成2个过程,也就是对半分。所以以interpolatedTime < 0.5f为界限,
每次调用applyTransformation的时候,我们先保存一下mCamera.save();的状态,主要是播放完一帧后将相机放回原处。
然后我们将View绕X轴旋转SCALE_CHANGE*interpolatedTime度数,其实就是将View向里面旋转。但是请注意,看我上面的图,其实这个时候旋转时有效的,但是旋转的中心是0点,并不是我们的View的中心,所以我们需要
matrix.preTranslate(-width/2, -height/2);
matrix.postTranslate(width/2, height/2);
来助攻,当然这两个方法可以实现我们所谓的旋转中心的改变,其实也没变,只是将图片以矩阵的形式进行操作,达到与旋转中心改变一样的效果罢了。preTranslate方法的作用是在旋转之间先把图片向上移动图片高度的一半的距离,这样图片就关于x轴对称了,然后再进行旋转的变换,postTranslate方法是在变换之后再将图片向下移动图片高度的一半的距离也即是回到了原来的位置,这样图片显示出来的结果就是对称的了。原理也很简单,旋转中心还是(0,0),只不过我们移动图片,这样进行旋转变换的时候就会得到对称的结果了。
然后操作完后记得mCamera.restore();还原我们的摄像机。
然后当大于0.5f的时候,这个时候需要平移加旋转,缩放其实就是延Z轴平移,如果说是缩小,那么我们就像Z轴的正方向平移n个单位。一开始我们是绕X轴旋转从0-0.5f,然后缩小就是从0.5-0喽,那就直接(1f-interpolatedTime)。
2.处理放大动画
当我们的interpolatedTime<0.5的时候,其实一直是属于缩小状态的,所以我们其实一直就是调用
mCamera.translate(0,0,10*SCALE_CHANGE*(1f-interpolatedTime));旋转其实你会发现,和缩小是一样的,唯一不一样的就是在后面半段0.5-1的时候,这个时候你需要逐渐放大我们的View。那就是说从0.5-0喽mCamera.translate(0,0,10*SCALE_CHANGE*(1f-interpolatedTime));那就是这样喽。是不是搞定了,然后把所有代码合并,最后就是现在这样子了。其实我刚开始写的时候,因为对于Camera不熟悉,所以还是遇到挺多坑的。还有就是在处理完事情后一定要mCamera.restore();不然如果你设置了setFillAfter(true);你的动画会非常可怕的~你可以试试。刚开始我肯定也是分为2个动画去写,先写缩小,再写放大,然后再合并。(奸笑脸)
然后实现整个页面的缩放动画
其实刚开始我是直接拿外层ViewGroup去播放动画,然后用在项目中你会发现项目中各种View的叠加,动画播放的时候竟然会闪烁!好了,那就只能想其他办法了。
通过屏幕截图来获取bitmap,然后把ImageView添加到我们的android.R.id.content布局,最后实现全屏动画的折叠效果。
 private void initLayout(){
        setInterpolator(new AccelerateInterpolator());
        setFillAfter(true);
        setDuration(400);
        contentView = (ViewGroup)this.activity.findViewById(android.R.id.content);
        contentView.setDrawingCacheEnabled(true);
        if(contentView.findViewWithTag(TAG_FOR_PARENT) == null){
            parentView = new FrameLayout(this.activity);
            parentView.setTag(TAG_FOR_PARENT);
            parentView.setLayoutParams(new FrameLayout.LayoutParams(FrameLayout.LayoutParams.MATCH_PARENT,FrameLayout.LayoutParams.MATCH_PARENT));
            parentView.setBackgroundColor(Color.parseColor("#000000"));
            childView = new ImageView(activity);
            childView.setTag(TAG_FOR_CHILD);
            childView.setLayoutParams(new ViewGroup.LayoutParams(ViewGroup.LayoutParams.MATCH_PARENT,ViewGroup.LayoutParams.MATCH_PARENT));
            parentView.addView(childView);
            contentView.addView(parentView);
        }else{
            parentView = (FrameLayout) contentView.findViewWithTag(TAG_FOR_PARENT);
            childView = (ImageView) parentView.findViewWithTag(TAG_FOR_CHILD);
        }
        parentView.setVisibility(View.GONE);
        contentView.destroyDrawingCache();//释放缓存资源
        contentView.buildDrawingCache();
        childView.setImageBitmap(contentView.getDrawingCache());
    }
看代码,还是我们的老方法~哈哈,真的好用,具体有兴趣可以看看我的【Android】当关闭通知消息权限后无法显示系统Toast的解决方案 这个Toast就是添加在最外层布局的~
上面我创建了一个FrameLayout,然后设置成MATCH_PARENT,并设置背景颜色为黑色,然后创建了一个ImageView,页设置成MATCH_PARENT。并且都设置TAG,方式一个页面添加多个的问题(EToast的经验)
关键代码就是这个:
contentView.setDrawingCacheEnabled(true);
contentView.destroyDrawingCache();//释放缓存资源
contentView.buildDrawingCache();
childView.setImageBitmap(contentView.getDrawingCache());
其实上面短短4行代码就把截屏拿下了哦~不用任何权限,并且是所有View都自带的效果。唯一要注意的是为此截图的时候需要先释放缓存资源,不然每次拿出来的Bitmap都是一样的。
public void startAnimation() {
        parentView.setVisibility(View.VISIBLE);
        childView.startAnimation(this);
        if(isOpen){
            setAnimationListener(new AnimationListener() {
                @Override
                public void onAnimationStart(Animation animation) {

                }

                @Override
                public void onAnimationEnd(Animation animation) {
                    parentView.setVisibility(View.GONE);
                }

                @Override
                public void onAnimationRepeat(Animation animation) {

                }
            });
        }
    }
最后创建一个startAnimation接口,然后调用对应启动动画的方法,处理好之后的事情即可。
总结
不知不觉都10点半了。。。我得赶紧回家~我家黑爷可要着急了。然后有啥问题的,欢迎大家给我留言讨论,很乐意和大家探讨哦~
