python Flask框架如何请求及返回数据——flask详细教程
python Flask框架如何请求及返回数据——flask详细教程
文章目录:
- 1 Flask介绍
- 1.1 Flask简单介绍
- 1.2 Flask相关资料信息
- 2 Flask快速入门
- 2.1 Flask编写一个hello world
- 2.2 Flask编写一个hello world,程序解析
- 2.2.1 导入Flask类
- 2.2.2 创建Flask实例对象
- 2.2.3 注册路由(route)
- 2.2.4 启动Flask创建的web服务
- 2.3 例子:flask请求返回处理后的图片
1 Flask介绍
1.1 Flask简单介绍
Flask是一个相对于Django而言轻量级的Web框架。它提供了一个web应用后端处理的框架,通过Flask中封装好的api来进行网页的渲染、及定制api的实现。和Django大包大揽不同,Flask建立于一系列的开源软件包之上,这其中 最主要的是WSGI应用开发库Werkzeug和模板引擎Jinja:
-
策略:werkzeug和Jinja这两个库和Flask一样,都是pocoo团队开发的。这 或许体现了pocoo与Django竞争时关于生态的一种策略,这种策略的自然 延伸是Flask框架中没有包含数据库方面的构件,无论ORM还是其他。 -
关注点:Flask是一个WSGI应用框架,这意味着我们进行Flask开发时,不需要关注网络方面的操作,Flask应用的入口是封装过的网络请求包,出口是网络响应,我们仅需要关注这个阶段内的处理逻辑。 -
WSGI服务器:Flask虽然内置了简单的WSGI服务器,但其性能仅仅适用于开发期的调试。 Flask官网推荐了多种WSGI服务器,实现方式从多进程到多线程到协程, 这方面的选择我们在本课程中将不涉及。 -
REST适应性:虽然Flask和Django一样,最初的出发点都是服务端的动态网页应用。但 Flask的设计使之也相当适用于面向资源的REST架构,在越来越移动化 并且单页应用越来越重要的WEB开发领域,这是Flask相对于Django相当大的优势。
1.2 Flask相关资料信息
1、python Flask官网:
##1.3 Flask文件组织形式
Flask有着特定的文件组织形式,按照Flask文件组织如下:
Appserver/
├── App
│   ├── static/      # 静态资源文件夹
│   ├── templates/   # 模板文件夹
│   ├── __init__.py
│   ├── run.py    # 主程序文件
│   └── config.py    # 配置文件
├── requirements     # 需求文件
└── README.md
templates文件夹:存储html文件static文件夹:存储用到的静态文件(图片,.css文件等)- run.py:写flask相关运行程序
2、python Flask中文文档
2 Flask快速入门
从编写一个Hello world ! 开始:
2.1 Flask编写一个hello world
创建一个run_flask.py文件,使用flask运行一个hello world
1、导入Flask类
from flask import Flask
Flask类是Flask框架的核心类,它实现了WSGI应用规范。
WSGI:Flask内置WSGI,通过使用WSGI封装了网络请求和网络响应,这样我们就不用写网络请求和网络响应的接口了。
2、创建Flask实例对象
app = Flask(__name__)
3、注册路由(route)
@route('/')
def index():
    return 'Hello world!'
4、启动Flask创建的web服务
if __name__ == '__main__':
	app.run()
5、完整程序
from flask import Flask
app = Flask(__name__)

@app.route('/')
def index():
    return 'Hello world!'

if __name__ == '__main__':
	app.run()
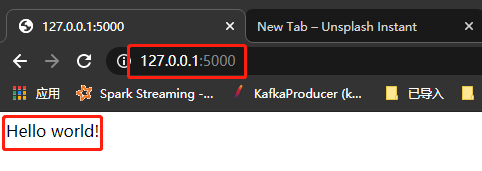
然后在浏览器中输入:http://127.0.0.1:5000/ 就会看到:Hello world!问候

2.2 Flask编写一个hello world,程序解析
创建一个run_flask.py文件,使用flask运行一个hello world
2.2.1 导入Flask类
from flask import Flask
Flask类是Flask框架的核心类,它实现了WSGI应用规范。
WSGI:Flask内置WSGI,通过使用WSGI封装了网络请求和网络响应,这样我们就不用写网络请求和网络响应的接口了。
2.2.2 创建Flask实例对象
app = Flask(__name__)

print(type(app), app)
#
我们实力化Flask对象,这里初始化了一个参数:import_name=__name__
__name__:这个参数是模块或包的名称,这样 Flask 才知道到哪去找模板、静态文件等等(即上面提到的Flask的文件组织结构)
Flask类的初始化参数:
def __init__(
        self,
        import_name,
        static_url_path=None,
        static_folder="static",
        static_host=None,
        host_matching=False,
        subdomain_matching=False,
        template_folder="templates",
        instance_path=None,
        instance_relative_config=False,
        root_path=None,
    ):

# 初始化参数的作用
    :param import_name: the name of the application package
    :param static_url_path: can be used to specify a different path for the
                            static files on the web.  Defaults to the name
                            of the `static_folder` folder.
    :param static_folder: the folder with static files that should be served
                          at `static_url_path`.  Defaults to the ``'static'``
                          folder in the root path of the application.
    :param static_host: the host to use when adding the static route.
        Defaults to None. Required when using ``host_matching=True``
        with a ``static_folder`` configured.
    :param host_matching: set ``url_map.host_matching`` attribute.
        Defaults to False.
    :param subdomain_matching: consider the subdomain relative to
        :data:`SERVER_NAME` when matching routes. Defaults to False.
    :param template_folder: the folder that contains the templates that should
                            be used by the application.  Defaults to
                            ``'templates'`` folder in the root path of the
                            application.
    :param instance_path: An alternative instance path for the application.
                          By default the folder ``'instance'`` next to the
                          package or module is assumed to be the instance
                          path.
    :param instance_relative_config: if set to ``True`` relative filenames
                                     for loading the config are assumed to
                                     be relative to the instance path instead
                                     of the application root.
    :param root_path: Flask by default will automatically calculate the path
                      to the root of the application.  In certain situations
                      this cannot be achieved (for instance if the package
                      is a Python 3 namespace package) and needs to be
                      manually defined.
2.2.3 注册路由(route)
使用route() 装饰器告诉 Flask 什么样的URL 能触发我们的函数。
@route('/')
def index():
	# 页面的跳转交给前端路由负责,后端不用再写大量的路由
	return 'Hello world!'
上面可能看不出来这个说的路由URL出发函数是怎么一回事,我们把装饰器的参数再改一下,你就明白了:
@route('/print_hello', methods=["POST"])
def index():
	# 页面的跳转交给前端路由负责,后端不用再写大量的路由
	return 'Hello world!'
此时在使用POST请求的路由URL ,必须是:http://127.0.0.1:5000/print_hello`,才能触发index函数的调用!
2.2.4 启动Flask创建的web服务
用 run() 函数来让应用运行在本地服务器上。 其中 if name ==‘main’: 确保服务器只会在该脚本被 Python 解释器直接执行的时候才会运行,而不是作为模块导入的时候。
1、使用run()默认参数
if __name__ == '__main__':
	app.run()
2、run()参数
run(self, host=None, port=None, debug=None, load_dotenv=True, **options):
host:主机的ip(服务端的ip,即运行flask程序的服务器)- 设置 host=‘0.0.0.0’,让操作系统监听所有公网 IP,把自己的电脑作为服务器,可以让别人访问,被人在浏览器中输入你的IP即可
- 设置
host='127.0.0.1',这个也是host的默认值,自己的机器
port:端口,默认值:port=5000debug:是否开启调试模式,默认值:debug=False
3、开启调试模式,有两种方式
- 在应用对象上设置
app.debug = True
app.run()
- 作为run的参数传入
app.run(host='0.0.0.0', debug=True)
2.3 例子:flask请求返回处理后的图片
例子说明:
前端(postman)以POST请求发送一张图片,后端对图片进行一个镜像处理,然后再把这个响应返回前端
例子程序:
__Author__ = "Shliang"
__Email__ = "[email protected]"

import os
import cv2
from flask import Flask, Response, request
app = Flask(__name__)
print(type(app), app)
#

print(app.root_path)  # 返回的是当前运行文件run_flask.py所在的目录
# D:\ZF\1_ZF_proj\2_YOLO\YOLO数据集相关

@app.route('/')
def index():
    return 'Hello world!'


@app.route('/img_flip', methods=["POST"])
def process_img():
    # 接收前端传来的图片  image定义上传图片的key
    upload_img = request.files['image']
    print(type(upload_img), upload_img)
    #

    # 获取到图片的名字
    img_name = upload_img.filename

    # 把前端上传的图片保存到后端
    upload_img.save(os.path.join('./', upload_img.filename))

    # 对后端保存的图片进行镜像处理
    img_path = os.path.join('./', upload_img.filename)
    print('path', img_path)
    img = cv2.imread(img_path)
    img_flip = cv2.flip(img, 0)
    cv2.imwrite(os.path.join('./', 'res_' + upload_img.filename), img_flip)

    # 把图片读成二进制,返回到前端
    image = open(os.path.join('./', 'res_' + upload_img.filename), mode='rb')
    response = Response(image, mimetype="image/jpeg")
    return response


if __name__ == '__main__':
    app.run(host='0.0.0.0', port=5000, debug=True)
参考1: https://blog.csdn.net/sinat_38682860/article/details/82354342# 个人学习笔记
参考2:https://www.w3cschool.cn/flask/flask_quick_guide.html # w3cschool文档,比较全
参考3: https://blog.csdn.net/m0_38088298/article/details/79901951
参考4:https://blog.csdn.net/weixin_30553065/article/details/96045980
参考5:
参考6:
参考7:
参考8:
参考9:
