Centos7 使用WordPress快速搭建个人博客
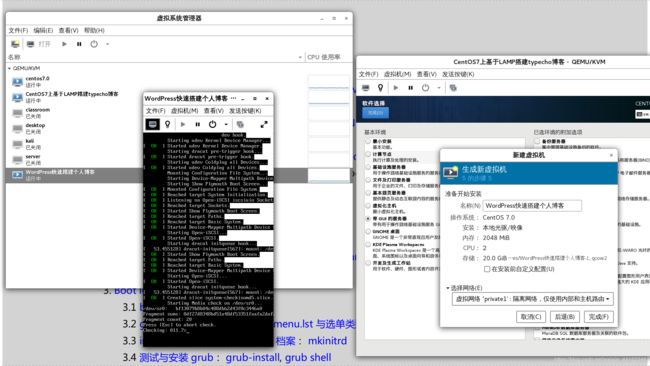
[root@xxxxxxxx ~]# clone-vm7
Enter VM number: 1
Creating Virtual Machine disk image......
Defining new virtual machine.....
##############################################################
[root@xxxxxxxx ~]# ssh -X [email protected]
[email protected]'s password:   (123456)
Last login: Wed Mar 27 15:04:10 2019
/usr/bin/xauth:  file /root/.Xauthority does not exist
[root@wordpress ~]# cat /etc/redhat-release
Red Hat Enterprise Linux Server release 7.4 (Maipo)
[root@wordpress ~]# ifconfig | grep "176.*"
    inet 176.204.21.15 netmask 255.255.255.0  broadcast 176.204.21.255
    [root@wordpress ~]# cat /etc/resolv.conf
    nameserver 176.204.0.227
    [root@wordpress ~]# ping www.baidu.com -c 2
    PING www.a.shifen.com (180.97.33.107) 56(84) bytes of data.
    64 bytes from 180.97.33.107 (180.97.33.107): icmp_seq=1 ttl=54 time=37.8 ms
    64 bytes from 180.97.33.107 (180.97.33.107): icmp_seq=2 ttl=54 time=31.5 ms
    --- www.a.shifen.com ping statistics ---
    2 packets transmitted, 2 received, 0% packet loss, time 1001ms
    rtt min/avg/max/mdev = 31.547/34.712/37.877/3.165 ms
      ##############################################################
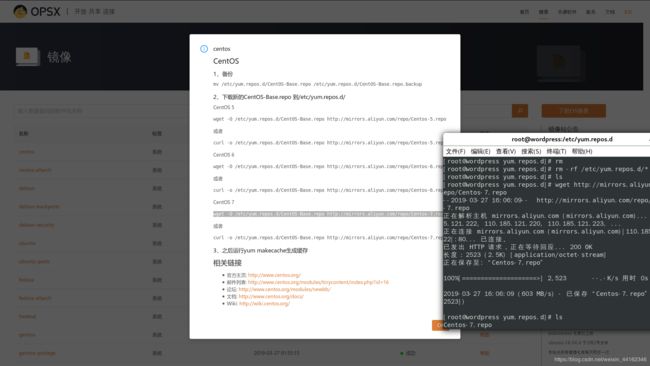
       [root@wordpress yum.repos.d]# rm -rf /etc/yum.repos.d/*
       [root@wordpress yum.repos.d]# ls
       [root@wordpress yum.repos.d]# wget http://mirrors.aliyun.com/repo/Centos-7.repo
之后运行 yum clean all ; yum makecache 生成缓存
阿里云开源镜像站
几个国内可用的 yum 源
yum源配置的三种方法
centos 7 更新阿里的yum 源
阿里yum源 - 神一样的存在
本地yum源 、阿里yum源、163yum源的配置安装
为了方便测试,停止并且开机不启动防火墙,生产环境根据需要进行调整
[root@wordpress ~]# systemctl stop firewalld
[root@wordpress ~]# systemctl disable firewalld
[root@wordpress ~]# systemctl status firewalld.service
● firewalld.service - firewalld - dynamic firewall daemon
Loaded: loaded (/usr/lib/systemd/system/firewalld.service; disabled; vendor preset: enabled)
Active: inactive (dead)
Docs: man:firewalld(1)
设置selinux=disabled
[root@wordpress ~]# sed -i '7cSELINUX=disabled' /etc/selinux/config
[root@wordpress ~]# cat /etc/selinux/config

# This file controls the state of SELinux on the system.
# SELINUX= can take one of these three values:
#     enforcing - SELinux security policy is enforced.
#     permissive - SELinux prints warnings instead of enforcing.
#     disabled - No SELinux policy is loaded.
SELINUX=disabled
# SELINUXTYPE= can take one of three two values:
#     targeted - Targeted processes are protected,
#     minimum - Modification of targeted policy. Only selected processes are protected.
#     mls - Multi Level Security protection.
SELINUXTYPE=targeted
二、yum 安装Apache+PHP+MySQL(LAMP)环境,(或者搜索XAMPP集成包直接安装,这里不演示)
1、安装Apache
yum方式安装httpd
[root@wordpress ~]# yum -y install php
[root@wordpress ~]# yum -y install php-mysql
[root@wordpress ~]# rpm -qa | grep php
php-mysql-5.4.16-46.el7.x86_64
php-5.4.16-46.el7.x86_64
php-common-5.4.16-46.el7.x86_64
php-cli-5.4.16-46.el7.x86_64
php-pdo-5.4.16-46.el7.x86_64
启动httpd并设置开机启动
systemctl enable httpd
2、安装PHP
yum 方式安装php
yum install php php-mysql -y
[root@ecs-35f2 ~]# rpm -qa | grep php
php-cli-5.4.16-43.el7_4.x86_64
php-mysql-5.4.16-43.el7_4.x86_64
php-common-5.4.16-43.el7_4.x86_64
php-5.4.16-43.el7_4.x86_64
php-pdo-5.4.16-43.el7_4.x86_64
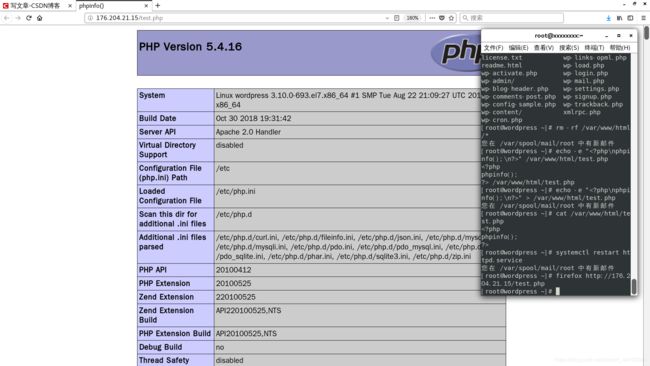
在Apache网页目录下创建一个.php结尾的php文件并重启httpd服务,测试能否正常访问
[root@wordpress ~]# echo -e "" > /var/www/html/test.php
[root@wordpress ~]# cat /var/www/html/test.php
3、安装数据库,Centos7更名为mariadb
yum方式安装
[root@wordpress ~]# yum -y install mariadb-server
[root@wordpress ~]# rpm -qa | grep mariadb
mariadb-5.5.60-1.el7_5.x86_64
mariadb-server-5.5.60-1.el7_5.x86_64
mariadb-libs-5.5.60-1.el7_5.x86_64
[root@wordpress ~]# systemctl enable mariadb
[root@wordpress ~]# systemctl restart mariadb
初始化数据库
[root@wordpress ~]# systemctl enable mariadb

NOTE: RUNNING ALL PARTS OF THIS SCRIPT IS RECOMMENDED FOR ALL MariaDB
      SERVERS IN PRODUCTION USE!  PLEASE READ EACH STEP CAREFULLY!

In order to log into MariaDB to secure it, .........

Enter current password for root (enter for none): (输入原始root密码,若无enter)
Set root password? [Y/n] y(是否设置root密码)
New password:  (123456)
Re-enter new password:  (1234456)
Password updated successfully!
Reloading privilege tables..
 ... Success!
Remove anonymous users? [Y/n] y(是否移除匿名用户)
 ... skipping.
Disallow root login remotely? [Y/n] n(是否禁止远程root登录)
 ... skipping.
Remove test database and access to it? [Y/n] y(是否删除测试数据库)
 ... skipping.
Reload privilege tables now? [Y/n] y(重新载入)
 ... Success!

Cleaning up...

All done!  If you've completed all of the above steps, your MariaDB
installation should now be secure.

Thanks for using MariaDB!
为wordpress创建数据库和用户,注意这里的数值要和等下安装的wordpress里面的wp-config.php一致
[root@wordpress ~]# mysql -uroot -p123456
Welcome to the MariaDB monitor.  Commands end with ; or \g.
Your MariaDB connection id is 10
Server version: 5.5.60-MariaDB MariaDB Server

Copyright (c) 2000, 2018, Oracle, MariaDB Corporation Ab and others.

Type 'help;' or '\h' for help. Type '\c' to clear the current input statement.

MariaDB [(none)]>create database wpdb character set utf8;
Query OK, 1 row affected (0.00 sec)

MariaDB [(none)]> grant all privileges on wpdb.* to 'root'@'localhost' identified by '123456';
Query OK, 0 rows affected (0.00 sec)

MariaDB [(none)]> flush privileges;
Query OK, 0 rows affected (0.00 sec)

MariaDB [(none)]> exit
Bye
三、安装wordpress,这里使用wget方式下载到本地,下载链接到官网查询:https://cn.wordpress.org/
先yum安装wget,然后下载wordpress安装包
[root@wordpress ~]# yum -y install wget
[root@wordpress ~]# wget https://cn.wordpress.org/wordpress-4.9.1-zh_CN.tar.gz
解压缩wordpress安装包并拷贝到所有文件到/var/www/html,添加wp-config.php
[root@wordpress ~]# cp wordpress-4.9.1-zh_CN.tar.gz /var/www/html/
[root@wordpress ~]# cd /var/www/html/
[root@wordpress html]# ls
test.php  wordpress-4.9.1-zh_CN.tar.gz
[root@wordpress html]# tar -xvzf wordpress-4.9.1-zh_CN.tar.gz
总用量 9904
-rw-r--r--. 1 root   root            20 3月  27 19:31 test.php
drwxr-xr-x. 5 nobody nfsnobody     4096 11月 30 2017 wordpress
-rw-r--r--. 1 root   root      10130710 3月  27 19:48 wordpress-4.9.1-zh_CN.tar.gz
[root@wordpress html]# cp -R wordpress/* /var/www/html/
[root@wordpress html]# ls
index.php                     wp-blog-header.php    wp-login.php
license.txt                   wp-comments-post.php  wp-mail.php
readme.html                   wp-config-sample.php  wp-settings.php
test.php                      wp-content            wp-signup.php
wordpress                     wp-cron.php           wp-trackback.php
wordpress-4.9.1-zh_CN.tar.gz  wp-includes           xmlrpc.php
wp-activate.php               wp-links-opml.php
wp-admin                      wp-load.php
这里修改一下权限(可以忽略,如果等下外网访问网页空白再修改即可)
[root@wordpress html]# chown -R root:root /var/www/html/
复制配置文件,直接改权限
[root@wordpress html]# cp wp-config-sample.php  wp-config.php
[root@wordpress html]# chmod 777 /var/www/html/wp-config.php
修改wp-config.php配置文件,这里的用户名,密码,字符编码都是刚才初始化数据库定义好了
[root@wordpress html]# vim wp-config.php
// ** MySQL 设置 - 具体信息来自您正在使用的主机 ** //
/** WordPress数据库的名称 */
define('DB_NAME', 'wpdb');

/** MySQL数据库用户名 */
define('DB_USER', 'root');

/** MySQL数据库密码 */
define('DB_PASSWORD', '123456');

/** MySQL主机 */
define('DB_HOST', 'localhost');

/** 创建数据表时默认的文字编码 */
define('DB_CHARSET', 'utf8');

/** 数据库整理类型。如不确定请勿更改 */
define('DB_COLLATE', '');
重启数据库和httpd
[root@wordpress html]# systemctl restart mariadb.service
[root@wordpress html]# systemctl restart httpd.service
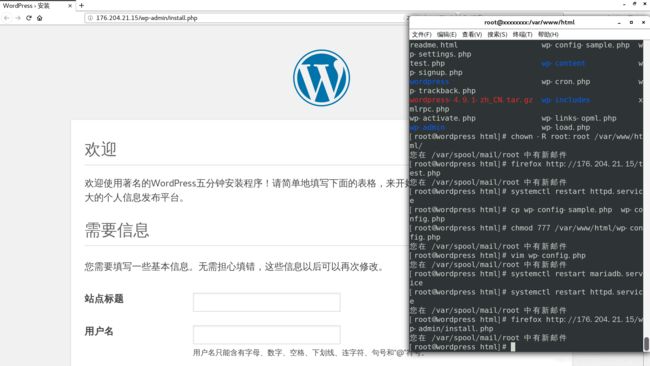
内网访问测试
http://176.204.21.15/wp-admin/install.php


云主机公网IP访问测试,由于80端口需要备案,因此修改httpd为88端口。这里需要注意点是,要先在web页面修改好端口再回到服务器修改httpd的端口
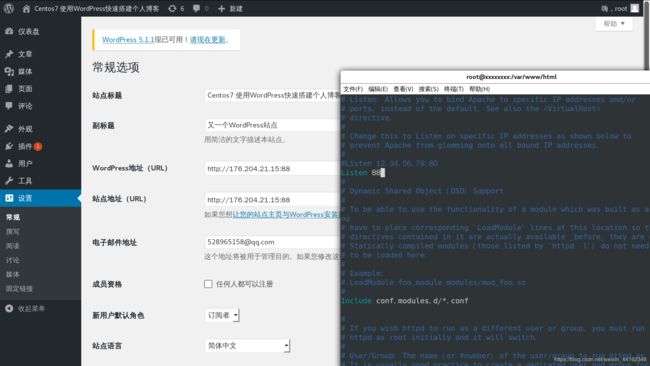
[root@wordpress html]#  vim /etc/httpd/conf/httpd.conf
Listen 88
然后再重启数据和httpd服务,就可以访问了 ok 完成!
[root@wordpress html]# systemctl restart httpd.service
