NotePad功能添加
NotePad功能添加
@author:065
NotePad是一个比较完整的安卓开发sample,只不过源码都比较旧了,这一次期中考试开始的时候我花了很久的时间让整个项目跑起来,顺便更新了一些方法的用法。
首先,阅读老师给的整个项目的初步分析(链接)大致了解了整个项目的结构
原文:“一共包含了6个类,其中4个Activity,一个ContentProvider,还有一个数据契约类。
· NotesList 应用程序的入口,笔记本的首页面会显示笔记的列表
· NoteEditor 编辑笔记内容的Activity
· TitleEditor 编辑笔记标题的Activity
· NotesLiveFolder ContentProvider的LiveFolder(实时文件夹),这个功能在Android API 14后被废弃,不再支持。因此代码中所有涉及LiveFolder的内容将不再阐述。
· NotePadProvider 这是笔记本应用的ContentProvider,也是整个应用的关键所在”
项目整理
在第一次导入项目的时候,无法在虚拟机上运行整个项目,大致问题都是出现在整个工程太旧,所以sync不成功.
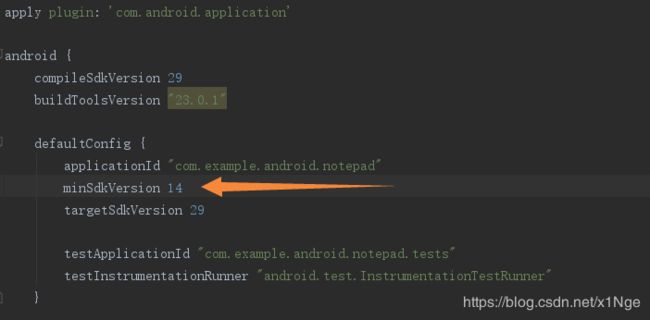
1.minSdkVersion 11 cannot be smaller than version 14 一开始我按照AS的提示,将
minSdkVersion改成了14,如图:

2.sync成功后,在我创建了一个约束布局的xml后又报错了,发现无法在这个项目中使用约束布局。在简单思考一会后,我决定在自己经常使用的环境下重构整个项目。
build.gradle:
apply plugin: 'com.android.application'

android {
    compileSdkVersion 29
    buildToolsVersion "29.0.3"
    defaultConfig {
        applicationId "com.x1nge.notepaddemo2"
        minSdkVersion 25
        targetSdkVersion 29
        versionCode 1
        versionName "1.0"
        testInstrumentationRunner "androidx.test.runner.AndroidJUnitRunner"
    }
    buildTypes {
        release {
            minifyEnabled false
            proguardFiles getDefaultProguardFile('proguard-android-optimize.txt'), 'proguard-rules.pro'
        }
    }
}

dependencies {
    implementation fileTree(dir: 'libs', include: ['*.jar'])
    implementation 'androidx.appcompat:appcompat:1.0.2'
    implementation 'androidx.constraintlayout:constraintlayout:1.1.3'
    testImplementation 'junit:junit:4.12'
    androidTestImplementation 'androidx.test.ext:junit:1.1.0'
    androidTestImplementation 'androidx.test.espresso:espresso-core:3.1.1'
}
然后导入必要的代码文件,再进行一些小error的修复,就可以成功跑起程序了。
为NotePad每条记录显示时间
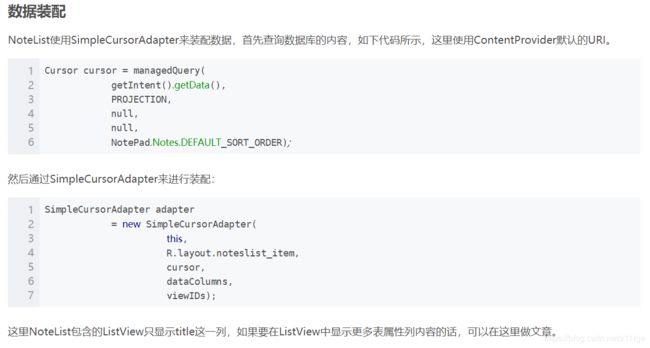
在阅读老师的文件说明的时候,老师针对这一功能的添加作了一个小小的提示(原文):

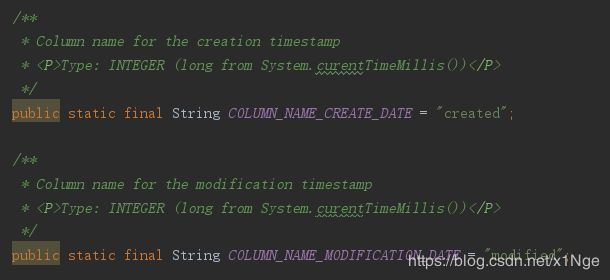
结合代码原来的注释:
![]()

不难发现这里就有现成时间可以使用,这里我使用修改时间。
1.在PROJECTION中加入我们要显示的时间:
    /**
     * The columns needed by the cursor adapter
     */
    private static final String[] PROJECTION = new String[] {
            NotePad.Notes._ID, // 0
            NotePad.Notes.COLUMN_NAME_TITLE, // 1
            NotePad.Notes.COLUMN_NAME_MODIFICATION_DATE, // time
    };
2.相应的,添加要装配的数据:
// The names of the cursor columns to display in the view, initialized to the title column
        String[] dataColumns = { NotePad.Notes.COLUMN_NAME_TITLE , NotePad.Notes.COLUMN_NAME_MODIFICATION_DATE } ;

        // The view IDs that will display the cursor columns, initialized to the TextView in
        // noteslist_item.xml
        int[] viewIDs = { android.R.id.text1,R.id.time };
3.在这里我们把要显示的文本放在标题的下方:
 		android:id="@+id/time_title"
            android:layout_width="match_parent"
            android:layout_height="wrap_content"
            android:textAppearance="?android:attr/textAppearanceSmall"
            android:text="@string/time_title"
            android:paddingLeft="5dip" />

        android:id="@+id/time"
            android:layout_width="match_parent"
            android:layout_height="wrap_content"
            android:textAppearance="?android:attr/textAppearanceSmall"
            android:paddingLeft="5dip" />
在这里源码所用的一个方法已经过时了,根据AS提示,将它修改成新的方法:

		Cursor cursor = getContentResolver().query(
            getIntent().getData(),            // Use the default content URI for the provider.
            PROJECTION,                       // Return the note ID ,  title and time for each note.
            null,                             // No where clause, return all records.
            null,                             // No where clause, therefore no where column values.
            NotePad.Notes.DEFAULT_SORT_ORDER  // Use the default sort order.
        );
这样就很轻松地完成了整个时间的显示,但是会发现显示的时间戳,一般来说我们见到的都是显示一个具体的时间,所以这里要把时间戳转换成Date型数据。
首先import所需要的包:
import java.text.SimpleDateFormat;
import java.util.Date;
在NotePadProvider.java中,我们修改这一部分:
 		// Gets the current system time in milliseconds
        Long now = Long.valueOf(System.currentTimeMillis());
        SimpleDateFormat sdf = new SimpleDateFormat("yyyy-MM-dd HH:mm:ss");
        String time = sdf.format(new Date(Long.parseLong(String.valueOf(now))));
再将put的参数由now改成我们定义的time
在NoteEditor.java中,我们在update方法中也修改时间的类型:
		// Sets up a map to contain values to be updated in the provider.
        ContentValues values = new ContentValues();
        Long now = Long.valueOf(System.currentTimeMillis());
        SimpleDateFormat sdf = new SimpleDateFormat("yyyy-MM-dd HH:mm:ss");
        String time = sdf.format(new Date(Long.parseLong(String.valueOf(now))));
        values.put(NotePad.Notes.COLUMN_NAME_MODIFICATION_DATE, time);
添加搜索框
安卓开发中有一个搜索框的组件SearchView,我们可以根据这一组件来构建搜索框。按照老师上课的提示,我们把这个搜索放在菜单上,并且点击后弹出新的页面。
1.画一个搜索的视图:
"1.0" encoding="utf-8"?>
xmlns:android="http://schemas.android.com/apk/res/android"
xmlns:app="http://schemas.android.com/apk/res-auto"
android:layout_width="match_parent"
android:layout_height="wrap_content"
android:orientation="vertical">
android:layout_width="wrap_content"
android:layout_height="wrap_content"
android:orientation="horizontal">
android:id="@android:id/list"
android:layout_width="match_parent"
android:layout_height="wrap_content" />
有话说:在这里基本思路是根据NoteList.java的代码,我们用同样的方法来用列表将所有数据列出来。这里有出现一个问题,一开始我将这个ListView的id写为:@+id/search_text,但是运行后发现报错,提示找不到id为list的ListView,所以把id这行改成如上代码就可以运行了。
预览一下大致的结构:

2.复制一下上面的菜单写法,我们添加一个:
- android:id="@+id/search"
android:title="@string/search"
android:icon="@android:drawable/ic_search_category_default"
android:showAsAction="always"
tools:ignore="AppCompatResource">
3.接下来就是逻辑代码的编写了,整个代码文件我是将NoteList.java中的代码框架迁移到行的搜索代码中。
不过这里有一个跳转页面的操作,所以加上一句:
setContentView(R.layout.activity_search_result);
为返回按钮设置事件:
		Button btn_back = findViewById(R.id.btn_back);
        Drawable drawable = getDrawable(R.drawable.ic_menu_revert);
        btn_back.setCompoundDrawables(drawable,null, null, null);

        btn_back.setOnClickListener(new View.OnClickListener(){
            public void onClick(View v){
                Intent i = new Intent(search_result.this,NotesList.class);
                startActivity(i);
            }
        });
找到我们写的组件:
SearchView sv = findViewById(R.id.search);
然后我们添加监听:
		// 监听
        sv.setOnQueryTextListener(this);
根据AS的提示我们alt+enter快速构建需要我们重写的两个方法,一个是当按下搜索按钮或者回车键的时候执行搜索操作,一个是当文本发生改变的时候执行搜索操作。在这里我都给它加上。
@Override
    public boolean onQueryTextSubmit(String query) {
        String selection = NotePad.Notes.COLUMN_NAME_TITLE + " Like?";
        String[] selectionArgs = { "%" + query + "%" };
        String sortOrder = NotePad.Notes.COLUMN_NAME_TITLE + " DESC";

        /* Performs a managed query. The Activity handles closing and requerying the cursor
         * when needed.
         *
         * Please see the introductory note about performing provider operations on the UI thread.
         */
//        Cursor cursor = managedQuery(
//                getIntent().getData(),            // Use the default content URI for the provider.
//                PROJECTION,                       // Return the note ID and title for each note.
//                selection,                             // No where clause, return all records.
//                selectionArgs,                             // No where clause, therefore no where column values.
//                sortOrder
////                NotePad.Notes.DEFAULT_SORT_ORDER  // Use the default sort order.
//        );
        Cursor cursor = getContentResolver().query(
                getIntent().getData(),            // Use the default content URI for the provider.
                PROJECTION,                       // Return the note ID and title for each note.
                selection,                             // No where clause, return all records.
                selectionArgs,                             // No where clause, therefore no where column values.
                sortOrder
//                NotePad.Notes.DEFAULT_SORT_ORDER  // Use the default sort order.
        );

        /*
         * The following two arrays create a "map" between columns in the cursor and view IDs
         * for items in the ListView. Each element in the dataColumns array represents
         * a column name; each element in the viewID array represents the ID of a View.
         * The SimpleCursorAdapter maps them in ascending order to determine where each column
         * value will appear in the ListView.
         */

        // The names of the cursor columns to display in the view, initialized to the title column
        String[] dataColumns = { NotePad.Notes.COLUMN_NAME_TITLE , NotePad.Notes.COLUMN_NAME_MODIFICATION_DATE} ;

        // The view IDs that will display the cursor columns, initialized to the TextView in
        // noteslist_item.xml
        int[] viewIDs = { android.R.id.text1,R.id.time };

        // Creates the backing adapter for the ListView.
        SimpleCursorAdapter adapter
                = new SimpleCursorAdapter(
                this,                             // The Context for the ListView
                R.layout.noteslist_item,          // Points to the XML for a list item
                cursor,                           // The cursor to get items from
                dataColumns,
                viewIDs
        );

        // Sets the ListView's adapter to be the cursor adapter that was just created.
        setListAdapter(adapter);
        return true;
    }
另外一个当文本发生改变时执行搜索的代码和这个一样,其他部分不作修改。
效果如下图所示:

总结
- 同步更新至CSDN,仅作实验记录之用。
- 水平有限,文章有需要改正之处还望指出。
- @author:065
