ambari HDP3.0 非root集群搭建详解步骤
生产环境ambari HDP3.0集群搭建详解步骤
- 安装前准备
- 安装Ambari-server
- 设置最大文件打开数(master)
- 安装httpd服务器(master)
- 安装jdk(所有主机)
- 安装时间同步服务(所有agent)
- 安装mysql 5.7(master)
- 安装ambari
- 本地yum源建立
- 执行安装
- 安装ambari-agent
- 安装
- 安装完成
- 异常报错
安装前准备
由于安装复杂,可以优先安装主节点,从节点后续添加
建议关闭所有主机防火墙,不然一个个开放port的步骤会很折磨,出现port连接不上那就是服务没有开启
给对应安装的用户配置sudo免密权限详情请参考 异常报错 1
安装Ambari-server
设置最大文件打开数(master)
官方建议为大于 10000,服务器实际设置为 655350
在 sudo vi /etc/security/limits.conf 如下内容
- soft nofile 655350
* hard nofile 655350
* soft nproc 655350
* hard nproc 655350
注释掉 sudo vi /etc/security/limits.d/20-nproc.conf 里的两行
# * soft nproc 1024
# root soft nproc unlimited
直接设置文件打开数(避免重启)需要 root 账户
# ulimit -n 655350
安装httpd服务器(master)
安装HTTP服务器,允许 http 服务通过防火墙(永久)
yum install httpd
firewall-cmd --add-service=http
firewall-cmd --permanent --add-service=http
设置 服务器端口 ,默认文件夹位置
vi /etc/httpd/conf/httpd.conf
这里我修改了监听端口
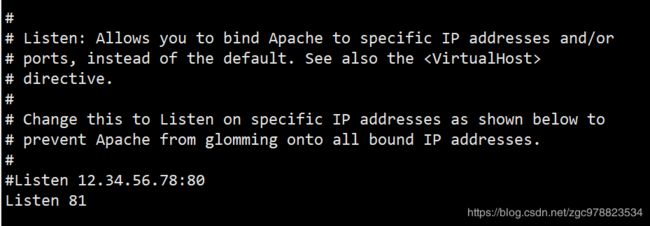
监听的地址,你的http主机地址

默认发布的文件位置

安装jdk(所有主机)
jdk安装包含jre,同时配置环境变量
安装时间同步服务(所有agent)
安装配置时间同步服务
yum install chrony
设置开机启动
systemctl enable chronyd.service
启动时间同步服务
systemctl start chronyd.service
安装mysql 5.7(master)
建议安装5.7版本以下,高版本某些设置有冲突
在mysql中创建用户
create database ambari default character set utf8;
create user 'ambari'@'%' identified by 'bigdata';
grant all privileges on ambari. * to 'ambari'@'%';
flush privileges;
安装ambari
在官网选择3.0下载
https://docs.cloudera.com/HDPDocuments/index.html
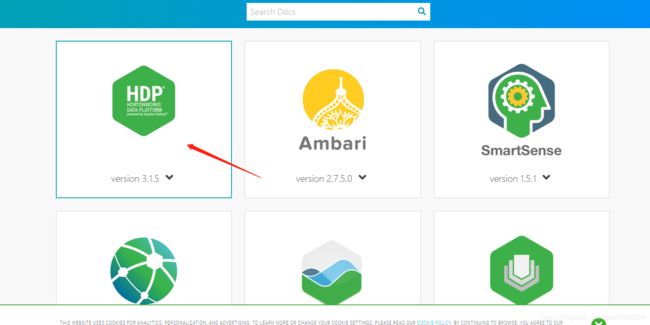
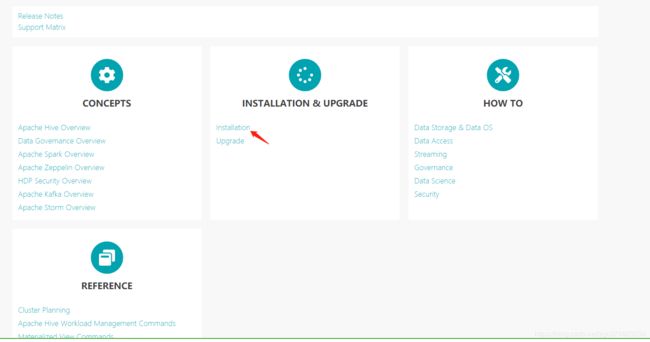
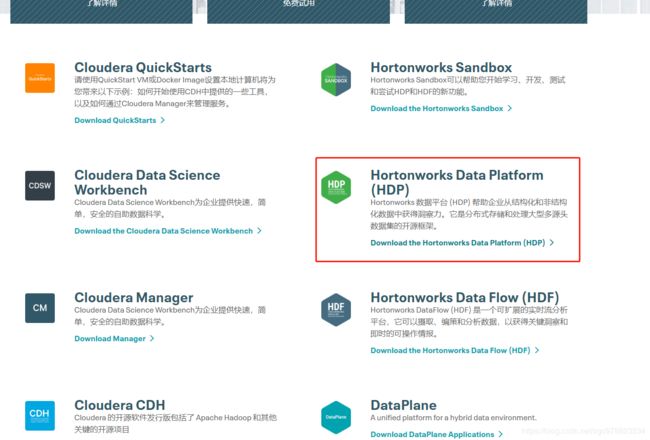

下载ambari
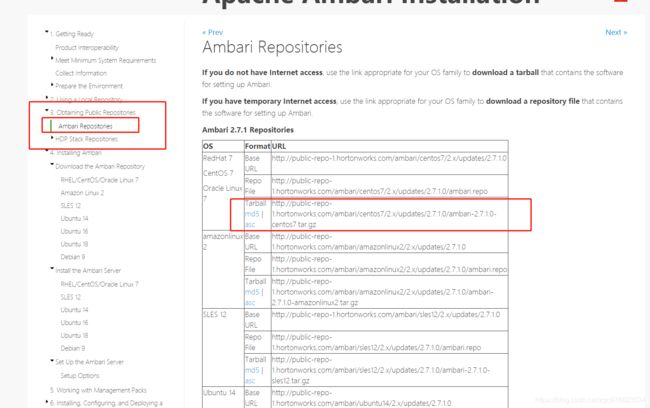
选择下载HDP
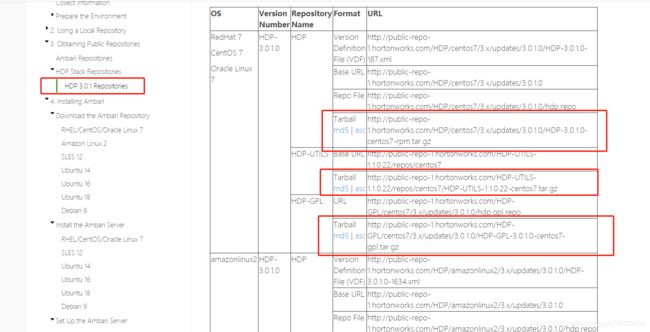
完整的就是下列四个压缩包:
ambari-2.7.1.0-centos7.tar.gz
HDP-3.0.1.0-centos7-rpm.tar.gz
HDP-GPL-3.0.1.0-centos7-gpl.tar.gz
HDP-UTILS-1.1.0.22-centos7.tar.gz
相继解压后放入/var/www/html/hdp_repo
本地yum源建立
备份原有的YUM源的配置文件
rename .repo .repo.bak /etc/yum.repos.d/*
清除YUM缓冲 yum clean all
列出可用的YUM源 yum repolist
开启httpd服务 service httpd start (用来配置公共yum源,这里http服务我是用非外网可以访问的方式,也可以设置成内网的服务)
如果无法访问httpd
在线检查域名和端口是否开放
http://coolaf.com/tool/port
安装基本软件并配置
在/etc/yum.repos.d下创建对应的.repo文件 拷贝到每个agent
ambari.repo:
[ambari-2.7.1.0]
name=ambari_repo
baseurl= http://httpipxxx.xxx:81/hdp_repo/ambari/centos7/2.7.1.0-169/
enabled=1
gpgcheck=1
gpgkey=http://httpipxxx.xxx:81/hdp_repo/ambari/centos7/2.7.1.0-169/RPM-GPG-KEY/RPM-GPG-KEY-Jenkins
priority=1
hdp.repo:
[HDP-3.0.1.0]
name=hdp_repo
baseurl= http://httpipxxx.xxx:81/hdp_repo/HDP/centos7/3.0.1.0-187/
enabled=1
gpgcheck=1
gpgkey=http://httpipxxx.xxx:81/hdp_repo/HDP/centos7/3.0.1.0-187/RPM-GPG-KEY/RPM-GPG-KEY-Jenkins
priority=1
hdp-utils.repo:
[HDP-UTILS-1.1.0.22]
name=hdp_utils_repo
baseurl= http://httpipxxx.xxx:81/hdp_repo/HDP-UTILS/centos7/1.1.0.22/
enabled=1
gpgcheck=1
priority=1
gpgkey=http://httpipxxx.xxx:81/hdp_repo/HDP-UTILS/centos7/1.1.0.22/RPM-GPG-KEY/RPM-GPG-KEY-Jenkins
hdp-gpl.repo:
[HDP-GPL-3.0.1.0-187]
name=hdp_gpl_repo
baseurl= http://httpipxxx.xxx:81/hdp_repo/HDP-GPL/centos7/3.0.1.0-187/
enabled=1
gpgcheck=0
gpgkey=http://httpipxxx.xxx:81/hdp_repo/HDP-GPL/centos7/3.0.1.0-187/RPM-GPG-KEY/RPM-GPG-KEY-Jenkins
priority=1
如果地址访问不为404,就算配置成功
执行安装
通过yum安装Ambari Server
yum install ambari-server
没有报错则表示安装成功
上传mysql.jar包
建立Ambari与MySQL驱动的连接
ambari-server setup --jdbc-db=mysql --jdbc-driver=(jar包地址)mysql-connector-java.jar
修改jar包权限为使用用户

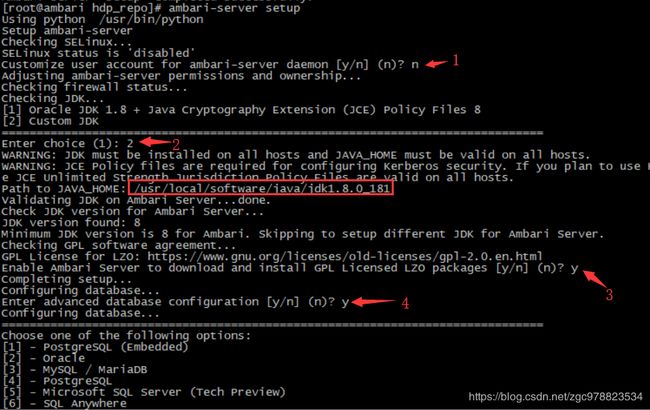
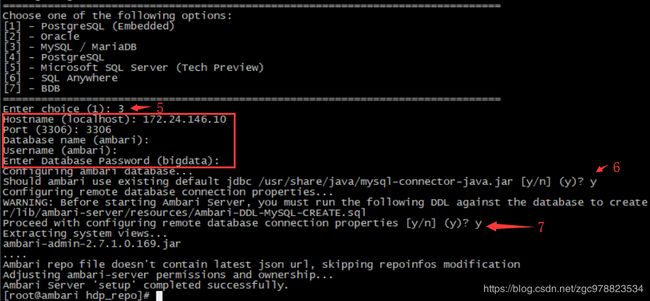
初始化Ambari Server
ambari-server setup
这里推荐这篇博客讲的比较清楚
https://www.cnblogs.com/langfanyun/p/10368688.html
将 Ambari 数据库脚本导入到数据库
mysql -uambari -pPassword_1
use ambari
source /var/lib/ambari-server/resources/Ambari-DDL-MySQL-CREATE.sql
开启ambari服务
ambari-server start
登录
http://masteripxxx:8080/
初始登录
admin
admin
安装ambari-agent
yum -y install ambari-agent
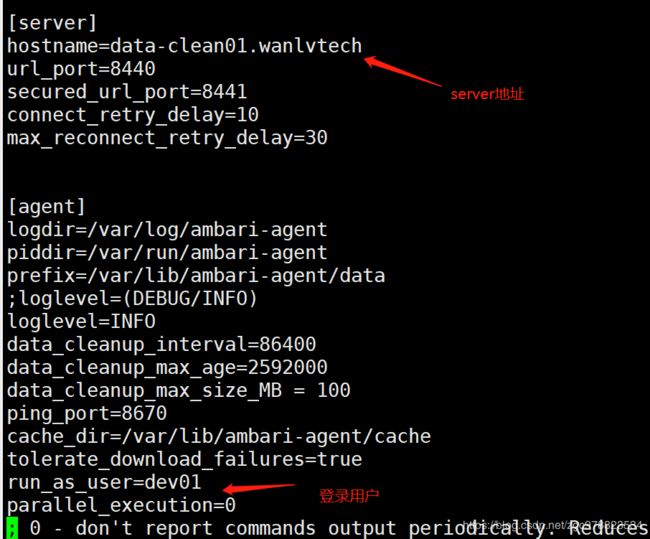
修改agent设置
vi /etc/ambari-agent/conf/ambari-agent.ini
这里run_as_user要改为ambari使用用户不然会出现权限问题
启动ambari-agent服务
ambari-agent start
安装
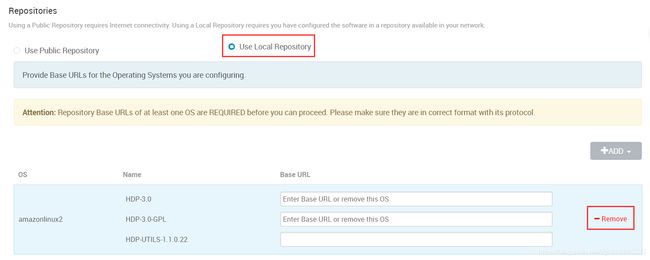
选择本地仓库
选择安装httpd源地址
情参照对应yum源的 baseurl
安装完成
检验
在ambari使用户下开启是否没有报权限问题
ambari-server start
ambari-agent start
修改对应权限
在对应非root用户下成功开启则安装完成
异常报错
一般报错请检查以下操作是否完成
1、由于ambari会检查是否有sudo权限,需要在相应节点/etc/sudoers末尾追加:dev01 ALL=(ALL) NOPASSWD:ALL
2、配置主机域名/etc/hostname,执行下:执行hostname -f命令进行验证是否生效,如果不生效,则执行hostname name(此处name为需设置的域名),使其生效;
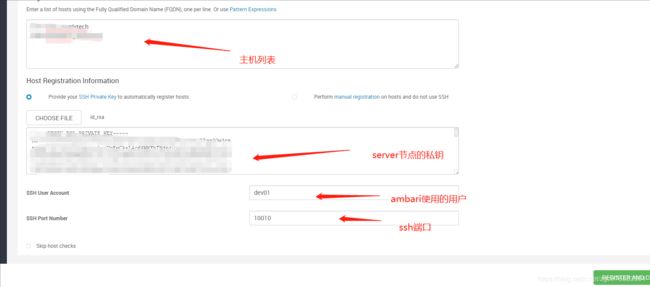
3、ssh免秘钥登录需在使用用户下完成;
4、用chown -R命令修改repo目录下所有文件的归属权限为当前用户所有(如放置目录:/var/www/html/hdp_repo/,所属为dev01:dev01)
6、再执行# sudo ambari-server setup安装时,会出现如下提示步骤:
Customize user account for ambari-server daemon [y/n] (n)?
输入y,提示输入的用户为:dev01
7、检查/etc/ambari-agent/conf/ambari-agent.ini中
hostname是否和主机名字一致
如果报错: Ambari agent machine hostname (localhost.localdomain) does not match expected ambari server hostname (data-clean01.wanlvtech). Aborting registration. Please check hostname, hostname -f and /etc/hosts file to confirm your hostname is setup correctly 将/evc/hosts中添加主机名
给master配置hosts

Host (data-clean01.wanlvtech) is redhat7 OS type, but the repositories chosen in “Select Stack” step was amazonlinux2. Selected repositories do not support this host OS type.
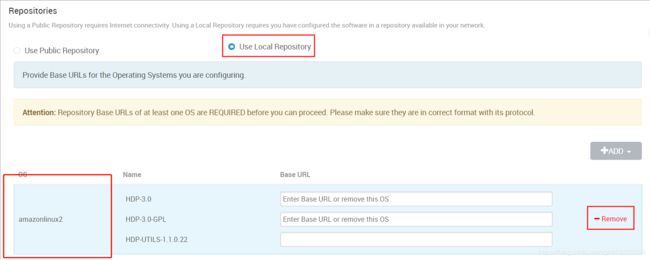
这里的类型为redhat7删除其他
端口访问被拒绝
netstat -anp 查看端口是否被开启,相关服务是否开启
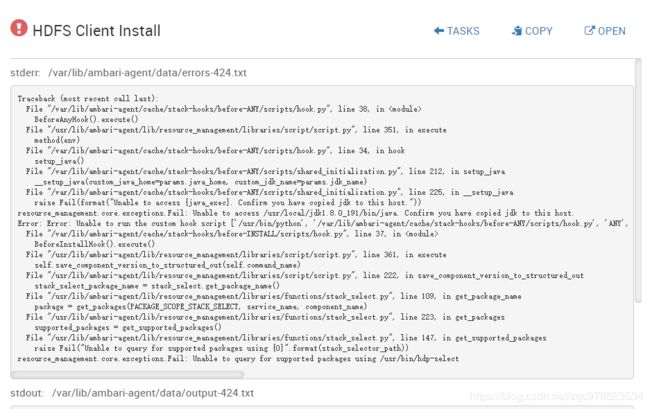
DateNode Install

vi /etc/python/cert-verification.cfg
[https]
verify=disable
检查yum .repo配置是否有效
ambari服务启动或停止卡死
如果卡在starting状态
可以kill掉对应进程
或者直接
rm /tmp/hsperfdata_*
然后重启ambari
检查所属服务目录(默认在/etc下)是否是dev01权限 root权限容易出错
