手把手教用matlab做无人驾驶(十一)-- stanley控制算法
stanley算法是斯坦福大学开发的无人车,通过这样设计横向控制器,获得了2005年度DARPA Grand Challenge的第一名,这个stanley算法相比较前一篇博客介绍的pure pursuit算法,优点就是既考虑了车身偏航角,又考虑了车与跟踪路径的横向误差距离,这个设计想法我觉得很棒。这篇文章可以在这个地址免费下载到:
http://xueshu.baidu.com/usercenter/paper/show?paperid=0e69039a5c58c8336ee5a08dfd0a6538&site=xueshu_se
对于已经工作的人而言,下载论文可能有时候可能有一点麻烦,这里顺便给出英文论文免费下载地址:http://tool.yovisun.com/scihub
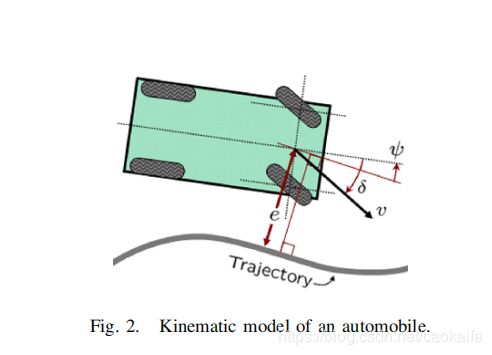
这里我就不讲解原理的证明了,可以自己去看文章。直接给出他这里控制输入的设计:
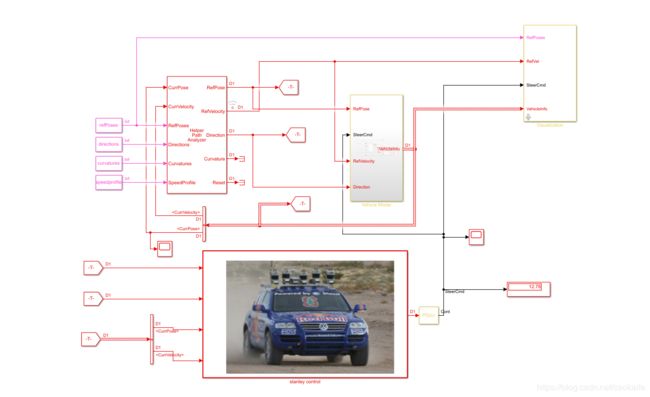
现在,我们来看matlab/simulink的实现(代码是在matlab官方老师代码中改的,我相信看我博客的同学大多都是关注算法的,所以大家只要关注我写的stanley control即可,不要纠结太多,如果想用了解更多并且有时间的也可以自己慢慢探索 ,同时也欢迎一起探讨):
注意:这里stanley control模块我用了stanley文章里的图片。
现在来看看代码的实现:
% Editor:Robert
% Date:2019.6.11
function steercmd = fcn(RefPos,direction,CurPos,curvelocity)
Ksoft = 1;
gain=20;
wheelbase=0.15;
% Clip heading angle to be within [0, 360) and convert to radian
RefPos(3) =RefPos(3)*pi/180 ;
CurPos(3)= CurPos(3)*pi/180;
%to the interval [0 2*pi] such that zero maps to
%zero and 2*pi maps to 2*pi
twoPiRefPos = cast(2*pi, 'like', RefPos(3));
twoPiCurPos = cast(2*pi, 'like', CurPos(3));
positiveInputRefPos = RefPos(3) > 0;
positiveInputCurPos = CurPos(3) > 0;
thetaRef = mod(RefPos(3), twoPiRefPos);
thetaCur = mod(CurPos(3), twoPiRefPos);
positiveInputRefPos = (thetaRef == 0) & positiveInputRefPos;
thetaRef = thetaRef + twoPiRefPos*positiveInputRefPos;
positiveInputCurPos = (thetaCur == 0) & positiveInputCurPos;
thetaCur = thetaCur + twoPiCurPos*positiveInputCurPos;
RefPos(3)=thetaRef ;
CurPos(3)=thetaCur;
%This function ensures that angError is in the range [-pi,pi).
angError =CurPos(3)-RefPos(3);
piVal = cast(pi, 'like', angError);
twoPi = cast(2*pi, 'like', angError);
positiveInput = (angError+piVal)> 0;
theta = mod((angError+piVal), twoPi);
positiveInput = (theta == 0) & positiveInput;
theta = theta + twoPi*positiveInput;
theta=theta-piVal;
angError=theta;
%rearPoseToFrontPose Transform pose from rear wheel to front wheel
tHat = [cos(RefPos(3)), sin(RefPos(3))];
CurPos(:, 1) = CurPos(:, 1) + wheelbase * cos(CurPos(3));
CurPos(:, 2) = CurPos(:, 2) + wheelbase * sin(CurPos(3));
d = CurPos(1:2) - RefPos(1:2);
% Tracking error vector
posError = -(d(1)*tHat(2) - d(2)*tHat(1));
delta = -(angError + atan(gain * posError/(Ksoft+curvelocity)));
delta=delta*180/pi;
delta = sign(delta) * min(abs(delta), 35);
steercmd = delta;
上面就是这个算法的整个代码的实现,代码中有部分注释,这里也讲一下:
1.首先,要角度要转换为弧度。
RefPos(3) =RefPos(3)*pi/180 ;
CurPos(3)= CurPos(3)*pi/180;
2.下面代码就是让0度对应0度,360度对应360
%to the interval [0 2*pi] such that zero maps to
%zero and 2*pi maps to 2*pi
twoPiRefPos = cast(2*pi, 'like', RefPos(3));
twoPiCurPos = cast(2*pi, 'like', CurPos(3));
positiveInputRefPos = RefPos(3) > 0;
positiveInputCurPos = CurPos(3) > 0;
thetaRef = mod(RefPos(3), twoPiRefPos);
thetaCur = mod(CurPos(3), twoPiRefPos);
positiveInputRefPos = (thetaRef == 0) & positiveInputRefPos;
thetaRef = thetaRef + twoPiRefPos*positiveInputRefPos;
positiveInputCurPos = (thetaCur == 0) & positiveInputCurPos;
thetaCur = thetaCur + twoPiCurPos*positiveInputCurPos;
RefPos(3)=thetaRef ;
CurPos(3)=thetaCur;
3.其实最应该注意的是要把后轮坐标系转化到前轮坐标中
%rearPoseToFrontPose Transform pose from rear wheel to front wheel
tHat = [cos(RefPos(3)), sin(RefPos(3))];
CurPos(:, 1) = CurPos(:, 1) + wheelbase * cos(CurPos(3));
CurPos(:, 2) = CurPos(:, 2) + wheelbase * sin(CurPos(3));
4.仿真结果如下:
代码下载地址:https://download.csdn.net/download/caokaifa/11236591
注意:这个程序下载打开直接运行matlab/simulink程序:LateralControlStanleyKinematic.slx就好出现上面的结果。


