小程序登录授权完整代码(适合萌新)
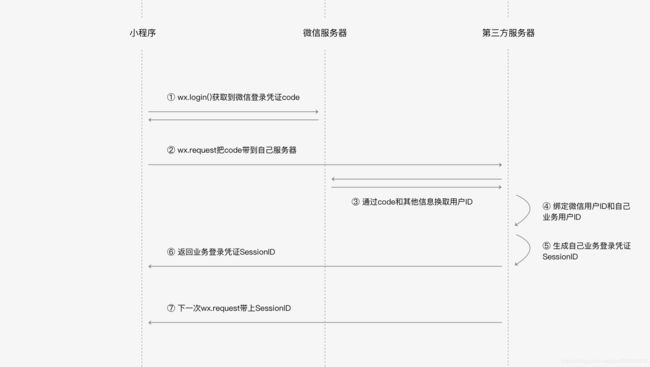
小程序授权登录流程参考官方文档 官方文档
最新的小程序内用户帐号登录规范调整和优化建议官方建议
简单粗爆的代码完整流程:
首先引导页面进入小程序某个页面如详情页,个人中心就可以发起授权请求了,注意:首页要展示完整的界面不能直接进入小程序就发起授权,不然的话审核是不会通过的,参考上面第二条链接。
引导页

大部分都是这种,可根据自己公司的项目编写样式。
我们创建一个目录为authorize。
authorize.wxml代码:
申请获取以下权限
获得你的公开信息(昵称,头像等)
请升级微信版本
authorize.wxss代码:
.header {
    margin: 90rpx 0 90rpx 50rpx;
    text-align: center;
    width: 650rpx;
    height: 300rpx;
    line-height: 450rpx;
}

.header image {
    width: 200rpx;
    height: 200rpx;
    border-radius: 100rpx;
}

.content {
    margin-left: 50rpx;
    margin-bottom: 90rpx;
}

.content text {
    display: block;
    color: #9d9d9d;
    margin-top: 40rpx;
}

.bottom {
    border-radius: 80rpx;
    margin: 70rpx 50rpx;
    font-size: 35rpx;
}
authorize.js代码:
import requestUrl from '../../utils/util.js'

Page({
    data: {
        //判断小程序的API,回调,参数,组件等是否在当前版本可用。
        canIUse: wx.canIUse('button.open-type.getUserInfo')
    },
    onLoad: function (options) {
    },
    bindGetUserInfo: function (e) {//点击的“拒绝”或者“允许
        if (e.detail.userInfo) {//点击了“允许”按钮,
            var that = this;
            requestUrl.requestUrl({//将用户信息传给后台数据库
                url: "/xxxx/xxxx",
                params: {
                    token: wx.getStorageSync('token'),
                    // openId: globalOpenId,//用户的唯一标识
                    nick: e.detail.userInfo.nickName,//微信昵称
                    avatarUrl: e.detail.userInfo.avatarUrl,//微信头像
                    province: e.detail.userInfo.province,//用户注册的省
                    city: e.detail.userInfo.city//用户注册的市
                }
            }).then((data) => {
            // 这一步我设置的是当进入tabBar页面(除了首页)获取授权后会停留在当前界面;而进入到某个详情页面也就是除了tabBar页面授权之后会返回上一页。
                let pages = getCurrentPages();
                if (pages.length) {
                    if (pages.length == 1) {
                        wx.switchTab({
                            url: '../my/my', // 个人中心页面为my,名字随便起
                        })
                    }else {
                        wx.navigateBack({
                            delta: 1,
                        })
                    }
                }
            }).catch((errorMsg) => {
                console.log(errorMsg)
            })
            wx.setStorageSync('userInfo', e.detail.userInfo) // 存储用户信息
        } else {
            wx.showModal({
                title: '警告',
                content: '您点击了拒绝授权,将无法进入小程序,请授权之后再进入!!!',
                showCancel: false,
                confirmText: '返回授权',
                success: function (res) {
                    if (res.confirm) {
                    }
                }
            })
        }
    }
})
authorize.json不多说了。
这样的话授权页面就编写完毕。剩下的就是如果检测有无授权,以及怎么在其它页面调起用户授权。
app.js页面
import requestUrl from './utils/util.js'
App({
    onLaunch: function () {
        this.checkout()
    },
    //检验code
    checkout: function () {
        wx.checkSession({
            success: function() {
                //session_key 未过期,并且在本生命周期一直有效
                console.log("未过期",wx.getStorageSync('token'))
            },
            fail: function() {
                //session_key 已经失效,需要重新执行登录流程
                console.log("过期了",wx.getStorageSync('token'))
                wx.login({
                    success: res => {
                        // 发送 res.code 到后台换取 openId, sessionKey, unionId
                        if (res.code) {
                            console.log('code', res.code)
                            requestUrl.requestUrl({
                                url: "/xx/xx/xx",
                                params: {
                                    code: res.code
                                }
                            }).then((res) => {
                                wx.setStorageSync('openId', res.data.data.openid);
                                wx.setStorageSync('token', res.data.data.token);
                            }).catch((errorMsg) => {
                                console.log(errorMsg)
                            })
                        }
                    }
                })
            }
        })
    },
    //检验授权的方法
    getSettings:function () {
        let that = this
        wx.getSetting({
            success: (res) => {
                if (res.authSetting['scope.userInfo']) {//授权了,可以获取用户信息了
                    wx.getUserInfo({
                        success: (res) => {
                        }
                    })
                } else {//未授权,跳到授权页面
                    wx.redirectTo({
                        url: '../authorize/authorize',//授权页面
                    })
                }
            }
        })
    },
    globalData: {
        userInfo: "",//用户信息
        openId: "",//登录用户的唯一标识
        appid: '',//appid
        AppSecret: '',//secret秘钥
        token: ''
    },
    onHide: function () {//小程序退出时触发的事件
        console.log("小程序完全退出了")
    }
})
getSettings()这个是检验授权的方法,在其它页面使用比如my.js
const app = getApp()
Page({
  data: {
    userInfo: wx.getStorageSync('userInfo')
  },

  onLoad: function (options) {
    app.getSettings()  // 进入页面就调用此方法
  },
  onShow() {
    this.setData({
      userInfo: wx.getStorageSync('userInfo')
    })
  },
})
checkout()是检查code是否过期的方法,比如清除缓存啊,长时间不进入小程序过期等等
最后封装方法放一下:
util.js
//封装请求
const server = 'xxxxxxxxxxxxx';//正式域名 必须为https
const requestUrl = ({url, params, success, method = "post"}) => {
    wx.showLoading({
        title: '加载中',
    });
    let headerPost = {'content-type': 'application/x-www-form-urlencoded'}
    let headerGet = {'content-Type': 'application/json'}
    return new Promise((resolve, reject) => {
        wx.request({
            url: server + url,
            method: method,
            data: params,
            header: method = 'post' ? headerPost : headerGet,
            success: (res) => {
                wx.hideLoading();
                if (res['statusCode'] == 200) {
                    resolve(res)//异步成功之后执行的函数
                } else {
                    wx.showToast({
                        title: res.data.msg || '请求出错',
                        icon: 'none',
                        duration: 2000,
                        mask: true
                    })
                    reject(res.ErrorMsg);
                }
            },
            fail: (res) => {
                wx.hideLoading();
                wx.showToast({
                    title: res.data.msg || '',
                    icon: 'none',
                    duration: 2000,
                    mask: true
                })
                reject('网络出错');
            },
            complete: function () {
                wx.hideLoading()
            }
        })
    })
}
module.exports = {
    requestUrl: requestUrl
}
在其它页面使用:
import requestUrl from './utils/util.js'
  requestUrl.requestUrl({
       url: "xxxxx",
        params: {

        }
  }).then((data) => {

  }).catch((errorMsg) => {

  })
over。贴的代码注释很重要,记得详看