基于Spring Boot+Vue的博客系统 09——登录功能的实现(码云第三方登录)
0. 第三方登录的使用
博客提供码云的第三方登录,用户可以通过码云账号登录博客
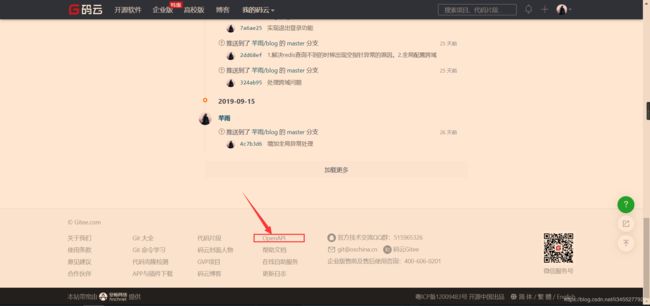
登录码云,在下方找到OpenApi

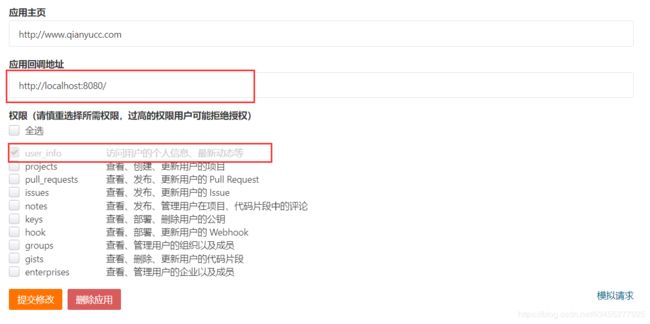
根据文档创建一个应用,注意这里应用主页可以随便填一个网址,因为项目上线的时候才用得到,应用回调地址为前端项目的URL地址,权限我们只需要用户信息就行。

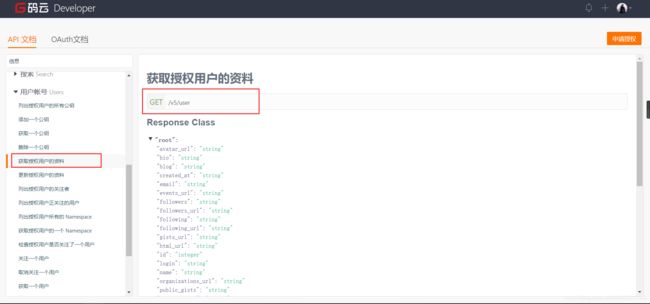
在API文档可以找到获取用户信息的api,需要注意的是:获取用户信息的api接口随着时间可能改变,当获取失败的时候可以找到官方文档看api是否发生了改变

1. 登录流程
这里推荐一个设计流程图的网站:https://www.processon.com/
登录过程采用token作为登陆标识,前端将token存储在localStorage中,后端存储在redis中,逻辑如下:

2. 前端设计
导航栏设计
使用vuex保存全局状态,在app.js里面定义isLogin变量来表示用户是否登录,初始值为false
/src/store/modules/app.js
const app = {
  state: {
    isLogin: false,
  },
  mutations: {
    setIsLogin(state, isLogin) {
      state.isLogin = isLogin;
    }
  }
}
export default app;
在navBar.vue使用isLogin来判断是否显示登录按钮或者用户信息
 <b-navbar-nav class="ml-auto">
   <b-nav-item to="/">归档b-nav-item>
   <b-nav-item to="/">关于我b-nav-item>
   <b-nav-item to="/">留言b-nav-item>

   <b-nav-item-dropdown :text="userInfo.name" right v-if="isLogin">
     <b-dropdown-item  @click="exit()">退出登录b-dropdown-item>
   b-nav-item-dropdown>
   <b-nav-item
       v-else
       href="https://gitee.com/oauth/authorize?client_id=2b6cf5c72f27da85a00e2c101ca7a734985ea52f4aa24999636a7f592f94a0ab&redirect_uri=http://localhost:8080&response_type=code"
     >登录b-nav-item>


   <b-nav-item v-if="isLogin">
     <b-img class="head-img" :src="userInfo.avatarUrl" rounded="circle">b-img>
   b-nav-item>
 b-navbar-nav>
定义exit()函数实现退出登录功能,退出登录只需将token清空,并将isLogin设置为false
<script>
import { mapState, mapMutations } from "vuex";
export default {
  name: "navBar",
  data() {
    return {};
  },
  computed: {
    isLogin: state => state.app.isLogin,
    userInfo: state => state.user.userInfo
  },
  methods: {
    ...mapMutations(["setIsLogin"]),
    // 退出登录
    exit() {
      window.localStorage.removeItem("token");
      this.setIsLogin(false);
    }
  }
};
script>
处理回调地址中code
实现上面功能之后,点击登录之后会跳转到我们创建的应用的“应用回调地址”上面,并携带code,如下图所示:

因为跳转的页面是博客项目的首页(即路由地址对应的/),所以我们在首页(mainPage.vue)里面处理code
<script>
import carousel from "@/components/common/carousel";
import articles from "@/components/common/articles";
import userInfo from "@/components/common/userInfo";
import tags from "@/components/common/tags";
import articleKinds from "@/components/common/articleKinds";

import { mapActions, mapMutations } from "vuex";

export default {
  name: "mainPage",
  components: {
    carousel,
    articles,
    userInfo,
    tags,
    articleKinds
  },
  methods: {
    ...mapActions(["login"]),
    ...mapMutations(["setIsLogin", "setToken"]),
    /**
     * 获取浏览器地址上面的code,
     */
    getCode() {
      let arr = window.location.href.split("?");
      let code;
      if (arr.length > 1) {
        code = arr[1].split("=");
        if (code[0] == "code") {
          code = code[1].split("#")[0];
        } else {
          code = null;
        }
      }
      return code;
    }
  },
  created() {
    let code = this.getCode();
    if (code) {
      // 向服务端发送请求,并携带code,获取带有token用户信息,设置vuex中token和userInfo
    } else {
      // 检查本地是否有token,如果有就向服务端发送请求检查token是否过期
      // 如果没有token,不执行任何操作
    }
  }
};
</script>
3. 服务端实现
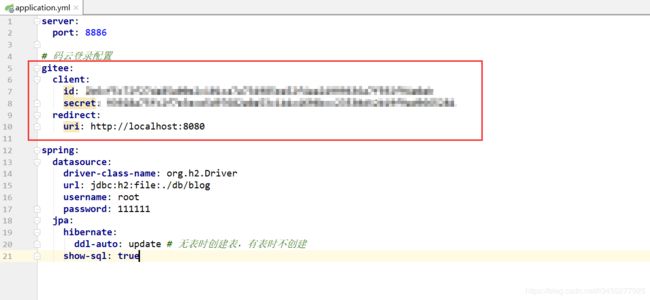
在application.yml中配置码云登录需要用到的信息

新建com.qianyucc.blog.model.dto.UserDTO类,封装从码云获取的用户信息
package com.qianyucc.blog.model.dto;

import lombok.*;

/**
 * @author lijing
 * @date 2019-10-11 14:43
 * @description 封装从码云获取的用户信息
 */
@Data
public class UserDTO {
    private Long id;
    private String login;
    private String name;
    private String avatarUrl;
    private String bio;
}
新建com.qianyucc.blog.provider.GiteeProvider类,用来封装码云登录操作
package com.qianyucc.blog.provider;

import cn.hutool.core.util.*;
import cn.hutool.http.*;
import com.alibaba.fastjson.*;
import com.qianyucc.blog.model.dto.*;
import lombok.extern.slf4j.*;
import org.springframework.beans.factory.annotation.*;
import org.springframework.stereotype.*;

import java.util.*;

/**
 * @author lijing
 * @date 2019-10-11 14:41
 * @description 根据code获取access_token,在哪access_token换取用户信息
 */
@Component
@Slf4j
public class GiteeProvider {
    private final String GET_ACCESS_TOKEN_URL = "https://gitee.com/oauth/token?grant_type=authorization_code&code={}&client_id={}&redirect_uri={}&client_secret={}";
    private final String GET_USER_INFO_URL = "https://gitee.com/api/v5/user?access_token={}";

    @Value("${gitee.redirect.uri}")
    private String redirectUri;
    @Value("${gitee.client.id}")
    private String clientId;
    @Value("${gitee.client.secret}")
    private String clientSecret;

    /**
     * 获取用户信息
     *
     * @param code
     * @return
     */
    public UserDTO getUserinfo(String code) {
        String url = StrUtil.format(GET_ACCESS_TOKEN_URL, code, clientId, redirectUri, clientSecret);
        String respData = HttpUtil.post(url, new HashMap<>());
        String accessToken = JSON.parseObject(respData).getString("access_token");
        String userInfoStr = HttpUtil.get(StrUtil.format(GET_USER_INFO_URL, accessToken));
        // fastJson可以自动将下划线转驼峰,例如avatar_url可以映射为avatarUrl或者avatarurl
        UserDTO userDTO = JSON.parseObject(userInfoStr, UserDTO.class);
        return userDTO;
    }
}
StrUtil和HttpUtil都是Hutool工具包中的类,可以通过简单的代码实现请求发送和字符串处理
JSON是fastJson里面的类,可以解析json字符串转换为java类,并可以自动将下划线映射为驼峰
4. 实现controller
这里使用redis缓存token,redis的安装和简单操作可见:https://www.runoob.com/redis/redis-tutorial.html
配置redis,这里我的redis没有密码,就只做如下简单配置
# redis
redis:
  hostname: localhost
  port: 6379
导入依赖
<dependency>
     <groupId>org.springframework.bootgroupId>
     <artifactId>spring-boot-starter-data-redisartifactId>
dependency>
新建com.qianyucc.blog.config.RedisConfig类,配置键值的序列化器,防止存入的值出现中文乱码
package com.qianyucc.blog.config;

import org.springframework.boot.autoconfigure.*;
import org.springframework.boot.autoconfigure.data.redis.*;
import org.springframework.context.annotation.*;
import org.springframework.data.redis.connection.lettuce.*;
import org.springframework.data.redis.core.*;
import org.springframework.data.redis.serializer.*;

import java.io.*;
import java.nio.charset.*;

/**
 * @author lijing
 * @date 2019-10-11 15:00
 * @description redis配置
 */
@Configuration
@AutoConfigureAfter(RedisAutoConfiguration.class)
public class RedisConfig {
    @Bean
    public RedisTemplate<String, Serializable> redisCacheTemplate(LettuceConnectionFactory redisConnectionFactory) {
        RedisTemplate<String, Serializable> template = new RedisTemplate<>();
        // key的序列化器设置成StringRedisSerializer
        template.setKeySerializer(new StringRedisSerializer());
        // 解决中文乱码问题
        template.setValueSerializer(new GenericToStringSerializer<String>(String.class, Charset.forName("UTF-8")));
        template.setConnectionFactory(redisConnectionFactory);
        return template;
    }
}
定义com.qianyucc.blog.service.UserService类,处理关于用户的业务
package com.qianyucc.blog.service;

import com.qianyucc.blog.model.dto.*;
import com.qianyucc.blog.model.entity.*;
import com.qianyucc.blog.repository.*;
import org.springframework.beans.*;
import org.springframework.beans.factory.annotation.*;
import org.springframework.stereotype.*;

import java.util.*;

/**
 * @author lijing
 * @date 2019-10-11 15:08
 * @description 处理与User相关的业务
 */
@Service
public class UserService {
    @Autowired
    private UserRepository userRepository;

    public UserDO login(UserDTO userDTO, String token) {
        UserDO userDO = new UserDO();
        BeanUtil.copyProperties(userDTO, userDO);

        userDO.setToken(token);
        userDO.setGmtUpdate(System.currentTimeMillis());
        userDO.setGmtCreate(userDO.getGmtUpdate());

        Optional<UserDO> byId = userRepository.findById(userDTO.getId());
        byId.ifPresent(dbUser -> userDO.setGmtCreate(dbUser.getGmtCreate()));
        return userRepository.save(userDO);
    }

    public UserVO findUserById(Long id) {
        UserDO userDO = userRepository.findById(id).orElse(new UserDO());
        return UserUtil.doToVo(userDO);
    }
}
定义com.qianyucc.blog.controller.comm.GiteeController,实现码云登录
package com.qianyucc.blog.controller.comm;

import com.qianyucc.blog.model.dto.*;
import com.qianyucc.blog.model.entity.*;
import com.qianyucc.blog.provider.*;
import com.qianyucc.blog.service.*;
import lombok.extern.slf4j.*;
import org.springframework.beans.factory.annotation.*;
import org.springframework.data.redis.core.*;
import org.springframework.web.bind.annotation.*;

import java.util.*;
import java.util.concurrent.*;

/**
 * @author lijing
 * @date 2019-10-11 15:07
 * @description 实现码云登录
 */
@RestController
@RequestMapping("/api/comm/gitee")
@Slf4j
public class GiteeController {
    @Autowired
    private GiteeProvider giteeProvider;
    @Autowired
    private UserService userService;
    @Autowired
    private RedisTemplate<String,String> redisTemplate;

    @GetMapping("/callback")
    public UserDO callback(String code) {
        UserDTO userDTO = giteeProvider.getUserinfo(code);
        String token = UUID.randomUUID().toString();
        // 登录之后将token放在redis中
        UserDO userDO = userService.login(userDTO, token);
        redisTemplate.opsForValue().set(token, userDO.getId().toString(), 30, TimeUnit.MINUTES);
        return userDO;
    }
}
获取到用户信息之后,生成token,然后调用登录业务,并将token存入redis中,设置过期时间为30分钟,这里使用token作为key,用户的id作为value
- 定义
com.qianyucc.blog.controller.comm类,实现与用户相关的api
package com.qianyucc.blog.controller.comm;

import cn.hutool.core.map.*;
import com.qianyucc.blog.model.entity.*;
import com.qianyucc.blog.service.*;
import lombok.extern.slf4j.*;
import org.springframework.beans.factory.annotation.*;
import org.springframework.data.redis.core.*;
import org.springframework.web.bind.annotation.*;

/**
 * @author lijing
 * @date 2019-10-11 15:29
 * @description 用户相关api
 */
@RestController
@RequestMapping("/api/comm/user")
@Slf4j
public class UserController {
    @Autowired
    private UserService userService;
    @Autowired
    private RedisTemplate<String, String> redisTemplate;

    @GetMapping("/getUserInfo")
    public UserDO getUserInfo(String token, HttpServletResponse response) {
        String redisToken = redisTemplate.opsForValue().get(token);
        if (redisToken == null) {
            response.setStatus(403);
            return null;
        } else {
            return userService.findUserById(Long.valueOf(redisToken));
        }
    }
}
这里如果token存在的话就查找用户信息,返回到前端。不存在的话就返回null,并把status设置为403
由于前后端分离之后会产生跨域问题,所以需要在Spring Boot项目中配置跨域设置
package com.qianyucc.blog.config;

import org.springframework.beans.factory.annotation.*;
import org.springframework.context.annotation.*;
import org.springframework.web.servlet.config.annotation.*;

/**
 * @author lijing
 * @date 2019-10-11 16:44
 * @description 解决跨域问题
 */
@Configuration
public class WebConfig implements WebMvcConfigurer {
    @Value("${gitee.redirect.uri}")
    private String redirectUri;

    // 跨域
    @Override
    public void addCorsMappings(CorsRegistry registry) {
        // 设置允许跨域的路径
        registry.addMapping("/**")
                .allowedHeaders("*")
                // 设置允许跨域请求的域名
                .allowedOrigins(redirectUri)
                // 是否允许证书 不再默认开启
                .allowCredentials(true)
                // 设置允许的方法
                .allowedMethods("*")
                // 跨域允许时间
                .maxAge(3600);
    }
}
5. 前后端整合实现登录功能
- 在
/src/request/api/url.js中添加url
const baseUrl = "http://localhost:8886/";

const getUserInfoUrl = baseUrl + '/api/comm/user/getUserInfo';
const callbackUrl = baseUrl + '/api/comm/gitee/callback';

export default {
  getUserInfoUrl,
  callbackUrl
};
新建/src/request/user.js文件,定义所有与用户有关的api
// 导入axios实例
import axios from "@/request/http"
// 导入所有url
import url from '@/request/api/url'

export default {
  getUserInfoByCode(code, callback) {
    axios
      .get(url.callbackUrl, {
        params: {
          code: code
        }
      })
      .then(callback)
      .catch(err => {
        console.log("getUserInfoByCode Error");
      });
  },
  getUserInfoByToken(token, callback) {
    axios
      .get(url.getUserInfoUrl, {
        params: {
          token: token
        }
      })
      .then(callback)
      .catch(err => {
        console.log("getUserInfoByToken Error");
      });
  }
}
在/src/request/api/index.js中导入user.js
/**
 * api接口的统一出口
 */
// 文章模块接口
import article from '@/request/api/article';
import user from '@/request/api/user';

// 导出接口
export default {
  article,
  user
}
最后实现mainPage.vue的created()函数:
created() {
  let code = this.getCode();
  if (code) {
    this.$api.user.getUserInfoByCode(code, resp => {
      let userInfo = resp.data;
      window.localStorage.setItem("token", userInfo.token);
      this.setIsLogin(true);
      this.login(userInfo);
    });
    // 将地址栏地址设为不带code的,看着顺眼,也防止多次提交
    window.history.pushState({}, 0, "http://localhost:8080/#/");
  } else {
    let token = window.localStorage.getItem("token");
    // 如果未登录并且有token就获取用户信息存入vuex中
    if (!this.isLogin && token) {
      this.setToken(token);
      this.$api.user.getUserInfoByToken(token, resp => {
        this.setIsLogin(true);
        this.login(resp.data);
      });
    }
  }
}
