mmdetection源码笔记(一):train.py解读
引言:
刚接触mmdetection,建议不着急看代码,可以先去把config文件夹下的py配置文件先去好好了解一下,因为,要改动或者微调、以及复现论文中的精度,基本上都在config文件夹下进行修改数据。
- 【干货】用mmdetection,在COCO数据集上跑通faster R-CNN(测试、训练)
- 【干货】mmdetection使用coco格式的CrowdHuman数据集进行训练及测试(附调参过程)
上面文章是博主刚开始接触mmdetection时,跑通mmdetection的过程和复现论文CrowdHuman里fpn精度的过程,里面有 configs/faster_rcnn_r50_fpn_1x.py文件里的各个字段详细的解释。可以根据配置文件,修改参数,进行复现结果。
其他的py配置文件,就大同小异了,基本上差不多。
mmdetection源码解读,本文就直接先train.py文件下手。
train.py文件
里面主要就两个函数,parse_args()和main()。
作用:
parse_args():其实就是获取命令行参数的一个过程,从创建解析对象,到对其解析(有点拗口,但不是重点,只要知道,这个函数用来获得命令行的各个参数就行了。)
main():函数主入口,先做了一些config文件,work_dir以及log的操作(这些操作都是从命令行获得的,或者从命令行带有的文件里得到的参数等。)。
然后最主要的三个步骤就是调用build_detector()来创建模型,调用build_dataset()对数据集进行注册,然后在训练检测器train_detector()。
这里的三个函数build_detector()、build_dataset()、train_detector()我们先不讨论具体的实现。
根据我们之前看的py配置文件,以及跑通mmdetection,大致可以知道。执行train.py时,最主要的参数就是py配置文件。
博主当时跑通mmdetection时,执行训练的命令:
python tools/train.py configs/faster_rcnn_r50_fpn_1x.py
所以呢,我们就可以知道,build_detection()就是将py配置文件里的数据,加载到建立的模型中,然后根据py配置文件中的数据集路径,执行build_dataset()加载数据集模型,最后进行训练train_detector()。
ok,现在详细的来看下面代码。
# -*- coding: utf-8 -*-
from __future__ import division
import argparse
import os
from mmcv import Config
from mmdet import __version__
from mmdet.datasets import build_dataset
from mmdet.apis import (train_detector, init_dist, get_root_logger,
                        set_random_seed)
from mmdet.models import build_detector
import torch


def parse_args():
    #argparse是python标准库里面用来处理****命令行参数****的库
    #ArgumentParser()方法参数须知:一般我们只选择用description
    #description=None,    - help时显示的开始文字
    parser = argparse.ArgumentParser(description='Train a detector')#创建一个解析对象
    # add_argument向该对象中添加你要关注的命令行参数和选项
    # help		可以写帮助信息
    parser.add_argument('--config', help='train config file path')
    parser.add_argument('--work_dir', help='the dir to save logs and models')
    parser.add_argument(
        '--resume_from', help='the checkpoint file to resume from')
    #action	表示值赋予键的方式,这里用到的是bool类型
    parser.add_argument(
        '--validate',
        action='store_true',
        help='whether to evaluate the checkpoint during training')
    # type   - 指定参数类型
    parser.add_argument(
        '--gpus',
        type=int,
        default=1,
        help='number of gpus to use '
        '(only applicable to non-distributed training)')
    parser.add_argument('--seed', type=int, default=None, help='random seed')
    parser.add_argument(
        '--launcher',
        choices=['none', 'pytorch', 'slurm', 'mpi'],
        default='none',
        help='job launcher')
    parser.add_argument('--local_rank', type=int, default=0)
    args = parser.parse_args() #进行解析
    if 'LOCAL_RANK' not in os.environ:
    #os.environ[''] : 获取系统环境变量
        os.environ['LOCAL_RANK'] = str(args.local_rank)
    return args

def main():
    args = parse_args()#获得命令行参数,实际上就是获取config配置文件
    cfg = Config.fromfile(args.config)#读取配置文件
    # set cudnn_benchmark
    #在图片输入尺度固定时开启,可以加速,一般都是关的,只有在固定尺度的网络如SSD512中才开启
    if cfg.get('cudnn_benchmark', False):
        torch.backends.cudnn.benchmark = True
    # update configs according to CLI args
    if args.work_dir is not None:
    # 创建工作目录存放训练文件,如果不键入,会自动从py配置文件中生成对应的目录,key为work_dir
        cfg.work_dir = args.work_dir
    if args.resume_from is not None:
    # 断点继续训练的权值文件,为None就没有这一步的设置
        cfg.resume_from = args.resume_from
    cfg.gpus = args.gpus

    # init distributed env first, since logger depends on the dist info.
    if args.launcher == 'none':
        distributed = False
    else:
        distributed = True
        init_dist(args.launcher, **cfg.dist_params)

    # init logger before other steps
    logger = get_root_logger(cfg.log_level)
    #log_level在配置文件里有这个key,value=“INFO”训练一次batch就可以看到输出这个str
    logger.info('Distributed training: {}'.format(distributed))

    # set random seeds 关于设置随机种子的原因,请看文末推荐文章第一篇。
    if args.seed is not None:
        logger.info('Set random seed to {}'.format(args.seed))
        set_random_seed(args.seed)
    #
    #  1.  build_detector()在models/builder.py里,其实就是间接调用了build()。搭建模型
    #
    model = build_detector(
        cfg.model, train_cfg=cfg.train_cfg, test_cfg=cfg.test_cfg)
    #
    #  2.  将训练配置传入,其中 build_dataset()在mmdet/datasets/builder.py里实现
    #
    train_dataset = build_dataset(cfg.data.train)#配置文件中的data字典,里的字段
    #train_dataset就是一个字典了,包含了训练时的所有参数字段。
    if cfg.checkpoint_config is not None:
#save mmdet version, config file content and class names in checkpoints as meta data
#将mmdet版本,配置文件内容和检查点中的类名称保存为元数据
        # 要注意的是,以前发布的模型是不存这个类别等信息的,
        # 用的默认COCO或者VOC参数,所以如果用以前训练好的模型检测时会提醒warning一下,问题不大。
        cfg.checkpoint_config.meta = dict(
            mmdet_version=__version__,
            config=cfg.text,
            CLASSES=train_dataset.CLASSES)
            #得到数据集的类,比如coco类啊,voc类的等,都是一个类
            #都要在registry里进行注册。可在datasets文件夹下的py文件看建立模型过程。
    # add an attribute for visualization convenience 添加属性以方便可视化
    model.CLASSES = train_dataset.CLASSES
    # model的CLASSES属性本来没有的,但是python不用提前声明,再赋值的时候自动定义变量
    #
    #  3.  开始训练
    #
    train_detector(
        model,
        train_dataset,
        cfg,                     #配置文件
        distributed=distributed, #分布式训练 true or flase
        validate=args.validate,
        logger=logger)


if __name__ == '__main__':
    main()
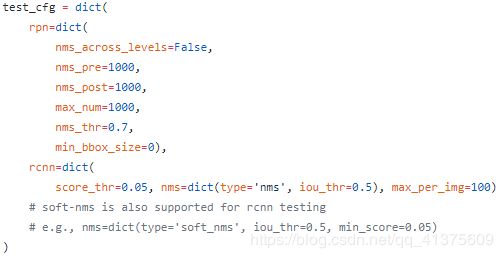
在第86行处,cfg.model, train_cfg=cfg.train_cfg, test_cfg=cfg.test_cfg,cfg为py配置文件里的内容,配置文件是一个字典,每个字段的value值还可能又是个字典,本处就是将key为model、train_cfg、test_cfg的value传入函数build_detector中。下面分别是key为model、train_cfg、test_cfg的截图(该配置文件为faster_rcnn_r50_fpn_1x.py)


通过上面的大量注释,相信已经大致可以知道,train.py主要的流程。接下来就是对建立模型、搭建网络、包括loss处理等部分、创建数据集模型、训练模型等的源码解读了。
mmdetection源码解读系列文章:
- mmdetection源码笔记(二):搭建模型之registry.py和builder.py解读(上)
- mmdetection源码笔记(二):创建网络模型之cascade_rcnn.py的解读(中)
- mmdetection源码笔记(二):cascade_rcnn.py搭建模型过程中各个module的forward()的代码解读(下)(待完成)
- mmdetection源码笔记(三):创建数据集模型之datasets/coco.py的解读(上)
- mmdetection源码笔记(三):创建数据集模型之datasets/custom.py的解读(下)
- mmdetection源码笔记(四):训练模型之train_detector()的解读
- mmdetection源码笔记(五):测试之test()部分的解读
推荐文章
- 深度学习笔记:随机种子的作用
参考
- mmdetection源码注释