目标检测任务数据集介绍-COCO API介绍
链接上篇简单介绍了MS COCO数据集的下载和数据结构以及API的下载安装,本文主要以官方发布的demo脚本为例,记录了COCO数据集API的使用方法。比较冗长基础,适合入门。
COCO API介绍
- 简介
- 安装
- 使用方法
- pycocoDemo.ipynb
- pycocoEvalDemo.ipynb
简介
COCO官网中有对API的简介信息链接。
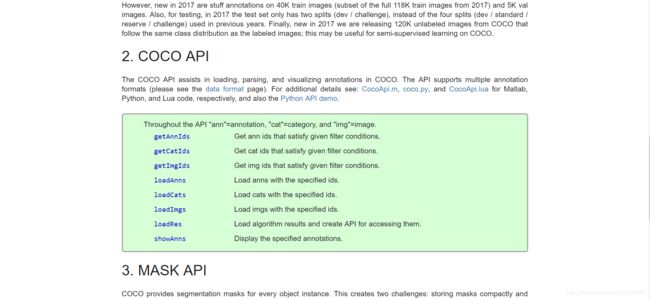
COCO API可以用于加载,解析和可视化COCO数据集。API支持COCO数据集的多种标注格式,也有支持分割掩码的MASK API。官方发布了Matlab、Python和Lua的使用接口。本文只介绍python的使用接口。
python接口在官网中只有以下简单的注解,主要解释文本都在下载安装pycocotools后的coco.py代码开头的注释内容中,可以查看检索,本文通过逐段运行demo脚本的方式来通过具体的代码学习API的使用。
Throughout the API "ann"=annotation, "cat"=category, and "img"=image.
getAnnIdsGet ann ids that satisfy given filter conditions.
getCatIdsGet cat ids that satisfy given filter conditions.
getImgIdsGet img ids that satisfy given filter conditions.
loadAnnsLoad anns with the specified ids.
loadCatsLoad cats with the specified ids.
loadImgsLoad imgs with the specified ids.
loadResLoad algorithm results and create API for accessing them.
showAnnsDisplay the specified annotations.
安装
COCO官网发布了Linux和OSX系统的安装代码,貌似就没有考虑win系统的安装(讲道理微软的数据集没考虑到windows环境的使用接口这是出于什么考量,也是很迷啊)。这里找到了大佬修改的适用于win的COCO API地址https://github.com/philferriere/cocoapi.
四种安装方法:
- cmd中使用pip安装
$ pip install git+https://github.com/philferriere/cocoapi.git#subdirectory=PythonAPI
- 下载github压缩文件后,解压,和下载的COCO train2014/val2014文件夹在同一个目录。然后切换到cocoapi\PythonAPI目录,运行以下命令,第一种方法没有将库安装到python site-packages目录,使用时通过相对路径import支持库,第二种方法相当于pip install,使用时直接import即可。
# install pycocotools locally
python setup.py build_ext --inplace

# install pycocotools to the Python site-packages
python setup.py build_ext install
安装过程遇到问题可以参考一些大佬的解决方法https://blog.csdn.net/u010103202/article/details/87905029、https://www.jianshu.com/p/8658cda3d553。
解决“unable to find vcvarsall.bat”问题:
先更新setuptools:
pip install --upgrade setuptools
https://devblogs.microsoft.com/python/unable-to-find-vcvarsall-bat/
然后下载安装Visual C++ Build Tools 2015。
若出现VS2015报“安装包丢失或损坏”问题,则原因为:microsoft root certificate authority 2010、microsoft root certificate authority 2011证书未安装,导致文件校验未通过,下载并安装这两个证书即可。
链接:https://pan.baidu.com/s/1fbIWjuczPFTtZ_hm9aYuaw
提取码:8swi
解压出里面两个注册文件【受信任的根证书颁发机构】。右键文件选择安装证书,弹出对话框点击下一步,选择将所有证书放入下列存储,选择【受信任的根证书颁发机构】点击确定下一步直至安装完成,win+ r ,输入 certmgr.msc,在受信任的根证书颁发机构里刷新 ,看是否有"Microsoft Root Certificate Authority 2010" “Microsoft Root Certificate Authority 2011”. ,有的话就在vs2015安装下点击重试就可以了。安装过程还有其它问题可以参考博客内容。如果上述方法均不能解决,就尝试下完整安装VS,一般就没问题了。
- 也可以在https://pypi.org/网站中搜索pycocotools,下载压缩包解压后,通过python setup.py install安装

- 直接pip install pycocotools安装
这里第3,4种方法最简单,但没有列在前面,是因为有些代码中对coco的api做了自定义的修改,需要用修改后的版本,故列在了后面,大家视自己的情况酌情使用。
使用方法
安装完成后,就通过官方发布的demo示例pycocoDemo.ipynb和pycocoEvalDemo.ipynb两个脚本https://github.com/philferriere/cocoapi/tree/master/PythonAPI/demos(该文件在我们下载压缩包的PythonAPI\demos路径下)来学习使用COCO数据集API。本文没有通过notebook运行代码,将代码拷贝到spyder中运行学习(个人习惯,也可以直接在notebook中运行pycocoDemo.ipynb)。
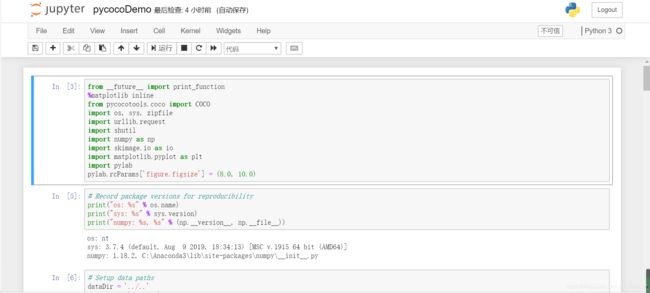
在notebook中打开pycocoDemo.ipynb结果如图所示,本文也是根据ipynb中所设置的逐段运行,查看运行结果来搞清楚每部分代码做了什么工作。
需要注意的路径问题:在运行时,将下载得到的安装包与2014数据影像数据images以及标注数据annotations文件夹解压到同一目录下,如图所示,本文中cocoapi-win-master即为下载后压缩包解压的文件夹。

然后将demos文件夹中的ipynb文件拷贝到PythonAPI文件夹中(本文将ipynb脚本中的代码拷贝到了py文件中运行)即可运行。

pycocoDemo.ipynb
逐段运行并解释该脚本中的代码。
- 首先当然是导入了各种支持库,其中pycocotools即为我们安装的支持库。
from __future__ import print_function
from pycocotools.coco import COCO
import os, sys, zipfile
import urllib.request
import shutil
import numpy as np
import skimage.io as io
import matplotlib.pyplot as plt
import pylab
pylab.rcParams['figure.figsize'] = (8.0, 10.0)
- 输出各支持库的版本,以利于其他人复现该代码
# Record package versions for reproducibility
print("os: %s" % os.name)
print("sys: %s" % sys.version)
print("numpy: %s, %s" % (np.__version__, np.__file__))
本机输出结果:
os: nt
sys: 3.7.4 (default, Aug  9 2019, 18:34:13) [MSC v.1915 64 bit (AMD64)]
numpy: 1.18.2, C:\Anaconda3\lib\site-packages\numpy\__init__.py
下载支持库的版本如图,python为3.6,numpy为1.13,经测试本机的环境也可以正常运行。

- 设置数据路径,因为本文演示所用数据为2014年数据所以第三行数据类型dataType修改为了val2014.
# Setup data paths
dataDir = '../..'
dataType = 'val2014'
annDir = '{}/annotations'.format(dataDir)
annZipFile = '{}/annotations_train{}.zip'.format(dataDir, dataType)
annFile = '{}/instances_{}.json'.format(annDir, dataType)
annURL = 'http://images.cocodataset.org/annotations/annotations_train{}.zip'.format(dataType)
print (annDir)
print (annFile)
print (annZipFile)
print (annURL)
输出各路径(对照自己的路径是不是一样):
../../annotations
../../annotations/instances_val2014.json
../../annotations_trainval2014.zip
http://images.cocodataset.org/annotations/annotations_trainval2014.zip
- 检查路径与文件是否存在,不存在的话下载zip文件并且解压
# Download data if not available locally
if not os.path.exists(annDir):
    os.makedirs(annDir)
if not os.path.exists(annFile):
    if not os.path.exists(annZipFile):
        print ("Downloading zipped annotations to " + annZipFile + " ...")
        with urllib.request.urlopen(annURL) as resp, open(annZipFile, 'wb') as out:
            shutil.copyfileobj(resp, out)
        print ("... done downloading.")
    print ("Unzipping " + annZipFile)
    with zipfile.ZipFile(annZipFile,"r") as zip_ref:
        zip_ref.extractall(dataDir)
    print ("... done unzipping")
print ("Will use annotations in " + annFile)
- 初始化实例标注文件的COCO api
# initialize COCO api for instance annotations
coco=COCO(annFile)
该步骤属于核心步骤,仔细阅读该行代码,COCO由from pycocotools.coco import COCO导入支持库,通过COCO()实例化对象,参数为annFile,返回之前设置路径的部分可以查到annFile=’…/…/annotations/instances_val2014.json’,即标注json文件的路径。
- 显示COCO的类别和上级类别
# display COCO categories and supercategories
cats = coco.loadCats(coco.getCatIds())
nms=[cat['name'] for cat in cats]
print('COCO categories: \n{}\n'.format(' '.join(nms)))

nms = set([cat['supercategory'] for cat in cats])
print('COCO supercategories: \n{}'.format(' '.join(nms)))
输出结果:
COCO categories:
person bicycle car motorcycle airplane bus train truck boat traffic light fire hydrant stop sign parking meter bench bird cat dog horse sheep cow elephant bear zebra giraffe backpack umbrella handbag tie suitcase frisbee skis snowboard sports ball kite baseball bat baseball glove skateboard surfboard tennis racket bottle wine glass cup fork knife spoon bowl banana apple sandwich orange broccoli carrot hot dog pizza donut cake chair couch potted plant bed dining table toilet tv laptop mouse remote keyboard cell phone microwave oven toaster sink refrigerator book clock vase scissors teddy bear hair drier toothbrush
COCO supercategories:
food person furniture appliance sports accessory electronic indoor outdoor kitchen animal vehicle
cats,nms(先存储name,再存储supercategory)变量分别存储的内容为:
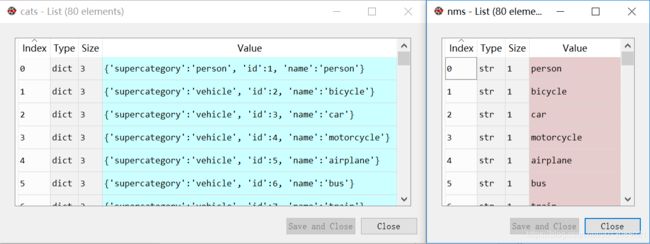
coco对象是通过类别序号Id来load载入每个类别的信息。其中coco.getCatIds()返回了instances_val2014.json文件中所有的类别序号,是一个长度为80的list,其中序号并不是连续的,最大到90,该点在该博文已说明。
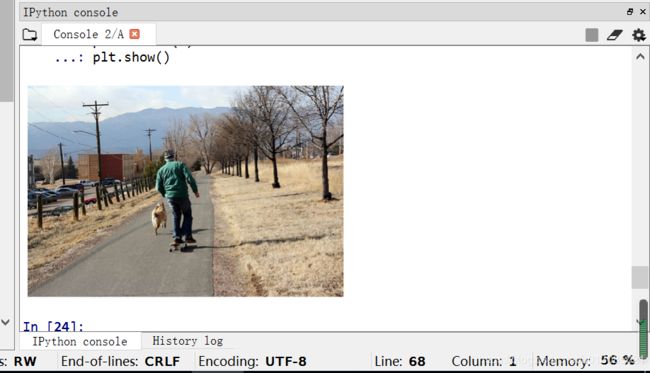
- 取出所有包含给定类别的影像序列号Id,在以下代码的意思就是取出所有包含’person’,‘dog’,'skateboard’三种类别对象的影像序列号,然后随机选择其中一幅影像,在代码中是选择了Id为324158的影像。
# get all images containing given categories, select one at random
catIds = coco.getCatIds(catNms=['person','dog','skateboard']);
imgIds = coco.getImgIds(catIds=catIds );
imgIds = coco.getImgIds(imgIds = [324158])
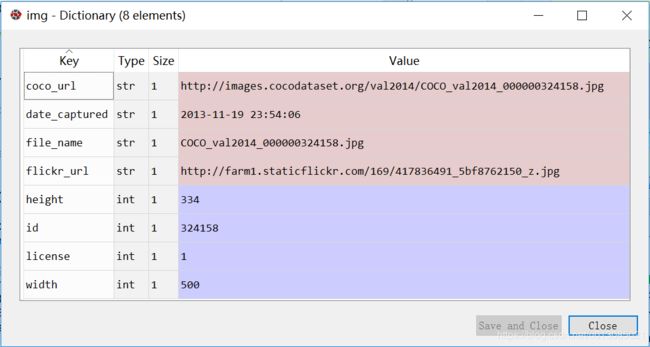
img = coco.loadImgs(imgIds[np.random.randint(0,len(imgIds))])[0]
最后一行语句coco.loadImgs()是载入所有给定Id的影像信息,img变量内容如图所示,存储的该序列影像的所有image信息:
- 载入并且显示图片
# load and display image
# I = io.imread('%s/images/%s/%s'%(dataDir,dataType,img['file_name']))
# use url to load image
I = io.imread(img['coco_url'])
plt.axis('off')
plt.imshow(I)
plt.show()
两种方式读取图片,第一种通过io.imread(img_path)读取图片,代码中该图片路径为…/…/images/val2014/COCO_val2014_000000324158.jpg;第二种通过url链接读取图片。图片显示如下:
9. 载入并且展示实例对象标注,
# load and display instance annotations
plt.imshow(I); plt.axis('off')
annIds = coco.getAnnIds(imgIds=img['id'], catIds=catIds, iscrowd=None)
anns = coco.loadAnns(annIds)
coco.showAnns(anns)
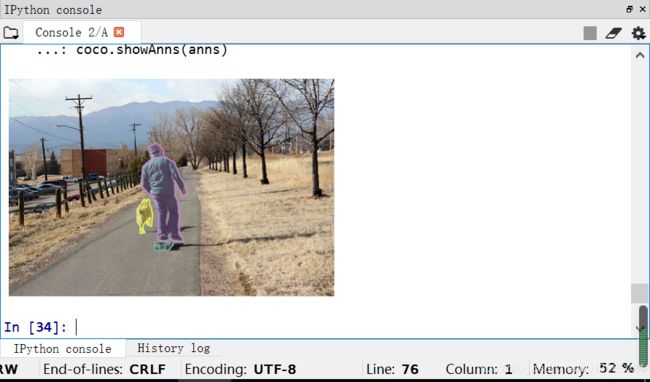
coco.getAnnIds()语句返回了给定imgId影像序列、catId类别种类等参数确定的标注对象AnnId,代码中返回结果为[10673, 638724, 2162813],然后coco.loadAnns(annIds)即返回上述三个Id的标注对象。anns存储三个annotation的list,每个元素为存储了标注信息的dict字典。具体内容如下图:

最后将标注与原图叠加显示效果如下:
11. 初始化关键点标注文件的COCOapi接口
# initialize COCO api for person keypoints annotations
annFile = '{}/annotations/person_keypoints_{}.json'.format(dataDir,dataType)
coco_kps=COCO(annFile)
以上内容为目标检测标注文件的接口使用与图片显示,接下来使用关键点标注文件的api。首先还是通过COCO()类初始化coco_kps对象,只不过这次参数annFile为’…/…/annotations/person_keypoints_val2014.json’,是关键点标注json文件。
- 同样和目标检测标注文件一样,先载入并显示关键点标注
# load and display keypoints annotations
plt.imshow(I); plt.axis('off')
ax = plt.gca()
annIds = coco_kps.getAnnIds(imgIds=img['id'], catIds=catIds, iscrowd=None)
anns = coco_kps.loadAnns(annIds)
coco_kps.showAnns(anns)
调用函数同目标检测可视化时的函数一样,仍然为先用getAnnIds()返回标注信息的序号Id,然后通过loadAnns()载入该标注信息,最后用showAnns()显示标注信息。
最后可视化结果:

13. 初始化字幕标注的COCO api,方法同目标检测和关键点检测。
# initialize COCO api for caption annotations
annFile = '{}/annotations/captions_{}.json'.format(dataDir,dataType)
coco_caps=COCO(annFile)
- 载入并展示字幕标注
# load and display caption annotations
annIds = coco_caps.getAnnIds(imgIds=img['id']);
anns = coco_caps.loadAnns(annIds)
coco_caps.showAnns(anns)
plt.imshow(I); plt.axis('off'); plt.show()
结果:
 报错处理:如果遇到UserWarning: Matplotlib is currently using agg,which is a non-GUI backend, so cannot show the figure该问题而使得图像无法显示的时候(本文是在spyder中运行,在notebook中直接运行ipynb文件的话应该不会报这个错误)
将coco.py文件中
import matplotlib; matplotlib.use('Agg')
修改为以下内容,即删除matplotlib.use(‘Agg’)即可。
import matplotlib
至此pycocoDemo演示代码运行完毕,通过以上内容我们知道了coco api使用的方法,coco api统一了不同的标注文件的对象初始化,第一统一使用COCO()方法初始化对象,传入不同的标注文件路径名即可。第二getAnnIds()返回需要的标注对象的序列号,参数为限制条件,传入限定条件,即我们需要的标注对象,coco数据集中,是以标注对象annotation为单位存储标注数据的,先通过该函数返回需要的标注对象的序列号。最后loadAnns(annIds)载入标注对象的信息,标注信息中存储了标注对象的多边形,bbox等信息。showAnns(anns)可视化标注对象。
pycocoEvalDemo.ipynb
接下来再来看看另一个的demo文件pycocoEvalDemo。该示例文件演示了精度评估相关api的使用方法。依旧逐段运行来理解整个代码。
前面导入关联库和显示各支持库版本,同pycocoDemo文件,在此不赘述。
注意路径问题:在运行该脚本时,将results文件夹(该文件夹中存储了模拟的标注信息)移动到同coco2014数据的images以及安装cocoapi的解压缩文件同一个文件夹(即根目录)中,如图所示:

报错:程序运行时有一个报错信息,TypeError: object of type
File “E:_detection_dataset\COCO2014\cocoapi-win-master\PythonAPI\pycocotools\cocoeval.py”, line 507, in setDetParams
self.iouThrs = np.linspace(.5, 0.95, np.round((0.95 - .5) / .05) + 1, endpoint=True)。
原因是numpy1.18版本以上中np.linspace()函数第三个参数不为int值的话会报错,手动强制转换为int。
将定位到的语句
self.iouThrs = np.linspace(.5, 0.95, np.round((0.95 - .5) / .05) + 1, endpoint=True)
self.recThrs = np.linspace(.0, 1.00, np.round((1.00 - .0) / .01) + 1, endpoint=True)
修改为
self.iouThrs = np.linspace(.5, 0.95, int(np.round((0.95 - .5) / .05)) + 1, endpoint=True)
self.recThrs = np.linspace(.0, 1.00, int(np.round((1.00 - .0) / .01)) + 1, endpoint=True)
- 指定进行评价的标注类型,该代码中指定了计算bbox边界框的精度计算。
annType = ['segm','bbox','keypoints']
annType = annType[1]      #specify type here
prefix = 'person_keypoints' if annType=='keypoints' else 'instances'
print('Running demo for *%s* results.'%(annType))
- 设置数据路径
# Setup data paths
dataDir = '../..'
dataType = 'val2014'
annDir = '{}/annotations'.format(dataDir)
annZipFile = '{}/annotations_train{}.zip'.format(dataDir, dataType)
annFile = '{}/instances_{}.json'.format(annDir, dataType)
annURL = 'http://images.cocodataset.org/annotations/annotations_train{}.zip'.format(dataType)
print (annDir)
print (annFile)
print (annZipFile)
print (annURL)
输出路径为:
../../annotations
../../annotations/instances_val2014.json
../../annotations_trainval2014.zip
http://images.cocodataset.org/annotations/annotations_trainval2014.zip
- 检查路径及文件是否存在,不存在则通过url下载
# Download data if not available locally
if not os.path.exists(annDir):
    os.makedirs(annDir)
if not os.path.exists(annFile):
    if not os.path.exists(annZipFile):
        print ("Downloading zipped annotations to " + annZipFile + " ...")
        with urllib.request.urlopen(annURL) as resp, open(annZipFile, 'wb') as out:
            shutil.copyfileobj(resp, out)
        print ("... done downloading.")
    print ("Unzipping " + annZipFile)
    with zipfile.ZipFile(annZipFile,"r") as zip_ref:
        zip_ref.extractall(dataDir)
    print ("... done unzipping")
print ("Will use annotations in " + annFile)
- 初始化COCO真值的api,同样最关键的步骤,初始化api对象,此处的api路径annFile=…/…/annotations/instances_val2014.json,记录的是真实的标注边界框bbox。
#initialize COCO ground truth api
cocoGt=COCO(annFile)
- 初始化检测到的边界框的api,results里的json作为模拟的检测出的边界框的json文件,路径为…/…/results/instances_val2014_fakebbox100_results.json,初始化api后通过loadRes()函数读入该json中的bbox数据作为模拟检测结果计算精度。
#initialize COCO detections api
resFile='%s/results/%s_%s_fake%s100_results.json'
resFile = resFile%(dataDir, prefix, dataType, annType)
cocoDt=cocoGt.loadRes(resFile)
- 将模拟检测结果的imgId排序,只取出前100幅图片。后又随机挑选了一幅图片,后面并没有使用该图片,而是计算了100幅图片的精度。
imgIds=sorted(cocoGt.getImgIds())
imgIds=imgIds[0:100]
imgId = imgIds[np.random.randint(100)]
- 运行精度评价算法,步骤1先通过COCOeval(cocoGt,cocoDt,annType)初始化COCOeval对象,其中cocoGt为真值的COCO对象,cocoDt为检测值得COCO对象,annType为计算精度的类型,此处是计算bbox即边界框的精度。步骤2赋给cocoEval.params.imgIds需要计算的影像序号imgIds,步骤3 依次调用cocoEval.evaluate()、cocoEval.accumulate()、cocoEval.summarize()函数计算检测精度。
# running evaluation
cocoEval = COCOeval(cocoGt,cocoDt,annType)
cocoEval.params.imgIds  = imgIds
cocoEval.evaluate()
cocoEval.accumulate()
cocoEval.summarize()
输出结果:
Running per image evaluation...
Evaluate annotation type *bbox*
DONE (t=0.35s).
Accumulating evaluation results...
DONE (t=0.46s).
 Average Precision  (AP) @[ IoU=0.50:0.95 | area=   all | maxDets=100 ] = 0.505
 Average Precision  (AP) @[ IoU=0.50      | area=   all | maxDets=100 ] = 0.697
 Average Precision  (AP) @[ IoU=0.75      | area=   all | maxDets=100 ] = 0.573
 Average Precision  (AP) @[ IoU=0.50:0.95 | area= small | maxDets=100 ] = 0.586
 Average Precision  (AP) @[ IoU=0.50:0.95 | area=medium | maxDets=100 ] = 0.519
 Average Precision  (AP) @[ IoU=0.50:0.95 | area= large | maxDets=100 ] = 0.501
 Average Recall     (AR) @[ IoU=0.50:0.95 | area=   all | maxDets=  1 ] = 0.387
 Average Recall     (AR) @[ IoU=0.50:0.95 | area=   all | maxDets= 10 ] = 0.594
 Average Recall     (AR) @[ IoU=0.50:0.95 | area=   all | maxDets=100 ] = 0.595
 Average Recall     (AR) @[ IoU=0.50:0.95 | area= small | maxDets=100 ] = 0.640
 Average Recall     (AR) @[ IoU=0.50:0.95 | area=medium | maxDets=100 ] = 0.566
 Average Recall     (AR) @[ IoU=0.50:0.95 | area= large | maxDets=100 ] = 0.564
总结一下精度计算步骤:
- 调用COCO()初始化真值对象cocoGt。
- cocoGt.loadRes(resFile)初始化检测结果的api
- 按照自己需要计算的影像生成影像序列imgIds
- 初始化评价api cocoEval=COCOeval(cocoGt,cocoDt,annType)
- 赋给需要计算的影像序列cocoEval.params.imgIds=imgIds
- 计算精度cocoEval.evaluate()、cocoEval.accumulate()、cocoEval.summarize()
Finall,至此我们了解了COCO数据的使用接口API,可以在以后的模型中使用COCO数据训练同时评价检测结果的精度。