H.266/VVC代码学习:MIP技术相关代码之predIntraMip函数
predIntraMip函数是进行MIP预测的入口函数,主要功能是进行矩阵乘法运算,再通过上采样获得整个块的预测像素,实现步骤如下图所示:
predIntraMip代码及注释如下
#if JVET_R0350_MIP_CHROMA_444_SINGLETREE
void MatrixIntraPrediction::predBlock(int *const result, const int modeIdx, const bool transpose, const int bitDepth,
                                      const ComponentID compId)
{
  CHECK(m_component != compId, "Boundary has not been prepared for this component.");
#else
void MatrixIntraPrediction::predBlock(int* const result, const int modeIdx, const bool transpose, const int bitDepth)
{
#endif
  //是否需要上采样
  const bool needUpsampling = ( m_upsmpFactorHor > 1 ) || ( m_upsmpFactorVer > 1 );

  //根据mipSizeId获取MIP矩阵
  const uint8_t* matrix = getMatrixData(modeIdx);
  //存储缩减预测像素
  static_vector bufReducedPred( m_reducedPredSize * m_reducedPredSize );
  int* const       reducedPred     = needUpsampling ? bufReducedPred.data() : result;
  //根据是否转置获得缩减边界像素向量
  const int* const reducedBoundary = transpose ? m_reducedBoundaryTransposed.data() : m_reducedBoundary.data();
  //进行矩阵乘法计算缩减预测像素
  computeReducedPred(reducedPred, reducedBoundary, matrix, transpose, bitDepth);
  //如果需要进行上采样
  if( needUpsampling )
  {
    //上采样函数,利用缩减预测像素获得整个块的预测像素
    predictionUpsampling( result, reducedPred );
  }
} | 块尺寸 | 下采样后的边界长度 m_reducedBdrySize |
矩阵乘法输出边界长度 m_reducedPredSize |
MIP矩阵数目 | MIP矩阵维度 | |
| mipSizeId = 0 | 4x4 | 2 | 4 | 16 | 16x4 |
| mipSizeId = 1 | 4xN、Nx4、8x8 | 4 | 4 | 8 | 16x8 |
| mipSizeId = 2 | 其余块 | 4 | 8 | 6 | 64x8 |
1、获取MIP矩阵
MIP矩阵的获取和mipSizeId有关,如上表所示,不同mipSizeId对应的MIP矩阵数目、维度不同
2、计算预测像素
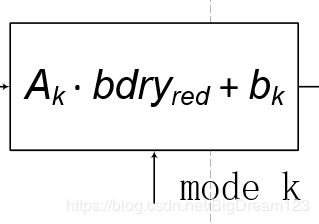
computeReducedPred函数是通过进行矩阵乘法计算下采样后的预测像素,如下图所示。mode k表示MIP矩阵的模式号,![]() 表示模式k对应的MIP矩阵,通过调用getMatrixData函数获得。
表示模式k对应的MIP矩阵,通过调用getMatrixData函数获得。![]() 对应于偏移向量,计算方法如下,其中p[i]表示矩阵乘法输入向量,inSize表示 2 * m_reducedBdrySize.
对应于偏移向量,计算方法如下,其中p[i]表示矩阵乘法输入向量,inSize表示 2 * m_reducedBdrySize.
MIP矩阵乘法公式如下所示,其中mWeight表示MIP矩阵,p表示MIP矩阵乘法输入向量。
void MatrixIntraPrediction::computeReducedPred( int*const result, const int* const input,
                                                const uint8_t* matrix,
                                                const bool transpose, const int bitDepth )
{
  const int inputSize = 2 * m_reducedBdrySize; // 4 or 8

  // use local buffer for transposed result 对转置结果使用本地缓冲区
  static_vector resBufTransposed( m_reducedPredSize * m_reducedPredSize );
  int*const resPtr = (transpose) ? resBufTransposed.data() : result;

  int sum = 0;
  for( int i = 0; i < inputSize; i++ ) { sum += input[i]; }
  // MIP_SHIFT_MATRIX 移位因子sW固定为6
  // MIP_OFFSET_MATRIX 偏移因子fO固定为32
  // 计算偏移量Bias
  const int offset = (1 << (MIP_SHIFT_MATRIX - 1)) - MIP_OFFSET_MATRIX * sum;
  CHECK( inputSize != 4 * (inputSize >> 2), "Error, input size not divisible by four" );

  const uint8_t *weight = matrix; //权重矩阵
  // 获取input[0],即m_reducedBoundary[0]
  const int   inputOffset = transpose ? m_inputOffsetTransp : m_inputOffset;

  const bool redSize = (m_sizeId == 2);
  int posRes = 0;
  for( int y = 0; y < m_reducedPredSize; y++ )
  {
    for( int x = 0; x < m_reducedPredSize; x++ )
    {
      if( redSize ) weight -= 1;
      int tmp0 = redSize ? 0 : (input[0] * weight[0]);
      int tmp1 = input[1] * weight[1];
      int tmp2 = input[2] * weight[2];
      int tmp3 = input[3] * weight[3];
      for (int i = 4; i < inputSize; i += 4)
      {
        tmp0 += input[i]     * weight[i];
        tmp1 += input[i + 1] * weight[i + 1];
        tmp2 += input[i + 2] * weight[i + 2];
        tmp3 += input[i + 3] * weight[i + 3];
      }
      //对矩阵乘法输出采样钳位
      resPtr[posRes++] = ClipBD(((tmp0 + tmp1 + tmp2 + tmp3 + offset) >> MIP_SHIFT_MATRIX) + inputOffset, bitDepth);

      weight += inputSize;
    }
  }

  if( transpose )
  {
    // 将矩阵乘法结果进行转置
    for( int y = 0; y < m_reducedPredSize; y++ )
    {
      for( int x = 0; x < m_reducedPredSize; x++ )
      {
        result[ y * m_reducedPredSize + x ] = resPtr[ x * m_reducedPredSize + y ];
      }
    }
  }
}
3、上采样
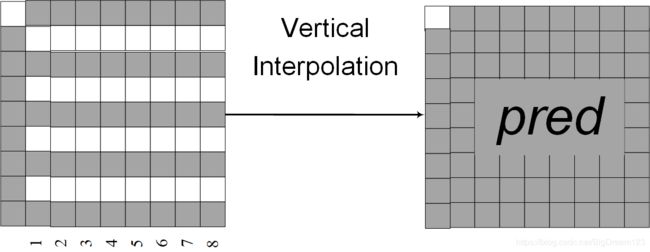
插值顺序是固定的,如果需要水平插值的话,则先进行水平插值,后垂直插值,如下图所示(以8x8的块为例)。上采样的过程其实就是一种线性加权的过程,在相应位置处通过对参考像素和预测像素线性加权,即可求得空白处的像素值(权重和位置有关)。
相关代码及注释如下所示:
// dst 上采样结果
// src 矩阵乘法输出结果
void MatrixIntraPrediction::predictionUpsampling( int* const dst, const int* const src ) const
{
  const int* verSrc     = src;
  SizeType   verSrcStep = m_blockSize.width;
  //插值过程固定,先水平后垂直
  if( m_upsmpFactorHor > 1 ) //如果需要进行水平插值
  {
    int* const horDst = dst + (m_upsmpFactorVer - 1) * m_blockSize.width;
    verSrc = horDst;
    verSrcStep *= m_upsmpFactorVer;

    predictionUpsampling1D( horDst, src, m_refSamplesLeft.data(),
                            m_reducedPredSize, m_reducedPredSize,
                            1, m_reducedPredSize, 1, verSrcStep,
                            m_upsmpFactorVer, m_upsmpFactorHor );
  }

  if( m_upsmpFactorVer > 1 )
  {
    predictionUpsampling1D( dst, verSrc, m_refSamplesTop.data(),
                            m_reducedPredSize, m_blockSize.width,
                            verSrcStep, 1, m_blockSize.width, 1,
                            1, m_upsmpFactorVer );
  }
}
插值代码具体实现(以8x8为例):
水平插值:代码中水平插值的顺序是从上往下,即插值顺序为第2、4、6、8行
垂直插值:代码中垂直插值的顺序是从左到右,即插值顺序为第1 2 3 4 5 6 7 8列。
代码中,是在插值的过程中,将预测像素放到结果块中的。
/*
- dst:上采样结果
- srt:矩阵乘法输入结果或者水平插值结果
- bndry:边界参考像素
- bndryStep:插值时参考边界像素的间隔(有时候不一定会参考全部的边界像素)
- srcSizeUpsmpDim: m_reducedPredSize(4/8)
- srcSizeOrthDim:当前插值方向需要插值的次数
- upsmpFactor:采样因子
*/
void MatrixIntraPrediction::predictionUpsampling1D(int* const dst, const int* const src, const int* const bndry,
                                                   const SizeType srcSizeUpsmpDim, const SizeType srcSizeOrthDim,
                                                   const SizeType srcStep, const SizeType srcStride,
                                                   const SizeType dstStep, const SizeType dstStride,
                                                   const SizeType bndryStep,
                                                   const unsigned int upsmpFactor )
{
  const int log2UpsmpFactor = floorLog2( upsmpFactor );
  CHECKD( upsmpFactor <= 1, "Upsampling factor must be at least 2." );
  const int roundingOffset = 1 << (log2UpsmpFactor - 1);

  SizeType idxOrthDim = 0;
  const int* srcLine = src;//矩阵乘法输出或水平插值结果
  int* dstLine = dst;
  const int* bndryLine = bndry + bndryStep - 1;//边界参考像素
  while( idxOrthDim < srcSizeOrthDim )
  {
    SizeType idxUpsmpDim = 0;
    const int* before = bndryLine;//前一个参考像素
    const int* behind = srcLine;//后一个参考像素
    int* currDst = dstLine;
    while( idxUpsmpDim < srcSizeUpsmpDim )
    {
      SizeType pos = 1;//控制当前插值的位置,将插值结果和矩阵乘法结果放到各自相应的位置上
      int scaledBefore = ( *before ) << log2UpsmpFactor;
      int scaledBehind = 0;
      while( pos <= upsmpFactor )
      {
        //通过+-操作可以控制插值时参考像素的权重
        scaledBefore -= *before;
        scaledBehind += *behind;
        *currDst = (scaledBefore + scaledBehind + roundingOffset) >> log2UpsmpFactor;

        pos++;
        currDst += dstStep;
      }

      idxUpsmpDim++;
      before = behind;//移动前一个参考像素
      behind += srcStep;//移动后一个参考像素
    }

    idxOrthDim++;
    srcLine += srcStride;
    dstLine += dstStride;
    bndryLine += bndryStep;
  }
}


