Atlas指南
Atlas简介
一、远程Bundle:Bundle类似于Android项目中的Module的概念,远程Bundle是项目编译时不会打包进APK的模块,在项目编译时,Atlas框架会将远程Bundle生成一个.so文件,我们将这个.so文件置于服务器,用户使用APP时如果需要打开这个模块,就从服务器上下载这个.so文件,并加载到应用中,以此来减小安装包的体积。
二、热更新:就是打补丁包,对一个版本进行代码修改后,可以通过Atlas框架根据修改的代码生成差量补丁包,客户端可以通过下载服务器上的补丁包并部署,在不需要用户更新应用的情况下完成更新。
Atlas接入
参考:
手把手教你接入啊里的Atlas
Atlas官方指引
开源Android容器化框架Atlas开发者指南
1.新建项目
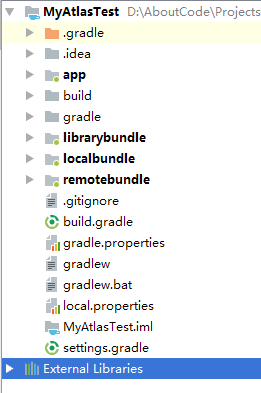
新建项目后,再新建几个 类型的Module(Bundle):
app
主工程
LibraryBundle
所有的项目依赖都在这个Bundle完成(比如Retrofit),其他的Bundle再依赖于这个Bundle
LocalBundle
本地Bundle,在打包时就会打包到APK中
RemoteBundle
远程Bundle,编译后会生成.so文件,当用户需要打开某个模块时,从服务器上下载这个.so文件,并加载到应用中
2.修改Gradle
以下内容基于 Android Studio3.0 ,初始Gradle版本 4.1, compileSdkVersion 26
这个步骤将会修改Gradle版本及compiledSdkVersion
修改Gradle版本至3.3
将工程目录下的 gradle\wrapper\gradle-wrapper.properties 文件中的最后一行的值改成
https\://services.gradle.org/distributions/gradle-3.3-all.zip
这时Gradle报了一个错: Gradle DSL method not found: 'google()'
可以将项目目录下的build.gradle文件中两个google()去掉,点及Try Again
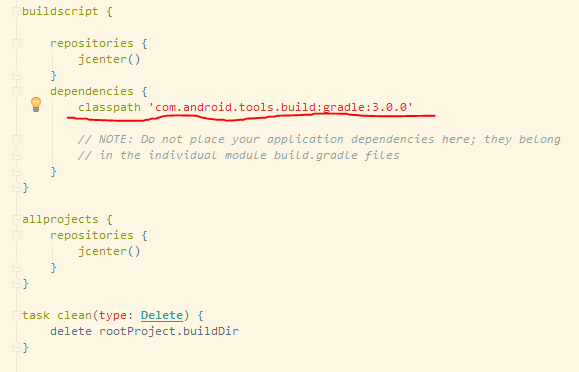
Gradle又报了一个Minimum support Gradle version is 4.1. Current version is 3.3的错,这是因为刚刚我们修改的那个文件中的dependencies闭包中的classpath声明的gradle版本不对
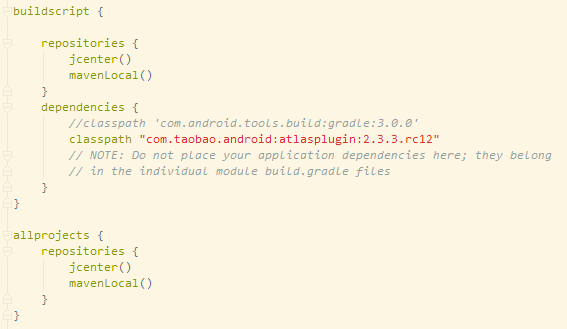
本来应该是2.3.3版本,这里直接将classpath这一行替换成
classpath "com.taobao.android:atlasplugin:2.3.3.rc12"
引入阿里的依赖(需要将原来的删除),阿里依赖里面默认是2.1版本的Gradle
顺便在这个文件中加入mavenLocal()如图示
点击Try Again之后Gradle又报了一个Could not find method implementation() ..............啥的错...
这是因为之前建项目的时候是4.1版本的Gradle,它把项目的依赖从compile改成了implementation....
我们这时候将Module下的build.gradle文件中的implementation改成compile
改完之后dependencies成了这样:
在示例中直接将compileSdkVersion改成25,同时需要修改的还有buildToolsVersion,修改成'25.0.2',targetSdkVersion也改成25
同时之前新建的Module也像上面这样修改
注意:
Android Studio会提示更新Gradle版本到4.1,不要让Android Studio更新,点击Don't remind me for this project
3.引入Atlas框架
修改app下的build.gradle
group = 'com.gavynzhang.myatlastest'
version = getEnvValue("versionName", "1.0.0");      //版本号
def apVersion = getEnvValue("apVersion", "");

apply plugin: 'com.android.application'
apply plugin: 'com.taobao.atlas'

android {
    compileSdkVersion 25
    buildToolsVersion '25.0.2'
    defaultConfig {
        applicationId "com.gavynzhang.myatlastest"
        minSdkVersion 19
        targetSdkVersion 25
        versionCode 1
        versionName "1.0"
        testInstrumentationRunner "android.support.test.runner.AndroidJUnitRunner"
    }
    buildTypes {
        release {
            minifyEnabled false
            proguardFiles getDefaultProguardFile('proguard-android.txt'), 'proguard-rules.pro'
        }
    }
}

dependencies {
    compile fileTree(dir: 'libs', include: ['*.jar'])
    androidTestCompile('com.android.support.test.espresso:espresso-core:2.2.2', {
        exclude group: 'com.android.support', module: 'support-annotations'
    })
    compile 'com.android.support:appcompat-v7:25.3.1'
    compile 'com.android.support.constraint:constraint-layout:1.0.0-alpha8'
    testCompile 'junit:junit:4.12'

    //atlas的依赖
    compile('com.taobao.android:atlas_core:5.0.7.42@aar') {
        transitive = true
    }
    compile 'com.taobao.android:atlasupdate:1.1.4.11@aar'
    compile 'com.alibaba:fastjson:1.1.45.android@jar'

    //项目依赖
    compile project(':librarybundle')
    compile project(':localbundle')
    compile project(':remotebundle')
}

//加入以下配置
atlas {
    atlasEnabled true   //打开atlas
    tBuildConfig {
        // autoStartBundles = ['com.android.homebundle'] //自启动bundle配置
        outOfApkBundles = ['remotebundle']      //远程module,列表来的,可填多个
        preLaunch = 'com.gavynzhang.myatlastest.AtlasLaunch' //AppApplication启动之前调用,这个类下面放出代码
    }
    patchConfigs {
        debug {
            createTPatch true
        }
    }
    buildTypes {
        debug {
            if (apVersion) {
                // 打差异补丁 gradlew assembleDebug -DapVersion=1.1.0 -DversionName=1.1.1
                // 对应着本地maven仓库地址 .m2/repository/com/gavynzhang/myatlastest/AP-debug/1.0.0/AP-debug-1.0.0.ap
                baseApDependency "com.gavynzhang.myatlastest:AP-debug:${apVersion}@ap"
                patchConfig patchConfigs.debug
            }
        }
    }
}

String getEnvValue(key, defValue) {
    def val = System.getProperty(key);
    if (null != val) {
        return val;
    }
    val = System.getenv(key);
    if (null != val) {
        return val;
    }
    return defValue;
}

apply plugin: 'maven'
apply plugin: 'maven-publish'

publishing {
    // 指定仓库位置
    repositories {
        mavenLocal()
    }
    publications {
        // 默认本地仓库地址  用户目录/.m2/repository/
        maven(MavenPublication) {
            //读取ap目录上传maven
            artifact "${project.buildDir}/outputs/apk/${project.name}-debug.ap"
            //生成本地maven目录
            groupId group
            artifactId "AP-debug"
        }
    }
}
修改RemoteBundle和LocalBundle中的build.gradle
apply plugin: 'com.android.library'
apply plugin: 'com.taobao.atlas'

atlas {
    bundleConfig{
        awbBundle true
    }
    buildTypes {
        debug {
            baseApFile project.rootProject.file('app/build/outputs/apk/app-debug.ap')
        }
    }
}

android {
    compileSdkVersion 25
    buildToolsVersion "25.0.2"

    defaultConfig {
        minSdkVersion 19
        targetSdkVersion 25
        versionCode 1
        versionName "1.0"

        testInstrumentationRunner "android.support.test.runner.AndroidJUnitRunner"

    }

    buildTypes {
        release {
            minifyEnabled false
            proguardFiles getDefaultProguardFile('proguard-android.txt'), 'proguard-rules.pro'
        }
    }

}

dependencies {
    compile fileTree(dir: 'libs', include: ['*.jar'])
    compile 'com.android.support:appcompat-v7:25.3.1'
    compile 'com.android.support.constraint:constraint-layout:1.0.2'
    testCompile 'junit:junit:4.12'
    androidTestCompile('com.android.support.test.espresso:espresso-core:2.2.2', {
        exclude group: 'com.android.support', module: 'support-annotations'
    })
    //依赖lib中间bundle
    compile project(':librarybundle')
}
需要将其中的applicationId删去
修改LibraryBundle中的build.gradle
apply plugin: 'com.android.library'

android {
    compileSdkVersion 25
    buildToolsVersion "25.0.2"

    defaultConfig {
        minSdkVersion 19
        targetSdkVersion 25
        versionCode 1
        versionName "1.0"

        testInstrumentationRunner "android.support.test.runner.AndroidJUnitRunner"

    }

    buildTypes {
        release {
            minifyEnabled false
            proguardFiles getDefaultProguardFile('proguard-android.txt'), 'proguard-rules.pro'
        }
    }

}

dependencies {
    compile fileTree(dir: 'libs', include: ['*.jar'])
    androidTestCompile('com.android.support.test.espresso:espresso-core:2.2.2', {
        exclude group: 'com.android.support', module: 'support-annotations'
    })
    compile 'com.android.support:appcompat-v7:25.3.1'
    compile 'com.android.support.constraint:constraint-layout:1.0.0-alpha8'
    testCompile 'junit:junit:4.12'

    compile 'com.squareup.okhttp3:okhttp:3.9.0'     //在librarybundle中添加依赖

}
修改AndroidManifest.xml文件
将LocalBundle和RemoteBundle中的AndroidManifest.xml修改成如下形式:
将LibraryBundle中的AndroidManifest.xml中的application标签删去
增加MyApplication
public class MyApplication extends Application {
    @Override
    public void onCreate() {
        super.onCreate();

        Atlas.getInstance().setClassNotFoundInterceptorCallback(new ClassNotFoundInterceptorCallback() {
            @Override
            public Intent returnIntent(Intent intent) {
                final String className = intent.getComponent().getClassName();
                final String bundleName = AtlasBundleInfoManager.instance()
                        .getBundleForComponet(className);

                if (!TextUtils.isEmpty(bundleName)
                        && !AtlasBundleInfoManager.instance().isInternalBundle(bundleName)) {

                    //远程bundle
                    Activity activity = ActivityTaskMgr.getInstance().peekTopActivity();
                    File remoteBundleFile = new File(activity.getExternalCacheDir(),
                            "lib" + bundleName.replace(".","_") + ".so");

                    String path = "";
                    if (remoteBundleFile.exists()){
                        path = remoteBundleFile.getAbsolutePath();
                    }else {
                        Toast.makeText(activity, " 远程bundle不存在,请确定 : "
                                + remoteBundleFile.getAbsolutePath() , Toast.LENGTH_LONG).show();
                        return intent;
                    }


                    PackageInfo info = activity.getPackageManager()
                            .getPackageArchiveInfo(path, 0);
                    try {
                        Atlas.getInstance().installBundle(info.packageName, new File(path));
                    } catch (BundleException e) {
                        Toast.makeText(activity, " 远程bundle 安装失败," + e.getMessage()
                                , Toast.LENGTH_LONG).show();
                        e.printStackTrace();
                    }

                    activity.startActivities(new Intent[]{intent});

                }

                return intent;
            }
        });

    }
}
增加类AtlasLaucher
public class AtlasLauncher implements AtlasPreLauncher {
    @Override
    public void initBeforeAtlas(Context context) {

    }
}
Atlas使用
加载远程Bundle
先在 项目/app目录下执行 ..\gradlew.bat clean assembleDebug,执行完成之后远程Bundle的.so文件将在app/build/outputs/remote-bundles-debug目录下
将远程Bundle的.so文件下载到/sdcard/Android/data/应用包名/cache目录,然后通过
Intent intent = new Intent();
intent.setClassName(view.getContext(),"com.gavynzhang.remotebundle.RemoteActivity");
activity.startActivity(intent);
来启动这个远程Bundle
加载本地Bundle
使用以下代码即可:
Intent intent = new Intent();
intent.setClassName(view.getContext(), "com.gavynzhang.localbundle.MainActivity");
startActivity(intent);
项目构建及运行
打包APK
在项目中的APP目录下使用..\gradlew.bat clean assembleDebug
安装
上一个步骤完成之后,生成的apk文件会在app/build/outputs/apk目录下,使用adb install build/outputs/apk/app-debug.apk将APK安装到手机上
动态修补(TPatch)
发布基线版本
在app目录下执行..\gradlew.bat clean assembleDebug命令,执行完成之后再执行..\gradlew.bat publish命令
此时将会生成app-debug.apk文件,在app/build/outputs/apk目录下
使用adb install 命令将app-debug.apk安装到虚拟机或测试机上
生成动态修补相关文件
在项目中进行一些想要的修改之后(不支持AndroidManifest.xml的修改), 在app的build.gradle文件中修改versionName为新的version(如将"1.0.0"修改成"1.0.1");
然后在app目录下执行
..\gradlew.bat clean assembleDebug -DapVersion=apVersion -DversionName=newVersion命令,其中apVersion为修改之前的versionName,newVersion为修改之后的versionName;
如 ..\gradlew.bat clean assembleDebug -DapVersion=1.0.0 -DversionName=1.0.1
此时相关的文件将在app/build/outputs/tpatch-debug目录中生成,我们需要将其中的
[email protected]和update.json放到服务器上(.tpatch文件名由修改前后的versionName决定)
加载到app中
将之前生成的.tpatch文件和update.json文件下载到/sdcard/Android/data/应用包名/cache目录下,并执行如下代码:(需要在子线程中运行)
File updateInfo = new File(getExternalCacheDir(), "update.json");
String jsonStr = new String(FileUtils.readFile(updateInfo));
UpdateInfo info = JSON.parseObject(jsonStr, UpdateInfo.class);
File patchFile = new File(getExternalCacheDir(), "patch-" + info.updateVersion + "@" + info.baseVersion + ".tpatch");
try {
    AtlasUpdater.update(info, patchFile);   //调用Atlas进行动态修补
} catch (Throwable e) {
    e.printStackTrace();
    showToast("更新失败, " + e.getMessage());
}
Atlas单模块部署
当项目越来越大,每次调试都重新构建整个项目会非常地慢,在Atlas中,可以使用
..\gradlew.bat clean assemblePatchDebug 在不重新安装APP的情况下进行快速地调试(在APP运行的情况下)
具体流程如下:
- 先启动已经安装的app
- 在Android Studio的命令行中切换到需要调试的Bundle的目录下,如 cd firstbundle
- 执行
..\gradlew.bat clean assemblePatchDebug
执行完成后就能够看到app重启,单模块部署生效


