创建springBoot+jpa+atomikos多数据源的框架
废话不多说,我们直接来
1.首先新建一个springBoot的基础框架,核心的pom配置文件,如图
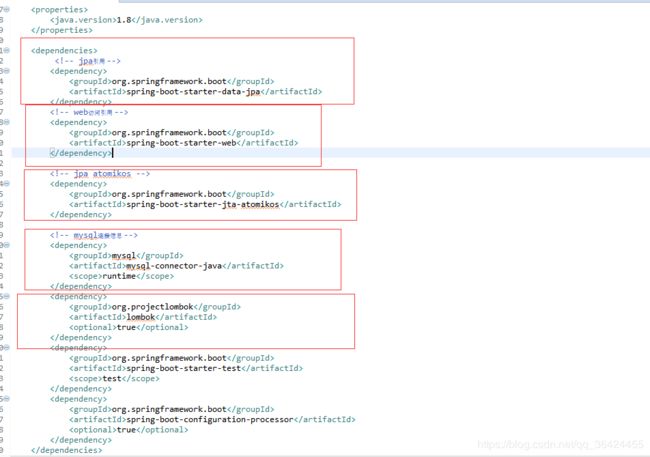
4.0.0
org.springframework.boot
spring-boot-starter-parent
2.1.4.RELEASE
com.jok
spring_boot_jpa
0.0.1-SNAPSHOT
spring_boot_jpa
Demo project for Spring Boot
	1.8


		org.springframework.boot
		spring-boot-starter-data-jpa


		org.springframework.boot
		spring-boot-starter-web


		org.springframework.boot
		spring-boot-starter-jta-atomikos


		mysql
		mysql-connector-java
		runtime


		org.projectlombok
		lombok
		true


		org.springframework.boot
		spring-boot-starter-test
		test


		org.springframework.boot
		spring-boot-configuration-processor
		true


			org.springframework.boot
			spring-boot-maven-plugin
2.配置数据源信息application.properties,computer 和mobile 分别代表了两个不同数据库的表字段来源,这个完全可以自定义

3.对应我们需要将数据源信息初始化给对象,那么配置对应的表对象配置类
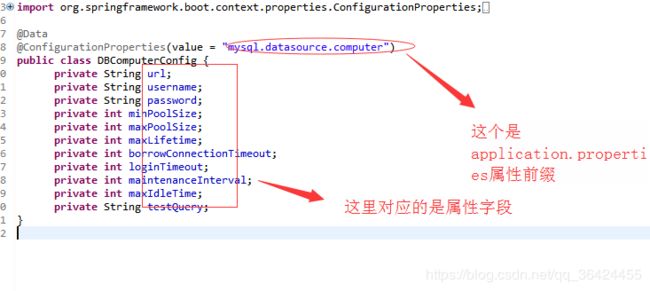
package com.jok.jpa.config;
import org.springframework.boot.context.properties.ConfigurationProperties;
import lombok.Data;
@Data
@ConfigurationProperties(value = “mysql.datasource.computer”)
public class DBComputerConfig {
private String url;
private String username;
private String password;
private int minPoolSize;
private int maxPoolSize;
private int maxLifetime;
private int borrowConnectionTimeout;
private int loginTimeout;
private int maintenanceInterval;
private int maxIdleTime;
private String testQuery;
}
4.配置数据源信息
以下代码是以其中一个表对应的配置的数据源
package com.jok.jpa.config;
import java.sql.SQLException;
import java.util.HashMap;
import javax.sql.DataSource;
import org.springframework.beans.factory.annotation.Autowired;
import org.springframework.boot.context.properties.EnableConfigurationProperties;
import org.springframework.boot.jta.atomikos.AtomikosDataSourceBean;
import org.springframework.context.annotation.Bean;
import org.springframework.context.annotation.Configuration;
import org.springframework.context.annotation.DependsOn;
import org.springframework.data.jpa.repository.config.EnableJpaRepositories;
import org.springframework.orm.jpa.JpaVendorAdapter;
import org.springframework.orm.jpa.LocalContainerEntityManagerFactoryBean;
import com.mysql.cj.jdbc.MysqlXADataSource;
@Configuration
@DependsOn(“transactionManager”)
@EnableJpaRepositories(basePackages = {“com.jok.jpa.computer.dao”},// 用于扫描持久层
entityManagerFactoryRef = “computerEntityManager”, // 实体管理工厂
transactionManagerRef = “transactionManager”) // 事物管理器
@EnableConfigurationProperties(DBComputerConfig.class)
public class JtaComputerDataSource {
@Autowired
private JpaVendorAdapter jpaVendorAdapter;
@Autowired
public DBComputerConfig config;

// 配置数据源
@Bean(name = "computerDataSource", initMethod = "init", destroyMethod = "close")
public DataSource computerDataSource() throws SQLException {
	// 新建数据源,并将数据源配置信息装置
	MysqlXADataSource mysqlXADataSource = new MysqlXADataSource();
	mysqlXADataSource.setUrl(config.getUrl());
	mysqlXADataSource.setUser(config.getUsername());
	mysqlXADataSource.setPassword(config.getPassword());
	mysqlXADataSource.setPinGlobalTxToPhysicalConnection(true);
	// 将事物信息交给atomikos进行统一管理
	AtomikosDataSourceBean xDataSource = new AtomikosDataSourceBean();
	xDataSource.setXaDataSource(mysqlXADataSource); // 将数据源信息放入到atomikos容器中
	xDataSource.setUniqueResourceName("computerDataSource");

	//设置数据源其他参数信息
	xDataSource.setMinPoolSize(config.getMinPoolSize());
	xDataSource.setMaxPoolSize(config.getMaxPoolSize());
	xDataSource.setMaxLifetime(config.getMaxLifetime());
	xDataSource.setBorrowConnectionTimeout(config.getBorrowConnectionTimeout());
	xDataSource.setLoginTimeout(config.getLoginTimeout());
	xDataSource.setMaintenanceInterval(config.getMaintenanceInterval());
	xDataSource.setMaxIdleTime(config.getMaxIdleTime());
	xDataSource.setTestQuery(config.getTestQuery());
	return xDataSource;
}


@Bean(name = "computerEntityManager")
@DependsOn("transactionManager")
public LocalContainerEntityManagerFactoryBean computerEntityManager() throws Throwable {

	HashMap properties = new HashMap();
	properties.put("hibernate.transaction.jta.platform", AtomikosJtaPlatform.class.getName());
	properties.put("javax.persistence.transactionType", "JTA");

	LocalContainerEntityManagerFactoryBean entityManager = new LocalContainerEntityManagerFactoryBean();
	entityManager.setJtaDataSource(computerDataSource());
	entityManager.setJpaVendorAdapter(jpaVendorAdapter);
	entityManager.setPackagesToScan("com.jok.jpa.computer.domain");
	entityManager.setPersistenceUnitName("computerPersistenceUnit");
	entityManager.setJpaPropertyMap(properties);
	return entityManager;
}
}
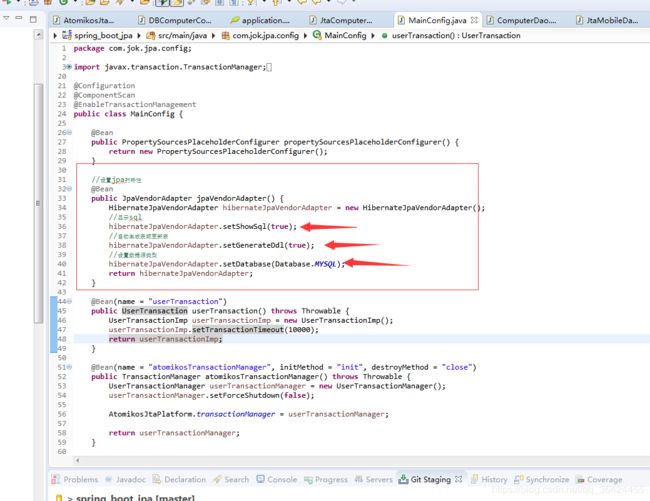
5.事物管理配置,在配置以下代码时,对应另一个数据源mobile,重复第三步和第四步即可
package com.jok.jpa.config;
import javax.transaction.TransactionManager;
import javax.transaction.UserTransaction;
import org.springframework.context.annotation.Bean;
import org.springframework.context.annotation.ComponentScan;
import org.springframework.context.annotation.Configuration;
import org.springframework.context.annotation.DependsOn;
import org.springframework.context.support.PropertySourcesPlaceholderConfigurer;
import org.springframework.orm.jpa.JpaVendorAdapter;
import org.springframework.orm.jpa.vendor.Database;
import org.springframework.orm.jpa.vendor.HibernateJpaVendorAdapter;
import org.springframework.transaction.PlatformTransactionManager;
import org.springframework.transaction.annotation.EnableTransactionManagement;
import org.springframework.transaction.jta.JtaTransactionManager;
import com.atomikos.icatch.jta.UserTransactionImp;
import com.atomikos.icatch.jta.UserTransactionManager;
@Configuration
@ComponentScan
@EnableTransactionManagement
public class MainConfig {
@Bean
public PropertySourcesPlaceholderConfigurer propertySourcesPlaceholderConfigurer() {
	return new PropertySourcesPlaceholderConfigurer();
}

//设置jpa的特性
@Bean
public JpaVendorAdapter jpaVendorAdapter() {
	HibernateJpaVendorAdapter hibernateJpaVendorAdapter = new HibernateJpaVendorAdapter();
	//显示sql
	hibernateJpaVendorAdapter.setShowSql(true);
	//自动生成表或更新表
	hibernateJpaVendorAdapter.setGenerateDdl(true);
	//设置数据源类型
	hibernateJpaVendorAdapter.setDatabase(Database.MYSQL);
	return hibernateJpaVendorAdapter;
}

@Bean(name = "userTransaction")
public UserTransaction userTransaction() throws Throwable {
	UserTransactionImp userTransactionImp = new UserTransactionImp();
	userTransactionImp.setTransactionTimeout(10000);
	return userTransactionImp;
}

@Bean(name = "atomikosTransactionManager", initMethod = "init", destroyMethod = "close")
public TransactionManager atomikosTransactionManager() throws Throwable {
	UserTransactionManager userTransactionManager = new UserTransactionManager();
	userTransactionManager.setForceShutdown(false);

	AtomikosJtaPlatform.transactionManager = userTransactionManager;

	return userTransactionManager;
}

@Bean(name = "transactionManager")
@DependsOn({ "userTransaction", "atomikosTransactionManager" })
public PlatformTransactionManager transactionManager() throws Throwable {
	UserTransaction userTransaction = userTransaction();

	AtomikosJtaPlatform.transaction = userTransaction;

	TransactionManager atomikosTransactionManager = atomikosTransactionManager();
	return new JtaTransactionManager(userTransaction, atomikosTransactionManager);
}
}
6.配置对应的持久层信息,必须继承JpaRepository,那么你会发现这个类里面已经封装好了我们需要的crud。当然,也可以自定义查询语句,如图。

其中我们需要注意的是,在配置数据源的时候,我们扫描的包下的ComputerDao接口类,因为这里要把数据持久化到数据库中,所以要对应到这里

package com.jok.jpa.computer.dao;
import java.util.List;
import org.springframework.data.jpa.repository.JpaRepository;
import org.springframework.data.jpa.repository.Query;
import org.springframework.data.repository.query.Param;
import com.jok.jpa.computer.domain.Computer;
public interface ComputerDao extends JpaRepository
@Query(value = " select id,name,price from computer m where m.name=:name", nativeQuery = true)
List findByComputerName(@Param(“name”) String name);
  // 模糊查询包含 name 的数据
  List findByNameLike(String name);

  // 模糊查询 不 包含 name 的数据
  List findByNameNotLike(String name);
}
7.这个时候最要部分来了,我们要新建对应实体类

当我们配置这些信息后,程序启动时候,会帮助我们自动创建表,创建表信息的开关来自于MainConfig.java,我们配置了jpa特性,记住,这里是必须指定的
8.接下来就是我们熟悉的部分,我们的持久层配置好了,就是配置应的Service 以及controller


9.最后,我们将启动类配置扫描组件信息

这样我们一个简单的多数据源框架就搭建成功了。以上代码不清楚的,可以download对应的git源码信息,地址如下:https://github.com/1658989705/spring_boot_jpa.git