问题描述
在最近的项目中,遇到一个奇葩问题。起初为了解决打开app白屏或者黑屏问题,在SplashActivity的Theme里面添加属性:
- @drawable/splash_activity_launch _bg
drawable设置背景色为白色,并在中间放置了一张图片
-
为了不显得突兀,在SplashActivity的布局activity_splash.xml中间也放置了一张相同的图片
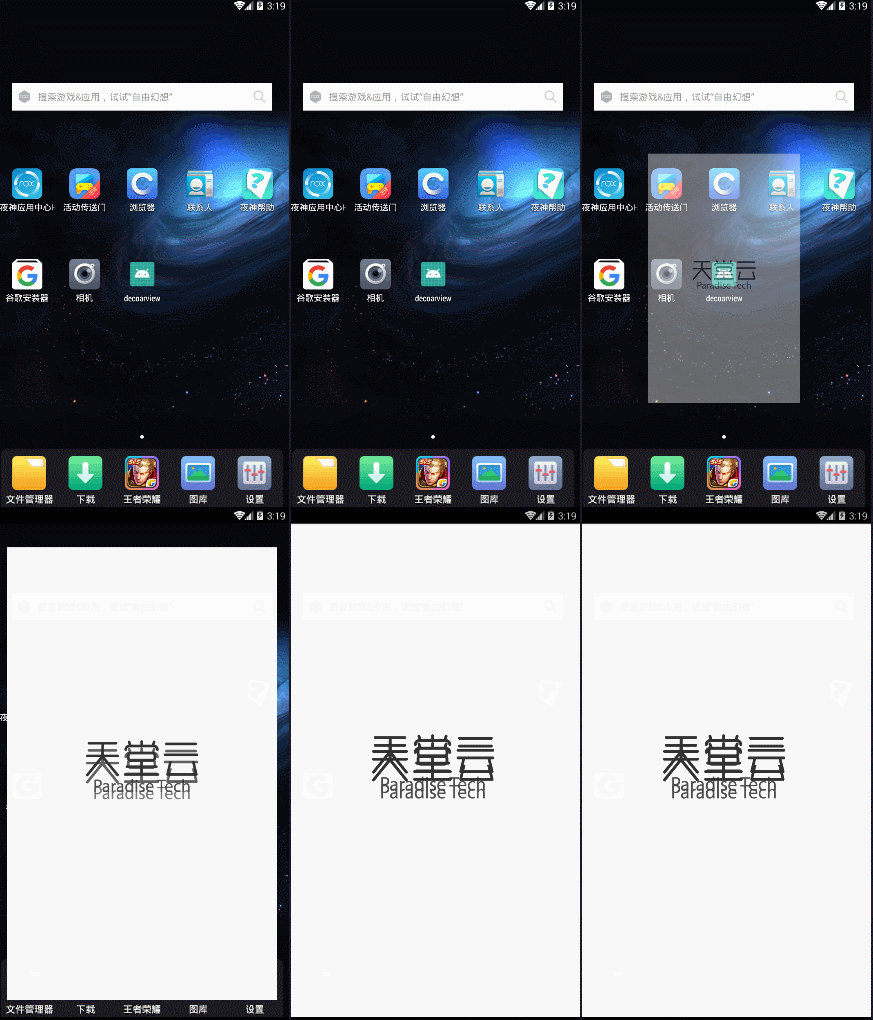
但奇怪的是两张图片居然错位了(两张图片为什么会一起显示是由于背景色导致的,此次不必追究)。具体效果看图:
这里不妨大胆猜测activity_splash.xml所代表的区域和windowBackground所代表的区域并不一致,那他们各自所代表的区域是什么呢,下面我们就跟随源码一步步的分析。
分析步骤
activity_splash.xml即通常说的内容区域,绘制的控件都显示在其中,一般我们通过setContentView()添加到activity中(必须继承Activity,AppCompatActivity源码不同),点击去看一下源码。里面调用了抽象类Window的抽象方法setContentView()
public void setContentView(@LayoutRes int layoutResID) {
    getWindow().setContentView(layoutResID);
    initWindowDecorActionBar();
}

public abstract class Window {
    public abstract void setContentView(@LayoutRes int layoutResID);
}
搜索一下实现类,可以看到实现类为PhoneWindow
    mWindow = new PhoneWindow(this, window, activityConfigCallback);
    mWindow.setWindowControllerCallback(this);
    mWindow.setCallback(this);
    mWindow.setOnWindowDismissedCallback(this);
    mWindow.getLayoutInflater().setPrivateFactory(this);
去看一下实现类PhoneWindow的setContentView()方法,这里主要完成了两件事,调用installDecor()方法和将传入的layoutResID(就是activity根布局)布局添加到mContentParent中。mContentParent还不知道是什么,但是它肯定在installDecor()方法中被初始化了。
 @Override
    public void setContentView(int layoutResID) {
        //第一次mContentParent是空值,执行installDecor()方法
        if (mContentParent == null) {
            installDecor();
        } else if (!hasFeature(FEATURE_CONTENT_TRANSITIONS)) {
            mContentParent.removeAllViews();
        }
        if (hasFeature(FEATURE_CONTENT_TRANSITIONS)) {
            final Scene newScene = Scene.getSceneForLayout(mContentParent, layoutResID,
                    getContext());
            transitionTo(newScene);
        } else {
          //将传入的布局layoutResID布局添加到mContentParent中
            mLayoutInflater.inflate(layoutResID, mContentParent);
        }
installDecor()主要调用了两个方法generateDecor()和generateLayout(),generateDecor()方法的返回值是mDecor ,generateLayout(mDecor)方法的返回值是mContentParent 。
    private void installDecor() {
        mForceDecorInstall = false;
        if (mDecor == null) {
            //第一次mDecor为空
            mDecor = generateDecor(-1);
            mDecor.setDescendantFocusability(ViewGroup.FOCUS_AFTER_DESCENDANTS);
            mDecor.setIsRootNamespace(true);
            if (!mInvalidatePanelMenuPosted && mInvalidatePanelMenuFeatures != 0) {
                mDecor.postOnAnimation(mInvalidatePanelMenuRunnable);
            }
        } else {
            mDecor.setWindow(this);
        }
        if (mContentParent == null) {
            //此时mContentParent 被初始化
            mContentParent = generateLayout(mDecor);
先看一下generateDecor()方法,这里直接new了一个DecorView,DecorView继承FrameLayout 。
 protected DecorView generateDecor() {
        return new DecorView(getContext(), -1);
    }
 private final class DecorView extends FrameLayout implements RootViewSurfaceTaker {
        private final int mFeatureId;
        private final Rect mDrawingBounds = new Rect();
        private final Rect mBackgroundPadding = new Rect();
回过头继续看一下generateLayout()方法,此方法主要是根据样式选择相应的布局、将此布局添加到mDecor中,并初始化mContentParent。留意下面的"ID_ANDROID_CONTENT "
    protected ViewGroup generateLayout(DecorView decor) {
        //获取设置的Window样式,这里说明设置全屏、隐藏标题栏等必须在setContentView()之前
        TypedArray a = getWindowStyle();
        ........
             //下面的代码,主要是根据样式和属性选择对应的布局,这个布局是什么,待会解释;
        int layoutResource;
        int features = getLocalFeatures();
        if ((features & (1 << FEATURE_SWIPE_TO_DISMISS)) != 0) {
            layoutResource = R.layout.screen_swipe_dismiss;
        } else if ((features & ((1 << FEATURE_LEFT_ICON) | (1 << FEATURE_RIGHT_ICON))) != 0) {
            if (mIsFloating) {
                TypedValue res = new TypedValue();
                getContext().getTheme().resolveAttribute(
                        R.attr.dialogTitleIconsDecorLayout, res, true);
                layoutResource = res.resourceId;
            } else {
                layoutResource = R.layout.screen_title_icons;
            }
            removeFeature(FEATURE_ACTION_BAR);
        } else if ((features & ((1 << FEATURE_PROGRESS) | (1 << FEATURE_INDETERMINATE_PROGRESS))) != 0
                && (features & (1 << FEATURE_ACTION_BAR)) == 0) {
            layoutResource = R.layout.screen_progress;
        } else if ((features & (1 << FEATURE_CUSTOM_TITLE)) != 0) {
            if (mIsFloating) {
                TypedValue res = new TypedValue();
                getContext().getTheme().resolveAttribute(
                        R.attr.dialogCustomTitleDecorLayout, res, true);
                layoutResource = res.resourceId;
            } else {
                layoutResource = R.layout.screen_custom_title;
            }
            removeFeature(FEATURE_ACTION_BAR);
        } else if ((features & (1 << FEATURE_NO_TITLE)) == 0) {
            if (mIsFloating) {
                TypedValue res = new TypedValue();
                getContext().getTheme().resolveAttribute(
                        R.attr.dialogTitleDecorLayout, res, true);
                layoutResource = res.resourceId;
            } else if ((features & (1 << FEATURE_ACTION_BAR)) != 0) {
                layoutResource = a.getResourceId(
                      R.styleable.Window_windowActionBarFullscreenDecorLayout,
                       //含有ActionBar的布局
                        R.layout.screen_action_bar);
            } else {
                //含有TitleBar的布局
                layoutResource = R.layout.screen_title;
            }
        } else if ((features & (1 << FEATURE_ACTION_MODE_OVERLAY)) != 0) {
            layoutResource = R.layout.screen_simple_overlay_action_mode;
        } else {
           //最常用布局
            layoutResource = R.layout.screen_simple;
        }
        mDecor.startChanging();
        //将layoutResource 转化为View
        View in = mLayoutInflater.inflate(layoutResource, null);
       //将View添加到Decor中
        decor.addView(in, new ViewGroup.LayoutParams(MATCH_PARENT, MATCH_PARENT));
        mContentRoot = (ViewGroup) in;
        //注意这个ID: public static final int ID_ANDROID_CONTENT = com.android.internal.R.id.content;
        //这里说明mContentParent对象就是ID_ANDROID_CONTENT代表的布局
        ViewGroup contentParent = (ViewGroup)findViewById(ID_ANDROID_CONTENT);
        if (contentParent == null) {
            throw new RuntimeException("Window couldn't find content container view");
        }
上面提到了根据样式Style选择相应的布局,但是这个布局到底是什么呢。可以用SearchEverything搜索R.layout.screen_simple、R.layout.screen_title、R.layout.screen_action_bar几个常用的布局看一下。
screen_simple:普通布局
         android:id="@android:id/content"
         android:layout_width="match_parent"
         android:layout_height="match_parent"
         android:foregroundInsidePadding="false"
         android:foregroundGravity="fill_horizontal|top"
         android:foreground="?android:attr/windowContentOverlay" />
screen_title:含有TitleBar的布局
android:id="@android:id/content"
        android:layout_width="match_parent"
        android:layout_height="0dip"
        android:layout_weight="1"
        android:foregroundGravity="fill_horizontal|top"
        android:foreground="?android:attr/windowContentOverlay" />
screen_action_bar:含有ActionBar的布局
android:id="@android:id/content"
                 android:layout_width="match_parent"
                 android:layout_height="match_parent" />
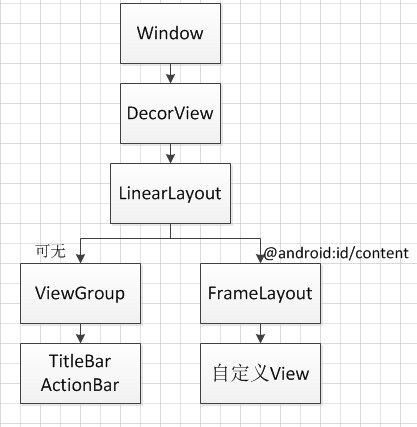
上面三个分别代表了常用布局、含有TitleBar的布局、含有ActionBar的布局,原来TitleBar、ActionBar这些也是写在布局文件中的,其实一点也不神奇。来看一下这些布局的共性,会发现这些布局的根布局都是LinearLayout,且都有一个id为"@android:id/content"的FrameLayout,其实mContentParent其实就是布局里面的FrameLayout
现在来梳理一下:
- layoutResID----------添加到----------mContentParent
mLayoutInflater.inflate(layoutResID, mContentParent);
- mContentParent----------等于----------FrameLayout
//调用setContentView()方法就是把布局添加到FrameLayout中
ViewGroup contentParent = (ViewGroup)findViewById(ID_ANDROID_CONTENT);
- FrameLayout----------添加到----------mDecor
View in = mLayoutInflater.inflate(layoutResource, null);
decor.addView(in, new ViewGroup.LayoutParams(MATCH_PARENT, MATCH_PARENT));
DecorView什么时候被添加到Window中呢?这里就不一步步的看了,在ActivityThread.java的handleResumeActivity()方法中。
    final void handleResumeActivity(IBinder token,
            boolean clearHide, boolean isForward, boolean reallyResume, int seq, String reason) {
        ActivityClientRecord r = mActivities.get(token);
        if (!checkAndUpdateLifecycleSeq(seq, r, "resumeActivity")) {
            return;
        }
        unscheduleGcIdler();
        mSomeActivitiesChanged = true;
        r = performResumeActivity(token, clearHide, reason);
        if (r != null) {
            final Activity a = r.activity;
            if (localLOGV) Slog.v(
            final int forwardBit = isForward ?       WindowManager.LayoutParams.SOFT_INPUT_IS_FORWARD_NAVIGATION : 0;
            boolean willBeVisible = !a.mStartedActivity;
            if (!willBeVisible) {
                try {
                    willBeVisible = ActivityManager.getService().willActivityBeVisible(
                            a.getActivityToken());
                } catch (RemoteException e) {
                    throw e.rethrowFromSystemServer();
                }
            }
            if (r.window == null && !a.mFinished && willBeVisible) {
                r.window = r.activity.getWindow();
                View decor = r.window.getDecorView();
                decor.setVisibility(View.INVISIBLE);
                ViewManager wm = a.getWindowManager();
                WindowManager.LayoutParams l = r.window.getAttributes();
                a.mDecor = decor;
                l.type = WindowManager.LayoutParams.TYPE_BASE_APPLICATION;
                l.softInputMode |= forwardBit;
                if (r.mPreserveWindow) {
                    a.mWindowAdded = true;
                    r.mPreserveWindow = false;
                    ViewRootImpl impl = decor.getViewRootImpl();
                    if (impl != null) {
                        impl.notifyChildRebuilt();
                    }
                }
                if (a.mVisibleFromClient) {
                    if (!a.mWindowAdded) {
                        a.mWindowAdded = true;
                        wm.addView(decor, l);//将DecorView添加到Window中
                    } else {
                        a.onWindowAttributesChanged(l);
                    }
                }
DecorView为整个Window界面的最顶层View,且只含有一个子元素LinearLayout。也就是FrameLayout的根元素,如果不信的话,可以尝试打开更多的布局,结果无一另外全是LinearLayout(ActionBar的根布局ActionBarOverlayLayout继承LinearLayout)。
下面来区分几个activity界面的常用概念,以便理解。
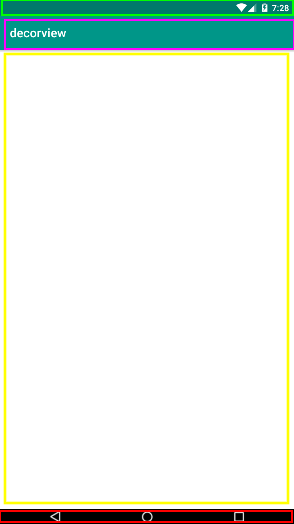
绿色区域:状态栏StatusBar,高度计算如下:
public static int getStatusBarHeight(Context context) {
        int statusBarHeight = 0;
        int resourceId = context.getResources().getIdentifier("status_bar_height", "dimen", "android");
        if (resourceId > 0) {
            statusBarHeight = context.getResources().getDimensionPixelSize(resourceId);
        }
        return statusBarHeight;
    }
紫色部分:ActionBar或者TitleBar ,高度计算如下
    public static int getTitleBarHeight(Activity context) {
        int top = context.getWindow().findViewById(Window.ID_ANDROID_CONTENT).getTop();
        return top > getStatusBarHeight(context) ? top - getStatusBarHeight(context) : 0;
    }
黄色部分:RootView(也叫内容区域),高度计算如下
    public static int getRootView(Activity context) {
        return context.getWindow().findViewById(Window.ID_ANDROID_CONTENT).getHeight();
    }
红色部分:导航栏NavigationBar,高度计算如下
    public static int getNavigationBarHeight(Context context) {
        int resourceId = context.getResources().getIdentifier("navigation_bar_height", "dimen", "android");
        return context.getResources().getDimensionPixelSize(resourceId);
    }
应用区域:内容区域+紫色区域(RootView+TitleBar/ActionBar)
    public static int getContentViewHeight(Activity context) {
        Rect outRect = new Rect();
        context.getWindow().getDecorView().getWindowVisibleDisplayFrame(outRect);
        return outRect.height();
    }
这里要重点说明一下,通常getDisplayMetrics().heightPixels方法拿到的分辨率的高度不一定是真的分辨率高度,具体详情查看Android手机获取屏幕分辨率高度因虚拟导航栏带来的问题
到了这里我们就可以大致推断DecorView的高度了
DecorViewHeight=RootView+TitleBar/ActionBar+StatusBarHeight;
或者
DecorViewHeight=RootView+TitleBar/ActionBar+StatusBarHeight+NavigationBarHeight;
这里是不是很困惑了?高度怎么把StatusBarHeight和NavigationBar算进去了。原来StatusBar和NavigationBar都是系统UI,每一个Activity在绘制的时候都会预留空间给StatusBar和NavigationBar,占据DecorView空间但不属于DecorView本身。那为什么DecorView高度有时包括NavigationBar有时不包括呢,这主要是由各个系统版本和Style决定的,具体源码在何处现在没有去分析。总之DecorView高度并不是固定的是可以动态变化的,举个栗子吧!
例子
1、首先隐藏StatusBar和NavigationBar
    View decorView = getWindow().getDecorView();
    int uiOptions = View.SYSTEM_UI_FLAG_HIDE_NAVIGATION
                | View.SYSTEM_UI_FLAG_FULLSCREEN;
    decorView.setSystemUiVisibility(uiOptions);
    setContentView(R.layout.activity_splash);
2、在onWindowFocusChanged()方法中打印DecorView高度
    @Override
    public void onWindowFocusChanged(boolean hasFocus) {
        super.onWindowFocusChanged(hasFocus);
        Log.e("decorViewHeight  ", getWindow().getDecorView().getHeight() + "");
        Log.e("DisplayHeight  ", UIUtil.getDisplayHeight(this) + "");
        Log.e("RealMetricsHeight  ", UIUtil.getRealMetrics(this) + "");
        Log.e("stateBarHeight  ", UIUtil.getStatusBarHeight(this) + "");
        Log.e("TitleBarHeight  ", UIUtil.getTitleBarHeight(this) + "");
        Log.e("ActionBarHeight  ", UIUtil.getActionBarHeight(this) + "");
        Log.e("NavigationBarHeight  ", UIUtil.getNavigationBarHeight(this) + "");
        Log.e("rootViewHeight  ", UIUtil.getRootView(this) + "");
        Log.e("contentViewHeight", UIUtil.getContentViewHeight(this) + "");
    }
3、打印日志如下
07-08 20:33:43.568 5731-5731/paradise.decoarview E/decorViewHeight: 1280
07-08 20:33:43.568 5731-5731/paradise.decoarview E/DisplayHeight: 1244
07-08 20:33:43.578 5731-5731/paradise.decoarview E/RealMetricsHeight: 1280
07-08 20:33:43.578 5731-5731/paradise.decoarview E/stateBarHeight: 38
07-08 20:33:43.578 5731-5731/paradise.decoarview E/TitleBarHeight: 46
07-08 20:33:43.578 5731-5731/paradise.decoarview E/ActionBarHeight: 0
07-08 20:33:43.578 5731-5731/paradise.decoarview E/NavigationBarHeight: 36
07-08 20:33:43.578 5731-5731/paradise.decoarview E/rootViewHeight: 1158
07-08 20:33:43.578 5731-5731/paradise.decoarview E/contentViewHeight: 1242
4、点击一下屏幕,唤起NavigationBar、按返回键,打印日志如下
07-08 20:36:22.548 5731-5731/paradise.decoarview E/decorViewHeight: 1244
07-08 20:36:22.548 5731-5731/paradise.decoarview E/DisplayHeight: 1244
07-08 20:36:22.548 5731-5731/paradise.decoarview E/RealMetricsHeight: 1280
07-08 20:36:22.548 5731-5731/paradise.decoarview E/stateBarHeight: 38
07-08 20:36:22.548 5731-5731/paradise.decoarview E/TitleBarHeight: 46
07-08 20:36:22.548 5731-5731/paradise.decoarview E/ActionBarHeight: 0
07-08 20:36:22.548 5731-5731/paradise.decoarview E/NavigationBarHeight: 36
07-08 20:36:22.548 5731-5731/paradise.decoarview E/rootViewHeight: 1122
07-08 20:36:22.548 5731-5731/paradise.decoarview E/contentViewHeight: 1206
DecorView高度由1280变成了1244,而这个高度正好是NavigationBar高度。
问题解决
到了这里,一且都明白了。原来在本项目中
activity_splash.xml高度=RootView高度+ActionBarHeight/TitleBarHeight
WindowBackground高度=RootView高度+ActionBarHeight/TitleBarHeight+StatusBarHeight
多了一个StatusBarHeight,所以需要在初始化的时候RootView减去StatusBarHeight
        FrameLayout.LayoutParams params = (FrameLayout.LayoutParams) rlSplashRoot.getLayoutParams();
        params.topMargin = UIUtil.getStatusBarHeight();
        rlSplashRoot.setLayoutParams(params);


