实验
使用实验楼虚拟机打开shell
启动内核完成后进入menu程序
此时已经成功加载了menuos内核
使用gdb跟踪调试内核
加上-s和-S参数重新启动内核
此时内核启动程序停止在startup处
水平方式开启另外一个shell
在第二个shell中启动gdb模式
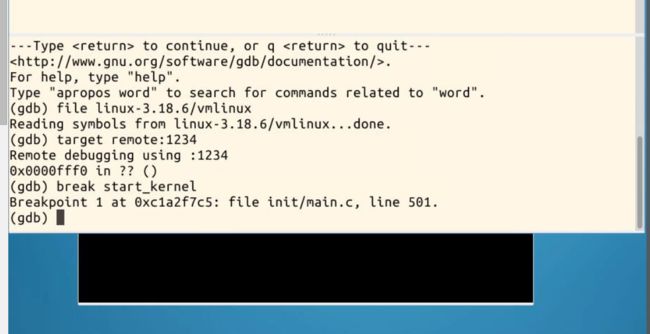
加载带有debug信息的linux镜像符号表
连接刚刚启动好的被冻结的内核窗口
在start_kernel处设置一个断点
使用c命令继续运行,此时被冻结的窗口开始运行至start_kernel处停止
使用list命令观察此处代码
在rest_init处设置断点
使用c命令继续执行,此时系统执行至rest_init处停止
使用list命令观察此处代码,可发现他是在start_kernel函数的尾部被调用
分析start_kernel函数
找到并观察start_kernel函数源代码
asmlinkage __visible void __init start_kernel(void)
{
    char *command_line;
    char *after_dashes;

    /*
     * Need to run as early as possible, to initialize the
     * lockdep hash:
     */
    lockdep_init();
    set_task_stack_end_magic(&init_task);
    smp_setup_processor_id();
    debug_objects_early_init();

    /*
     * Set up the the initial canary ASAP:
     */
    boot_init_stack_canary();

    cgroup_init_early();

    local_irq_disable();
    early_boot_irqs_disabled = true;

/*
 * Interrupts are still disabled. Do necessary setups, then
 * enable them
 */
    boot_cpu_init();
    page_address_init();
    pr_notice("%s", linux_banner);
    setup_arch(&command_line);
    mm_init_cpumask(&init_mm);
    setup_command_line(command_line);
    setup_nr_cpu_ids();
    setup_per_cpu_areas();
    smp_prepare_boot_cpu(); /* arch-specific boot-cpu hooks */

    build_all_zonelists(NULL, NULL);
    page_alloc_init();

    pr_notice("Kernel command line: %s\n", boot_command_line);
    parse_early_param();
    after_dashes = parse_args("Booting kernel",
                  static_command_line, __start___param,
                  __stop___param - __start___param,
                  -1, -1, &unknown_bootoption);
    if (!IS_ERR_OR_NULL(after_dashes))
        parse_args("Setting init args", after_dashes, NULL, 0, -1, -1,
               set_init_arg);

    jump_label_init();

    /*
     * These use large bootmem allocations and must precede
     * kmem_cache_init()
     */
    setup_log_buf(0);
    pidhash_init();
    vfs_caches_init_early();
    sort_main_extable();
    trap_init();
    mm_init();

    /*
     * Set up the scheduler prior starting any interrupts (such as the
     * timer interrupt). Full topology setup happens at smp_init()
     * time - but meanwhile we still have a functioning scheduler.
     */
    sched_init();
    /*
     * Disable preemption - early bootup scheduling is extremely
     * fragile until we cpu_idle() for the first time.
     */
    preempt_disable();
    if (WARN(!irqs_disabled(),
         "Interrupts were enabled *very* early, fixing it\n"))
        local_irq_disable();
    idr_init_cache();
    rcu_init();
    context_tracking_init();
    radix_tree_init();
    /* init some links before init_ISA_irqs() */
    early_irq_init();
    init_IRQ();
    tick_init();
    rcu_init_nohz();
    init_timers();
    hrtimers_init();
    softirq_init();
    timekeeping_init();
    time_init();
    sched_clock_postinit();
    perf_event_init();
    profile_init();
    call_function_init();
    WARN(!irqs_disabled(), "Interrupts were enabled early\n");
    early_boot_irqs_disabled = false;
    local_irq_enable();

    kmem_cache_init_late();

    /*
     * HACK ALERT! This is early. We're enabling the console before
     * we've done PCI setups etc, and console_init() must be aware of
     * this. But we do want output early, in case something goes wrong.
     */
    console_init();
    if (panic_later)
        panic("Too many boot %s vars at `%s'", panic_later,
              panic_param);

    lockdep_info();

    /*
     * Need to run this when irqs are enabled, because it wants
     * to self-test [hard/soft]-irqs on/off lock inversion bugs
     * too:
     */
    locking_selftest();

#ifdef CONFIG_BLK_DEV_INITRD
    if (initrd_start && !initrd_below_start_ok &&
        page_to_pfn(virt_to_page((void *)initrd_start)) < min_low_pfn) {
        pr_crit("initrd overwritten (0x%08lx < 0x%08lx) - disabling it.\n",
            page_to_pfn(virt_to_page((void *)initrd_start)),
            min_low_pfn);
        initrd_start = 0;
    }
#endif
    page_cgroup_init();
    debug_objects_mem_init();
    kmemleak_init();
    setup_per_cpu_pageset();
    numa_policy_init();
    if (late_time_init)
        late_time_init();
    sched_clock_init();
    calibrate_delay();
    pidmap_init();
    anon_vma_init();
    acpi_early_init();
#ifdef CONFIG_X86
    if (efi_enabled(EFI_RUNTIME_SERVICES))
        efi_enter_virtual_mode();
#endif
#ifdef CONFIG_X86_ESPFIX64
    /* Should be run before the first non-init thread is created */
    init_espfix_bsp();
#endif
    thread_info_cache_init();
    cred_init();
    fork_init(totalram_pages);
    proc_caches_init();
    buffer_init();
    key_init();
    security_init();
    dbg_late_init();
    vfs_caches_init(totalram_pages);
    signals_init();
    /* rootfs populating might need page-writeback */
    page_writeback_init();
    proc_root_init();
    cgroup_init();
    cpuset_init();
    taskstats_init_early();
    delayacct_init();

    check_bugs();

    sfi_init_late();

    if (efi_enabled(EFI_RUNTIME_SERVICES)) {
        efi_late_init();
        efi_free_boot_services();
    }

    ftrace_init();

    /* Do the rest non-__init'ed, we're now alive */
    rest_init();
}
可以看到start_kernel函数源代码是由很多模块的调用组成
涉及到大多数内核模块的调用
运行过程分析:
-进行死锁检测初始化,初始化两个table
-设置init_task栈顶
-设置处理器id
-初始化追踪对象
-设置初始canary,防止缓冲区溢出
-对cgroup初始化
-此时中断仍处在关闭状态,做完必要的设置之后才会打开中断
-使用bootmem分配器,运行keme_cache_init
-设置进程优先级中断
-运行sched_init
-使用preempt_disable关闭优先权
-初始化一些链接设定
-初始化IRQ
-time参数初始化
-IRQ开启后需要检测死锁信息
-线程创建后开始定义其bsp
-对线程信息初始化等等
...
-需要写回page来回填根目录
...
-最后进行的是rest_init切换至用户态
总结
linux内核源代码简介
计算机工作的三大法宝
-存储程序计算机工作模型
-函数调用堆栈
-中断
操作系统的两把宝剑
-中断上下文的切换
-进程上下文的切换
这些都和汇编有很大的联系
阅读linux源代码时候主要注意arch/x86、init、kernel等
查看readme文档
构造一个简单的Linux系统menuos
进入Linuxkernel目录
找到内核源代码
启动kernel执行init
跟踪调试linux内核
使用gdb跟踪调试内核
qemu -kernel linux-3.18.6/arch/x86/boot/bzImage -initrd rootfs.img -s -S首先启动内核
- -S freeze CPU at startup (use 'c' to start execution)冻结运行初始化状态
- -s shorthand for -gdb tcp::1234 若不想使用1234端口,则可以使用-gdb tcp:xxxx来取代-s选项
另开一个shell窗口
gdb
(gdb) file linux-3.18.6/vmlinux 在gdb界面中 target remote 之前加载符号表
(gdb) target remote:1234 建立gdb和gdbserver之间的连接,按c让qemu上的linux继续运行
(gdb) break start_kernel 断点的设置可以在target remote之前,也可以在之后
按c回车之后启动至断点
(gdb) break rest_init
(gdb) list 查看代码调用情况
简单分析start_kernel
观察init目录中的main.c代码
分析内核的任何部分都会涉及到start_kernel
王潇洋
原创作品转载请注明出处
《Linux内核分析》MOOC课程http://mooc.study.163.com/course/USTC-1000029000


