GAT及代码实现
GAT及代码实现
- GAT公式定义
- 论文源码
- 使用numpy自定义参数简单复现
GAT公式定义
在交通预测任务中,不同点位高度相关。GAT根据节点的输入数据,提取节点之间的关系,通过对节点特征的变换和融合,得到新的节点特征。GAT只需要根据点位的相邻信息即可完成计算,不需要获得完整的图结构。

a i j a_{ij} aij和以往用的attention没什么区别,只不过就是该公式的分母是与节点 i i i相连的所有节点 k k k进行计算求和,而不是所有节点,也印证了GAT的计算不需要知道完整的图结构。
e i j e_{ij} eij其实就是将节点 i i i的向量和节点 j j j的向量先进行一个相同的线性变化,concatenate起来后再乘向量 a a a然后通过 L e a k y R e L U LeakyReLU LeakyReLU函数。
R e L U ReLU ReLU是将所有的负值都设为零,而 L e a k y R e L U Leaky ReLU LeakyReLU是给所有负值赋予一个非零斜率,论文中的值设为0.2。
公式部分很简单,代码的实现也比较简洁。
论文源码
代码摘自论文
GRAPH ATTENTION NETWORKS(2018 ICLR)
class GraphAttentionLayer(nn.Module):
    """
    Simple GAT layer, similar to https://arxiv.org/abs/1710.10903
    """

    def __init__(self, in_features, out_features, dropout, alpha, concat=True):
        super(GraphAttentionLayer, self).__init__()
        self.dropout = dropout
        self.in_features = in_features
        self.out_features = out_features
        self.alpha = alpha
        self.concat = concat

        self.W = nn.Parameter(torch.zeros(size=(in_features, out_features)))
        nn.init.xavier_uniform_(self.W.data, gain=1.414)
        self.a = nn.Parameter(torch.zeros(size=(2*out_features, 1)))
        nn.init.xavier_uniform_(self.a.data, gain=1.414)

        self.leakyrelu = nn.LeakyReLU(self.alpha)

    def forward(self, input, adj):
        h = torch.mm(input, self.W)
        N = h.size()[0]

        a_input = torch.cat([h.repeat(1, N).view(N * N, -1), h.repeat(N, 1)], dim=1).view(N, -1, 2 * self.out_features)
        e = self.leakyrelu(torch.matmul(a_input, self.a).squeeze(2))

        zero_vec = -9e15*torch.ones_like(e)
        attention = torch.where(adj > 0, e, zero_vec)
        attention = F.softmax(attention, dim=1)
        attention = F.dropout(attention, self.dropout, training=self.training)
        h_prime = torch.matmul(attention, h)

        if self.concat:
            return F.elu(h_prime)
        else:
            return h_prime

    def __repr__(self):
        return self.__class__.__name__ + ' (' + str(self.in_features) + ' -> ' + str(self.out_features) + ')'
使用numpy自定义参数简单复现
因为我只想直接看一下GAT的实现,不想完整debug一遍代码,就简单的用numpy做了一个demo。
我做的是交通流预测,因次随便设一个维度为 5 ∗ 1 5*1 5∗1的矩阵,代表某一个时刻5个节点的属性,1-5代表此时每个监测节点的车流量。 [ 1 2 3 4 5 ] \begin{bmatrix} 1 \\ 2 \\ 3 \\ 4 \\ 5 \end{bmatrix} ⎣⎢⎢⎢⎢⎡12345⎦⎥⎥⎥⎥⎤
参照原公式中的concatenate操作,实际上我们就是为了将每两个节点的属性连起来,以节点1为例,我们可以得到 A 1 = [ 1 1 1 2 1 3 1 4 1 5 ] A1=\begin{bmatrix} 1 &1 \\ 1 &2 \\ 1 &3 \\ 1 &4 \\ 1 &5 \end{bmatrix} A1=⎣⎢⎢⎢⎢⎡1111112345⎦⎥⎥⎥⎥⎤,(对应代码中的)
接下来计算每两个节点属性值的相关性,对应公式中的
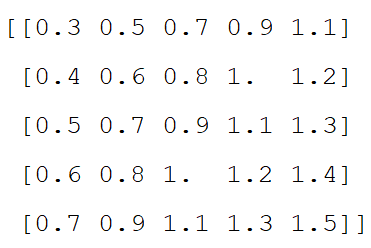
设a的维度为 2 ∗ 1 2*1 2∗1,那么与A1相乘后得到的维度为 5 ∗ 1 5*1 5∗1,因为我们有5个节点,所以总的维度为 5 ∗ 5 ∗ 1 5*5*1 5∗5∗1,最后一维squeeze后得到了 5 ∗ 5 5*5 5∗5的矩阵。
每一行代表某一个节点与所有节点的关联性,但是上面公式写到分母只和节点相连的,因此我们需要接用邻接矩阵筛选出矩阵中大于0的元素(对应代码中的torch.where行)
处理后可以得到

attention进行 S o f t m a x Softmax Softmax后代入公式的最终输出

可以看见考虑了周围节点信息我们点位数值产生有了变化,值得注意的是这个公式计算的是点位相邻点位的信息,可以用残差的方式引入节点自身信息如Pan et al. 提出的ST-MetaNet模型。
import numpy as np
import torch
import torch.nn.functional as F
from torch.nn import LeakyReLU
leakyrelu = LeakyReLU(0.2)
adj1 = np.array([[0, 1, 1, 1, 0],
                 [1, 0, 1, 0, 0],
                 [1, 1, 0, 0, 1],
                 [1, 0, 0, 0, 1],
                 [0, 0, 1, 1, 0]])#自定义邻接矩阵
adj = torch.from_numpy(adj1)
input = np.arange(1, 6, 1).reshape(5, 1)#自定义输入
h = np.array(input).astype(np.float)  # 假设已经经过了线性变化
h = torch.from_numpy(h)
a = np.array([[0.1], [0.2]])
a = torch.from_numpy(a)
print(a.size())
c_1 = h.repeat(1, 5).view(25, 1)  # view前维度5*5
c_2 = h.repeat(5, 1).view(25, 1)  # view前维度25*1,这一行代码用np.repate写结果不太一样
a_input = torch.cat([c_1, c_2], dim=1).view(5, -1, 2)
e = leakyrelu(torch.matmul(a_input, a).squeeze(-1))
zero_vec = -9e15 * torch.ones_like(e)
attention = torch.where(adj > 0, e, zero_vec)
attention = F.softmax(attention, dim=1)
h_prime = torch.matmul(attention, h)
print(h_prime)