从本地加载FASHION MNIST数据集并输入到模型进行训练
文章目录
- 1.概要
- 2.代码
- 2.1 数据集加载及展示
- 2.2模型训练
- 3. 源文件和训练结果
1.概要
本文将简要介绍fashion minist数据集,从本地加载此数据集,并将其输入到一个简单的分类神经网络模型完成训练。
2.代码
2.1 数据集加载及展示
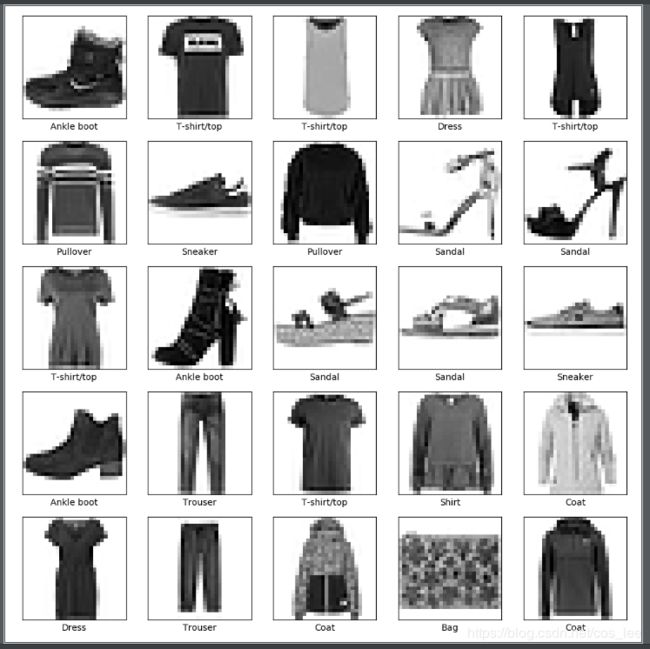
FashionMNIST 是一个替代 MNIST 手写数字集的图像数据集。 其涵盖了来自 10 种类别的共 7 万个不同商品的正面图片。 FashionMNIST 的大小、格式和训练集/测试集划分与原始的 MNIST 完全一致。60000/10000 的训练测试数据划分,28x28 的灰度图片。你可以直接用它来测试你的机器学习和深度学习算法性能,且不需要改动任何的代码。
依赖库:
import tensorflow as tf
from tensorflow import keras
import numpy as np
import matplotlib.pyplot as plt
import gzip
本地fashion minist数据集加载:
def get_data():
    # 文件获取
    train_image = r"E:/Data/fashion_minist/train-images-idx3-ubyte.gz"
    test_image = r"E:/Data/fashion_minist/t10k-images-idx3-ubyte.gz"
    train_label = r"E:/Data/fashion_minist/train-labels-idx1-ubyte.gz"
    test_label = r"E:/Data/fashion_minist/t10k-labels-idx1-ubyte.gz" #文件路径
    paths = [train_label, train_image, test_label,test_image]

    with gzip.open(paths[0], 'rb') as lbpath:
        y_train = np.frombuffer(lbpath.read(), np.uint8, offset=8)

    with gzip.open(paths[1], 'rb') as imgpath:
        x_train = np.frombuffer(
            imgpath.read(), np.uint8, offset=16).reshape(len(y_train), 28, 28)

    with gzip.open(paths[2], 'rb') as lbpath:
        y_test = np.frombuffer(lbpath.read(), np.uint8, offset=8)

    with gzip.open(paths[3], 'rb') as imgpath:
        x_test = np.frombuffer(
            imgpath.read(), np.uint8, offset=16).reshape(len(y_test), 28, 28)

    return (x_train, y_train), (x_test, y_test)
这个函数实现从本地加载fashion minist数据集为适合模型直接输入的格式(选择从本地加载是因为原代码直接下载数据集总是报错,可以选择用迅雷等下载后再从本地加载),其中的4个文件路径需要自行指定。返回值为array格式,可直接输入到model中训练。
数据集可视化:
显示训练集中的前 25 张图像,并在每张图像下显示类别名称。验证确保数据格式正确无误(定义class_name来对应标签文件):
class_names = ['T-shirt/top', 'Trouser', 'Pullover', 'Dress', 'Coat',
               'Sandal', 'Shirt', 'Sneaker', 'Bag', 'Ankle boot']
plt.figure(figsize=(10,10))
for i in range(25):
    plt.subplot(5,5,i+1)
    plt.xticks([])
    plt.yticks([])
    plt.grid(False)
    plt.imshow(train_images[i], cmap=plt.cm.binary)
    plt.xlabel(class_names[train_labels[i]])
plt.show()
出图结果:

确认无误后,就可以开始训练了。其实这个数据集肯定没错,但如果要迁移到自己的数据集上去的话,这个步骤还是挺重要的。
2.2模型训练
模型训练前先要对训练数据和测试数据做归一化处理,这一步非常重要,对训练结果有很大的影响。(未做归一化处理的话,模型训练的时候基本不收敛)
    #数据归一化
    train_images = train_images / 255.0
    test_images = test_images / 255.0
然后搭建模型,模型结构按照自己的需要构建即可,包括loss以及优化器还有评估指标的选择,要注意的是输入图像的大小在这里是28*28。然后是模型训练以及测试。
    #模型搭建
    model = keras.Sequential([
        keras.layers.Flatten(input_shape=(28, 28)),
        keras.layers.Dense(128, activation=tf.nn.relu),
        keras.layers.Dense(10, activation=tf.nn.softmax)
    ])
    model.compile(optimizer=tf.train.AdamOptimizer(),
                  loss='sparse_categorical_crossentropy',
                  metrics=['accuracy'])
    #模型训练
    model.fit(train_images, train_labels, epochs=50)
    #模型测试
    test_loss, test_acc = model.evaluate(test_images, test_labels)
    print('Test accuracy:', test_acc)```
3. 源文件和训练结果
此代码指定本地数据集路径即可运行
import tensorflow as tf
from tensorflow import keras
import numpy as np
import matplotlib.pyplot as plt
import gzip

#数据集加载
def get_data():
    #本地数据集文件获取
    train_image = r"E:/Data/fashion_minist/train-images-idx3-ubyte.gz"
    test_image = r"E:/Data/fashion_minist/t10k-images-idx3-ubyte.gz"
    train_label = r"E:/Data/fashion_minist/train-labels-idx1-ubyte.gz"
    test_label = r"E:/Data/fashion_minist/t10k-labels-idx1-ubyte.gz"
    paths = [train_label, train_image, test_label,test_image]

    with gzip.open(paths[0], 'rb') as lbpath:
        y_train = np.frombuffer(lbpath.read(), np.uint8, offset=8)

    with gzip.open(paths[1], 'rb') as imgpath:
        x_train = np.frombuffer(
            imgpath.read(), np.uint8, offset=16).reshape(len(y_train), 28, 28)

    with gzip.open(paths[2], 'rb') as lbpath:
        y_test = np.frombuffer(lbpath.read(), np.uint8, offset=8)

    with gzip.open(paths[3], 'rb') as imgpath:
        x_test = np.frombuffer(
            imgpath.read(), np.uint8, offset=16).reshape(len(y_test), 28, 28)

    return (x_train, y_train), (x_test, y_test)
if __name__ == '__main__':
    #本地数据加载
    (train_images, train_labels), (test_images, test_labels) = get_data()

    #数据展示
    class_names = ['T-shirt/top', 'Trouser', 'Pullover', 'Dress', 'Coat',
                   'Sandal', 'Shirt', 'Sneaker', 'Bag', 'Ankle boot']
    plt.figure(figsize=(10,10))
    for i in range(25):
        plt.subplot(5,5,i+1)
        plt.xticks([])
        plt.yticks([])
        plt.grid(False)
        plt.imshow(train_images[i], cmap=plt.cm.binary)
        plt.xlabel(class_names[train_labels[i]])
    plt.show()

    #数据归一化
    train_images = train_images / 255.0
    test_images = test_images / 255.0

    #模型搭建
    model = keras.Sequential([
        keras.layers.Flatten(input_shape=(28, 28)),
        keras.layers.Dense(128, activation=tf.nn.relu),
        keras.layers.Dense(10, activation=tf.nn.softmax)
    ])
    model.compile(optimizer=tf.train.AdamOptimizer(),
                  loss='sparse_categorical_crossentropy',
                  metrics=['accuracy'])
    #模型训练
    model.fit(train_images, train_labels, epochs=50)
    #模型测试
    test_loss, test_acc = model.evaluate(test_images, test_labels)
    print('Test accuracy:', test_acc)
运行结果(epochs=50):

训练结果:loss:0.0972 train_acc:0.9634
测试结果:loss:0.4937 test_acc:0.8813
才疏学浅,若有错误之处,还请各位道友批评指正。