使用去躁自编码提取MNIST特征
0、引言
在非监督学习中,最典型的一类神经网络莫过于autoencoder(自编码器),它的目的是基于输入的unlabeled数据X={x(1),x(2),x(3),…}X={x(1),x(2),x(3),…},通过训练得到数据的一个降维特征表达H={h(1),h(2),h(3),…}H={h(1),h(2),h(3),…}。以图像识别为例,隐层HH会提取出图像的边角,将这种更为抽象的特征作为后续的多层感知网络的输入,可以更好地表达输入图像,在图像分类等任务上获得更好的性能。
从最原始的自编码器衍生出很多不同的种类:
- 降噪自编码器,接受加噪的输入来进行训练
- 稀疏自编码器,对隐层的激活输出进行正则,同一时间只有部分隐层神经元是活跃的
- 栈式自编码器,级联多个自编码器,逐层提取抽象特征
1、去躁自编码器
和自编码器不同的是,降噪自编码的训练过程中,输入的数据有一部分是“损坏”的,DAE(Denoising Autoencoder)的核心思想是,一个能够从中恢复出原始信号的神经网络表达未必是最好的,能够对“损坏”的原始数据编码、解码,然后还能恢复真正的原始数据,这样的特征才是好的。在论文“Stacked Denoising Autoencoders: Learning Useful Representations in a Deep Network with a Local Denoising Criterion”中,阐述了DAE的原理,如下图所示:

2、代码示例:
# -*- coding: utf-8 -*-
"""
Created on Sun May 27 17:49:18 2018
# -*- coding: utf-8 -*-
"""
import tensorflow as tf
import numpy as np
import matplotlib.pyplot as plt

from tensorflow.examples.tutorials.mnist import input_data
mnist = input_data.read_data_sets('MNIST_data', one_hot=True)

print(type(mnist))  #

print('Training data shape:', mnist.train.images.shape)  # Training data shape: (55000, 784)
print('Test data shape:', mnist.test.images.shape)  # Test data shape: (10000, 784)
print('Validation data shape:', mnist.validation.images.shape)  # Validation data shape: (5000, 784)
print('Training label shape:', mnist.train.labels.shape)  # Training label shape: (55000, 10)

train_X = mnist.train.images
train_Y = mnist.train.labels
test_X = mnist.test.images
test_Y = mnist.test.labels


def denoising_auto_encoder():
    '''
    去燥自编码器 784-256-256-784

    对MNIST原始输入图片加入噪声,在自编码网络中进行训练,以得到抗干扰更强的特征提取模型
    '''
    n_input = 784  # 输入节点数
    n_hidden = 256  # 隐藏层节点个数
    learning_rate = 0.01  # 学习率
    training_epochs = 20  # 迭代轮数
    batch_size = 256  # 小批量数量大小
    display_epoch = 2
    show_num = 10  # 显示的图片个数

    # 定义占位符
    input_x = tf.placeholder(dtype=tf.float32, shape=[None, n_input])
    input_y = tf.placeholder(dtype=tf.float32, shape=[None, n_input])
    keep_prob = tf.placeholder(dtype=tf.float32)
    # 定义参数
    weights = {
        'h1': tf.Variable(tf.random_normal(shape=[n_input, n_hidden], stddev=0.1)),
        'h2': tf.Variable(tf.random_normal(shape=[n_hidden, n_hidden], stddev=0.1)),
        'out': tf.Variable(tf.random_normal(shape=[n_hidden, n_input], stddev=0.1))
    }

    biases = {
        'b1': tf.Variable(tf.zeros(shape=[n_hidden])),
        'b2': tf.Variable(tf.zeros(shape=[n_hidden])),
        'out': tf.Variable(tf.zeros(shape=[n_input]))
    }

    # 网络模型 去燥自编码
    h1 = tf.nn.sigmoid(tf.add(tf.matmul(input_x, weights['h1']), biases['b1']))
    h1 = tf.nn.dropout(h1, keep_prob)
    h2 = tf.nn.sigmoid(tf.add(tf.matmul(h1, weights['h2']), biases['b2']))
    h2 = tf.nn.dropout(h2, keep_prob)
    pred = tf.nn.sigmoid(tf.add(tf.matmul(h2, weights['out']), biases['out']))

    # 计算代价
    cost = tf.reduce_mean((pred - input_y) ** 2)

    # 定义优化器
    # train = tf.train.RMSPropOptimizer(learning_rate).minimize(cost)
    train = tf.train.AdamOptimizer(learning_rate).minimize(cost)

    num_batch = int(np.ceil(mnist.train.num_examples / batch_size))

    # 开始训练
    with tf.Session() as sess:
        sess.run(tf.global_variables_initializer())
        print('开始训练')
        for epoch in range(training_epochs):
            total_cost = 0.0
            for i in range(num_batch):
                batch_x, batch_y = mnist.train.next_batch(batch_size)
                # 添加噪声 每次取出来一批次的数据,将输入数据的每一个像素都加上0.3倍的高斯噪声
                batch_x_noise = batch_x + 0.3 * np.random.randn(batch_size, 784)  # 标准正态分布
                _, loss = sess.run([train, cost], feed_dict={input_x: batch_x_noise, input_y: batch_x, keep_prob: 1.0})
                total_cost += loss

            # 打印信息
            if epoch % display_epoch == 0:
                print('Epoch {0}/{1}  average cost {2}'.format(epoch, training_epochs, total_cost / num_batch))
        print('训练完成')

        # 数据可视化
        test_noisy = mnist.test.images[:show_num] + 0.3 * np.random.randn(show_num, 784)
        reconstruction = sess.run(pred, feed_dict={input_x: test_noisy, keep_prob: 1.0})
        plt.figure(figsize=(1.0 * show_num, 1 * 2))
        for i in range(show_num):
            # 原始图像
            plt.subplot(3, show_num, i + 1)
            plt.imshow(np.reshape(mnist.test.images[i], (28, 28)), cmap='gray')
            plt.axis('off')
            # 加入噪声后的图像
            plt.subplot(3, show_num, i + show_num * 1 + 1)
            plt.imshow(np.reshape(test_noisy[i], (28, 28)), cmap='gray')
            plt.axis('off')
            # 去燥自编码器输出图像
            plt.subplot(3, show_num, i + show_num * 2 + 1)
            plt.imshow(np.reshape(reconstruction[i], (28, 28)), cmap='gray')
            plt.axis('off')
        plt.show()

        # 测试鲁棒性 为了测试模型的鲁棒性,我们换一种噪声方式,然后再生成一个样本测试效果
        plt.figure(figsize=(2.4 * 3, 1 * 2))
        # 生成一个0~mnist.test.images.shape[0]的随机整数
        randidx = np.random.randint(test_X.shape[0], size=1)
        orgvec = test_X[randidx]  # 1x784

        # 获取标签
        label = np.argmax(test_Y[randidx], 1)

        print('Label is %d' % (label))
        # 噪声类型  对原始图像加入噪声
        print('Salt and Paper Noise')
        noisyvec = test_X[randidx]  # 1 x 784
        # 噪声点所占的比重
        rate = 0.15
        # 生成噪声点索引
        noiseidx = np.random.randint(test_X.shape[1], size=int(test_X.shape[1] * rate)).astype(np.int32)
        # 对这些点像素进行反向
        for i in noiseidx:
            noisyvec[0, i] = 1.0 - noisyvec[0, i]

            # 噪声图像自编码器输出
        outvec = sess.run(pred, feed_dict={input_x: noisyvec, keep_prob: 1.0})
        outimg = np.reshape(outvec, (28, 28))

        # 可视化
        plt.subplot(1, 3, 1)
        plt.imshow(np.reshape(orgvec, (28, 28)), cmap='gray')
        plt.title('Original Image')
        plt.axis('off')

        plt.subplot(1, 3, 2)
        plt.imshow(np.reshape(noisyvec, (28, 28)), cmap='gray')
        plt.title('Input Image')
        plt.axis('off')

        plt.subplot(1, 3, 3)
        plt.imshow(outimg, cmap='gray')
        plt.title('Reconstructed Image')
        plt.axis('off')


if __name__ == '__main__':
    denoising_auto_encoder()
3、输出结果


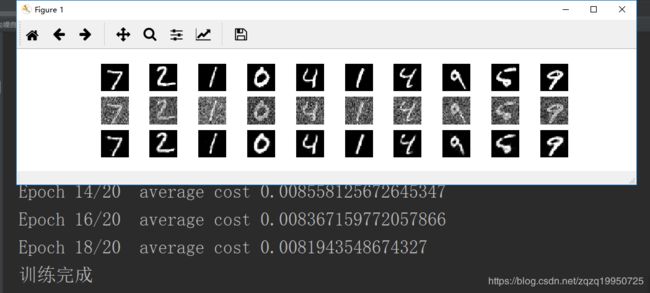
第一张图片总共有3行10列,第一行我原始图像,第二行为加入随机高斯噪声之后的图像,第三行为经过去噪编码器的输出。