23种设计模式(上)
文字参考:https://www.bilibili.com/video/av24176315
代码参考:https://www.github.com/anxpp/JavaDesignPattern
变化是复用最大的天敌,面向对象编程最大的优势是抵御变化。需要将这种优势发挥出来就需要我们遵循设计原则,设计原则通常相辅相成,违反一个设计原则就违反了其他的设计原则。设计模式的设计就遵循设计原则。在学习设计模式的时候,我们需要回归设计原则。
在学习设计模式的过程中需要有意识的去发现代码中稳定的部分和变化的部分,在变化点处应用设计模式。几乎所有的设计模式都是用于有稳定又有变化的代码,因为如果完全稳定或者完全需要变化的代码根本没有使用设计模式的必要性。另外我们需要认识的是,我们没有办法消灭变化,只是将变化集中到一个地方,这样控制起来会比较容易,就像一直猫,原来在屋子里跑来跑去,现在我们将它关在了一个笼子里。
在什么时候,什么地方使用设计模式非常重要,对于设计模式的学习有的时候我们需要谨防“走火入魔”,比如接到需求的时候一上来就使用设计模式,如果不是特别有经验的程序员,这不是推荐的做法,因为这可能会导致你使用了错误的设计模式,从而使工作陷入困境之中。更推荐的做法是按照我们第一反应去写完需求,在检查代码的时候,会发现我们也许违背了一些设计原则或者一些经验不允许的代码结构(比如代码中出现if else结构,我们需要考虑是否可以使用策略模式),而这些问题可以使用设计模式去修正。所以更加推荐的做法是在代码演化的过程中使用模式,而不是一上来就直接到模式,除非你有足够的自信。
最后在学习设计模式的过程中看代码一定要有高度,和抽象思维,这对于理解和使用设计模式是非常有帮助的。
重构中我们通常可以使用以下的技法:
- 静态 变为 动态
- 早绑定 变为 晚绑定
- 继承 变为 组合
- 编译时依赖 变为 运行时依赖
- 紧耦合 变为 松耦合
目录
- > 面向对象设计原则
- > 从封装变化角度对模式分类
- 一、模板方法(Template Method)
- 二、策略模式(Strategy)
- 三、观察者模式(Observer)
- 四、装饰模式(Decorator)
- 五、桥模式(Bridge)
- 六、工厂方法(Factory Method)
- 七、抽象工厂(Abstract Factory)
- 八、原型模式(Prototype)
- 九、构建器(builder)
- 十、单例模式(Singleton)
> 面向对象设计原则
1. 依赖倒置原则(DIP)
- 高层模块(稳定)不应该依赖于低层模块(变化),二者都应该依赖于抽象(稳定) 。
- 抽象(稳定)不应该依赖于实现细节(变化) ,实现细节应该依赖于抽象(稳定)。
2. 开放封闭原则(OCP)
- 对扩展开放,对更改封闭。
- 类模块应该是可扩展的,但是不可修改。
3. 单一职责原则(SRP)
- 一个类应该仅有一个引起它变化的原因。
- 变化的方向隐含着类的责任。
4. Liskov 替换原则(LSP)
- 子类必须能够替换它们的基类(IS-A)。
- 继承表达类型抽象。
5. 接口隔离原则(ISP)
- 不应该强迫客户程序依赖它们不用的方法。
- 接口应该小而完备。
6. 优先使用对象组合,而不是类继承
- 类继承通常为“白箱复用”,对象组合通常为“黑箱复用” 。
- 继承在某种程度上破坏了封装性,子类父类耦合度高。
- 而对象组合则只要求被组合的对象具有良好定义的接口,耦合度低。
7. 封装变化点
- 使用封装来创建对象之间的分界层,让设计者可以在分界层的一侧进行修改,而不会对另一侧产生不良的影响,从而实现层次间的松耦合。
8. 针对接口编程,而不是针对实现编程
- 不将变量类型声明为某个特定的具体类,而是声明为某个接口。
- 客户程序无需获知对象的具体类型,只需要知道对象所具有的接口。
- 减少系统中各部分的依赖关系,从而实现“高内聚、松耦合”的类型设计方案。
> 从封装变化角度对模式分类
以下的分类并不是绝对的,只是这种模式在这个分类特点中表现的最为明显。
组件协作:
- Template Method(模板方法)
- Observer/Event(观察者模式)
- Strategy(策略模式)
单一职责:
- Decorator(装饰模式)
- Bridge(桥模式)
对象创建:
- Factory Method(工厂方法)
- Bridge(桥模式)
- Abstract Factory(抽象工厂)
- Prototype(原型模式)
- Builder(构建器)
对象性能:
- Singleton(单例模式)
- Flyweight(享元模式)
接口隔离:
- Façade(门面模式)
- Proxy(代理模式)
- Mediator(中介者)
- Adapter(适配器模式)
状态变化:
- Memento(备忘录)
- State(状态模式)
数据结构:
- Composite(组合模式)
- Iterator(迭代器模式)
- Chain of Resposibility(职责链)
行为变化:
- Command(命令模式)
- Visitor(访问者模式)
领域问题:
- Interpreter(解析器模式)
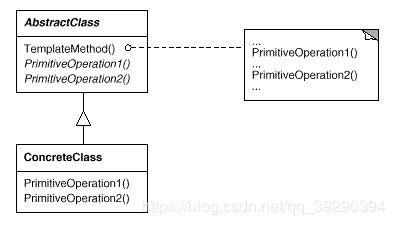
一、模板方法(Template Method)
动机(Motivation)
- 在软件构建过程中,对于某一项任务,它常常有稳定的整体操作结构,但各个子步骤却有很多改变的需求,或者由于固有的原因(比如框架与应用之间的关系)而无法和任务的整体结构同时实现。
- 如何在确定稳定操作结构的前提下,来灵活应对各个子步骤的变化或者晚期实现需求?、
模式定义
- 定义一个操作中的算法的骨架 (稳定,比如功能流程) ,而将一些步骤(具体实现细节)延迟 (变化) 到子类中。 Template Method使得子类可以不改变(复用)一个算法的结构即可重定义(override 重写)该算法的 某些特定步骤。
要点总结
- Template Method模式是一种非常基础性的设计模式,在面向对象系统中有着大量的应用。它用最简洁的机制(虚函数的多态性) 为很多应用程序框架提供了灵活的扩展点,是代码复用方面的基本实现结构。
- 除了可以灵活应对子步骤的变化外, “不要调用我,让我来调用你” 的反向控制结构是Template Method的典型应用。
- 在具体实现方面,被Template Method调用的虚方法可以具有实现,也可以没有任何实现(抽象方法、纯虚方法),但一般推荐将它们设置为protected方法。
在代码中我们的抽象类已经将处理逻辑(dealData()函数)实现了或者说固定了,但是却不知道getData()和calcData()的实现或者说需要子类实现。
- 抽象类中定义好了模板方法
public abstract class AbstractTemplate {
	Object data;
	//模板方法
	void dealData(){
		getData();
		calcData();
		printData();
	}
	//下面是普通方法,可能已经实现,也可能需要子类实现
	abstract void getData();
	abstract void calcData();
	void printData(){
		System.out.println(data);
	}
}
- 子类实现抽象类中没有实现的方法
//继承模板的具体模板对象
public class Template extends AbstractTemplate {
	@Override
	void getData() {
		data = "data";
	}
	@Override
	void calcData() {
		data = (String)data+data;
	}
}
- 测试主类
public class TestUse {
	public static void main(String args[]){
		Template template = new Template();
		template.dealData();
	}
}
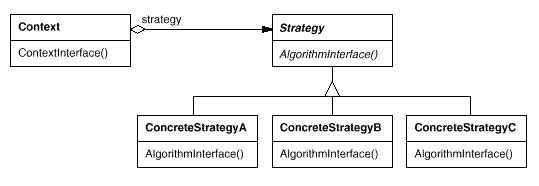
二、策略模式(Strategy)
动机(Motivation)
- 在软件构建过程中,某些对象使用的算法可能多种多样,经常改变,如果将这些算法都编码到对象中,将会使对象变得异常复杂;而且有时候支持不使用的算法也是一个性能负担。
- 如何在运行时根据需要透明地更改对象的算法?将算法与对象本身解耦,从而避免上述问题?
模式定义
- 定义一系列算法,把它们一个个封装起来,并且使它们可互相替换(变化)。该模式使得算法可独立于使用它的客户程序(稳定)而变化(扩展,子类化)。
要点总结
- Strategy及其子类为组件提供了一系列可重用的算法,从而可以使得类型在运行时方便地根据需要在各个算法之间进行切换。
- Strategy模式提供了用条件判断语句以外的另一种选择,消除条件判断语句,就是在解耦合。含有许多条件判断语句的代码通常都需要Strategy模式。
- 如果Strategy对象没有实例变量,那么各个上下文可以共享同一个Strategy对象,从而节省对象开销。
代码示例
代码中,我们需要保存数据,但是使用哪种保存策略是变化的,如果使用if else结构来实现这种逻辑,显然是不合理的,如果添加一种新的保存策略,就需要添加新if else块。所以我们可以使用策略模式。我们还可以使用setSaveData来动态的修改保存策略,这里非常直观的将变化的部分提取出来,单独实现,从而减少耦合。通常来说如果在代码种出现if else结构,并且if无法枚举完所有情况或者枚举的情况太多,我们都可以考虑使用策略模式。
- 使用环境
public class SaveClient {
	private ISaveData saveData;
	public SaveClient(ISaveData saveData){
		this.saveData = saveData;
	}
	public void setSaveData(ISaveData saveData){
		this.saveData = saveData;
	}
	public void save(Object data){
		saveData.save(data);
	}
}
- 策略接口和3种策略实现
public interface ISaveData {
	void save(Object data);
}
public class SaveToFile implements ISaveData {
	@Override
	public void save(Object data) {
		System.out.println("数据:" + data + " 保存到文件");
	}
}
public class SaveToMysql implements ISaveData {
	@Override
	public void save(Object data) {
		System.out.println("数据:" + data + " 保存到Mysql");
	}
}
public class SaveToRedis implements ISaveData {
	@Override
	public void save(Object data) {
		System.out.println("数据:" + data + " 保存到Redis");
	}
}
- 测试主类
public class TestUse {
	public static void main(String args[]){
		Object data = "数据";
		ISaveData saveData = new SaveToRedis();
		SaveClient client = new SaveClient(saveData);
		client.save(data);
		client.setSaveData(new SaveToFile());
		client.save(data);
	}
}
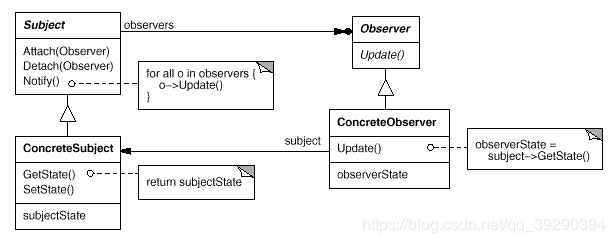
三、观察者模式(Observer)
动机(Motivation)
- 在软件构建过程中,我们需要为某些对象建立一种“通知依赖关系” ——一个对象(目标对象)的状态发生改变,所有的依赖对 象(观察者对象)都将得到通知。如果这样的依赖关系过于紧密,将使软件不能很好地抵御变化。
- 使用面向对象技术,可以将这种依赖关系弱化,并形成一种稳定的依赖关系。从而实现软件体系结构的松耦合。
模式定义
- 定义对象间的一种一对多(变化)的依赖关系,以便当一个对象(Subject)的状态发生改变时,所有依赖于它的对象都得到通知并自动更新。
要点总结
- 使用面向对象的抽象,Observer模式使得我们可以独立地改变目标与观察者,从而使二者之间的依赖关系达致松耦合。
- 目标发送通知时,无需指定观察者,通知(可以携带通知信息作为参数)会自动传播。
- 观察者自己决定是否需要订阅通知,目标对象对此一无所知。
- Observer模式是基于事件的UI框架中非常常用的设计模式,也是MVC模式的一个重要组成部分。
代码示例
在代码中我们使用安卓和苹果订阅天气服务为示例,当天气变化的时候,安卓和苹果就会自动的打印出天气变化消息。
- 观察者接口和观察者的2个实现
//观察者接口
public interface Client {
	void getWeather(WeatherInfo info);
}
public class ClientAndroidServer implements Client {
	private static String name = "安卓服务";
	private WeatherInfo info;
	@Override
	public void getWeather(WeatherInfo info) {
		this.info = info;
		dealMsg();
	}
	private void dealMsg(){
		System.out.println(name + "收到最新天气:time="+info.getTime()+"msg="+info.getWeather()+"。马上开始推送消息...");
	}
}
public class ClientIphoneServer implements Client {
	private static String name = "苹果服务";
	private WeatherInfo info;
	@Override
	public void getWeather(WeatherInfo info) {
		this.info = info;
		dealMsg();
	}
	private void dealMsg(){
		System.out.println(name + "收到最新天气:time="+info.getTime()+"msg="+info.getWeather()+"。马上开始推送消息...");
	}
}
- 可以被订阅的主题
//主题接口
public interface IWeatherService {
	void addClient(Client client);		//添加观察者
	boolean deleteClient(Client client);//删除观察者
	void notifyClients();				//通知
	void updateWeather(WeatherInfo info);//主题内容更新
}
//主题实现
import java.util.Iterator;
import java.util.LinkedHashSet;
import java.util.LinkedList;
//主题,同时使用了枚举实现单例
public enum WeatherService implements IWeatherService{
	instance;
	private LinkedList<WeatherInfo> weatherInfos = new LinkedList<WeatherInfo>();
	private LinkedHashSet<Client> clients = new LinkedHashSet<Client>();//存放观察者
	//添加观察者
	@Override
	public void addClient(Client client) {
		clients.add(client);
	}
	//删除观察者
	@Override
	public boolean deleteClient(Client client) {
		return clients.remove(client);
	}
	//通知观察者
	@Override
	public void notifyClients() {
		Iterator<Client> iterator = clients.iterator();
		while(iterator.hasNext()){
			iterator.next().getWeather(weatherInfos.peekFirst());
		}
	}
	//更新天气
	@Override
	public void updateWeather(WeatherInfo info) {
		if(weatherInfos.size()>0)
			if(weatherInfos.peekFirst().equals(info)) return;
		weatherInfos.push(info);
		if(clients.size()==0) return;
		notifyClients();
	}
}
- 消息实体(非重点)
//天气的消息实体
public class WeatherInfo {
	private long time;
	private String weather;
	public WeatherInfo(long time,String weather){
		this.time = time;
		this.weather = weather;
	}
	public long getTime() {
		return time;
	}
	public void setTime(long time) {
		this.time = time;
	}
	public String getWeather() {
		return weather;
	}
	public void setWeather(String weather) {
		this.weather = weather;
	}
	@Override
	public boolean equals(Object obj) {
		WeatherInfo info = (WeatherInfo) obj;
		return info.time==this.time&&info.weather.equals(this.weather);
	}
}
- 测试主类
public class TestUse {
	public static void main(String args[]){
		//创建主题
		WeatherService service = WeatherService.instance;
		//添加观察者
		service.addClient(new ClientAndroidServer());
		service.addClient(new ClientIphoneServer());
		//更新主题
		service.updateWeather(new WeatherInfo(System.currentTimeMillis(), "多云"));
		service.updateWeather(new WeatherInfo(System.currentTimeMillis()+1000*60*60*24, "多云转晴"));
		service.updateWeather(new WeatherInfo(System.currentTimeMillis()+1000*60*60*24*2, "晴"));
	}
}
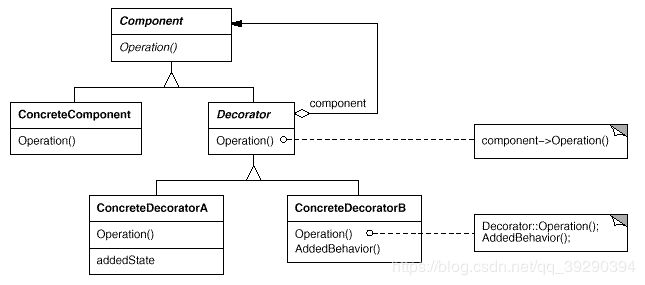
四、装饰模式(Decorator)
动机(Motivation)
- 在某些情况下我们可能会“过度地使用继承来扩展对象的功能”,由于继承为类型引入的静态特质(相对于多态这种动态),使得这种扩展方式缺乏灵活性; 并且随着子类的增多(扩展功能的增多),各种子类的组合(扩展功能的组合)会导致更多子类的膨胀。
- 如何使“对象功能的扩展”能够根据需要来动态地实现?同时避免“扩展功能的增多”带来的子类膨胀问题?从而使得任何“功能扩展变化”所导致的影响将为最低?
模式定义
- 动态(组合)地给一个对象增加一些额外的职责。就增加功能而言,Decorator模式比生成子类(继承)更为灵活(消除重复代码 & 减少子类个数)。
要点总结
- 通过采用组合而非继承的手法, Decorator模式实现了在运行时动态扩展对象功能的能力,而且可以根据需要扩展多个功能。 避免了使用继承带来的“灵活性差”和“多子类衍生问题”。
- Decorator类在接口上表现为is-a Component的继承关系,即Decorator类继承了Component类所具有的接口。 但在实现上又表现为has-a Component的组合关系,即Decorator类又使用了另外一个Component类。 这里的意思是被装饰以后的主体仍旧是主体。通过它你也许有组合和继承新的思考。
- Decorator模式的目的并非解决“多子类衍生的多继承”问题,Decorator模式应用的要点在于解决“主体类在多个方向上的扩展功能”——是为“装饰”的含义。 这些装饰类将在运行时装饰到主体类上,而不是固定到特定的装饰和主体组合的类中(这可能是很多人偏向的做法)。
代码示例
- 可被装饰的主体
//被装饰者接口
public interface IPersistentUtil {
	void persistentMsg(String msg);
}
//具体的被装饰者
public class PersistentUtil implements IPersistentUtil{
	@Override
	public void persistentMsg(String msg) {
		System.out.println(msg + " 存入文件");
	}
}
- 装饰中间类和两个不同的装饰类
//装饰
public abstract class PersistentDecorator implements IPersistentUtil {
	IPersistentUtil iPersistentUtil;

	public PersistentDecorator(IPersistentUtil iPersistentUtil){
		this.iPersistentUtil = iPersistentUtil;
	}

	@Override
	public void persistentMsg(String msg) {
		iPersistentUtil.persistentMsg(msg);
	}
}
//装饰--存入数据库
public class PersistentDbDecorator extends PersistentDecorator {

	public PersistentDbDecorator(IPersistentUtil iPersistentUtil){
		super(iPersistentUtil);
	}

	@Override
	public void persistentMsg(String msg) {
		iPersistentUtil.persistentMsg(msg);
		persistentToDb(msg);
	}

	private void persistentToDb(String msg){
		System.out.println(msg + " 存入数据库");
	}
}
//装饰--存入网络其他地方
public class PersistentNetDecorator extends PersistentDecorator {
	public PersistentNetDecorator(IPersistentUtil iPersistentUtil){
		super(iPersistentUtil);
	}
	@Override
	public void persistentMsg(String msg) {
		iPersistentUtil.persistentMsg(msg);
		persistentToNet(msg);
	}
	private void persistentToNet(String msg){
		System.out.println(msg + " 存入网络的其他地方");
	}
}
- 测试主体
public class TestUse {
	public static void main(String args[]){
		//被装饰者
		final String data = "数据";
		IPersistentUtil iPersistentUtil = new PersistentUtil();
		iPersistentUtil.persistentMsg(data);
		System.out.println("下面装饰数据库持久化:");
		iPersistentUtil = new PersistentDbDecorator(iPersistentUtil);
		iPersistentUtil.persistentMsg(data);
		System.out.println("下面继续装饰网络存储器持久化:");
		iPersistentUtil = new PersistentNetDecorator(iPersistentUtil);
		iPersistentUtil.persistentMsg(data);
	}
}
五、桥模式(Bridge)
动机(Motivation)
- 由于某些类型的固有的实现逻辑,使得它们具有两个变化的维度,乃至多个纬度的变化(比如业务功能和平台实现这两个不同的维度)。如果这些维度变化,那么就需要产生新的类来满足需求,如果可以将这些维度拆分,使其自由组合,将会使产生的类和重复的代码结构减少。
- 如何应对这种“多维度的变化”?如何利用面向对象技术来使得类型可以轻松地沿着两个乃至多个方向变化,而不引入额外的复杂度?
模式定义
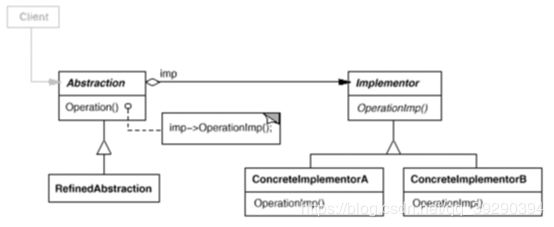
- 将抽象部分(业务功能)与实现部分(平台实现)分离,使它们都可以独立地变化。
要点总结
- Bridge模式使用 “对象间的组合关系” 解耦了抽象和实现之间固有的绑定关系,使得抽象和实现可以沿着各自的维度来变化。所谓抽象和实现沿着各自纬度的变化,即“子类化”它们。
- Bridge模式有时候类似于多继承方案,但是多继承方案往往违背单一职责原则(即一个类只有一个变化的原因),复用性比较差。Bridge模式是比多继承方案更好的解决方法。
- Bridge模式的应用一般在“两个非常强的变化维度”,有时一个类也有多于两个的变化维度,这时可以使用Bridge的扩展模式。通常来说我们可以将一个维度抽象成一个类,而维度的变化都是这个类的子类。不同维度的子类相互组合形成我们的业务需求。
代码示例
在代码中有两种存储方式(commonSave和massageSave)分别表示数据存储成功后给不给提示信息, 实现方式也有两种(SaveToDB 和SaveToFile)分别表示存储到数据库还是文件中。存储方式和实现方式是两种不同变化的维度,我们使其自由组合。
- 变化维度一
//抽象
public abstract class AbstractSave {
	ISaveData saveData;
	public AbstractSave(ISaveData saveData){
		this.saveData = saveData;
	}
	public abstract void save(Object data);
}
//细化抽象
public class commonSave extends AbstractSave{
	public LocalSave(ISaveData saveData) {
		super(saveData);
	}
	@Override
	public void save(Object data) {
		System.out.print("本地存储:");
		saveData.save(data);
	}
}
//细化抽象
public class massageSave extends AbstractSave{
	public NetSave(ISaveData saveData) {
		super(saveData);
	}
	@Override
	public void save(Object data) {
		System.out.print("网络存储:");
		saveData.save(data);
		saveData.sendMassage();
	}
}
- 变化维度二
//实现
public interface ISaveData {
	void save(Object data);
	void sendMassage();
}
//具体实现
public class SaveToDB implements ISaveData{
	@Override
	public void save(Object data) {
		System.out.println(data + " 存储到数据库");
	}
	@Override
	public void sendMassage(){
		System.out.println("数据已被存储到数据库");
	}
}
//具体实现
public class SaveToFile implements ISaveData{
	@Override
	public void save(Object data) {
		System.out.println(data + " 存储到文件");
	}
	@Override
	public void sendMassage(){
		System.out.println("数据已被存储到文件");
	}
}
- 测试主类
public class TestUse {
	public static void main(String args[]){
		Object data = "数据";
		ISaveData saveDataDb = new SaveToDB();
		ISaveData saveDataFile = new SaveToFile();
		AbstractSave save;
		save = new commonSave(saveDataDb);
		save.save(data);
		save = new commonSave(saveDataFile);
		save.save(data);
		save = new massageSave(saveDataDb);
		save.save(data);
		save = new massageSave(saveDataFile);
		save.save(data);
	}
}
代码中第一个变化维度是CPU类型,第二个变化维度是不同品牌的电脑,最后可以自由组合
- 变化维度一
//实现者
interface Cpu{
	String discribe();
}
//具体实现者*2
class Amd implements Cpu{
	public String discribe() {
		return "AMD CPU";
	}
}
class Intel implements Cpu{
	public String discribe() {
		return "INTEL CPU";
	}
}
- 变化维度二
//抽象
abstract class AbstractComputer{
	Cpu cpu;
	public AbstractComputer(Cpu cpu){
		this.cpu=cpu;
	}
	public abstract void discribe();

}
//细化抽象*2
class LenevoComputer extends AbstractComputer{
	public LenevoComputer(Cpu cpu) {
		super(cpu);
	}
	@Override
	public void discribe() {
		System.out.println("联想笔记本cpu:"+super.cpu.discribe());
	}
}
class HaseeComputer extends AbstractComputer{
	public HaseeComputer(Cpu cpu) {
		super(cpu);
	}
	@Override
	public void discribe() {
		System.out.println("神舟笔记本cpu:"+super.cpu.discribe());
	}
}
- 测试主类
//桥接模式
public class SimpleBridge {
	public static void main(String args[]){
		new LenevoComputer(new Amd()).discribe();
		new HaseeComputer(new Intel()).discribe();
	}
}
六、工厂方法(Factory Method)
动机(Motivation)
- 在软件系统中,经常面临着创建对象的工作;由于需求的变化,需要创建的对象的具体类型经常变化。
- 如何应对这种变化?如何绕过常规的对象创建方法(new),提供一种“封装机制”来避免客户程序和这种“具体对象创建工作”的紧耦合?
模式定义
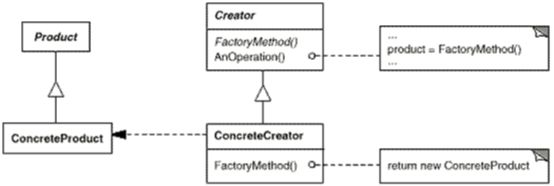
- 定义一个用于创建对象的接口,让子类(具体工厂)决定实例化哪一个类。Factory Method使得一个类的实例化延迟到子类。
要点总结
- Factory Method模式用于隔离类对象的使用者和具体类型之间的耦合关系。面对一个经常变化的具体类型,紧耦合关系(new)会导致软件的脆弱。
- Factory Method模式通过面向对象的手法,将所要创建的具体对象工作延迟到子类,从而实现一种扩展(而非更改)的策略,较好地解决了这种紧耦合关系。
- Factory Method模式解决“单个对象”的需求变化。缺点在 于要求创建方法/参数相同。
代码中我们有两种不同的产品和对应的工厂,并且还有一个商店出售它们,关于商品出售什么,我们延迟到了主类中再确定。
- 不同产品(需要创建的对象)
//抽象产品
interface MeizuPhone{
	String describe();
}
//具体产品*2
class PRO5 implements MeizuPhone{
	@Override
	public String describe() {
		return "PRO5";
	}
}
class MX5 implements MeizuPhone{
	@Override
	public String describe() {
		return "MX5";
	}
}
- 不同工厂
interface IFactory{
	MeizuPhone produce();
}
class BigFactory implements IFactory{
	@Override
	public MeizuPhone produce() {
		return new PRO5();
	}
}
class SmallFactory implements IFactory{
	@Override
	public MeizuPhone produce() {
		return new MX5();
	}
}
- 使用工厂的类
class Store{
	IFactory factory;

	public Stroe(IFactory factory){
		this.factory = factory;
	}

	public void sell(){
		System.out.println("sell " + factory.produce().describe());
	}
}
- 测试主类
//工厂方法模式
public class FactoryMethod {
	public static void main(String args[]){
		Store store;
		store = new Store(new SmallFactory());
		store.sell();
		store = new Store(new BigFactory());
		store.sell();
	}
}
七、抽象工厂(Abstract Factory)
动机(motivation)
- 在软件系统中,经常面临着“一系列相互依赖的对象工作”;同时,由于需求的变化,往往存在更多系列对象的创建工作。
- 如何应对这种变化?如何绕过常规的对象创建方法(new),提供一种“封装机制”来避免客户程序和这种“多系列具体对象创建工作”的紧耦合。
模式定义
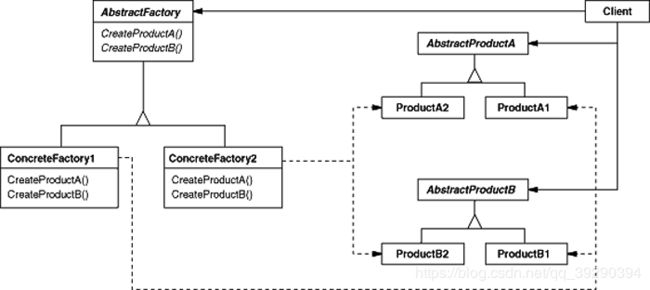
- 提供一个接口,让该接口负责创建一系列”相关或者相互依赖的对象“,无需指定它们具体的类。
要点总结
- 如果没有应对”多系列对象创建“的需求变化,则没有必要使用Abstract Factory模式,这时候使用简单的工厂(上一节中的工厂方法)即可。
- ”系列对象“指的是在某一个特定系列的对象之间有相互依赖、或作用的关系。不同系列的对象之间不能相互依赖。如果一个对象改变,则使用的这个对象同一系列的其他对象都需要改变。
- Abstract Factory模式主要在于应用”新系列“的需求变动。其缺点在与难以应对现有系列中添加”新对象“的需求变动。
代码示例
代码中EP21和MX5是同一个系列,EP30和PRO5是同一个系列,需要配套使用。
- 两种产品
//抽象产品1
interface MeizuPhone{
	void run();
}
class PRO5 implements MeizuPhone{
	@Override
	public void run() {
		System.out.println("我是一台PRO5");
	}
}
class MX5 implements MeizuPhone{
	@Override
	public void run() {
		System.out.println("我是一台MX5");
	}
}
//抽象产品2
interface Headset{
	void play();
}
class EP21 implements Headset{
	@Override
	public void play() {
		System.out.println("我是一副EP21和MX5配套使用");
	}
}
class EP30 implements Headset{
	@Override
	public void play() {
		System.out.println("我是一台EP30和PRO5配套使用");
	}
}
- 生产配套产品的工厂
//抽象工厂
interface IFactory{
	MeizuPhone producePhone();
	Headset produceHeadset();
}
//具体工厂
class BigFactory implements IFactory{
	@Override
	public MeizuPhone producePhone() {
		return new PRO5();
	}
	@Override
	public Headset produceHeadset() {
		return new EP30();
	}
}
//具体工厂
class SmallFactory implements IFactory{
	@Override
	public MeizuPhone producePhone() {
		return new MX5();
	}
	@Override
	public Headset produceHeadset() {
		return new EP21();
	}
}
- 测试主类
//抽象工厂模式
public class AbstractFactory {
	public static void main(String args[]){
		IFactory bigfactory = new BigFactory();
		IFactory smallfactory = new SmallFactory();
		bigfactory.producePhone().run();
		bigfactory.produceHeadset().play();
		smallfactory.producePhone().run();
		smallfactory.produceHeadset().play();
	}
}
八、原型模式(Prototype)
动机(motivation)
- 在软件系统中,经常面临这“某些结构复杂的对象”的创建工作;由于需求的变化,这些对象经常面临着剧烈的变化,但是它们却拥有比较稳定一致的接口。
- 如何应对这种变化?如何向“客户程序(使用这些对象的程序)”隔离出“这些易变对象”,从而使得依赖这些”易变对象“的客户程序不随着需求改变而改变。
模式定义
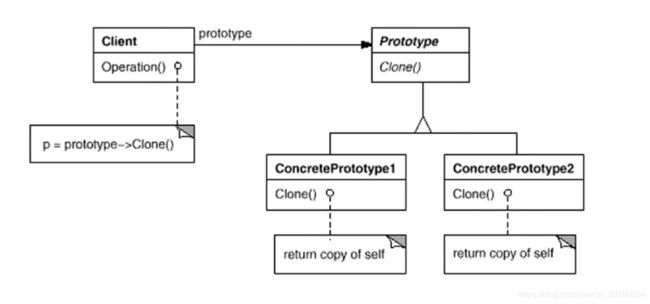
- 使用原型实例指定创建对象的种类,然后通过拷贝这些原型来创建新的对象。
要点总结
- Prototype模式同样用于隔离对象的使用者和具体类型(易变类)之间的耦合关系,它同样要求这些“易变类”拥有稳定的接口。
- Prototype模式对于“如何创建易变类的实体对象“采用”原型克隆“的方法来做, 它使得我们可以非常灵活地动态创建”拥有某些稳定接口“的新对象——所需工作仅仅是注册一个新类的对象(即原型), 然后在任何需要的地方Clone。这和工厂方法有一些不同,工厂方法中具体工厂直接返回的是new的一个对象,而这里Clone出来的对象可能是做过一些改变的对象。这个模式没有工厂方法常见。
- Prototype模式中的Clone方法可以利用某些框架中的序列化来实现深拷贝。
代码中我们使用了SimplePrototype作为一个可克隆自身的对象,在使用的时候我们给Client传入什么样的SimplePrototype(一般来说相对于直接new的状态是改变了一些属性的),在获取的时候就返回什么样的SimplePrototype,只是这个SimplePrototype是一个新的SimplePrototype。
//抽象原型
interface Prototype{
    Object cloneSelf();//克隆自身的方法
}
//具体原型
public class SimplePrototype implements Prototype,Cloneable {
	int value;
	//这样的clone()实现只是示例,并不适合在实际工程中这样做,可以使用序列化和反序列化来实现
	@Override
	public Object cloneSelf() {
		SimplePrototype self = new SimplePrototype();
		self.value = value;
		return self;
	}
}
//客户端使用
class Client{
	SimplePrototype prototype;
	public Client(SimplePrototype prototype){
		this.prototype = prototype;
	}
	public Object getPrototype(){
		return prototype.cloneSelf();
	}
}
Public class Prototype{
	public static void main(){
		SimplePrototype simplePrototype = new SimpePrototype();
		simplePrototype.value = 500;
		Client client = new Client(simplePrototype);
		simplePrototype = (SimplePrototype)client.getPrototype();
		System.out.println(simplePrototype.value);
	}
}
九、构建器(builder)
动机(Motivation)
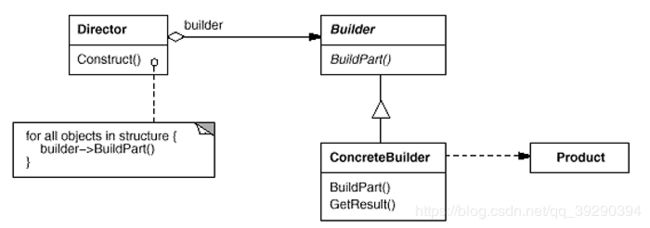
- 在软件系统中,有时候面临着“一个复杂对象”的创建工作,其通常由各个部分的子对象用一定的算法构成;由于需求的变化,这个复杂对象的各个部分经常面临着剧烈的变化,但是将它们组合在一起的算法却相对稳定。为此我们可以将稳定的部分提取出来,而变化的部分交给子类处理,有点类似于模板方法。
- 如何应对这种变化?如何提供一种“封装机制”来隔离出“复杂对象的各个部分”的变化,从而保持系统中的“稳定构建算法”不随着需求改变而改变?
模式定义
- 将一个复杂对象的构建与其表示相分离,使得同样的构建过程(稳定)可以创建不同的表示(变化)。
要点总结
- Builder 模式主要用于“按步骤构建一个复杂的对象”。在这其中“按步骤”是一个稳定的算法,而构建的算法则经常变化。
- 变化点在哪里,封装哪里—— Builder模式主要在于应对“复杂对象各个部分”的频繁需求变动。其缺点在于难以应对“分步骤构建算法”的需求变动。
- 在Builder模式中,要注意不同语言中构造器内调用虚函数的差别(C++(构造函数中不可以调用虚函数) vs. C#)。
在代码中,我们有不同的生产器来生产出我们想要的产品。如果按照普通的思维,想要不同的产品就直接写一个类,然后直接new。但是这样产生的不同的类中生产步骤是一样的,也就是有一些结构的重复,我将这些不变的部分提取出来作为指挥者(Director),然后将不同的实现的具体方法也作为不同的类。最后原来一个可以直接new的类被分为需要生产的产品类,指挥者类,实现类。通过替换指挥者类中的实现类,就可以生产出不同的产品类。实际上构建器构建的是将产品从new的最初的状态构建为我们需要的状态。
- 需要被构建的产品
//产品
public class MyDate {
	String date;
}
- 具体构建的操作
//抽象生成器
public interface IDateBuilder {
	MyDate myDate;
	void buildDate(int y,int m,int d);
	MyDate getData();
}
//具体生成器
public class DateBuilder1 implements IDateBuilder{

	public DateBuilder1(MyDate myDate){
		this.myDate = myDate;
	}

	@Override
	public void buildDate(int y, int m, int d) {
		myDate.date = y+"-"+m+"-"+d;
	}

	@Override
	public MyDate getDate() {
		return myDate;
	}
}
//具体生成器
public class DateBuilder2 implements IDateBuilder{

	public DateBuilder2(MyDate myDate){
		this.myDate = myDate;
	}

	@Override
	public void buildDate(int y, int m, int d) {
		myDate.date = y+" "+m+" "+d;
	}

	@Override
	public MyDate getDate() {
		return myDate;
	}
}
- 稳定的部分,即产品构建步骤
//指挥者
public class Derector {
	private IDateBuilder builder;
	public Derector(IDateBuilder builder){
		this.builder = builder;
	}
	public Mydate buildDate(int y,int m,int d){
		builder.buildDate(y, m, d);
		return builder.getData();
	}
}
- 测试主类
public class TestUse {
	public static void main(String args[]){
		Derector derector;

		MyDate mydate = new MyDate();
		derector = new Detector(new DateBuilder1(mydate));
		derector.buildDate(2066, 3, 5);
		System.out.println(mydata.date);

		MyDate mydate2 = new MyDate();
		derector = new Detector(new DateBuilder2(mydate2));
		derector.buildDate(2066, 3, 6);
		System.out.println(mydata2.date);
	}
}
十、单例模式(Singleton)
动机(Motivation)
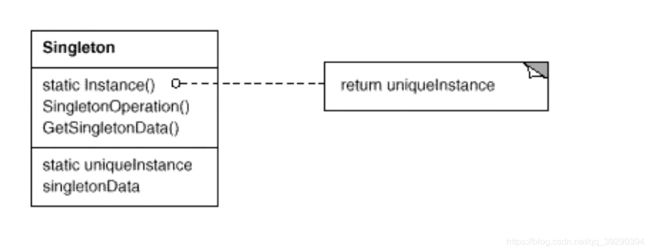
- 在软件系统中,经常有这样一些特殊的类,必须保证它们在系统中只存在一个实例,才能确保它们的逻辑正确性、以及良好的效率。
- 如何绕过常规的构造器,提供一种机制来保证一个类只有一个实例?这应该是类设计者的责任,而不是使用者的责任。
模式定义
- 保证一个类仅有一个实例,并提供一个该实例的全局访问点。
要点总结
- Singleton模式中的实例构造器可以设置为protected以允许子类派生。
- Singleton模式一般不要支持拷贝构造函数和Clone接口,因为这有可能导致多个对象实例,与Singleton模式的初中违背。
- 如何实现多线程环境下安全的Singleton?注意对双检查锁的正确实现。
单例模式是一个非常著名的问题,网上的代码示例很多,这里就不给出代码示例了。可以参考https://mp.weixin.qq.com/s/OHVMyZJzKIjk3fA7FzDTvg
