从零开始学OpenGLES开发——第五章
从零开始学OpenGLES开发——第五章
第五章,透明和混合。
32位色模型中,颜色由4个byte组成,分别为R、G、B、A(顺序根据实际情况为准),其中A表示不透明度。
而透明实际上是靠颜色混合决定的,就是前后两个像素点的的RGBA进行叠加计算,得到新的像素点颜色,看上去就会出现透明效果。
对于实现透明效果的混合公式是这样的(言外之意,混合不仅仅可以实现透明效果,混合只是实现透明的一种手段而已)
比如我有两个点P1(R1,G1,B1,A1),P2(R2,G2,B2,A2),而P1在前,P2在后。P1挡住了P2,P1为半透明。
那么最终我们看到的点Px的结果为
Px(
Rx=R1*A1+R2*A2*(1-A1),
Gx=...
Bx=...
Ax=1-(1-A1)*(1-A2)
)
其中A1,A2均代表百分比小数,1.0表示完全不透明,0.0表示完全透明。如果是byte值,那就是除以255的百分比值。
这个公式的原理是这样理解的,通过光的通过率计算。
如果P1的不透明度A1 = 0.3。那么光的30%会被这个P1反射(进入人的眼睛),而70%会透过它,照射到P2上面。
那么从P1上反射的光的R分量的值就是 R1*A1。
继续再来看P2,假设P2的A2 = 0.4,照射到P2上的光已经衰减到70%了,那么从P2反射的光的R分量=R2*A2*(1-A1)
所以总分量就是 R1*A1 + R2*A2*(1-A1)。G和B的处理是一样的。
而叠加之后最后的新透明度也比较理解了。光通过P1之后,剩下 (1-0.3)。再通过p2之后剩下 (1-0.3)*(1-0.4)
那么不透明率就是 1-(1-0.3)*(1-0.4) 即 1-(1-A1)*(1-A2)
注意:如果P1和P2的顺序变了,结果也会不一样(R,G,B最后的结果不一样)。所以透明效果的两层哪个在前,哪个在后,效果是不一样的。
OpenGL中,可以通过混合实现透明效果,就是GL_BLEND模式,并且可以设置以上的混合公式,那它就是透明的效果。(还可以设置完全叠加的公式,那效果就是颜色完全叠加的效果)。
对于OpenGLES1.0来说GL_BLEND使用起来并不那么方便,因为前面提到过了,P1和P2的远近关系会有影响。也就是说,真实世界的透明的效果受物体的远近影响。而OpenGLES1.0开发的时候,有时候你并不知道哪个物体近,哪个物体远,绘制的顺序是随机的。而GL_BLEND混合模式中,公式中的P1和P2,并不以远近来区分,而是以先后顺序来区分,OpenGL认为先画的物体为A1,后画的物体为P2,很可能其实P1比P2离眼睛更远。所以这里就出现了一个技术难题,这也是用GL_BLEND一般人都会遇到的技术难题。那就是如何确定叠加的顺序(明确知道哪个远哪个近)。为什么说无法确定绘制顺序呢,比如说,我从模型文件加载了一堆模型,其中有些是透明的,这时候我就没办法知道该先画哪个后画哪个了(如果我手动设置几个三角形,那当然是没问题的了)
本人技术水平也有限,暂时也没有完美解决1.0里面BLEND模式的这个技术难题,好像OpenGLES2.0或者3.0里面用GLSL方式开发的时候可能可以解决(待调研),感觉上应该可以读取深度缓存的值,深度缓存记录着前一个已经画了的点离眼睛的距离,进而下判断距离,再决定哪个是A1哪个是A2。
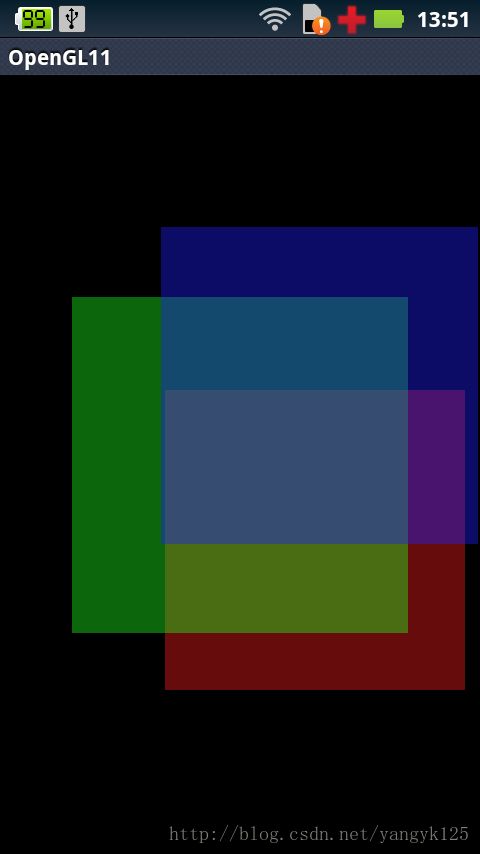
那么我们这里演示透明和混合,就统一采用一样的透明度来处理,因为都是一样的透明度的话,顺序就无关了,你懂的!
对于设置透明度(设置一种含有A的颜色)的方法,有两种,一种是设置到物体的材质上,一种是设置到物体的纹理上
设置到材质上就是设置材质的那一堆颜色(自发光,漫反射等等),并且指定透明度。
设置到纹理上就是使用一种透明的图片纹理,比如PNG。
这两种都可以实现透明的效果。
我这里使用材质的方式演示。
基于前几章的代码,定义三个球,三个球在位置上有重叠部分。并且三个球颜色不一样。完整代码如下:
public class MyGLSurfaceView extends GLSurfaceView implements Renderer {


	public MyGLSurfaceView(Context context, AttributeSet attrs) {
		super(context, attrs);
		init();
	}
	public MyGLSurfaceView(Context context) {
		super(context);
		init();
	}

	private void init(){
		this.setEGLContextClientVersion(1);
		this.setRenderer(this);
	}


	public void onSurfaceCreated(GL10 gl, EGLConfig config) {
		initOpenGLVertexs(0, 20) ;//构造第一个形状
		initOpenGLVertexs(1, 20) ;//构造第二个形状
		initOpenGLVertexs(2, 20) ;//构造第三个形状
		initOpenGLMaterial();
	}

	private FloatBuffer[] vertexBuffer   = new FloatBuffer[3] ;
	private FloatBuffer[] normalBuffer   = new FloatBuffer[3] ;
	private int[]		  vertexCount	 = new int[3] ;


	private void initOpenGLVertexs(int idx, float radius){

		float[] vertexArray  = new float[]{
        		/*第一个三角形*/
        		-radius, radius, 0, /*注意,这里我正方形z轴全为0,也就是正方形位于x-y的平面上*/
        		 radius,-radius, 0,
        		 radius, radius, 0,

        		/*第二个三角形*/
        		-radius, radius, 0,
        		-radius,-radius, 0,
        		 radius,-radius, 0,
		};
		float[] normalArray  = new float[]{
        		/*第一个三角形*/
        		 0, 0, 1, /*注意,这里我正方形z轴全为0,也就是正方形位于x-y的平面上*/
        		 0, 0, 1,
        		 0, 0, 1,

        		/*第二个三角形*/
        		 0, 0, 1,
        		 0, 0, 1,
        		 0, 0, 1,
		};

		vertexCount[idx]  = vertexArray.length / 3;

		vertexBuffer[idx] = ByteBuffer.allocateDirect(vertexArray.length * 4).order(ByteOrder.nativeOrder()).asFloatBuffer();
		vertexBuffer[idx].put(vertexArray);
		vertexBuffer[idx].position(0);

		normalBuffer[idx] = ByteBuffer.allocateDirect(normalArray.length * 4).order(ByteOrder.nativeOrder()).asFloatBuffer();
		normalBuffer[idx].put(normalArray);
		normalBuffer[idx].position(0);
	}

	private List ambient   = new ArrayList();
	private List diffuse   = new ArrayList();
	private List specular  = new ArrayList();
	private List emmissive = new ArrayList();
	private List   shininess = new ArrayList();


	private void initOpenGLMaterial(){

		ambient.add(new float[]{0.4f,0.0f,0.0f,0.4f}); //红色,20%透明
		ambient.add(new float[]{0.0f,0.4f,0.0f,0.4f}); //绿色,20%透明
		ambient.add(new float[]{0.0f,0.0f,0.4f,0.4f});

		diffuse.add(new float[]{0.8f,0.0f,0.0f,0.4f});
		diffuse.add(new float[]{0.0f,0.8f,0.0f,0.4f});
		diffuse.add(new float[]{0.0f,0.0f,0.8f,0.4f});

		specular.add(new float[]{0.6f,0.6f,0.6f,0.4f});
		specular.add(new float[]{0.6f,0.6f,0.6f,0.4f});
		specular.add(new float[]{0.6f,0.6f,0.6f,0.4f});

		emmissive.add(new float[]{0.8f,0.0f,0.0f,0.4f});
		emmissive.add(new float[]{0.0f,0.8f,0.0f,0.4f});
		emmissive.add(new float[]{0.0f,0.0f,0.8f,0.4f});

		shininess.add(Float.valueOf(20f));
		shininess.add(Float.valueOf(20f));
		shininess.add(Float.valueOf(20f));
	}

	public void onSurfaceChanged(GL10 gl, int width, int height) {

		GLES10.glViewport(0, 0, width, height); // 设置视口宽度高度。
		//GLES10.glEnable(GLES10.GL_DEPTH_TEST);
		/**
		 * 在透明物体绘制的时候,不能使用深度测试,因为深度测试一旦打开,它会直接使用更暴力的覆盖模式(一旦发现已经有物体更近了)
		 * 如果一个场景里又有透明物体,又有不透明物体。那就要打开深度测试。
		 * 同时绘制透明的物体的时候把深度缓存设置为只读,而不透明物体的时候,把深度缓存设置可读可写
		 * 我们这儿没有不透明物体,直接禁用深度测试就行了。
		 */

		//开启混合模式
		GLES10.glEnable(GLES10.GL_BLEND);
		//设置混合公式
		GLES10.glBlendFunc(GLES10.GL_SRC_ALPHA, GLES10.GL_ONE_MINUS_SRC_ALPHA);

		// {修改投影矩阵
		GLES10.glMatrixMode(GLES10.GL_PROJECTION); // 修改投影矩阵
		GLES10.glLoadIdentity(); // 复位,将投影矩阵归零
		GLU.gluPerspective(gl, 60.0f, ((float) width) / height, 0.1f, 1500f); // 最近和最远可以看到的距离,超过最远将不显示。
		// }

		GLES10.glEnable(GLES10.GL_LIGHTING);
		GLES10.glEnable(GLES10.GL_LIGHT0);

		//灯光在身后很有远处
		GLES10.glLightfv(GLES10.GL_LIGHT0, GLES10.GL_POSITION, new float[]{300, 300, 1000, 0}, 0);
	}

	private float[]  objMoveMatrix = new float[16] ; //物体运动

	public void onDrawFrame(GL10 gl) {
		GLES10.glClearColor(0.0f, 0.0f, 0.0f, 0.0f); // 清空场景为黑色。
		GLES10.glClear(GLES10.GL_COLOR_BUFFER_BIT | GLES10.GL_DEPTH_BUFFER_BIT);// 清空相关缓存。

		//{
		GLES10.glMatrixMode(GLES10.GL_MODELVIEW);
		GLES10.glLoadIdentity();//归零模型视图
		GLU.gluLookAt(gl, 0, 0, 0, 0.0f, 0.0f, -1.0f, 0.0f, 1.0f, 0.0f);//站在原点,往负半轴看去。
		//}


		GLES10.glEnableClientState(GLES10.GL_VERTEX_ARRAY);
		GLES10.glEnableClientState(GLES10.GL_NORMAL_ARRAY);

for(int idx=0; idx 
解释都在代码里。很多前面几章提到的代码就不作解释了。