Nginx的编译安装
yum install -y gcc gcc-c++ pcre pcre-devel zlib zlib-devel openssl openssl-devel
cd /root/tools
wget -q http://nginx.org/download/nginx-1.6.3.tar.gz
useradd nginx -s /sbin/nologin -M
tar xf nginx-1.6.3.tar.gz
cd nginx-1.6.3
./configure --user=nginx --group=nginx --prefix=/application/nginx-1.6.3/ --with-http_stub_status_module --with-http_ssl_module
make
make install
ln -s /application/nginx-1.6.3 /application/nginx
/application/nginx/sbin/nginx -t
/application/nginx/sbin/nginx
Mysql 的安装
源码安装包的解压
[root@test ~]# groupadd mysql
[root@test ~]# useradd -s /sbin/nologin -g mysql -M mysql
[root@test ~]# tail -1 /etc/passwd
mysql:x:500:500::/home/mysql:/sbin/nologin
[root@test ~]# id mysql
uid=500(mysql) gid=500(mysql) groups=500(mysql)
[root@test ~]# mkdir -p /root/tools
[root@test ~]# cd /root/tools/
[root@test tools]# ll
total 182348
-rw-r--r--. 1 root root 186722932 Dec 21 02:25 mysql-5.5.32-linux2.6-x86_64.tar.gz
[root@test tools]# tar xf mysql-5.5.32-linux2.6-x86_64.tar.gz
[root@test tools]# mkdir -p /application/
[root@test tools]# mv mysql-5.5.32-linux2.6-x86_64 /application/mysql-5.5.32
[root@test tools]# ln -sv /application/mysql-5.5.32/ /application/mysql
`/application/mysql' -> `/application/mysql-5.5.32/'
[root@test tools]# ll /application/
total 4
lrwxrwxrwx.  1 root root   26 Dec 21 02:27 mysql -> /application/mysql-5.5.32/
drwxr-xr-x. 13 root root 4096 Dec 21 02:27 mysql-5.5.32
初始化Mysql的配置文件
[root@test mysql]# cd /application/mysql
[root@test mysql]# ll support-files/*.cnf
-rw-r--r--. 1 7161 wheel  4691 Jun 19  2013 support-files/my-huge.cnf
-rw-r--r--. 1 7161 wheel 19759 Jun 19  2013 support-files/my-innodb-heavy-4G.cnf
-rw-r--r--. 1 7161 wheel  4665 Jun 19  2013 support-files/my-large.cnf
-rw-r--r--. 1 7161 wheel  4676 Jun 19  2013 support-files/my-medium.cnf
-rw-r--r--. 1 7161 wheel  2840 Jun 19  2013 support-files/my-small.cnf
[root@test mysql]# cp support-files/my-small.cnf /etc/my.cnf
cp: overwrite `/etc/my.cnf'? yes
[root@test mysql]# ll /etc/my.cnf
-rw-r--r--. 1 root root 2840 Dec 21 02:29 /etc/my.cnf
初始化Mysql数据库文件
[root@test mysql]# mkdir -p /application/mysql/data
[root@test mysql]# chown -R mysql.mysql /application/mysql/
[root@test mysql]# /application/mysql/scripts/mysql_install_db  --basedir=/application/mysql --datadir=/application/mysql/data --user=mysql
WARNING: The host 'test' could not be looked up with resolveip.
This probably means that your libc libraries are not 100 % compatible
with this binary MySQL version. The MySQL daemon, mysqld, should work
normally with the exception that host name resolving will not work.
This means that you should use IP addresses instead of hostnames
when specifying MySQL privileges !
Installing MySQL system tables...
OK
Filling help tables...
OK
To start mysqld at boot time you have to copy
support-files/mysql.server to the right place for your system
PLEASE REMEMBER TO SET A PASSWORD FOR THE MySQL root USER !
To do so, start the server, then issue the following commands:
/application/mysql/bin/mysqladmin -u root password 'new-password'
/application/mysql/bin/mysqladmin -u root -h test password 'new-password'
Alternatively you can run:
/application/mysql/bin/mysql_secure_installation
which will also give you the option of removing the test
databases and anonymous user created by default.  This is
strongly recommended for production servers.
See the manual for more instructions.
You can start the MySQL daemon with:
cd /application/mysql ; /application/mysql/bin/mysqld_safe &
You can test the MySQL daemon with mysql-test-run.pl
cd /application/mysql/mysql-test ; perl mysql-test-run.pl
Please report any problems with the /application/mysql/scripts/mysqlbug script!
[root@test mysql]#
安装有两个OK的字样,表示初始化成功,
以上的初始化命令生成的数据库文件如下:
[root@test mysql]# tree /application/mysql/data/
/application/mysql/data/
├── mysql
│   ├── columns_priv.frm
│   ├── columns_priv.MYD
│   ├── columns_priv.MYI
│   ├── db.frm
│   ├── db.MYD
│   ├── db.MYI
│   ├── event.frm
│   ├── event.MYD
│   ├── event.MYI
│   ├── func.frm
│   ├── func.MYD
│   ├── func.MYI
│   ├── general_log.CSM
│   ├── general_log.CSV
│   ├── general_log.frm
│   ├── help_category.frm
│   ├── help_category.MYD
│   ├── help_category.MYI
│   ├── help_keyword.frm
│   ├── help_keyword.MYD
│   ├── help_keyword.MYI
│   ├── help_relation.frm
│   ├── help_relation.MYD
│   ├── help_relation.MYI
│   ├── help_topic.frm
│   ├── help_topic.MYD
│   ├── help_topic.MYI
│   ├── host.frm
│   ├── host.MYD
│   ├── host.MYI
│   ├── ndb_binlog_index.frm
│   ├── ndb_binlog_index.MYD
│   ├── ndb_binlog_index.MYI
│   ├── plugin.frm
│   ├── plugin.MYD
│   ├── plugin.MYI
│   ├── proc.frm
│   ├── proc.MYD
│   ├── proc.MYI
│   ├── procs_priv.frm
│   ├── procs_priv.MYD
│   ├── procs_priv.MYI
│   ├── proxies_priv.frm
│   ├── proxies_priv.MYD
│   ├── proxies_priv.MYI
│   ├── servers.frm
│   ├── servers.MYD
│   ├── servers.MYI
│   ├── slow_log.CSM
│   ├── slow_log.CSV
│   ├── slow_log.frm
│   ├── tables_priv.frm
│   ├── tables_priv.MYD
│   ├── tables_priv.MYI
│   ├── time_zone.frm
│   ├── time_zone_leap_second.frm
│   ├── time_zone_leap_second.MYD
│   ├── time_zone_leap_second.MYI
│   ├── time_zone.MYD
│   ├── time_zone.MYI
│   ├── time_zone_name.frm
│   ├── time_zone_name.MYD
│   ├── time_zone_name.MYI
│   ├── time_zone_transition.frm
│   ├── time_zone_transition.MYD
│   ├── time_zone_transition.MYI
│   ├── time_zone_transition_type.frm
│   ├── time_zone_transition_type.MYD
│   ├── time_zone_transition_type.MYI
│   ├── user.frm
│   ├── user.MYD
│   └── user.MYI
├── performance_schema
│   ├── cond_instances.frm
│   ├── db.opt
│   ├── events_waits_current.frm
│   ├── events_waits_history.frm
│   ├── events_waits_history_long.frm
│   ├── events_waits_summary_by_instance.frm
│   ├── events_waits_summary_by_thread_by_event_name.frm
│   ├── events_waits_summary_global_by_event_name.frm
│   ├── file_instances.frm
│   ├── file_summary_by_event_name.frm
│   ├── file_summary_by_instance.frm
│   ├── mutex_instances.frm
│   ├── performance_timers.frm
│   ├── rwlock_instances.frm
│   ├── setup_consumers.frm
│   ├── setup_instruments.frm
│   ├── setup_timers.frm
│   └── threads.frm
└── test
    └── db.opt
3 directories, 91 files
初始化的时候可能的错误:
错误一
WARRNING:the host'test'could not be looked up with resolveip.
需要修改主机名的解析,使其和uname -n一样,修改后的结果如下:
[root@test mysql]# grep `uname -n` /etc/hosts
127.0.0.1 test localhost.localdomain localhost
错误二
ERROR: 1004 Can't create file'/temp/#sql300e_1_0.frm'(errno :13)
可能是/tmp权限的问题解决办法
chmod -R 1777 /tmp
配置并启动Mysql
1 设置启动脚本:
[root@test mysql]# cp support-files/mysql.server /etc/init.d/mysqld
[root@test mysql]# chmod +x /etc/init.d/mysqld
2 Mysql默认安装路径是/usr/local/mysql,启动脚本里是/usr/local/mysql的路径都需要替换:
[root@test mysql]# sed -i 's#/usr/local/mysql#/application/mysql#g' /application/mysql/bin/mysqld_safe /etc/init.d/mysqld
3 启动Mysql数据库
[root@test mysql]# /etc/init.d/mysqld start
Starting MySQL...                                          [  OK  ]
4 检查Mysql数据是否启动成功
[root@test mysql]# netstat -lntup|grep mysql
tcp        0      0 0.0.0.0:3306                0.0.0.0:*                   LISTEN      2330/mysqld
[root@test mysql]# lsof -i :3306
COMMAND  PID  USER   FD   TYPE DEVICE SIZE/OFF NODE NAME
mysqld  2330 mysql   10u  IPv4  23130      0t0  TCP *:mysql (LISTEN)
如果没发现3306,可以  tail -100 /application/mysql/data/机器名.err查看日志信息
5 查看Mysql数据库启动的日志
[root@test mysql]# tail -10 /application/mysql/data/test.err
InnoDB: Creating foreign key constraint system tables
InnoDB: Foreign key constraint system tables created
161221  2:43:58  InnoDB: Waiting for the background threads to start
161221  2:43:59 InnoDB: 5.5.32 started; log sequence number 0
161221  2:43:59 [Note] Server hostname (bind-address): '0.0.0.0'; port: 3306
161221  2:43:59 [Note]   - '0.0.0.0' resolves to '0.0.0.0';
161221  2:43:59 [Note] Server socket created on IP: '0.0.0.0'.
161221  2:43:59 [Note] Event Scheduler: Loaded 0 events
161221  2:43:59 [Note] /application/mysql/bin/mysqld: ready for connections.
Version: '5.5.32'  socket: '/tmp/mysql.sock'  port: 3306  MySQL Community Server (GPL)
6 设置Mysql开机自动启动
[root@test mysql]# chkconfig --add mysqld
[root@test mysql]# chkconfig mysqld on
[root@test mysql]# chkconfig --list mysqld
mysqld         0:off1:off2:on3:on4:on5:on6:off
7 配置mysql命令的全局使用路径
[root@test mysql]# echo 'export PATH=/application/mysql/bin:$PATH' >>/etc/profile
[root@test mysql]# tail -1 /etc/profile
export PATH=/application/mysql/bin:$PATH
[root@test mysql]# source /etc/profile
[root@test mysql]# echo $PATH
/application/mysql/bin:/usr/lib64/qt-3.3/bin:/usr/local/sbin:/usr/local/bin:/sbin:/bin:/usr/sbin:/usr/bin:/root/bin
8 登录测试Mysql,
mysql> show databases;
+--------------------+
| Database           |
+--------------------+
| information_schema |
| mysql              |
| performance_schema |
| test               |
+--------------------+
4 rows in set (0.00 sec)
mysql> select user();
+----------------+
| user()         |
+----------------+
| root@localhost |
+----------------+
1 row in set (0.00 sec)
mysql> quit
为Mysql的root用户设置密码
[root@test mysql]# mysqladmin -u root password '123qwe'
[root@test mysql]# mysql
ERROR 1045 (28000): Access denied for user 'root'@'localhost' (using password: NO)
[root@test mysql]# mysql -u root -p
Enter password:
清理无用的Mysql用户及库
mysql> select user,host from mysql.user;    ###
+------+-----------+
| user | host      |
+------+-----------+
| root | 127.0.0.1 |
| root | ::1       |
|      | localhost |
| root | localhost |
|      | test      |
| root | test      |
+------+-----------+
6 rows in set (0.00 sec)
mysql> drop user ""@"localhost";   ###
Query OK, 0 rows affected (0.00 sec)
mysql> drop user ""@"test";
Query OK, 0 rows affected (0.00 sec)
mysql> drop user "root"@"test";
Query OK, 0 rows affected (0.00 sec)
mysql> drop user "root"@"::1";
Query OK, 0 rows affected (0.00 sec)
mysql> select user,host from mysql.user;   ###
+------+-----------+
| user | host      |
+------+-----------+
| root | 127.0.0.1 |
| root | localhost |
+------+-----------+
2 rows in set (0.00 sec)
如果不能删除用户
mysql> drop user "root"@"::1";
ERROR 1396 (HY000): Operation DROP USER failed for 'root'@':1'
解决办法:
mysql> delete from mysql.user where user="and host=::1" ;
Query OK, 0 rows affected (0.00 sec)
mysql> flush privileges;
Query OK, 0 rows affected (0.00 sec)
现在就可以删除无用的数据库了
mysql> drop database test;
Query OK, 0 rows affected (0.00 sec)
PHP的安装
一、什么是CGI
全称“通用网关接口”(Common Gateway Interface),为HTTP服务与其他机器上的程序服务通信交流的一种工具,CGI程序须运行在网络服务器上。
FastCGI,在linux下FastCGI接口即为socket,可以使文件socket,也可以是IP socket,
FastCGI的重要特点如下:
HTTP服务器和动态脚本语言间通信的接口或工具;
可把动态语言解析和HTTP服务器分离开;
Nginx、Apache、Lighttpd,以及多数动态语言都支持FastCGI;
FastCGI接口方式采用C/S结构,分客户端(HTTPfuwuqi )和服务端(动态语言解析服务器)
PHP动态语言服务器端可以启动多个FastCGI的守护进程(例如php-fpm(fcgi process management))
HTTP服务器通过(例如Nginx fastcgi_pass)FastCGI客户端和动态语言FastCGI服务器端通信(例如php-fpm)
二、Nginx FastCGI的运行原理
三、LNMP的PHP(FastCGI方式)服务的安装准备
一、检查确认Nginx及Mysql的安装路径
[root@test nginx-1.6.3]# ll -d /application/mysql
lrwxrwxrwx. 1 root root 26 Dec 21 02:27 /application/mysql -> /application/mysql-5.5.32/
[root@test nginx-1.6.3]# ll -d /application/nginx
lrwxrwxrwx. 1 root root 24 Dec 21 03:34 /application/nginx -> /application/nginx-1.6.3
二、检查端口及启动情况
[root@test nginx-1.6.3]# netstat -lntup|grep -E "80|3306"
tcp        0      0 0.0.0.0:3306                0.0.0.0:*                   LISTEN      2330/mysqld
tcp        0      0 0.0.0.0:80                  0.0.0.0:*                   LISTEN      27326/nginx
三、测试访问Nginx及Mysql是否OK
[root@test nginx-1.6.3]# wget 127.0.0.1
--2016-12-21 03:36:58--  http://127.0.0.1/
Connecting to 127.0.0.1:80... connected.
HTTP request sent, awaiting response... 200 OK
Length: 612 [text/html]
Saving to: “index.html”
100%[==============================================>] 612         --.-K/s   in 0s
2016-12-21 03:36:58 (149 MB/s) - “index.html” saved [612/612]
[root@test nginx-1.6.3]# mysql -u root -p
Enter password:
Welcome to the MySQL monitor.  Commands end with ; or \g.
Your MySQL connection id is 7
Server version: 5.5.32 MySQL Community Server (GPL)
.......
四、检查安装PHP所需要的lib库
[root@test nginx-1.6.3]# rpm -qa zlib-devel libxml2-devel libjpeg-devel libjpeg-turbo-devel libiconv-devel
[root@test nginx-1.6.3]# yum install zlib-devel libxml2-devel libjpeg-devel libjpeg-turbo-devel libiconv-devel
[root@test nginx-1.6.3]# rpm -qa freetype-devel libpng-devel gd-devel libcurl-devel libxslt-devel
[root@test nginx-1.6.3]# yum install freetype-devel libpng-devel gd-devel libcurl-devel libxslt-devel
五、安装yum无法安装libiconv库
[root@test nginx-1.6.3]# cd /root/tools/
[root@test tools]# wget http://ftp.gnu.org/pub/gnu/libiconv/libiconv-1.14.tar.gz
--2016-12-21 03:42:51--  http://ftp.gnu.org/pub/gnu/libiconv/libiconv-1.14.tar.gz
Resolving ftp.gnu.org... 208.118.235.20, 2001:4830:134:3::b
Connecting to ftp.gnu.org|208.118.235.20|:80... connected.
HTTP request sent, awaiting response... 200 OK
Length: 4984397 (4.8M) [application/x-gzip]
Saving to: “libiconv-1.14.tar.gz”
100%[==============================================>] 4,984,397    276K/s   in 13s
2016-12-21 03:43:05 (370 KB/s) - “libiconv-1.14.tar.gz” saved [4984397/4984397]
[root@test tools]# tar zxf libiconv-1.14.tar.gz
[root@test tools]# cd libiconv-1.14
[root@test libiconv-1.14]# ./configure --prefix=/usr/local/libiconv
[root@test libiconv-1.14]# make
[root@test libiconv-1.14]# make install
六、安装libmcrypt库
[root@test tools]# wget -O /etc/yum.repos.d/epel.repo http://mirrors.aliyun.com/repo/epel-6.repo
[root@test tools]# cp epel-6.repo /etc/yum.repos.d/epel.repo
[root@test tools]# cat /etc/yum.repos.d/epel.repo
[root@test tools]# yum -y install libmcrypt-devel
七、安装mhash加密扩展库
yum -y install mhash
八、安装mcrypt加密扩展库
yum -y install mcrypt
PHP服务的安装
一、解压配置软件包
[root@test root]# cd /root/tools
[root@test php-5.3.27]# tar zxf php-5.3.27.tar.gz
[root@test php-5.3.27]#./configure \
--prefix=/application/php5.3.27 \
--with-mysql=/application/mysql \
--with-iconv-dir=/usr/local/libiconv \
--with-freetype-dir \
--with-jpeg-dir \
--with-png-dir \
--with-zlib \
--with-libxml-dir=/usr \
--enable-xml \
--disable-rpath \
--enable-safe-mode \
--enable-bcmath \
--enable-shmop \
--enable-sysvsem \
--enable-inline-optimization \
--with-curl \
--with-curlwrappers \
--enable-mbregex \
--enable-fpm \
--enable-mbstring \
--with-mcrypt \
--with-gd \
--enable-gd-native-ttf \
--with-openssl \
--with-mhash \
--enable-pcntl \
--enable-sockets \
--with-xmlrpc \
--enable-zip \
--enable-soap \
--enable-short-tags \
--enable-zend-multibyte \
--enable-static \
--with-xsl \
--with-fpm-user=nginx \
--with-fpm-group=nginx \
--enable-ftp
二、编译PHP
[root@test php-5.3.27]# ln -sv /application/mysql/lib/libmysqlclient.so.18 /usr/lib64/
[root@test php-5.3.27]# touch ext/phar/phar.phar
[root@test php-5.3.27]# make
[root@test php-5.3.27]# make install
三、配置PHP引擎配置文件php.ini
1、设置软连接以方便访问:
[root@test php-5.3.27]# ln -sv /application/php5.3.27 /application/php
`/application/php' -> `/application/php5.3.27'
[root@test php-5.3.27]# ll /application/php
lrwxrwxrwx. 1 root root 22 Dec 21 04:29 /application/php -> /application/php5.3.27
2、查看PHP配置默认模板文件
[root@test php-5.3.27]# ll php.ini*
-rw-r--r--. 1 101 101 69606 Jul 11  2013 php.ini-development
-rw-r--r--. 1 101 101 69627 Jul 11  2013 php.ini-production
开发环境更多的是开启日志、调试信息,而生产环境都是关闭状态
3、拷贝PHP配置文件到PHP默认目录,并更改文件名称为php.ini:
[root@test php-5.3.27]# cp php.ini-production /application/php/lib/php.ini
[root@test php-5.3.27]# ll /application/php/lib/php.ini
-rw-r--r--. 1 root root 69627 Dec 21 04:33 /application/php/lib/php.ini
四、配置PHP服务(FastCGI方式)的配置文件php-fpm.conf
[root@test php-5.3.27]# cd /application/php/etc/
[root@test etc]# ll
total 28
-rw-r--r--. 1 root root  1232 Dec 21 04:26 pear.conf
-rw-r--r--. 1 root root 21683 Dec 21 04:25 php-fpm.conf.default
[root@test etc]# cp php-fpm.conf.default php-fpm.conf
五、启动PHP服务(FastCGI方式)
1、启动PHP服务php-fpm
[root@test etc]# /application/php/sbin/php-fpm
2、检查PHP服务php-fpm的进程及端口启动情况
[root@test etc]# ps -ef|grep php-fpm
root      30568      1  0 04:36 ?        00:00:00 php-fpm: master process (/application/php5.3.27/etc/php-fpm.conf)
nginx     30569  30568  0 04:36 ?        00:00:00 php-fpm: pool www
nginx     30570  30568  0 04:36 ?        00:00:00 php-fpm: pool www
root      30572   1900  0 04:36 pts/0    00:00:00 grep php-fpm
六、配置Nginx支持PHP程序请求访问
1、查看Nginx的当前配置
[root@test etc]# cd /application/nginx/conf/
[root@test conf]# cp nginx.conf nginx.conf.02
[root@test conf]# cat nginx.conf
2、以blog为例
[root@test nginx]# cat conf/extra/blog.conf
server {
listen       80;
server_name blog.abc.com;
location / {
root   html/blog;
index  index.html index.htm;
}
error_page   500 502 503 504  /50x.html;
location = /50x.html {
root   html;
}
}
最终blog虚拟主机的完整配置如下:
[root@test nginx]# cat conf/extra/blog.conf
server {
listen       80;
server_name blog.abc.com;
location / {
root   html/blog;
index  index.html index.htm;
}
location ~.*\.(php|php5)$ {
root html/blog;
fastcgi_pass 127.0.0.1:9000;
fastcgi_index index.php;
include fastcgi.conf;
error_page   500 502 503 504  /50x.html;
#location = /50x.html {
#    root   html;
#}
}
}
检查语法并重启Nginx
[root@test blog]# /application/nginx/sbin/nginx -t
nginx: the configuration file /application/nginx-1.6.3//conf/nginx.conf syntax is ok
nginx: configuration file /application/nginx-1.6.3//conf/nginx.conf test is successful
[root@test blog]# /application/nginx/sbin/nginx -s reload
测试LNMP环境是否生效
在/application/nginx/html/blog下创建一个php文件
[root@test blog]# cat /application/nginx/html/blog/index.php

[root@test blog]#
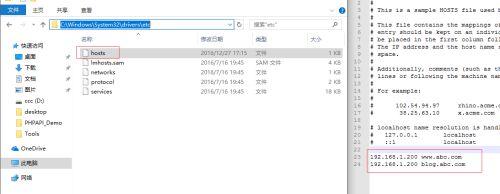
修改本地计算机(本人是WINDOWS 10)hosts文件的DNS,并访问blog.abc.com
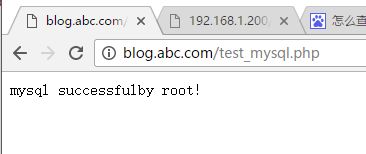
针对Nginx请求访问PHP,然后对PHP链接MYsql的情况进行测试,编辑test_mysql.php
[root@test blog]# cat test_mysql.php
现在我们可以用当前的环境来搭建一个简单的web网站了,详细设置Nginx配置文件即可!
.......


