Dapper也是是一种ORM框架
这里记录下,使用ASP.NET 集成 Dapper 的过程,方便自己查看
至于Dapper的特性以及操作可以参考Dapper官方文档
1.创建数据库相关
- 在Sql Server 创建一个叫做 DapperDemo 的数据库
- 再创建一个叫做 Products 的表
脚本如下
CREATE TABLE [dbo].[Products](
    [ProductID] [int] IDENTITY(1,1) NOT NULL,
    [Name] [nvarchar](max) NULL,
    [Quantity] [int] NULL,
    [Price] [float] NULL,
 CONSTRAINT [PK_Products] PRIMARY KEY CLUSTERED
(
    [ProductID] ASC
)WITH (PAD_INDEX = OFF, STATISTICS_NORECOMPUTE = OFF, IGNORE_DUP_KEY = OFF, ALLOW_ROW_LOCKS = ON, ALLOW_PAGE_LOCKS = ON) ON [PRIMARY]
) ON [PRIMARY] TEXTIMAGE_ON [PRIMARY]

GO
2.创建一个ASP.NET Web Api 项目
- 文件->新建->项目
- 选择 ASP.NET Core Web 应用 的模板,项目名 DapperDemo
- 在新的 ASP.NET Core Web 应用的页面,选择 API 模板,并确定,不要选择支持Docker
3.增加model实体
- 右击项目,新增一个Models文件夹
- 在Models文件夹下增加一个类(class),Product
public class Product
{
    [Key]
    public int ProductId { get; set; }
    public string Name { get; set; }
    public int Quantity { get; set; }
    public double Price { get; set; }
}
4.引入Dapper NuGet包
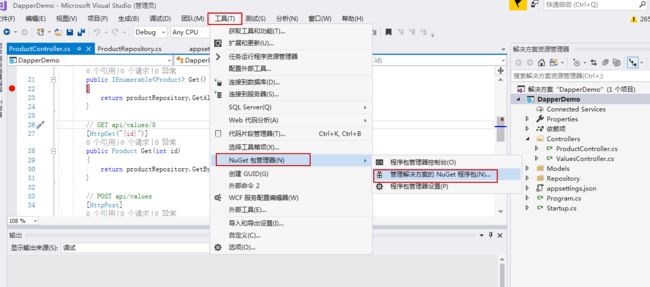
- 工具->NuGet 包管理器 -> 管理解决方案的 Nuget 包程序包
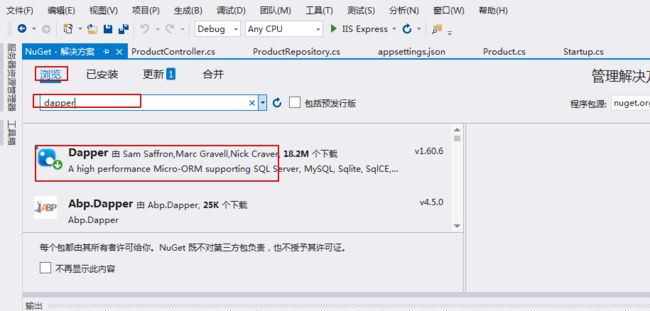
- 搜索Dapper ,并且安装
如下,安装
也可以使用 程序包管理器控制台 进行安装
Install-Package Dapper
5.使用Dapper
Dapper的使用需要下面三步:
- 使用连接字符串( connection string )创建一个 IDBConnection 对象
- 编写你自己的sql 语句
- 把 sql 语句传给 dapper
所以,操作如下
- 创建一个Repository文件夹
- 在Repository文件夹里增加一个名为 ProductRepository 的class类
代码如下
1 public class ProductRepository 2 { 3 private string connectionString; 4 public ProductRepository() 5 { 6 connectionString = @"Server=localhost;Database=DapperDemo;Trusted_Connection=true;"; 7 } 8 9 public IDbConnection Connection 10 { 11 get { 12 return new SqlConnection(connectionString); 13 } 14 } 15 16 public void Add(Product prod) 17 { 18 using (IDbConnection dbConnection = Connection) 19 { 20 string sQuery = "INSERT INTO Products (Name, Quantity, Price)" 21 + " VALUES(@Name, @Quantity, @Price)"; 22 dbConnection.Open(); 23 dbConnection.Execute(sQuery, prod); 24 } 25 } 26 27 public IEnumerableGetAll() 28 { 29 using (IDbConnection dbConnection = Connection) 30 { 31 dbConnection.Open(); 32 return dbConnection.Query ("SELECT * FROM Products"); 33 } 34 } 35 36 public Product GetByID(int id) 37 { 38 using (IDbConnection dbConnection = Connection) 39 { 40 string sQuery = "SELECT * FROM Products" 41 + " WHERE ProductId = @Id"; 42 dbConnection.Open(); 43 return dbConnection.Query (sQuery, new { Id = id }).FirstOrDefault(); 44 } 45 } 46 47 public void Delete(int id) 48 { 49 using (IDbConnection dbConnection = Connection) 50 { 51 string sQuery = "DELETE FROM Products" 52 + " WHERE ProductId = @Id"; 53 dbConnection.Open(); 54 dbConnection.Execute(sQuery, new { Id = id }); 55 } 56 } 57 58 public void Update(Product prod) 59 { 60 using (IDbConnection dbConnection = Connection) 61 { 62 string sQuery = "UPDATE Products SET Name = @Name," 63 + " Quantity = @Quantity, Price= @Price" 64 + " WHERE ProductId = @ProductId"; 65 dbConnection.Open(); 66 dbConnection.Query(sQuery, prod); 67 } 68 } 69 }
这里的连接字符串是直接写在代码里的,可以根据需要自己调整
6.创建Controller
- 创建一个名为 ProductController 的类
代码如下
1 [Route("api/[controller]")] 2 public class ProductController : Controller 3 { 4 private readonly ProductRepository productRepository; 5 public ProductController() 6 { 7 productRepository = new ProductRepository(); 8 } 9 // GET: api/values 10 [HttpGet] 11 public IEnumerableGet() 12 { 13 return productRepository.GetAll(); 14 } 15 16 // GET api/values/5 17 [HttpGet("{id}")] 18 public Product Get(int id) 19 { 20 return productRepository.GetByID(id); 21 } 22 23 // POST api/values 24 [HttpPost] 25 public void Post([FromBody]Product prod) 26 { 27 if (ModelState.IsValid) 28 productRepository.Add(prod); 29 } 30 31 // PUT api/values/5 32 [HttpPut("{id}")] 33 public void Put(int id, [FromBody]Product prod) 34 { 35 prod.ProductId = id; 36 if (ModelState.IsValid) 37 productRepository.Update(prod); 38 } 39 40 // DELETE api/values/5 41 [HttpDelete("{id}")] 42 public void Delete(int id) 43 { 44 productRepository.Delete(id); 45 } 46 }
7.运行,验证是否成功
在这之前,可以手动往数据库表里加几条数据,我这里没有加,只是在Get方法里打了个断点
在浏览器中输入 https://localhost:44315/api/product
因为我数据库里没有数据,这里返回的空的
这里做记录方便查看,如有错误,欢迎指正
参考网址:
https://www.talkingdotnet.com/use-dapper-orm-with-asp-net-core/


