图像增强:通过CNN,手机拍照图片得到相机照片的清晰度
来自于ICCV2017的一篇文章
DSLR-Quality Photos on Mobile Devices with Deep Convolutional Networks
将不同的手机和相机拍同一个场景的照片,对齐得到一个场景在不同拍摄下的场景。通过CNN来建立这种映射关系后,得到训练模型。输入手机拍摄的照片,得到高清照片。
对论文给的测试集中的照片处理后,效果非常好。用其它来源的照片处理后,有些不自然,能整体提亮照片,估计跟原始照片的分布有关。
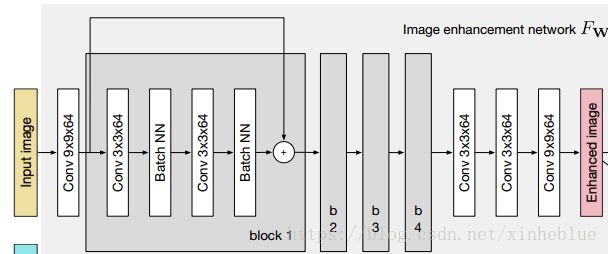
推理网络是一个ResNet的结构,结构图如下:
用代码描述如下
def resnet(image):

    with tf.variable_scope("generator"):

        # Convolutional layer

        W1 = weight_variable([9, 9, 3, 64], name="W1");
        b1 = bias_variable([64], name="b1");
        c1 = tf.nn.relu(conv2d(image, W1) + b1)

        # Residual layer 1

        W2 = weight_variable([3, 3, 64, 64], name="W2");
        b2 = bias_variable([64], name="b2");
        c2 = tf.nn.relu(_instance_norm(conv2d(c1, W2) + b2))

        W3 = weight_variable([3, 3, 64, 64], name="W3");
        b3 = bias_variable([64], name="b3");
        c3 = tf.nn.relu(_instance_norm(conv2d(c2, W3) + b3)) + c1

        # Residual layer 2

        W4 = weight_variable([3, 3, 64, 64], name="W4");
        b4 = bias_variable([64], name="b4");
        c4 = tf.nn.relu(_instance_norm(conv2d(c3, W4) + b4))

        W5 = weight_variable([3, 3, 64, 64], name="W5");
        b5 = bias_variable([64], name="b5");
        c5 = tf.nn.relu(_instance_norm(conv2d(c4, W5) + b5)) + c3

        # Residual layer 3

        W6 = weight_variable([3, 3, 64, 64], name="W6");
        b6 = bias_variable([64], name="b6");
        c6 = tf.nn.relu(_instance_norm(conv2d(c5, W6) + b6))

        W7 = weight_variable([3, 3, 64, 64], name="W7");
        b7 = bias_variable([64], name="b7");
        c7 = tf.nn.relu(_instance_norm(conv2d(c6, W7) + b7)) + c5

        # Residual layer 4

        W8 = weight_variable([3, 3, 64, 64], name="W8");
        b8 = bias_variable([64], name="b8");
        c8 = tf.nn.relu(_instance_norm(conv2d(c7, W8) + b8))

        W9 = weight_variable([3, 3, 64, 64], name="W9");
        b9 = bias_variable([64], name="b9");
        c9 = tf.nn.relu(_instance_norm(conv2d(c8, W9) + b9)) + c7

        # Convolutional layer

        W10 = weight_variable([3, 3, 64, 64], name="W10");
        b10 = bias_variable([64], name="b10");
        c10 = tf.nn.relu(conv2d(c9, W10) + b10)

        # Convolutional layer

        W11 = weight_variable([3, 3, 64, 64], name="W11");
        b11 = bias_variable([64], name="b11");
        c11 = tf.nn.relu(conv2d(c10, W11) + b11)

        # Output layer

        W12 = weight_variable([9, 9, 64, 3], name="W12");
        b12 = bias_variable([3], name="b12");
        prediction = tf.nn.tanh(conv2d(c11, W12) + b12) * 0.58 + 0.5

    return prediction
本文的创新点,重点来于损失函数的设计,不是简单用PSNR或者SSIM来评测最终图像的好坏。作者从4个角度来计算损失函数
1,颜色
为了突出颜色去掉其它因素对其影响,对目标图像和生成图像,进行了高斯模糊。
采用的高斯核如下
作者选取了A=0.053,均值为0,标准差为3
对卷积后的两幅图像,计算L2 Loss
2,纹理损失
这里先对生成的图像,和目标图像进行了灰度处理,然后汇入了一个GAN网络,这里的LOSS根据GAN最终预测的标签(是生成图像,还是目标图像)的准确度来判断
所使用的GAN网络
3,内容结构损失
这里将原图像和目标图像,各自汇入一个vgg19网络(通过ImageNet预训练),然后生成的特征图之间的欧式距离。(类似FaceNet, DeepID这种人脸识别结构)。
示意图
内容结构损失定义为
4,衡量生成图像平滑性的梯度损失
对生成的图像分别计算两个方向的梯度,定义为
最终的损失函数,定义为以上几个方向的损失函数的加权求和
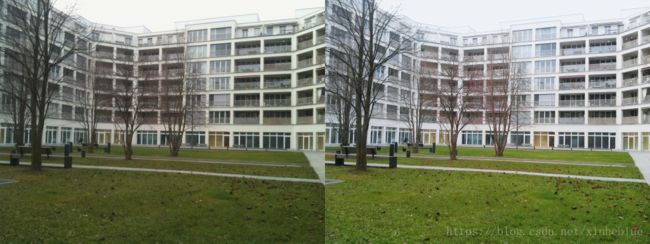
实验结果,在提供的测试集上,效果非常不错,看几张示例图
实测在其它来源图片上面,能整体提升亮度和对比度,但是细节地方还是有锯齿。估计跟图像分布有关系。
文章作者源码地址 https://github.com/aiff22/DPED
缺陷:
1,训练的时候,依赖同一场景的不同图片,训练集比较难
2,在其它来源的图像上面,泛化有限


