springcloud+shardingjdbc4.1.0+nacos+seata1.2.0集群
最近给项目加分布式事务,关于分布式事务的文章网上有很多,看了下比较适合springcloud/springcloud alibaba 架构的,是数据库中间件mycat和shardingsphere(shardingjdbc升级版本),综合考虑了下,选择了shardingsphere。大概原因:
1、shardingsphere比较完善,包含数据库分库分表、读写分离、分布式事务、编排治理等等一系列功能,并且有shardingjdbc及中间件shardingproxy,即可以maven方式引进代码架构中使用,也可以部署中间件直接使用,具体查看官方文档
2、从网上查找到的对比,都说shardingsphere对于mycat的文档比较友好,代码质量也比较高(没有去查看mycat的具体情况,但是shardingsphere文档有中文文档,确实不错)
整体需求
1、读写分离
2、项目中配置并合理使用分布式事务
过程
1、安装seata1.2.0
2、配置项目
安装seata1.2.0
1、官方下载
2、解压
配置及启动
网上大部分文章都是旧版本的,1.2.0版本的比较少,参考之前的文章容易踩坑,各种坑具体可以参考篇文章
seata-nacos解决分布式事务 seata-1.2.0踩过的坑
这里写下自己处理的过程:
seata集群
使用nacos作为注册中心,并配置集群(高可用)(注:本人nacos使用1.1.4版本,集群三个节点)
去gitee搜索seata项目(github上的没有),https://gitee.com/seata-io/seata/tree/develop,在script/config-center/目录下,找到config.txt(等同于旧版本使用的nacos_config.txt),因为1.2.0版本的原因,建义使用config.txt
修改参数主要是红色框标注的内容:

备注:需要创建数据库seata,并添加三张表,建表SQL在旧版本或者网上文章都有
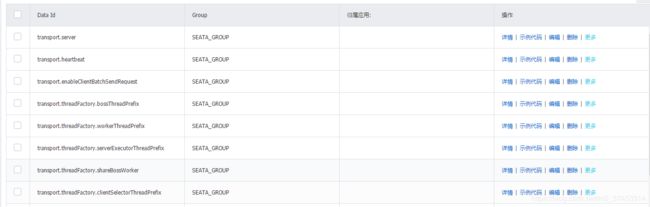
config.txt文件存放在seata解压目录,seata/config.txt,下载script/config-center/nacos目录下nacos_config.sh文件至seata解压目录下,如seata/conf/nacos_config.sh,执行命令sh nacos_config.sh localhost,这样通过脚本就把所有的参数都导入到nacos中了,并且分组为SEATA_GROUP
修改registry.conf文件(在seata/conf/目录下)

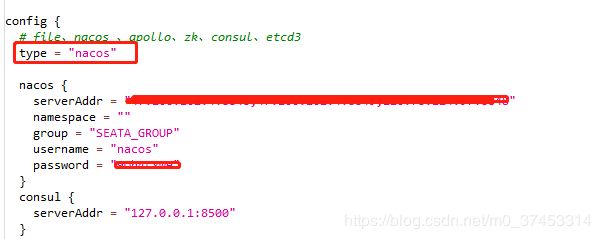
修改type为nacos,注意这里的serverAddr地址为nacos的集群地址,例如:192.168.1.1:8848,192.168.1.2:8848,192.168.1.3:8848(带端口,多个使用英文逗号分隔)
最后就可以启动seata了:
sh seata-server.sh -m db -h localhost -p 8091 -n 1
sh seata-server.sh -m db -h localhost -p 8092 -n 2
sh seata-server.sh -m db -h localhost -p 8093 -n 3
这里启动三个节点,在nacos上可以看到
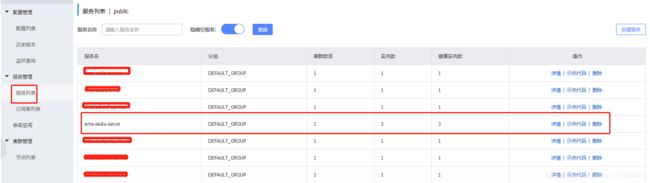
至此,seata1.2.0集群安装启动完成。
在项目中使用
项目情况:springboot2.1.3+springcloud(Greenwich.RELEASE)+springcloud alibaba2.1.0
添加seata启动配置:
1、去掉dependencyManagement 中 springcloud alibaba2.1.0自动继承的seata包
                com.alibaba.cloud
                spring-cloud-alibaba-dependencies
                2.1.0.RELEASE
                pom
                import


                        com.alibaba.cloud
                        spring-cloud-alibaba-seata


                        io.seata
                        seata-all
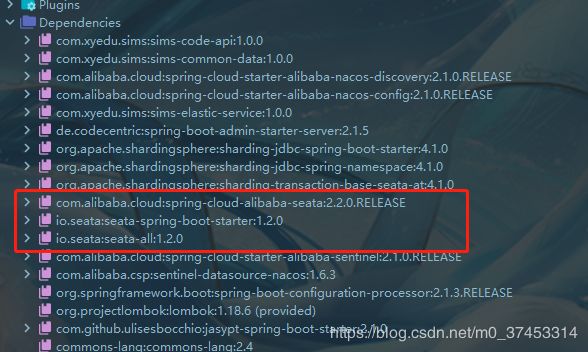
2、添加2.2.0版本的seata,并且添加starter为1.2.0版本的seata及seata-all(seata-version=1.2.0)
            com.alibaba.cloud
            spring-cloud-alibaba-seata
            2.2.0.RELEASE


            io.seata
            seata-spring-boot-starter
            ${seata.version}


            io.seata
            seata-all
            ${seata.version}
3、使用nacos配置中心配置seata参数:
seata:
  application-id: ${spring.application.name}-seata
  # 事务群组(可以每个应用独立取名,也可以使用相同的名字),在nacos配置中要有对应
  tx-service-group: my_test_tx_group
  service:
    vgroup-mapping:
      my_test_tx_group: default
    grouplist:
      - xxxxxxx:8091
      - xxxxxxx:8092
      - xxxxxxx.8093
  registry:
    type: nacos
    nacos:
      server-addr: ${spring.cloud.nacos.discovery.server-addr}
      namespace:
      cluster: default
      username: nacos
      password: xxx
      application: sims-seata-server
  config:
    type: nacos
    nacos:
      server-addr: ${spring.cloud.nacos.config.server-addr}
      namespace:
      group: SEATA_GROUP
      username: nacos
      password: xxx
注意:2.1.0版本继承的seata是0.7版本的,启动会报错,因此要修改为1.2.0版本的
使用shardingjdbc数据源,并且使用读写分离模式
            org.apache.shardingsphere
            sharding-jdbc-spring-boot-starter
            ${sharding-sphere.version}
配置shardingjdbc读写分离
spring:
  shardingsphere:
    datasource:
      master:
        driver-class-name: com.mysql.cj.jdbc.Driver
        jdbc-url: jdbc:mysql://xxxx/xxxx?characterEncoding=utf8&zeroDateTimeBehavior=convertToNull&useSSL=false&allowMultiQueries=true&useJDBCCompliantTimezoneShift=true&useLegacyDatetimeCode=false&serverTimezone=Asia/Shanghai
        password:xxxxxx
        type: com.zaxxer.hikari.HikariDataSource
        username: root
        minimum-idle: 60
        maximum-pool-size: 500
        idle-timeout: 30000
        pool-name: MasterHikariCP
        max-lifetime: 120000
        connection-timeout: 30000
        connection-test-query: SELECT 1
      names: master,slave0
      slave0:
        driver-class-name: com.mysql.cj.jdbc.Driver
        jdbc-url: jdbc:mysql://xxxx/xxx?characterEncoding=utf8&zeroDateTimeBehavior=convertToNull&useSSL=false&allowMultiQueries=true&useJDBCCompliantTimezoneShift=true&useLegacyDatetimeCode=false&serverTimezone=Asia/Shanghai
        password: xxxx
        type: com.zaxxer.hikari.HikariDataSource
        username: root
        minimum-idle: 60
        maximum-pool-size: 500
        idle-timeout: 30000
        pool-name: Slave0HikariCP
        max-lifetime: 120000
        connection-timeout: 30000
        connection-test-query: SELECT 1
    masterslave:
      load-balance-algorithm-type: round_robin
      master-data-source-name: master
      name: ms
      slave-data-source-names: slave0
    props:
      sql:
        show: true
至此,全部配置完成,启动项目(记得nacos的config参数中加上配置中心的参数)
2020-06-13 00:30:35 [timeoutChecker_1] INFO  io.seata.core.rpc.netty.NettyClientChannelManager - will connect to xxx.xx.xxx.xxx:8093
2020-06-13 00:30:35 [timeoutChecker_1] INFO  io.seata.core.rpc.netty.NettyPoolableFactory - NettyPool create channel to transactionRole:TMROLE,address:xxx.xx.xxx.xxx:8093,msg:< RegisterTMRequest{applicationId='sims-code-service-seata', transactionServiceGroup='my_test_tx_group'} >
2020-06-13 00:30:35 [timeoutChecker_1] INFO  io.seata.core.rpc.netty.TmRpcClient - register TM success. server version:1.2.0,channel:[id: 0xe2a080fb, L:/192.168.1.4:60149 - R:/xxx.xx.xxx.xxx:8093]
2020-06-13 00:30:35 [timeoutChecker_1] INFO  io.seata.core.rpc.netty.NettyPoolableFactory - register success, cost 70 ms, version:1.2.0,role:TMROLE,channel:[id: 0xe2a080fb, L:/192.168.1.4:60149 - R:/xxx.xx.xxx.xxx:8093]
2020-06-13 00:30:35 [timeoutChecker_1] INFO  io.seata.core.rpc.netty.NettyClientChannelManager - will connect to xxx.xx.xxx.xxx:8092
2020-06-13 00:30:35 [timeoutChecker_1] INFO  io.seata.core.rpc.netty.NettyPoolableFactory - NettyPool create channel to transactionRole:TMROLE,address:xxx.xx.xxx.xxx:8092,msg:< RegisterTMRequest{applicationId='sims-code-service-seata', transactionServiceGroup='my_test_tx_group'} >
2020-06-13 00:30:35 [timeoutChecker_1] INFO  io.seata.core.rpc.netty.TmRpcClient - register TM success. server version:1.2.0,channel:[id: 0xd7adf45b, L:/192.168.1.4:60152 - R:/xxx.xx.xxx.xxx:8092]
2020-06-13 00:30:35 [timeoutChecker_1] INFO  io.seata.core.rpc.netty.NettyPoolableFactory - register success, cost 39 ms, version:1.2.0,role:TMROLE,channel:[id: 0xd7adf45b, L:/192.168.1.4:60152 - R:/xxx.xx.xxx.xxx:8092]
2020-06-13 00:30:35 [timeoutChecker_1] INFO  io.seata.core.rpc.netty.NettyClientChannelManager - will connect to xxx.xx.xxx.xxx:8091
2020-06-13 00:30:35 [timeoutChecker_1] INFO  io.seata.core.rpc.netty.NettyPoolableFactory - NettyPool create channel to transactionRole:TMROLE,address:xxx.xx.xxx.xxx:8091,msg:< RegisterTMRequest{applicationId='sims-code-service-seata', transactionServiceGroup='my_test_tx_group'} >
2020-06-13 00:30:35 [timeoutChecker_2] INFO  io.seata.core.rpc.netty.NettyClientChannelManager - will connect to xxx.xx.xxx.xxx:8093
2020-06-13 00:30:35 [timeoutChecker_1] INFO  io.seata.core.rpc.netty.TmRpcClient - register TM success. server version:1.2.0,channel:[id: 0xb7a7a7e9, L:/192.168.1.4:60153 - R:/xxx.xx.xxx.xxx:8091]
2020-06-13 00:30:35 [timeoutChecker_1] INFO  io.seata.core.rpc.netty.NettyPoolableFactory - register success, cost 10 ms, version:1.2.0,role:TMROLE,channel:[id: 0xb7a7a7e9, L:/192.168.1.4:60153 - R:/xxx.xx.xxx.xxx:8091]
2020-06-13 00:30:35 [timeoutChecker_2] INFO  io.seata.core.rpc.netty.NettyPoolableFactory - NettyPool create channel to transactionRole:RMROLE,address:xxx.xx.xxx.xxx:8093,msg:< RegisterRMRequest{resourceIds='null', applicationId='sims-code-service-seata', transactionServiceGroup='my_test_tx_group'} >
2020-06-13 00:30:35 [timeoutChecker_2] INFO  io.seata.core.rpc.netty.RmRpcClient - register RM success. server version:1.2.0,channel:[id: 0xd8bc1ade, L:/192.168.1.4:60156 - R:/xxx.xx.xxx.xxx:8093]
2020-06-13 00:30:35 [timeoutChecker_2] INFO  io.seata.core.rpc.netty.NettyPoolableFactory - register success, cost 11 ms, version:1.2.0,role:RMROLE,channel:[id: 0xd8bc1ade, L:/192.168.1.4:60156 - R:/xxx.xx.xxx.xxx:8093]
2020-06-13 00:30:35 [timeoutChecker_2] INFO  io.seata.core.rpc.netty.NettyClientChannelManager - will connect to xxx.xx.xxx.xxx:8092
2020-06-13 00:30:35 [timeoutChecker_2] INFO  io.seata.core.rpc.netty.NettyPoolableFactory - NettyPool create channel to transactionRole:RMROLE,address:xxx.xx.xxx.xxx:8092,msg:< RegisterRMRequest{resourceIds='null', applicationId='sims-code-service-seata', transactionServiceGroup='my_test_tx_group'} >
2020-06-13 00:30:35 [timeoutChecker_2] INFO  io.seata.core.rpc.netty.RmRpcClient - register RM success. server version:1.2.0,channel:[id: 0x954ede9a, L:/192.168.1.4:60157 - R:/xxx.xx.xxx.xxx:8092]
2020-06-13 00:30:35 [timeoutChecker_2] INFO  io.seata.core.rpc.netty.NettyPoolableFactory - register success, cost 9 ms, version:1.2.0,role:RMROLE,channel:[id: 0x954ede9a, L:/192.168.1.4:60157 - R:/xxx.xx.xxx.xxx:8092]
2020-06-13 00:30:35 [timeoutChecker_2] INFO  io.seata.core.rpc.netty.NettyClientChannelManager - will connect to xxx.xx.xxx.xxx:8091
2020-06-13 00:30:35 [timeoutChecker_2] INFO  io.seata.core.rpc.netty.NettyPoolableFactory - NettyPool create channel to transactionRole:RMROLE,address:xxx.xx.xxx.xxx:8091,msg:< RegisterRMRequest{resourceIds='null', applicationId='sims-code-service-seata', transactionServiceGroup='my_test_tx_group'} >
2020-06-13 00:30:35 [timeoutChecker_2] INFO  io.seata.core.rpc.netty.RmRpcClient - register RM success. server version:1.2.0,channel:[id: 0x3a6c797f, L:/192.168.1.4:60158 - R:/xxx.xx.xxx.xxx:8091]
2020-06-13 00:30:35 [timeoutChecker_2] INFO  io.seata.core.rpc.netty.NettyPoolableFactory - register success, cost 11 ms, version:1.2.0,role:RMROLE,channel:[id: 0x3a6c797f, L:/192.168.1.4:60158 - R:/xxx.xx.xxx.xxx:8091]
全部参考:
1、seata官网、shardingsphere官网
2、http://seata.io/zh-cn/
3、https://mp.weixin.qq.com/s/2KSidJ72YsovpJ94P1aK1g
4、https://blog.csdn.net/sinat_38670641/article/details/105857484
补充
在shardingsphere 官网文档中(4.1版本),有配置shardingjdbc集成seata的方案。
不同点在于项目配置,这里说明一下。
其中pom.xml文件中,不再需要引入seata的启动配置文件,进入sharding-transaction-base-seata-at这个包中,可以看到这个jar包已经包含了seata启动需要的jar引用了
pom.xml引入文件
            org.apache.shardingsphere
            sharding-jdbc-spring-boot-starter
            ${sharding-sphere.version}


            org.apache.shardingsphere
            sharding-transaction-base-seata-at
            ${sharding-sphere.version}


            io.seata
            seata-all
            ${seata.version}
如未项目未包含seata1.2.0时,在new FileConfiguration时会报错
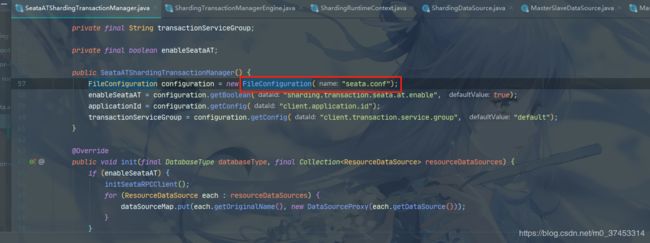
添加seata.conf及registry.conf文件
其中seata.conf文件只需要两个参数,registry.conf文件则与seata服务 seata/conf/registry.conf文件内容一样即可

添加TransactionConfiguration.java文件
该文件在shardingsphere官方文档中有说明,复制即可。
注意
使用该方案时,有两点需要注意的
1、通过读源码,发现需要使用分片模式时,才会读取seata.conf文件,只使用读写分离时,是不会使用shardingDatasource数据源的

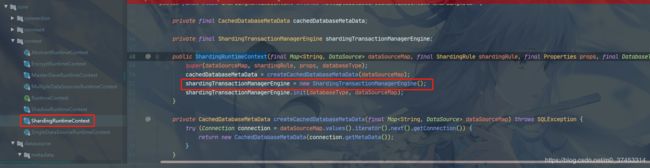
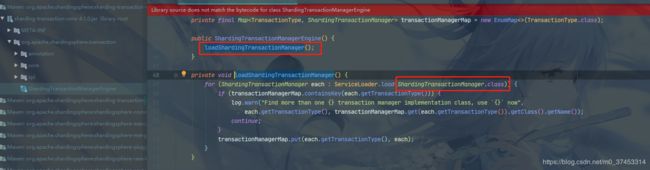
其中ServiceLoader.load(ShardingTransactionManager.class) 会启动事务并适配相应的数据源ShardingDataSource。
从读写分离修改为分片+读写分离示例如下,主要是shardingsphere.masterslave.xxxx换成shardingsphere.sharding.master-slave-rules.xxxx,具体可查看官方文档配置详细说明
spring:
  ...省略
  shardingsphere:
  ...省略
    #sharding jdbc 4.1版本中,如果要使用seata事务,就要使用分片逻辑,只使用读写分离是不会读取seata.conf配置文件的
    sharding:
      master-slave-rules:
        ds0:
          master-data-source-name: master
          slave-data-source-names: slave0
      default-data-source-name: master
2、ShardingDataSource不支持LocalDateTime\LocalDate数据格式转换,在org.apache.shardingsphere.shardingjdbc.jdbc.unsupported.AbstractUnsupportedOperationResultSet抛出不支持错误

备注:本人项目使用的是mybatis plus3.2.0,内嵌mybatis 3.5.2,上面说了通过适配模式,使用的数据源是ShardingDataSource,而mybatis3.5.2在返回数据时,最后一层调用的使用的是ShardingDataSource数据源,ShardingDataSource使用ShardingResultSet及ResultSetUtil对数据库返回的结果进行转换,而在ShardingResultSet及ResultSetUtil,可以看到并没有对LocalDateTime的处理。

最终,还是分开使用,seata作为分布式方案(BASE策略),shardingsphere暂时只用于数据库读写分离。(业务暂时去不到分库分表)
如有朋友对shardindjdbc作为数据源并可以解决LocalDateTime的问题,请不吝指教一下,谢谢。