吴恩达Deep Learning编程作业 Course1-神经网络和深度学习-第三周作业
吴恩达Deep Learning编程作业 Course1-神经网络和深度学习-第三周作业
Planar data classification with one hidden layer具有一个隐藏层的平面数据分类
编程目的:
- 使用带有非线性激活函数,比如tanh函数,实现一个具有单隐藏层的二分类神经网络。
- 计算交叉熵代价。
- 实现前向传播和反向传播。
1.需要使用的包
1.numpy:是Python用于科学计算的基本包。
2.matplotlib:python用于画图的库。
3.sklearn:为数据挖掘和数据分析提供简单有效的工具。
4.planar_utils:提供了在这个任务中使用的各种有用的函数。(吴恩达老师作业中提供)
5.testCases:提供了一些测试示例来评估函数的正确性
2.数据集
本次编程使用的数据集为"flower"。按照常规,我们首先加载数据集,查看以下数据集的信息。
代码:
import numpy as np
import matplotlib.pyplot as plt
from Utils import planar_utils, sigmoid

if __name__ == "__main__":
    X, Y = planar_utils.load_planar_dataset()
    print(X.shape)
    print(Y.shape)
    plt.scatter(X[0, :], X[1, :], c=np.squeeze(Y), s=40, cmap=plt.cm.Spectral)
运行结果:
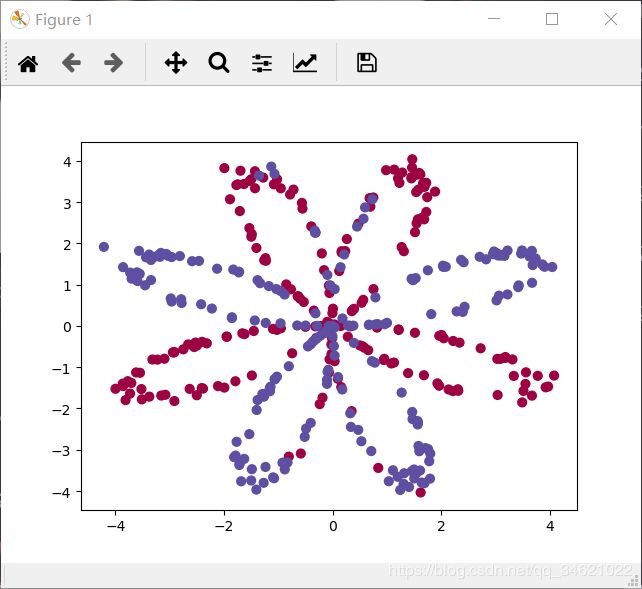

从运行结果可以看出X的维数是(2,400),Y的维数是(1,400)。也就是说X有400个样本,每个样本有两个特征。
在图像中红色的样本点的标签是Y=0,蓝色的样本点的标签是Y=1。
3.简单的逻辑回归
在构建完整的神经网络之前,让我们先看看逻辑回归在这个问题上的表现。可以使用sklearn的内置函数来实现这一点。运行下面的代码来训练数据集上的逻辑回归分类器。
    clf = sklearn.linear_model.LogisticRegressionCV()
    clf.fit(X.T, Y.T)
运行结果:会打印出两个警告,我们暂时忽略这两个warning。
D:\programfile\Anaconda3\lib\site-packages\sklearn\utils\validation.py:724: DataConversionWarning: A column-vector y was passed when a 1d array was expected. Please change the shape of y to (n_samples, ), for example using ravel().
y = column_or_1d(y, warn=True)
D:\programfile\Anaconda3\lib\site-packages\sklearn\model_selection_split.py:1978: FutureWarning: The default value of cv will change from 3 to 5 in version 0.22. Specify it explicitly to silence this warning.
warnings.warn(CV_WARNING, FutureWarning)
把逻辑回归分类器绘制出来:
代码:
 clf = sklearn.linear_model.LogisticRegressionCV()
    clf.fit(X.T, Y.T)
    # 绘制决策边界
    plot_decision_boundary(lambda x: clf.predict(x), X, Y)
    plt.title("Logistic Regression")
    #打印准确率
    LR_predictions = clf.predict(X.T)
    print('逻辑回归模型正确标记准确率:%d' %float((np.dot(Y, LR_predictions) + np.dot(1 - Y, 1 - LR_predictions)) / float(Y.size) * 100) + '%')
运行结果:
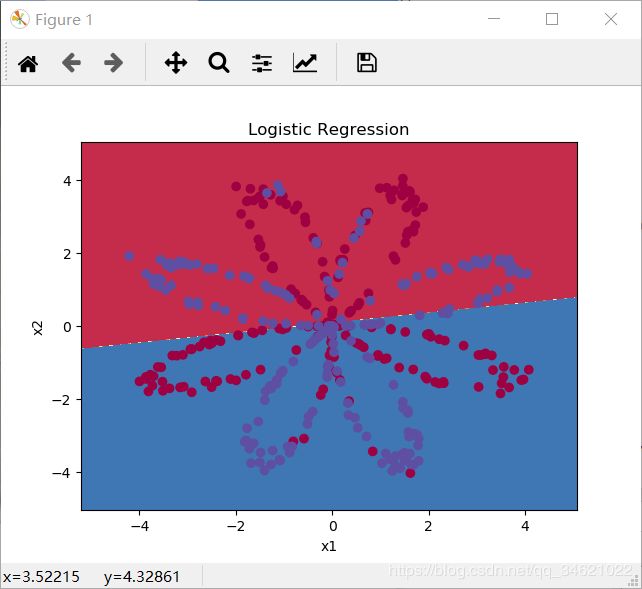
![]()
从上述运行结果我们也可以看出sklearn中自带的逻辑回归模型并不能很好的对数据集中的数据进行分类,正确率还不到50%。我们的目的就是得到更好的分类模型,接下来我们一起实现这个神经网络模型。
4.神经网络模型。
现在我们尝试着训练一个只有一层隐藏层的神经网络。
模型如图所示:
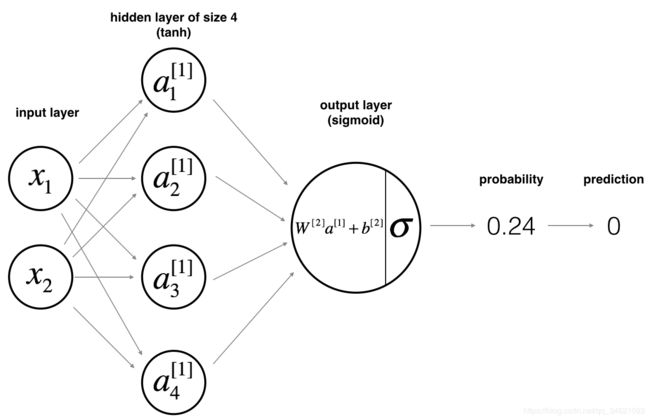
数学公式运算理解:
以一个样本 x ( i ) x^(i) x(i)为例:
z [ 1 ] ( i ) z^{[1](i)} z[1](i) = W [ 1 ] x ( 1 ) W^{[1]}x^{(1)} W[1]x(1) + b [ 1 ] ( i ) b^{[1](i)} b[1](i)
a [ 1 ] ( i ) a^{[1](i)} a[1](i) = tanh ( z [ 1 ] ( i ) ) \tanh(z^{[1](i)}) tanh(z[1](i))
z [ 2 ] ( i ) z^{[2](i)} z[2](i) = W [ 2 ] a [ 1 ] ( i ) W^{[2]}a^{[1](i)} W[2]a[1](i) + b [ 2 ] ( i ) b^{[2](i)} b[2](i)
y ^ ( i ) \hat y^{(i)} y^(i) = a [ 1 ] ( i ) a^{[1](i)} a[1](i) = σ ( z [ 2 ] ( i ) ) \sigma(z^{[2](i)}) σ(z[2](i))
y p r e d i c t i o n ( i ) y^{(i)}_{prediction} yprediction(i) = { 0 , a [ 2 ] ( i ) > 0.5 1 \begin{cases}0, a^{[2](i)} > 0.5 \\ 1 \end{cases} {0,a[2](i)>0.51
根据样本的预测结果,我们可以计算代价,以下为代价函数公式:
J = − 1 m ∑ i = 0 m ( y ( i ) log ( a [ 2 ] ( i ) ) + ( 1 − y ( i ) ) log ( 1 − a [ 2 ] ( i ) ) ) J = - \frac{1}{m} \sum\limits_{i = 0}^{m} \large\left(\small y^{(i)}\log\left(a^{[2] (i)}\right) + (1-y^{(i)})\log\left(1- a^{[2] (i)}\right) \large \right) \small J=−m1i=0∑m(y(i)log(a[2](i))+(1−y(i))log(1−a[2](i)))
4.1模型设计
建立一般神经网络模型的方法:
1.定义神经网络结构。
2.初始化模型参数。
3.循环:
- 实现前向传播
- 计算损失
- 反向传播获得梯度
- 更新参数
4.2 定义神经网络结构
定义三个变量:
- n_x:输入层的大小
- n_h:隐藏层的大小(设置为4)
- n_y:输出层的大小
先定义函数layer_sizes_test_cases,主要用来自动生成训练样本,代码如下:
def layer_sizes_test_case():
    #随机生成不同的训练集X和标签集Y
    #使用random.randrange()方法
    X_feature_num = random.randrange(1, 9)
    Y_feature_num = random.randrange(1, 3)
    number = random.randrange(10, 100)
    #(特征数,样本个数)
    X_assess = np.zeros(shape=(X_feature_num, number))
    Y_assess = np.zeros(shape=(Y_feature_num, number))
    return X_assess, Y_assess
定义layer_sizes函数,根据训练集和标签集获得输入层、隐藏层、输出层大小:
def layer_sizes(X, Y):
    n_x = X.shape[0]
    n_h = 4
    n_y = Y.shape[0]
    return n_x, n_h, n_y
测试:
X_assess, Y_assess = layer_sizes_test_case()
    n_x, n_h, n_y = layer_sizes(X_assess, Y_assess)
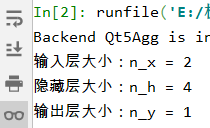
    print("输入层大小:n_x = %d"%n_x)
    print("隐藏层大小:n_h = %d"%n_h)
    print("输出层大小:n_y = %d"%n_y)
4.3 初始化模型参数
使用np.random.randn(a,b) * 0.01随机初始化形状矩阵(a,b)。将偏差向量初始化为零(乘以0.01的原因是:权重过大会使得输入激活函数的值过大,进而造成梯度下降停滞;randn生成随机数的范围是[0, 1))。
使用np.zeros((a,b))初始化一个带0的形状矩阵(a,b)。
代码:
def initiallize_parameters(n_x, n_h, n_y):
    np.random.seed(2)
    W1 = np.random.randn(n_h, n_x) * 0.01
    b1 = np.zeros(shape = (n_h, 1))
    W2 = np.random.randn(n_y, n_h) * 0.01
    b2 = np.zeros(shape=(n_y, 1))

    assert (W1.shape == (n_h, n_x))
    assert (b1.shape == (n_h, 1))
    assert (W2.shape == (n_y, n_h))
    assert (b2.shape == (n_y, 1))

    parameters = {"W1": W1,
                  "b1": b1,
                  "W2": W2,
                  "b2": b2}
    return parameters
测试:
 X_assess, Y_assess = layer_sizes_test_case()
    n_x, n_h, n_y = layer_sizes(X_assess, Y_assess)
    print("输入层大小:n_x = %d"%n_x)
    print("隐藏层大小:n_h = %d"%n_h)
    print("输出层大小:n_y = %d"%n_y)
    parameters = initiallize_parameters(n_x, n_h, n_y)
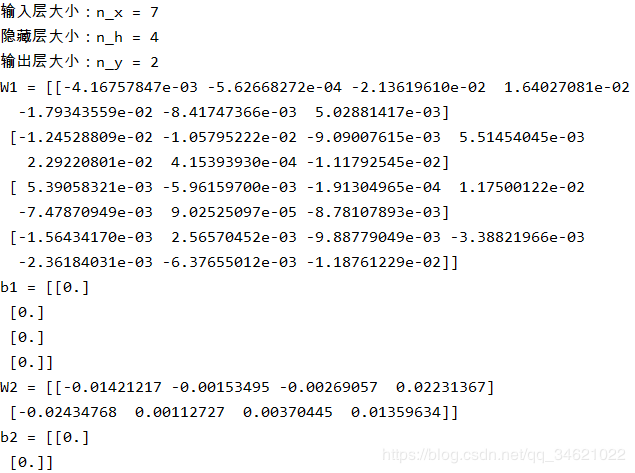
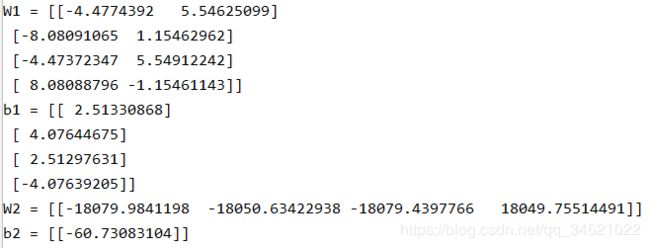
    print("W1 = " + str(parameters["W1"]))
    print("b1 = " + str(parameters["b1"]))
    print("W2 = " + str(parameters["W2"]))
    print("b2 = " + str(parameters["b2"]))
4.3 单隐层神经网络的实现
1.前向传播
代码:
def forward_propagation(X, parameters):
    print(X.shape)
    W1 = parameters['W1']
    b1 = parameters['b1']
    W2 = parameters['W2']
    b2 = parameters['b2']

    Z1 = np.dot(W1, X) + b1 #4,2 2,1 = 4,1
    A1 = np.tanh(Z1) #4, 1
    Z2 = np.dot(W2, A1) + b2 #1, 4 4,1 = 1,1
    A2 = sigmoid.sigmoid(Z2) #1, 1
    print(A2.shape)

    assert(A2.shape == (1, X.shape[1]))
    cache = {"Z1" : Z1,
             "A1" : A1,
             "Z2" : Z2,
             "A2" : A2}
    return A2, cache
测试:(用到的函数附在文档结尾处)
	X_assess, parameters = forward_propagation_test_case()
    A2, cache = forward_propagation(X_assess, parameters)
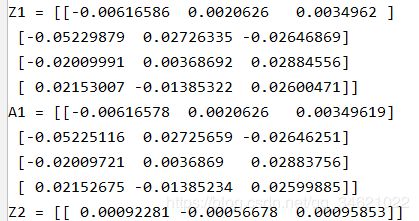
    print("Z1 = " + str(cache['Z1']))
    print("A1 = " + str(cache['A1']))
    print("Z2 = " + str(cache['Z2']))
2.代价函数
进行完前向传播后下一步我们就要计算代价,计算公式如下:
J = − 1 m ∑ i = 0 m ( y ( i ) log ( a [ 2 ] ( i ) ) + ( 1 − y ( i ) ) log ( 1 − a [ 2 ] ( i ) ) ) J = - \frac{1}{m} \sum\limits_{i = 0}^{m} \large{(} \small y^{(i)}\log\left(a^{[2] (i)}\right) + (1-y^{(i)})\log\left(1- a^{[2] (i)}\right) \large{)} \small J=−m1i=0∑m(y(i)log(a[2](i))+(1−y(i))log(1−a[2](i)))
代码:
def compute_cost(A2,Y,parameters):
    m = Y.shape[1]
    W1 = parameters['W1']
    W2 = parameters['W2']
    #对应元素相乘
    logprobs = np.multiply(np.log(A2), Y) + np.multiply(np.log(1 - A2), (1 - Y))
    cost = -np.sum(logprobs)/m

    cost = np.squeeze(cost)
    assert (isinstance(cost, float))
    return cost
运行结果:
![]()
3.计算反向传播
利用前向传播得到的cache里面的数据进行计算。
下面我们来看一下反向传播的计算公式:
在前向传播中我们使用的第一个激活函数是sigmoid,其导数可以写成
g ′ g^{'} g′(z) = g ( z ) ( 1 − g ( z ) ) g(z)(1-g(z)) g(z)(1−g(z));第二个激活函数是tanh,其导数为 g ′ g^{'} g′(z) = ( 1 − g ( z ) 2 ) (1-g(z)^{2}) (1−g(z)2);
实现代码:
def backward_propagation(parameters, cache, X, Y):
    m = X.shape[1]
    W1 = parameters['W1']
    W2 = parameters['W2']
    A1 = cache['A1']
    A2 = cache['A2']

    dZ2 = A2 - Y
    dW2 = np.dot(dZ2, A1.T)
    #纵轴之和
    db2 = np.sum(dZ2, axis=1, keepdims=True)/m
    dZ1 = np.multiply(np.dot(W2.T, dZ2), 1 - np.power(A1, 2))
    dW1 = np.dot(dZ1, X.T)/m
    db1 = (1 / m) * np.sum(dZ1, axis=1, keepdims=True)

    grads = {"dW1": dW1,
             "db1": db1,
             "dW2": dW2,
             "db2": db2}

    return grads
调用代码:
parameters, cache, X_assess, Y_assess = backward_propagation_test_case()

    grads = backward_propagation(parameters, cache, X_assess, Y_assess)
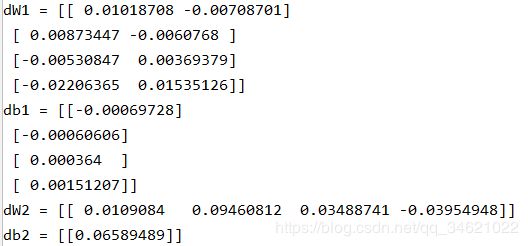
    print("dW1 = " + str(grads["dW1"]))
    print("db1 = " + str(grads["db1"]))
    print("dW2 = " + str(grads["dW2"]))
    print("db2 = " + str(grads["db2"]))
4.更新参数
现在我们已经得到了dW1,dW2,db1,db2的值,我们可以使用这些利用梯度下降法进行参数更新。
一般进行梯度更新的公式: θ = θ − α α J α θ \theta =\theta -\alpha{\alpha J\over\alpha\theta} θ=θ−ααθαJ,其中 α \alpha α是学习率, θ \theta θ是参数。
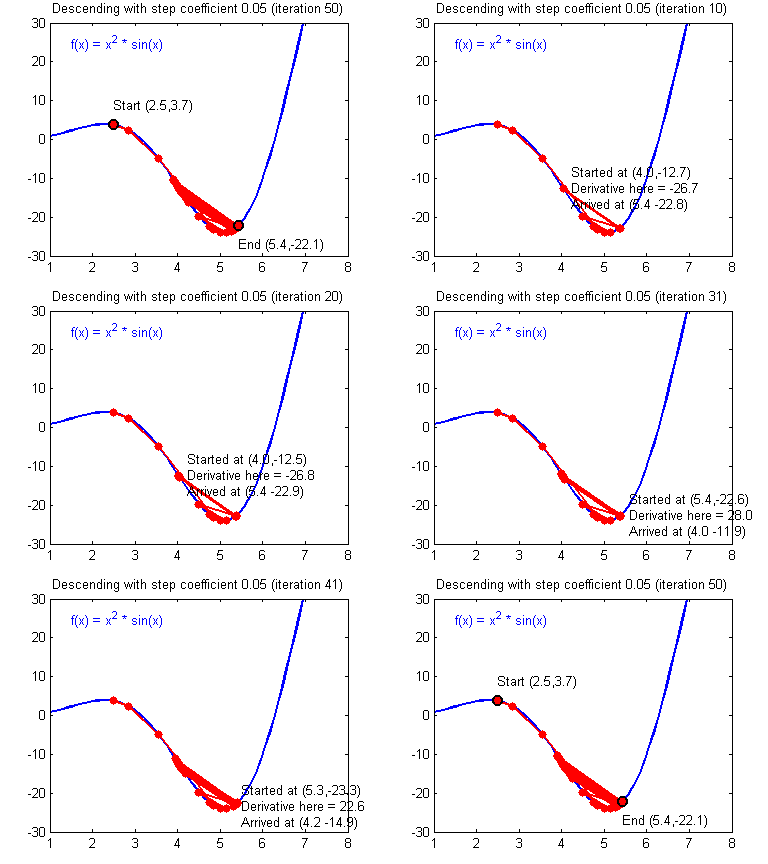
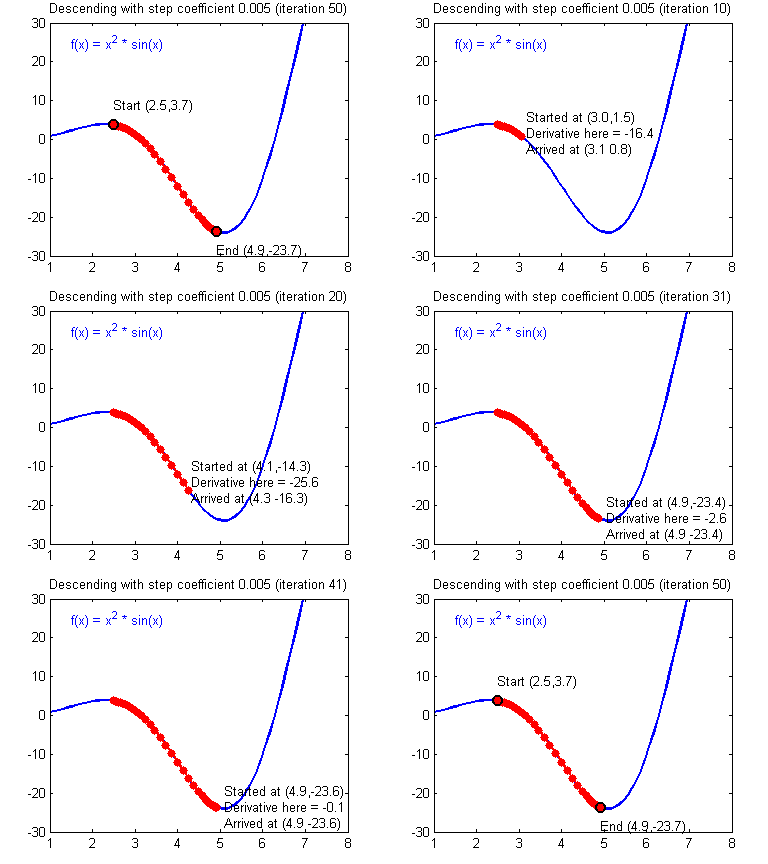
梯度下降算法具有良好的学习速率(收敛)和较差的学习速率(发散)。图片由Adam Harley提供。
代码实现:
def update_parameters(parameters, grads, learning_rate = 1.2):
    W1 = parameters['W1']
    b1 = parameters['b1']
    W2 = parameters['W2']
    b2 = parameters['b2']

    dW1 = grads['dW1']
    db1 = grads['db1']
    dW2 = grads['dW2']
    db2 = grads['db2']

    W1 = W1 - learning_rate * dW1
    b1 = b1 - learning_rate * db1
    W2 = W2 - learning_rate * dW2
    b2 = b2 - learning_rate * db2

    parameters = {"W1": W1,
                  "b1": b1,
                  "W2": W2,
                  "b2": b2}

    return parameters
测试:
 parameters, grads = update_parameters_test_case()
    parameters = update_parameters(parameters, grads)
    print("W1 = " + str(parameters["W1"]))
    print("b1 = " + str(parameters["b1"]))
    print("W2 = " + str(parameters["W2"]))
    print("b2 = " + str(parameters["b2"]))
运行结果:
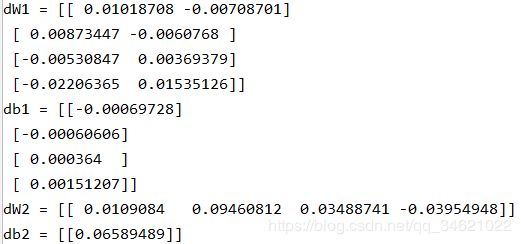
这里我们已更新完了参数,实际上我们更新完的参数可能并不是最优参数,我们需要多次迭代,指导满足一定的条件,这样才能最大可能性的得到最优参数。接下来我们就将上述步骤整合起来。
5.整合上述过程
实现代码:
def nn_model(X, Y, n_h, num_iterations = 10000, print_cost = False):
    #1.获得各层单元个数
    np.random.seed(3)
    n_x, nh, n_y = layer_sizes(X, Y)
    #2.初始化参数
    parameters = initiallize_parameters(n_x, n_h, n_y)
    W1 = parameters['W1']
    b1 = parameters['b1']
    W2 = parameters['W2']
    b2 = parameters['b2']
    #3.循环实现整个计算过程
    i = 0
    while i < num_iterations:
        i+=1
        print(i)
        #1.前向传播
        A2, cache = forward_propagation(X, parameters)
        #2.计算代价
        cost = compute_cost(A2, Y, parameters)
        #3.反向传播
        grads = backward_propagation(parameters, cache, X, Y)
        #4.更新参数
        parameters = update_parameters(parameters, grads)

        if print_cost and i % 1000 == 0:
            print("第%i次计算得到的代价为:%f." %(i, cost))

    return parameters
测试:
X_assess, Y_assess = nn_model_test_case()
    parameters = nn_model(X_assess, Y_assess, 4, num_iterations = 10000, print_cost=False)
    print("W1 = " + str(parameters["W1"]))
    print("b1 = " + str(parameters["b1"]))
    print("W2 = " + str(parameters["W2"]))
    print("b2 = " + str(parameters["b2"]))
6.预测
接下来我们就可以构建函数来进行模型的预测了。
y p r e d i c t i o n ( i ) y^{(i)}_{prediction} yprediction(i) = { 0 , a [ 2 ] ( i ) > 0.5 1 \begin{cases}0, a^{[2](i)} > 0.5 \\ 1 \end{cases} {0,a[2](i)>0.51
代码:
def predict(parameters, X):
    A2, cache = forward_propagation(X, parameters)
    #返回浮点数x的四舍五入值。>0.5为1 <=0.5为0
    predict_result = np.round(A2)
    return predict_result
测试:
parameters, X_assess = predict_test_case()
    predictions = predict(parameters, X_assess)
    print("predictions mean = " + str(np.mean(predictions)))
7. 运行整个模型查看结果:
代码:
X, Y = planar_utils.load_planar_dataset()
    parameters = nn_model(X, Y, 4, 1000, print_cost=True)
    plot_decision_boundary(lambda x: predict(parameters, x.T), X, Y)
    plt.title("Decision Boundary for hidden layer size " + str(4))
运行结果:
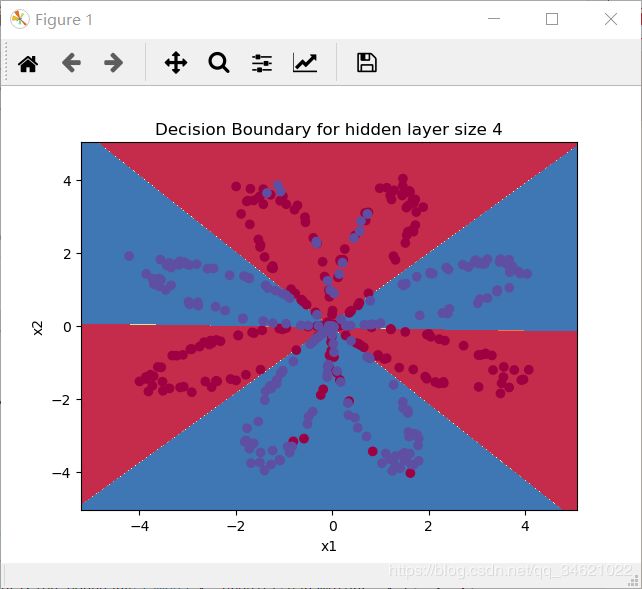
对比一开始我们使用逻辑回归模型进行划分,现在的结果明显优于逻辑回归模型的分类结果。
7. 计算精度
代码:
predictions = predict(parameters, X)
    print('Accuracy: %d' % float(
        (np.dot(Y, predictions.T) + np.dot(1 - Y, 1 - predictions.T)) / float(Y.size) * 100) + '%')
8. 测试不同隐藏层单元数下的预测精度
代码:
运行结果:
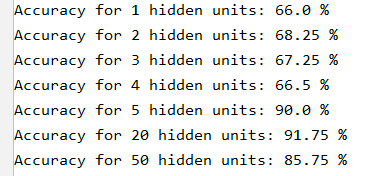
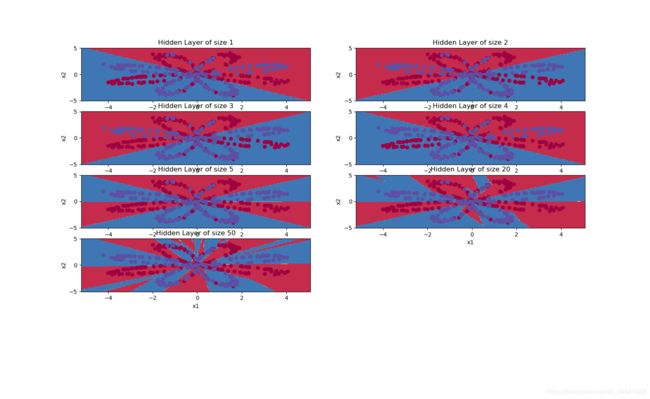
从结果看出,在这个问题上隐藏层设置为5会得到最高的预测率。
同时我们也可以改变学习率,看看最终的结果。
7. 运行其他数据集
代码:
 noisy_circles, noisy_moons, blobs, gaussian_quantiles, no_structure = load_extra_datasets()
    datasets = {"noisy_circles": noisy_circles,
                "noisy_moons": noisy_moons,
                "blobs": blobs,
                "gaussian_quantiles": gaussian_quantiles}
    dataset = "noisy_moons"
    X, Y = datasets[dataset]
    print(X.shape)
    print(Y.shape)
    X, Y = X.T, Y.reshape(1, Y.shape[0])
    if dataset == "blobs":
        Y = Y % 2
    plt.scatter(X[0, :], X[1, :], c=np.squeeze(Y), s=40, cmap=plt.cm.Spectral)
    parameters = nn_model(X, Y, n_h=5, num_iterations=5000)
    plot_decision_boundary(lambda x: predict(parameters, x.T), X, Y)
    predictions = predict(parameters, X)
    print('Accuracy: %d' % float(
    (np.dot(Y, predictions.T) + np.dot(1 - Y, 1 - predictions.T)) / float(Y.size) * 100) + '%')
运行结果:
![]()
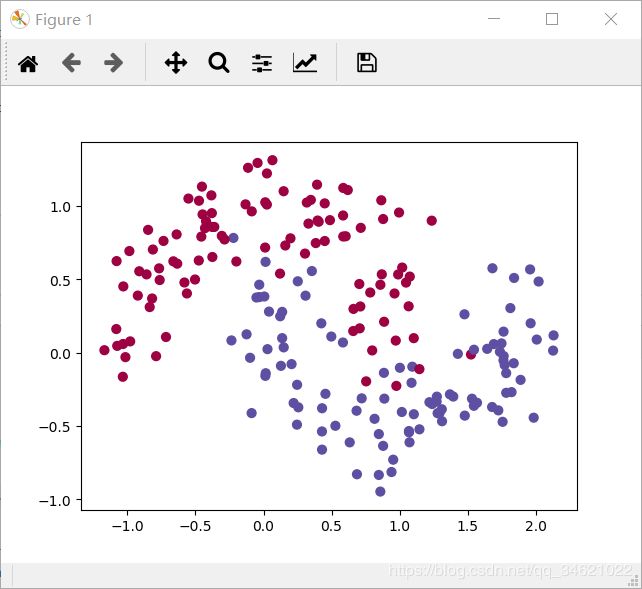

大家可以自己再进行学习率或隐藏层单元数等相关参数的调整。
Reference:https://github.com/Kulbear/deep-learning-coursera/blob
