《视觉SLAM十四讲精品总结》3:OpenCV 与点云图
一、OpenCV 图像
灰度图中,用0-255的整数表示灰度大小,一张宽度为640像素,高度为480像素分辨率的灰度图表示为:
unsigned char image[480][640]
二维数组,先行后列
访问图像中某个像素,需要指明他的坐标,灰度值 I(x,y)的读数
unsigned char pixel=image[y][x]遍历图像:
for(int y=0;y (y);
        //data_ptr指向待访问的像素数据
        unsigned char* data_ptr=&row_ptr[x*image.channels()];

        //输出像素的每个通道
        for(int c-0;c!=image.channels();c++)
         {
            unsigned char data=data_ptr[c];
         }
    }
}
彩色图像通道的默认顺序是B、G、R。
1、imageBasics.cpp
#include
#include
#include
using namespace std;

int main ( int argc, char** argv )
{
    // 读取argv[1]指定的图像
    cv::Mat image;
    image = cv::imread ( argv[1] ); //cv::imread函数读取指定路径下的图像
    // 判断图像文件是否正确读取
    if ( image.data == nullptr ) //数据不存在,可能是文件不存在
    {
        cerr<<"文件"<
2、CMakeLists.txt
cmake_minimum_required( VERSION 2.8 )
project( imageBasics )

# 寻找OpenCV库
find_package( OpenCV REQUIRED )
# 添加头文件
include_directories( ${OpenCV_INCLUDE_DIRS} )
# 可执行程序
add_executable( imageBasics imageBasics.cpp )
# 链接OpenCV库
target_link_libraries( imageBasics ${OpenCV_LIBS} )
调用:build/imageBasics ubuntu.png
二、拼接点云
通过点云拼接,我们就可以还原这个房间的三维场景。
已知:5张RGB-D图像,每个图像的内参K和外参T
目标:计算所有像素在世界坐标系的位置,把点云加起来,组成地图。
思路:根据pose.txt中相机外参(平移向量+旋转四元数)转换成变换矩阵T(4*4);对相机坐标(根据像素和实物关系得到)通T转换成世界坐标;之后根据5张图循环构造点云。
Step1:读取RGB图片和深度图片,以及相机位姿数据。
int main(int argc, char** argv)
{
	// 放入容器vector中
	// 彩色图和深度图,OpenCV 库里的Mat类
	// 相机位姿,Eigen 库里的Isometry3d变换矩阵T(4*4)类
	vector colorImgs, depthImgs;
	vector> poses;

	ifstream fin("./pose.txt");
	if (!fin)
	{
		cerr << "请在有pose.txt的目录下运行此程序" << endl;
		return 1;
	}
	//外参变换矩阵T(4*4)
	for (int i = 0; i<5; i++)
	{
		//boost::format 格式化字符串  拼接出图片文件名
		boost::format fmt("./%s/%d.%s");
		colorImgs.push_back(cv::imread((fmt%"color" % (i + 1) % "png").str()));
		depthImgs.push_back(cv::imread((fmt%"depth" % (i + 1) % "pgm").str(), -1)); // 使用-1读取原始图像

                 //读取位姿数据
		double data[7] = { 0 };
		for (auto& d : data)
			fin >> d;
		//四元数
		Eigen::Quaterniond q(data[6], data[3], data[4], data[5]);
		//变换矩阵T初始化旋转部分
		Eigen::Isometry3d T(q);
		//T初始化平移向量部分
		T.pretranslate(Eigen::Vector3d(data[0], data[1], data[2]));
		//存储T到位姿数组中
		poses.push_back(T);
	}
需要强调的关键点:
- 设地址:位姿地址只有一个(./pose.txt),但图片地址有多个,需要在for循环里把5张图格式统一下。
- 转换变换矩阵T:取出相机位姿(./pose.txt),包括用四元数表示的旋转和xyz轴平移,保存到变换矩阵T(4*4)中。
Step 2:设定相机内参
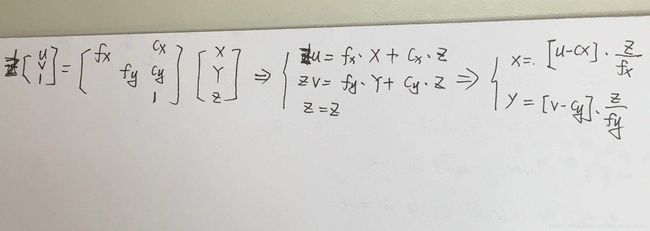
相机内参K用来将图片中的像素点转换到相机坐标系,进而再使用变换矩阵T变换到世界坐标系。
	// 相机内参
	double cx = 325.5;
	double cy = 253.5;
	double fx = 518.0;
	double fy = 519.0;
	double depthScale = 1000.0;
Step 3:拼接点云
pcl点云库提供了非常方便的调用接口,只需要传入每个点的三维坐标和颜色,就可以把多张图片自动拼接到一起。
像素坐标系到相机坐标系
	//定义RGB值pointT和点云pointCloud类
	typedef pcl::PointXYZRGB PointT;
	typedef pcl::PointCloud PointCloud;

	// 新建一个点云
	PointCloud::Ptr pointCloud(new PointCloud);
	for (int i = 0; i<5; i++)
	{
		cout << "转换图像中: " << i + 1 << endl;
		//颜色、深度、位姿T
		cv::Mat color = colorImgs[i];
		cv::Mat depth = depthImgs[i];
		Eigen::Isometry3d T = poses[i];
		//已知像素坐标,遍历所有像素(u,v)
		for (int v = 0; v(v)[u];
			if (d == 0) continue; // 为0表示没有测量到
			//像素坐标(u,v,d)计算相机坐标系下坐标 point
			Eigen::Vector3d point;
			point[2] = double(d) / depthScale;
			point[0] = (u - cx)*point[2] / fx;
			point[1] = (v - cy)*point[2] / fy;
			//相机位姿T计算在世界坐标系下坐标 pointWorld
			Eigen::Vector3d pointWorld = T*point;

			//pcl点 pointT ,x,y,z,b,g,r
			PointT p;
			p.x = pointWorld[0];
			p.y = pointWorld[1];
			p.z = pointWorld[2];
			p.b = color.data[v*color.step + u*color.channels()];
			p.g = color.data[v*color.step + u*color.channels() + 1];
			p.r = color.data[v*color.step + u*color.channels() + 2];
			//push_back(p)放进去一个个点p,构成了点云pointCloud
			pointCloud->points.push_back(p);
			}
	}

	pointCloud->is_dense = false;
	cout << "点云共有" << pointCloud->size() << "个点." << endl;
	//拼接点云,点云是指针形式
	pcl::io::savePCDFileBinary("map.pcd", *pointCloud);
	return 0;
- 世界坐标系下的点是用
Eigen::Vector3d保存的,而点云中的点是用PointT保存的,它们并不兼容。
CMakeLists.txt
# opencv 找库和头文件
find_package( OpenCV REQUIRED )
include_directories( ${OpenCV_INCLUDE_DIRS} )

# eigen 只有头文件
include_directories( "/usr/include/eigen3/" )

# pcl
find_package( PCL REQUIRED COMPONENT common io )
include_directories( ${PCL_INCLUDE_DIRS} )
add_definitions( ${PCL_DEFINITIONS} )
# 执行程序
add_executable( joinMap joinMap.cpp )
# 链接到库
target_link_libraries( joinMap ${OpenCV_LIBS} ${PCL_LIBRARIES} )
可视化
pcl_viewer map.pcd


