vue从入门到精通学习笔记
了解Vue.js
认识Vue.js
- Vue是一个渐进式框架,什么渐进式?
- 渐进式意味着你可以将Vue作为你应用的一部分嵌入其中,带来更丰富的交互体验
- 响应式
- vue的响应式
- 数据发生改变的时候,页面也跟着改变
- 可以直接在浏览器中的console下通过
对象.属性 = 值(app.message = ‘hello’)来改变数据,体验vue的响应式
- vue的响应式
- Vue的特点
- 解耦视图和数据
- 可复用的组件
- 前端路由技术
- 状态管理
- 虚拟DOM
Vue.js安装
-
CDN引入
<!-- 开发环境版本,代码没有压缩,包含了有帮助的命令行警告 --> <script src="https://cdn.jsdelivr.net/npm/vue/dist/vue.js"></script> <!-- 生产环境版本,优化了尺寸和速度 --> <script src="https://cdn.jsdelivr.net/npm/vue"></script> -
下载和引用
开发环境 https://vuejs.org/js/vue.js 生产环境 https://vuejs.org/js/vue.min.js -
npm安装
npm install vue
hello vue.js
-
数据展示
<!DOCTYPE html>
<html lang="en">

<head>
	<meta charset="UTF-8">
	<meta name="viewport" content="width=device-width, initial-scale=1.0">
	<title>Document</title>
	<script src="./node_modules/vue/dist/vue.js"></script>
</head>

<body>
	<div id="app">{{ message }}</div>
	<script>
		const app = new Vue({
			el: '#app',
			data() {
				return {
					message: 'hello vue.js'
				}
			}
		})
	</script>
</body>

</html>
{{}}语法:叫Mustache(玛斯塔)语法,可以进行数据计算,字符串的拼接。
优点:可以完全的达到页面与数据的分离
-
列表展示(for循环,item是每项的值,index是每个项的索引)
<div id="app"> <ul v-for = "item in message"> <li>{{ item }}</li> </ul> </div> <script> const app = new Vue({ el: '#app', data() { return { message: ['少年的你','最好的我们','寻梦环游记','匆匆那年'] } } }) </script> -
vue案例—计数器
<!DOCTYPE html> <html lang="en"> <head> <meta charset="UTF-8"> <meta name="viewport" content="width=device-width, initial-scale=1.0"> <title>Document</title> </head> <body> <div id="app"> <!-- 方法1 --> <!-- <button v-on:click="counter++">+</button> <span>{{ counter }}</span> <button v-on:click="counter--">-</button> --> <!-- 方法2 --> <input type="button" v-on:click="add" value="+" /> <span>{{ counter }}</span> <input type="button" v-on:click="sub" value="-"> </div> <script src="./node_modules/vue/dist/vue.js"></script> <script> new Vue({ el: '#app', data() { return { counter: 0 } }, methods: { add:function() { console.log('add'); this.counter++ }, sub:function() { console.log('sub'); this.counter-- } } }) </script> </body> </html> -
MVVM
-
Model View Model View
-
搜索网站
维基百科:https://www.wikipedia.org/
-
绑定view和model实现数据的双向绑定,
你变我也变 -
解释
- View层
- 视图层
- 在前端开发过程中,通常就是DOM
- 主要作用是给用户展示各种信息
- Model层
- 数据层
- 数据层是我们固定的四数据,更多的来自服务器,从网络上请求下来的数据
- 在我们计算过程中,就是从后面抽取过来的obj
- ViewModel层
- 视图模型层
- 视图模型层是视图层(View层)和模型层(Model层)沟通的桥梁
- 一方面实现了数据的绑定,将Model层的实时改变渲染到视图层上
- 另一方面实现了DOM监听,当DOM发生
事件时,可以监听到,并在对应情况下改变对应的数据
- View层
-
创建vue实例传递的opactions
- el
- 类型:string | HTMLElement
- 作用:决定之后Vue实例会管理那个DOM
- data
- 类型:Object | Function 在组件当中data必须是一个函数
- 作用:Vue实例对应的数据对象
- methods
- 类型:{[key:string]:Function} 函数名:函数体(function(){})
- 作用:定义属于Vue的一些方法,可以在其他地方调用,也可以在指令中调用
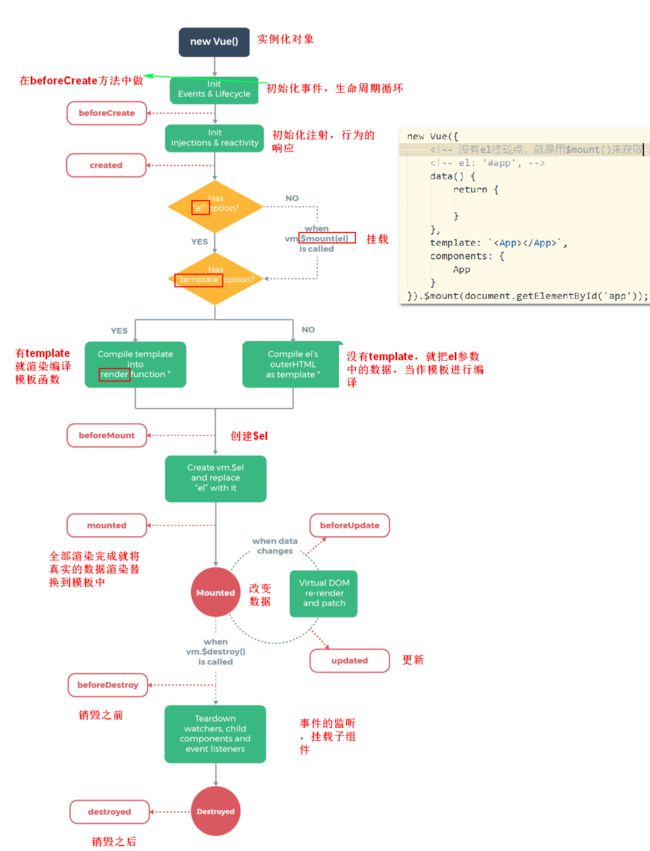
vue的生命周期
生命周期:事务从诞生到消亡的过程。
vue生命周期:创建前/后,载入前/后,更新前/后,销毁前/后。【重:面试会考】
生命周期函数,是vue自定义的公共函数,不需要创建,直接使用就。
生命周期图
生命钩子函数
什么是生命周期函数?
比如:
beforeMount: function() {
}

// 或者
beforeMount() {
}
- Vue的所有生命周期函数都是自动绑定到this的上下文上。所以,使用箭头函数的话,this指向的父级作用域,就会报错。
错误的形式:
mounted:() => {
}
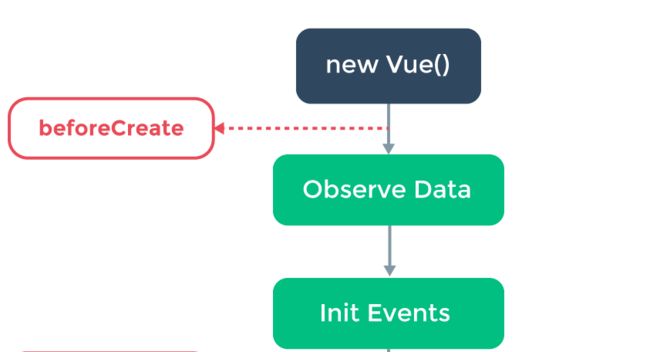
beforeCreate
在实例初始化之后,数据观测和暴露了一些有用的实例属性与方法。
实例初始化——new Vue()
数据观测——在vue的响应式系统中加入data对象中所有数据,这边涉及到vue的双向绑定,可以看官方文档上的这篇深度响应式原理 深度响应式原理
暴露属性和方法——就是vue实例自带的一些属性和方法,我们可以看一个官网的例子,例子中带$的属性和方法就是vue实例自带的,可以和用户定义的区分开来
var data = { a: 1 }
var vm = new Vue({
  el: '#example',
  data: data
})

vm.$data === data // => true
vm.$el === document.getElementById('example') // => true

// $watch 是一个实例方法
vm.$watch('a', function (newValue, oldValue) {
  // 这个回调将在 `vm.a` 改变后调用
})
复制代码
created
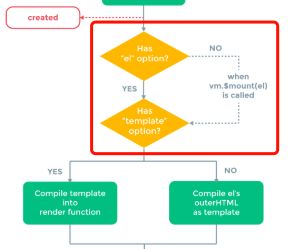
- el属性对生命周期的影响
// 有el属性的情况下
new Vue({
el: '#app',
beforeCreate: function() {
  console.log('调用了beforeCreate')
},
created: function() {
  console.log('调用了created')
},
beforeMount: function() {
  console.log('调用了beforeMount')
},
mounted: function() {
  console.log('调用了mounted')
}
})

// 输出结果
// 调用了beforeCreate
// 调用了created
// 调用了beforeMount
// 调用了mounted
复制代码
// 在没有el属性的情况下,没有vm.$mount

new Vue({
beforeCreate: function() {
  console.log('调用了beforeCreate')
},
created: function() {
  console.log('调用了created')
},
beforeMount: function() {
  console.log('调用了beforeMount')
},
mounted: function() {
  console.log('调用了mounted')
}
})

// 输出结果
// 调用了beforeCreate
// 调用了created
复制代码
// 在没有el属性的情况下,但是有vm.$mount方法

var vm = new Vue({
beforeCreate: function() {
  console.log('调用了beforeCreate')
},
created: function() {
  console.log('调用了created')
},
beforeMount: function() {
  console.log('调用了beforeMount')
},
mounted: function() {
  console.log('调用了mounted')
}
})

vm.$mount('#app')

// 输出结果
// 调用了beforeCreate
// 调用了created
// 调用了beforeMount
// 调用了mounted
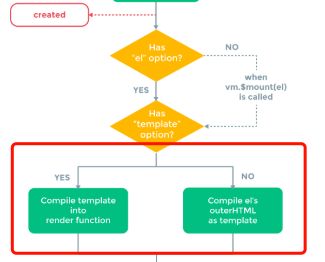
- template属性对生命周期的影响
主要分三种情况:
- 在实例内部有template属性的时候,直接用内部的,然后调用render函数去渲染。
- 在实例内部没有找到template,就调用外部的html。实例内部的template属性比外部的优先级高。
- 要是前两者都不满足,那么就抛出错误。
我们来看以下几个例子:
new Vue({
  el: '#app',
  template: 'hello world'
})

//页面上渲染出了hello world
复制代码
hello world

new Vue({
  el: '#app'
})

// 页面上渲染出了hello world
复制代码
//两者都存在的时候

hello world2

new Vue({
  el: '#app',
  template: 'hello world1'
})
// 页面上渲染出了hello world1
从上述的例子可以看出内部的优先外部的。
- 关于这个生命周期中的一些问题:
1、为什么el属性的判断在template之前? 因为el是一个选择器,比如上述例子中我们用到的最多的是id选择器app,vue实例需要用这个el去template中寻找对应的。
2、实际上,vue实例中还有一种render选项,我们可以从文档上看一下他的用法:
new Vue({
  el: '#app',
  render() {
    return (...)
  }
})
3、上述三者的渲染优先级:render函数 > template属性 > 外部html
4、vue编译过程——把tempalte编译成render函数的过程。
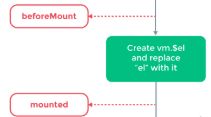
beforeMount和mounted
  {{message}}


new Vue({
  el: '#app',
  data: {
    message: 1
  },
  beforeMount: function() {
    console.log('调用了beforeMount');
    console.log(this.message)
    console.log(this.$el)
  },
  mounted: function() {
    console.log('调用了mounted');
    console.log(this.message)
    console.log(this.$el)
  }
})

// 输出的结果:
// 调用了beforeMount
// 1
//
//

// 调用了mounted
// 1
//
//  1
//
创建vue实例的$el,然后用它替代el属性。
beforeUpdate和updated
这个过程中,我们会发现,当一个数据发生改变时,你的视图也将随之改变,整个更新的过程是:数据改变——导致虚拟DOM的改变——调用这两个生命钩子去改变视图
- 重点:这个数据只有和模版中的数据绑定了才会发生更新。
// 没绑定的情况

var vm = new Vue({
  el: '#app',
  template: '',
  beforeUpdate: function() {
    console.log('调用了beforeUpdate')
  },
  updated: function() {
    console.log('调用了uodated')
  },
  data: {
    a: 1
  }
})

vm.a = 2
//这种情况在控制台中是什么都不会输出的。
复制代码
var vm = new Vue({
  el: '#app',
  template: '{{a}}',
  beforeUpdate: function() {
    console.log('调用了beforeUpdate')
  },
  updated: function() {
    console.log('调用了uodated')
  },
  data: {
    a: 1
  }
})

vm.a = 2

// 输出结果:
// 调用了beforeUpdate
// 调用了uodated
复制代码
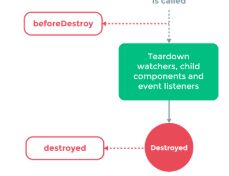
beforeDestory和destoryed
在beferoDestory生命钩子调用之前,所有实例都可以用,但是当调用后,Vue 实例指示的所有东西都会解绑定,所有的事件监听器会被移除,所有的子实例也会被销毁。
不常用的生命钩子函数
- activated:当组件激活的时候调用
- deactivated:当组件停用的时候调用
- errorCaptured:这个生命钩子可以看官网,2.5.0之后才有的。当捕获一个来自子组件的错误时被调用。
总
let vm = new Vue({
el: '#app',
data: {
message: 1
},
template: '{{message}}
',
beforeCreate() {
console.log('调用了beforeCreate')
console.log(this.message)
console.log(this.$el)
},
created() {
console.log('调用了created')
console.log(this.message)
console.log(this.$el)
},
beforeMount() {
console.log('调用了beforeMount')
console.log(this.message)
console.log(this.$el)
},
mounted() {
console.log('调用了mounted')
console.log(this.message)
console.log(this.$el)
},
beforeUpdate() {
console.log('调用了beforeUpdate')
console.log(this.message)
console.log(this.$el)
},
updated() {
console.log('调用了updated')
console.log(this.message)
console.log(this.$el)
},
beforeDestory() {
console.log('调用了beforeDestory')
console.log(this.message)
console.log(this.$el)
},
destoryed() {
console.log('调用了Destoryed')
console.log(this.message)
console.log(this.$el)
}
})
vm.message = 2
复制代码
- 输出的结果:
// 调用了beforeCreate
// undefined
// undefined
// 调用了created
// 1
// undefined
// 调用了beforeMount
// 1
//
// 调用了mounted
// 1
// 1
// 调用了beforeUpdate
// 2
// 2
// 调用了updated
// 2
// 2
代码规范:缩进,一般来说是缩进4个空格,但实际上缩进2个空格会更加的规范。
Vue的基础语法
模板语法
插值操作( {{}} )
-
Mustach语法,也就是双大括号({{}})语法
-
mustach:胡子,胡须
<div id="app"> <h2>{{ message }}</h2> </div> <script src="./node_modules/vue/dist/vue.js"></script> <script> new Vue({ el: '#app', data() { return { message: 'hello meustach' } } }) </script> -
Mustach语法,可以进行数值的计算,数据的绑定,字符串的拼接
-
常见指令 (v-xxx)
v-once指令
-
只显示第一次绑定的值,不会跟着用户的操作而改变
-
元素和组件只渲染一次,不会跟着数据的改变而改变
v-html指令
- 绑定html标签
<div id="app">
    <!-- 显示 点我  超链接   点击之后就跳转到https://pic.images.ac.cn/image/5e87056c7bec6网页 -->
	<h2 v-html = "url"></h2>
</div>
<script src="./node_modules/vue/dist/vue.js"></script>
<script>
	const app = new Vue({
		el: '#app',
		data() {
			return {
				url: `点我`
			}
		}
	})
</script>
v-text指令
-
绑定文本值
<div id="app"> <!-- 显示 hello v-text,good --> <h2>{{ message }},good</h2> <!-- 显示 hello v-text --> <h2 v-text = "message">good</h2> </div> <script src="./node_modules/vue/dist/vue.js"></script> <script> const app = new Vue({ el: '#app', data() { return { message: 'hello v-text' } } }) </script> -
不灵活,只能绑定确定的值,不能进行数据拼接,添加拼接值后,拼接值会被v-text的值覆盖
v-pre
-
和
标签作用一样,写什么就展示什么 -
用于跳过这个元素和它子元素的编译过程,用于显示原本的Mustache语法
<div id="app">
	<!-- 显示 hello v-text,good -->
	<h2>{{ message }},good</h2>
	<!-- 显示 {{ message }},good -->
	<h2 v-pre>{{ message }},good</h2>
</div>
<script src="./node_modules/vue/dist/vue.js"></script>
<script>
	const app = new Vue({
		el: '#app',
		data() {
			return {
				message: 'hello v-text'
			}
		}
	})
</script>
v-clock
-
在某些情况下,我们浏览器可能会直接显示出未编译的Mustach标签
-
clock:斗篷
<!DOCTYPE html> <html lang="en"> <head> <meta charset="UTF-8"> <meta name="viewport" content="width=device-width, initial-scale=1.0"> <title>Document</title> <style> /* v-lock存在的时候不显示内容 */ [v-lock] { display: none; } </style> </head> <body> <div id="app" v-lock> <!-- 显示 hello v-text,good --> <h2>{{ message }},good</h2> <!-- 显示 {{ message }},good --> <h2 v-pre>{{ message }},good</h2> </div> <script src="./node_modules/vue/dist/vue.js"></script> <script> // 在vue解析之前,div中有一个属性v-clock // vue解析完成后,div中没有v-lock属性 setTimeout(function () { const app = new Vue({ el: '#app', data() { return { message: 'hello v-text' } } }); },1000); </script> </body> </html> -
页面加载的时候起一个类似缓冲的作用
绑定属性(v-bind)
v-bind
-
作用:动态绑定属性
-
缩写: :
-
预期:any(with argument) | Object(without argument)
-
参数:attrOrProp(optional)
<div id="app"> <!-- 通过图片地址,动态绑定元素属性,显示图片 --> <!-- 图片不会显示 --> <img src="imgUrl"> <!-- 图片会显示 --> <!-- v-bind的原型 --> <img v-bind:src="imgUrl" > <!-- v-bind的简写形式 --> <img :src="imgUrl" > <!-- 通过 v-html 标签绑定形式,动态显示图片 --> <div v-html="img"></div> </div> <script src="./node_modules/vue/dist/vue.js"></script> <script> new Vue({ el: '#app', data() { return { // 图片地址 imgUrl: 'http://imgs.aixifan.com/content/2016_07_10/1468158502.gif', img: ' '
}
}
})
</script>
v-bind的语法糖
- 也就是v-bind的简写方式,在绑定属性之前,去掉v-bind,直接用v-bind的省略方式来绑定数据(v-bind:src -----》 :src)
动态绑定对象
class语法
<!DOCTYPE html>
<html lang="en">

	<head>
		<meta charset="UTF-8">
		<meta name="viewport" content="width=device-width, initial-scale=1.0">
		<title>Document</title>
		<style>
			.active{
				color: red;
			}
		</style>
	</head>

	<body>
		<div id="app">
			<!-- 可以通过app.isactive来改变属性的值(布尔值),展示不同的状态 -->
			<!-- <h2 :class="{key1:value1, key2:value2}">{{name}}</h2> -->
			<!-- <h2 :class="{类名1:true, 类名2:boolean}">{{name}}</h2> -->
			<!-- 元素绑定的class和动态绑定的class在浏览器中加载会合并 -->
			<h2 class="title" :class="{active:isactive, line:isline}">{{name}}</h2>

			<!-- 简化写法:将绑定的class属性写成一个方法,然后绑定封装后的方法,让页面看起来更加的简洁 -->
			<h2 class="title" :class="getClass()">{{name}}</h2>
			<button type="button" v-on:click="check">按钮</button>
		</div>
		<script src="./node_modules/vue/dist/vue.js"></script>
		<script type="text/javascript">
			var app = new Vue({
				el: '#app',
				data() {
					return {
						name: '小陈',
						isactive: true,
						isline: true
					}
				},
				methods: {
					// 通过按钮点击事件来切换绑定数据的显示样式
					check: function(){
						this.isactive = !this.isactive;
					},
					getClass: function() {
						return {active:this.isactive, line:this.isline}
					}
				}
			})
		</script>
	</body>

</html>
数组语法
<!DOCTYPE html>
<html lang="en">

	<head>
		<meta charset="UTF-8">
		<meta name="viewport" content="width=device-width, initial-scale=1.0">
		<title>Document</title>
		<style>
			.active{
				color: red;
			}
		</style>
	</head>

	<body>
		<div id="app">
			<!-- 通过数组语法绑定多个class名 -->
			<!-- 绑定的class属性有单引号时,当字符串解析 -->
			<!-- 在页面显示成	<h2 class="active line"></h2> -->
			<h2 :class="['active', 'line']">{{ name }}</h2>

			<!-- 绑定的class属性没有单引号时,当变量解析 -->
			<!-- 在页面显示成   <h2 class="aaa bbb"></h2> -->
			<h2 :class="[active, line]">{{ name }}</h2>

			<!-- 在页面显示成   <h2 class="aaa bbb"></h2> -->
			<h2 :class="getClass()">{{ name }}</h2>
		</div>
		<script src="./node_modules/vue/dist/vue.js"></script>
		<script type="text/javascript">
			var app = new Vue({
				el: '#app',
				data() {
					return {
						name: '小陈',
						active: 'aaa',
						line: 'bbb'
					}
				},
				methods: {
					getClass: function(){
						// 在使用方法绑定时,绑定数组中的属性值一定要加上this
						// 不加 this 就会显示active line is not defind
						// return [active, line]

						return [this.active, this.line]
					}
				}
			})
		</script>
	</body>

</html>
实例
-
点击列表中的哪一项,哪一项的值就变成红色
- 步骤
- 创建html页面
- 引入vue.js包
- 添加作用域( )
- 实例化Vue({})
- 添加挂载点(el)
- 添加data属性及要操作的movie数组
- 将data中movie数组中的数据渲染到页面上
- 给li标签绑定class属性,属性的索引等于点击的li的索引
- 添加点击事件,将绑定class属性的索引赋值给点击的索引
<!DOCTYPE html> <html lang="en"> <head> <meta charset="UTF-8"> <meta name="viewport" content="width=device-width, initial-scale=1.0"> <title>Document</title> <style type="text/css"> ul li { /* 鼠标移上去,添加小手样式 */ cursor: pointer; } /* 元素绑定的class样式 */ .active { color: red; } </style> </head> <body> <!-- 2 创建作用域 --> <div id="app"> <ul> <!--通过切换索引值改变class--> <!-- 遍历显示在那个标签里面v-for循环就写在那个标签里面 --> <li v-for='(item,index) in movie' @click="change(index)" :class='{ active:index === i }'>{{ item }}</li> </ul> </div> <!-- 1 引包 --> <script src="./node_modules/vue/dist/vue.js"></script> <script type="text/javascript"> // 3 实例化vue var app = new Vue({ // 4 添加挂载点 el el: '#app', data() { return { // 页面加载的时候给第一个li标签添加样式 // 元素的索引从0开始 i: 0, // 页面显示的数组数据 movie: ['寻梦环游记', '肖申克的救赎', '摩登家庭', '老友记'] } }, methods: { // 元素标签点击事件 change: function(index) { // console.log(index); // 将添加class属性的索引变成用户点击的索引 this.i = index; } } }) </script> </body> </html> - 步骤
v-bind绑定style样式
- 在写css属性名的时候,我们可以采用
- 驼峰命名法(fontSize)
- 短横线分割法(‘font-size’)
- 绑定class有两种语法
对象语法
<h2 :style="{fontSize: end + 'px'}">{{ message }}</h2>
style后面跟的是一个对象类型
对象的key是css属性名称
对象的value是具体赋的值,值可以来自data中的属性
<!DOCTYPE html>
<html lang="zh">
<head>
	<meta charset="UTF-8">
	<meta name="viewport" content="width=device-width, initial-scale=1.0">
	<meta http-equiv="X-UA-Compatible" content="ie=edge">
	<title></title>
</head>
<body>
	<div id="app">
		<!-- <h2 :style="{key: value}"></h2> -->
		<!-- key是css的属性名   value是属性值 -->
		<!-- 这样编译会报错,编译的时候浏览器把50px当成一个变量编译的,但是变量不能以数组开头 -->
		<!-- <h2 :style="{font-size: 50px}">{{ message }}</h2> -->
		<!-- 解决方法: 将 50px  变成  '50px' -->
		<h2 :style="{'font-size': '50px'}">{{ message }}</h2>
		<h2 :style="{fontSize: '50px'}">{{ message }}</h2>

		<!-- 直接引用变量finalSize -->
		<!-- 引用的变量的值有单位,直接引用变量 -->
		<h2 :style="{fontSize: finalSize, color: finalColor }">{{ message }}</h2>
		<!-- 通过函数封装来改变样式 -->
		<h2 :style="getStyle()">{{ message }}</h2>
		<!-- 引用变量的值没有单位,在变量后面通过字符串的拼接来添加单位 -->
		<h2 :style="{fontSize: end + 'px'}">{{ message }}</h2>
	</div>
	<script src="./node_modules/vue/dist/vue.js" type="text/javascript" charset="utf-8"></script>
	<script type="text/javascript">
		new Vue({
			el: '#app',
			data() {
				return {
					message: 'HerayChen',
					finalSize: '60px',
					end: 60,
					finalColor: 'red'
				}
			},
			methods: {
				getStyle: function() {
					return {fontSize: this.finalSize, color: this.finalColor }
				}
			}
		})
	</script>
</body>
</html>
数组语法
<h2 v-bind:style="[fontColor,backgroundColor]">{{ message }}</h2>
style后面跟的是一个数组类型
多个值,分隔即可
<!DOCTYPE html>
<html lang="zh">
<head>
	<meta charset="UTF-8">
	<meta name="viewport" content="width=device-width, initial-scale=1.0">
	<meta http-equiv="X-UA-Compatible" content="ie=edge">
	<title></title>
	<style type="text/css">

	</style>
</head>
<body>
	<div id="app">
		<h2 :style="[fontColor]">{{ message }}</h2>
	</div>
	<script src="./node_modules/vue/dist/vue.js" type="text/javascript" charset="utf-8"></script>
	<script type="text/javascript">
		new Vue({
			el: '#app',
			data() {
				return {
					message: 'HerayChen',
					fontColor: {color: 'red'}
				}
			}
		})
	</script>
</body>
</html>
计算属性(computed)
计算属性的基本使用
<!DOCTYPE html>
<html lang="zh">
	<head>
		<meta charset="UTF-8">
		<meta name="viewport" content="width=device-width, initial-scale=1.0">
		<meta http-equiv="X-UA-Compatible" content="ie=edge">
		<title></title>
	</head>
	<body>
		<div id="app">
			<!-- 通过mustach语法实现拼接 -->
			<h2>{{ cname + ' ' + ename }}</h2>
			<h2>{{ cname }} {{ ename }}</h2>

			<!-- 通过函数方法实现拼接 -->
			<h2>{{ getFullName() }}</h2>

			<!-- 通过计算属性实现拼接 -->
			<!-- 注意:计算属性,在写的时候是通过方法组合而成的,但是在使用的时候是当成属性使用的,直接通过属性名调用即可,不需要加双小括号 -->
			<h2>{{ fullName }}</h2>
		</div>
		<script src="./node_modules/vue/dist/vue.js" type="text/javascript" charset="utf-8"></script>
		<script type="text/javascript">
			new Vue({
				el: '#app',
				data() {
					return {
						ename: 'HerayChen',
						cname: '肖晨'
					}
				},
				// computed 计算属性
				computed: {
                    // fullName在这里是一个属性,不是一个函数
					fullName: function() {
						return this.cname + ' ' + this.ename;
					}
				},
				methods: {
					getFullName() {
						return this.cname + ' ' + this.ename;
					}
				}
			})
		</script>
	</body>
</html>
计算属性的复杂操作(通过for循环,计算总价格及es6 中的for-in方法)
<!DOCTYPE html>
<html lang="zh">
	<head>
		<meta charset="UTF-8">
		<meta name="viewport" content="width=device-width, initial-scale=1.0">
		<meta http-equiv="X-UA-Compatible" content="ie=edge">
		<title></title>
	</head>
	<body>
		<div id="app">
			<h2>所有书的总价格为:{{ books[0].price + books[1].price + books[2].price + books[3].price }}</h2>
			<h2>所有书的总价格为:{{ totalPrice }}</h2>
			<h2>所有书的总价格为:{{ tprice }}</h2>
		</div>
		<script src="./node_modules/vue/dist/vue.js" type="text/javascript" charset="utf-8"></script>
		<script type="text/javascript">
			new Vue({
				el: '#app',
				data() {
					return {
						books: [{
							id: 202001,
							name: '月亮与六便士',
							price: 50
						}, {
							id: 202002,
							name: '独家的记忆',
							price: 35
						}, {
							id: 202003,
							name: '我在未来等你',
							price: 25
						}, {
							id: 202004,
							name: '爱',
							price: 250
						}]
					}
				},
				computed: {
					totalPrice: function() {
						let result = 0;
						for(let i = 0; i < this.books.length; i++){
							result += this.books[i].price;
						}
						return result;
					},
					tprice: function() {
						let result = 0;
						// es6中的for循环
						for (let i in this.books) {
							result += this.books[i].price;
						}
						return result;
					}
				}
			})
		</script>
	</body>
</html>
计算属性的setter和getter
<!DOCTYPE html>
<html lang="zh">
<head>
	<meta charset="UTF-8">
	<meta name="viewport" content="width=device-width, initial-scale=1.0">
	<meta http-equiv="X-UA-Compatible" content="ie=edge">
	<title></title>
</head>
<body>
	<div id="app">
		<h2>{{ fullName }}</h2>
	</div>
	<script src="./node_modules/vue/dist/vue.js" type="text/javascript" charset="utf-8"></script>
	<script type="text/javascript">
		new Vue({
			el: '#app',
			data() {
				return {
					cname: '肖晨',
					ename: 'HerayChen'
				}
			},
			computed: {
				// fullName: function() {
				// 	return this.cname + ' ' + this.ename;
				// },

				// 计算属性一般没有set方法,只读属性
				fullName: {
					set: function(newName) {
						// 只有值更改后才会调用set方法
						// 要使用set方法,set方法一定是有参数的
						// 通过空格截取修改后的值
						const names = newName.split(' ');
						// 前面的部分是cname
						this.cname = names[0];
						// 后面的部分是ename
						this.ename = name[1];

					},
					get: function() {
						return this.cname + ' ' + this.ename;
					}
				}
			}
		})
	</script>
</body>
</html>
计算属性和methods的对比
计算属性(computed)比methods性能更高,methods加载一次调用一次(每次都会重新计算一次),计算属性只调用一次(只计算一次)。
<!DOCTYPE html>
<html lang="zh">
<head>
	<meta charset="UTF-8">
	<meta name="viewport" content="width=device-width, initial-scale=1.0">
	<meta http-equiv="X-UA-Compatible" content="ie=edge">
	<title></title>
</head>
<body>
	<div id="app">
		<!-- 直接拼接 -->
		<!-- 一般不使用这种方法,语法过于繁琐 -->
		<h2>{{ cname + ' ' + ename }}</h2>
		<!-- 通过函数拼接 -->
		<!-- 调用多次多次,页面加载一次调用一次 -->
		<h2>{{ getFullName() }}</h2>
		<!-- 通过计算属性拼接 -->
		<!-- 调用多次 不管调用多少次,fullName只调用一次 -->
		<h2>{{ fullName }}</h2>
	</div>
	<script src="./node_modules/vue/dist/vue.js" type="text/javascript" charset="utf-8"></script>
	<script type="text/javascript">
		new Vue({
			el: '#app',
			data() {
				return {
					cname: '肖晨',
					ename: 'HerayChen'
				}
			},
			computed: {
				fullName: function() {
					return this.cname + ' ' + this.ename;
				}
			},
			methods: {
				getFullName: function() {
					return this.cname + ' ' + this.ename;
				}
			}
		})
	</script>
</body>
</html>
es6语法总结
let和const
var/let:变量,const:常量
-
let
- 具有块级作用域
- 在if,for中var,没有块级作用域,(解决作用域方法:使用闭包,使用ES6语法)
- 使用闭包解决var中没有块级作用域的原理是,函数是一个作用域【在javascript中只有函数是有作用域的】
-
const
-
将某个变量变成常量
-
常量是固定值,不可以再次赋值
-
const可以保证数据的安全性
-
在es6开发中优先使用const,只有需要改变某一个标识符的时候才使用let
注意:
1 常量不可以再次修改
const name = 'herayChen';
name = 'xiaochen0';	// 错误
2  常量声明之后必须赋值
const name;	//错误
3 常量的含义是指向的对象不能修改,但是可以改变对象内部的属性
const obj = {
    name: 'xiaochen',
    age: 20
}
obj.age = 18;  //正确
-
对象字面量的增强写法
在const obj = {}中,{}就是obj的字面量。
-
属性的增强写法
// 属性的增强写法 const name = 'xiaochen'; const age = 20; const sex = '女'; // ES5中 const obj = { name: name, age: age, sex: sex } // ES6中 const obj = { name, age, sex } -
函数的增强写法
// 函数的增强写法
// ES5
const obj = {
	add: function() {

	},
	reducte: function() {

	}
}
// ES6
const obj = {
	add() {

	},
	reducte() {

	}
}
最近更新:typescript(microsoft),flow(facebook),angular(goole)【框架本身就使用的是typescript】
事件监听(v-on)
- 作用:绑定事件监听器
- 缩写:@click
- 预期:Function | Inline Statement | Object
- 参数:event
基本使用
<div id="app">
	<h2>{{ counter }}</h2>
	<!--
		v-bind的语法糖:
		<h2 v-bind:title="">{{ counter }}</h2>
		<h2 :title="">{{ counter }}</h2>
	 -->
	<!-- 直接操作数据 -->
	<button type="button" @click="counter++">+</button>
	<button type="button" @click="counter--">-</button>
	<!-- 绑定函数,调用 -->
	<button type="button" v-on:click="increment">+</button>
	<!-- v-on中的语法糖:@click  -->
	<button type="button" @click="decrement">-</button>
</div>
<script src="./node_modules/vue/dist/vue.js" type="text/javascript" charset="utf-8"></script>
<script type="text/javascript">
	new Vue({
		el: '#app',
		data() {
			return {
				counter: 0
			}
		},
		methods: {
			increment() {
				this.counter++;
			},
			decrement() {
				this.counter--;
			}
		}
	})
</script>
v-on参数
情况一:
如果该方法不需要额外参数,那么方法后面的()可以省略,但是如果方法本身中有一个参数,那么则会默认event参数传递进去。
情况二:
如果需要同时传递某一个参数,同时需要event时,剋通过$event传入事件。
<!DOCTYPE html>
<html lang="zh">
	<head>
		<meta charset="UTF-8">
		<meta name="viewport" content="width=device-width, initial-scale=1.0">
		<meta http-equiv="X-UA-Compatible" content="ie=edge">
		<title></title>
	</head>
	<body>
		<div id="app">
			<!-- 1.事件调用的方法没有参数 -->
			<!-- @click="btnClick"  或者 @click="btnClick()" -->
			<button @click="btn1Click">按钮1</button>

			<!-- 2.有一个参数 -->
			<!-- 在事件定义时,写函数时省略了小括号,但是方法本身是需要一个参数的 -->
			<!-- 打印输出123 -->
			<button @click="btn2Click(num)">按钮2</button>
			<!-- 没有传递参数函数的形参是undefined -->
			<button @click="btn2Click()">按钮2.1</button>
			<!-- 打印输出MouseEvent对象 -->
			<!-- 在进行事件操作的时候浏览器会自动生成一个event对象 -->
			<!-- v-on绑定函数需要传递新参,但是没有传递形参及小括号,就输出event对象 -->
			<button @click="btn2Click">按钮2.2</button>

			<!-- 3.有一个及多个参数 -->
			<!-- 在方法定义时,我们需要event对象,还需要其他参数 -->
			<!-- event is not defined -->
			<!-- 在这里浏览器解析的时候是把event当成一个变量来解析的 -->
			<button @click="btn3Click(num, event)">按钮3</button>
			<!-- 在调用方法的时候如何手动获取event对象 ,通过 $event -->
			<button @click="btn3Click(num, $event)">按钮3.1</button>


		</div>
		<script src="./node_modules/vue/dist/vue.js" type="text/javascript" charset="utf-8"></script>
		<script type="text/javascript">
			new Vue({
				el: '#app',
				data() {
					return {
						num: 123
					}
				},
				methods: {
					btn1Click() {
						console.log("btnClick");
					},
					btn2Click(abc) {
						console.log(abc);
					},
					btn3Click(abc, event) {
						console.log(abc, event);
					}
				}
			})
		</script>
	</body>
</html>
v-on修饰符
<!-- 1 停止冒泡 -->
<button @click.stop="doThis"></button>
<!-- 2 阻止默认行为 -->
<button @click.prevent="doThis"></button>
<!-- 3 阻止默认行为,没有表达式 -->
<button @click.stop></button>
<!-- 4 串联修饰符 -->
<button @click.stop.prevent="doThis"></button>
<!-- 5 键修饰符,键别名 -->
<button @click.enter="onEnter"></button>
<!-- 6 键修饰符,键代码 -->
<button @click.13="onEnter"></button>
<!-- 7 点击只会触发一次 -->
<button @click.once="doThis"></button>
示例:
<!DOCTYPE html>
<html lang="zh">
	<head>
		<meta charset="UTF-8">
		<meta name="viewport" content="width=device-width, initial-scale=1.0">
		<meta http-equiv="X-UA-Compatible" content="ie=edge">
		<title></title>
	</head>
	<body>
		<div id="app">
			<!-- 1 .stop阻止事件冒泡的使用 -->
			<div @click="divClick">
				<!-- 通过 stop阻止事件向上冒泡 -->
				<button @click.stop="btnClick">按钮</button>
			</div>

			<!-- 2 .prevent修饰符的使用 -->
			<form action="baidu.com">
				<!-- 通过prevent阻止表单的默认提交 -->
				<input type="submit" value="提交" @click.prevent="submitClick"/>
			</form>

			<!-- 3 监听键盘的键帽 -->
			<input type="text" @keyup.enter="keyUp" />

			<!-- 4 once修饰符的使用 -->
			<button type="button" @click.once="btn2Click">提交</button>

		</div>
		<script src="./node_modules/vue/dist/vue.js" type="text/javascript" charset="utf-8"></script>
		<script type="text/javascript">
			new Vue({
				el: '#app',
				data() {
					return {

					}
				},
				methods: {
					divClick() {
						console.log('divClick');
					},
					btnClick() {
						console.log('btnClick');
					},
					submitClick() {
						// 自定义提交
						console.log('submitClick');
					},
					keyUp() {
						// 监听键帽,按下回车键后才打印
						console.log('keyUp');
					},
					btn2Click() {
						// 只提交一次
						console.log('btn2Click');
					}
				}
			})
		</script>
	</body>
</html>
条件判断
v-if的使用
<div id="app">
	<!-- 为false不显示,true显示 -->
	<h2 v-if="isShow">good morning HerayChen</h2>
</div>
<script src="./node_modules/vue/dist/vue.js" type="text/javascript" charset="utf-8"></script>
<script type="text/javascript">
	new Vue({
		el: '#app',
		data() {
			return {
				isShow: true
			}
		}
	})
</script>
v-if和v-else的使用
<div id="app">
	<!-- v-if中的条件为true时,显示v-if里面的内容 -->
	<!-- v-if中的条件为false时,显示v-else里面的内容 -->
	<h2 v-if="isShow">{{ message }}</h2>
	<h2 v-else>{{ now }}</h2>
</div>
<script src="./node_modules/vue/dist/vue.js" type="text/javascript" charset="utf-8"></script>
<script type="text/javascript">
	new Vue({
		el: '#app',
		data() {
			return {
				message: 'good morning HerayChen',
				now: 'good afternoon HerayChen',
				isShow: false
			}
		}
	})
</script>
v-if,v-else-if,v-else的使用
层层判断
<div id="app">
	<!-- 1 直接在标签上使用 -->
	<h2 v-if="score >= 90">优秀</h2>
	<h2 v-else-if="score >= 80">良好</h2>
	<h2 v-else-if="score >= 60">及格</h2>
	<h2 v-else>继续加油呀!</h2>

	<!-- 2 通过计算属性来使用 -->
	<h1> {{ result }}</h1>
</div>
<script src="./node_modules/vue/dist/vue.js" type="text/javascript" charset="utf-8"></script>
<script type="text/javascript">
	new Vue({
		el: '#app',
		data() {
			return {
				score: 90
			}
		},
		computed: {
			result() {
				let showMessage = '';
				if (this.score >= 90) {
					showMessage = '优秀'
				} else if (this.score >= 80) {
					showMessage = '良好'
				} else if (this.score >= 60) {
					showMessage = '及格'
				} else{
					showMessage = '继续加油呀~'
				}
				return showMessage;
			}
		}
	})
</script>
条件渲染案例(条件判断)
选择不同的方式登录
在此过程中遇到的小问题:
- 如果我们在输入内容的情况下,切换了类型,我们会发现文字依然显示之前输入的内容
- 但是按道理讲,我们应该切换到另外一个input元素中了
- 在另外一个input元素中,我们并没有输入内容
- 为什么会出现这个问题呢?
问题解答:
- 这是因为Vue在进行DOM渲染时,出于性能考虑,会尽可能的复用已存在的元素,而不是重新创建新的元素。
- 在上面的案例中,Vue内部会发现原来的input元素不再使用,直接作为else中的input来使用了。
解决方案:
- 如果我们不希望Vue出现类似重复利用的问题,可以给对应的input添加key
- 并且需要保证key的不同
<div id="app">
	<span v-if="isUser">
		<label for="userName">手机账号</label>
		<!-- 给input标签添加key属性,防止在页面中输入了账号然后想切换登录方式,输入的数据没有清除 -->
		<!-- 这种现象的原因是:vue的虚拟DOM , 元素内部的复用问题-->
		<!-- 给input添加key属性,将key作为一个标识,决定能不能在其他地方进行使用 -->
		<!-- 当不需要在其他地方使用时,key的值一定唯一 -->
		<input type="text" id="userName" placeholder="手机账号" key="userName"/>
	</span>
	<span v-else>
		<label for="email">邮箱</label>
		<input type="text" id="email" placeholder="邮箱" key="email"/>
	</span>
	<button @click="isUser = !isUser">切换类型</button>
</div>
<script src="./node_modules/vue/dist/vue.js" type="text/javascript" charset="utf-8"></script>
<script type="text/javascript">
	new Vue({
		el: '#app',
		data() {
			return {
				isUser: true
			}
		}
	})
</script>
v-show
<div id="app">
	<!-- v-if条件为false是,包含v-if指令的元素,根本就不会存在DOM中 -->
	<!-- 创建 删除... -->
	<h2 v-if="isShow">{{ message }}</h2>

	<!-- v-show是通过使用display:none来实现的 -->
	<!-- display:block   display:none -->
	<h2 v-show="isShow">{{ message }}</h2>
</div>
<script src="./node_modules/vue/dist/vue.js" type="text/javascript" charset="utf-8"></script>
<script type="text/javascript">
	new Vue({
		el: '#app',
		data() {
			return {
				message: '知识改变命运,学习成就未来',
				isShow: true
			}
		}
	})
</script>
v-if和v-show对比:
- v-if和v-show都可以决定一个元素是否渲染
- 选择
- v-if条件为false时,压根不会有对应的元素在DOM中
- v-show条件为fasle是,仅仅是将元素的display属性设置为none
- 当需要频繁的切换显示隐藏之间切片很频繁时,使用v-show
- 当只有一次切换时,通过使用v-if
- 选择
循环遍历
v-for遍历数组
<div id="app">
	<!-- 在遍历过程中没有使用索引值 -->
	<ul>
		<li v-for="item in movies">{{ item }}</li>
	</ul>
	<!-- 在遍历过程中获取索引值 -->
	<ul>
		<li v-for="(item, index) in movies">{{ index+1 }}.{{ item }}</li>
	</ul>
</div>
<script src="./node_modules/vue/dist/vue.js" type="text/javascript" charset="utf-8"></script>
<script type="text/javascript">
	new Vue({
		el: '#app',
		data() {
			return {
				movies: ['寻梦环游记', '肖申克的救赎', '爱的冒险', '冰雪奇缘']
			}
		}
	})
</script>
v-for遍历对象
<div id="app">
	<ul>
		<!-- 在遍历对象中  item是对象中的每个属性的值 value -->
		<li v-for="item in movies">{{ item }}</li>
	</ul>

	<ul>
		<!-- key 属性名 -->
		<!-- item 属性值 -->
		<li v-for="(item,key) in movies">{{ key }}-{{ item }}</li>
	</ul>
</div>
<script src="./node_modules/vue/dist/vue.js" type="text/javascript" charset="utf-8"></script>
<script type="text/javascript">
	new Vue({
		el: '#app',
		data() {
			return {
				movies:{
					id: 1,
					name: '动物世界',
					actor: '李易峰',
					time: '2018-05-04'
				}
			}
		}
	})
</script>
组件的key属性
- 官方推荐使用v-for是,给对应的元素或者组件添加上一个key属性
- 为什么要使用key属性呢?
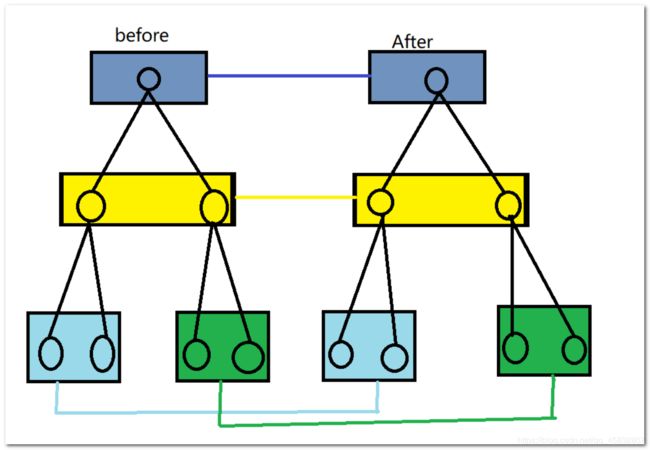
- 这个其实和Vue的Diff算法有关系
- 当某一层有很多相同的节点时,也就是列表节点是,我们希望插入一个新的节点
- 我们希望在b和c之间插入f,Diffy算法执行起来是这样的。
- 即把D更新成C,E更新成D,最后再插入E,这样做效率不太高
- 所以我们需要使用key来给每一个节点做一个唯一标识
- Diff算法就可以正确的识别此节点
- 找到正确的位置插入新的值
- key的作用是为了高效的更新虚拟DOM
数组中的响应式方法
1 push()
2 pop()
3 shift()
4 unshift()
5 splice()
6 sort()
7 reverse()
8 Vue中的set方法
<!DOCTYPE html>
<html lang="zh">
	<head>
		<meta charset="UTF-8">
		<meta name="viewport" content="width=device-width, initial-scale=1.0">
		<meta http-equiv="X-UA-Compatible" content="ie=edge">
		<title></title>
	</head>
	<body>
		<div id="app">
			<ul>
				<li v-for="item in letter" :key="item">{{ item }}</li>
			</ul>
			<button type="button" @click="btnClick">按钮</button>
		</div>
		<script src="./node_modules/vue/dist/vue.js" type="text/javascript" charset="utf-8"></script>
		<script type="text/javascript">
			new Vue({
				el: '#app',
				data() {
					return {
						letter: ['A', 'B', 'C', 'D', 'E'],
						nums: [1, 3, 4, 77, 33, 6]
					}
				},
				methods: {
					btnClick() {
						// 1 push()
						// 在数组后添加一个元素
						// Math.random().toString(36).substr(2) 随机生成字母和数字的组合
						this.letter.push(Math.random().toString(36).substr(2));
						// 一次添加多个元素
						this.letter.push('aaa', 'bbb', 'ccc');

						// 2 pop()
						// 删除数组的最后一个元素
						this.letter.pop();

						// 3 shift()
						// 删除数组的第一个元素
						this.letter.shift();

						// 4 unshift()
						// 在数组最前面添加一个元素
						this.letter.unshift(Math.random().toString(36).substr(2));

						// 5 splice()
						// splice方法可以删除元素/插入元素/替换元素
						// 删除
						this.letter.splice(1, 2);
						// splice(1, 2);//从第一个元素开始,向后删除2个元素		显示ADE
						// 如果没有传第二个参数就删除从起始位置后的所有元素

						// 替换
						// 显示AFGHI
						// 从第一个元素开始,向后替换四个元素
						this.letter.splice(1, 4, 'F', 'G', 'H', 'I');

						// 插入
						// 显示ABCDFGHIE
						// 在数组的第四个元素后添加'F', 'G', 'H', 'I'
						this.letter.splice(4, 0, 'F', 'G', 'H', 'I');

						// 6 sort()
						// 数组的排序
						// 打印输出 [1, 3, 33, 4, 6, 77]
						console.log(this.nums.sort());

						// 7 reverse()
						// 翻转数组
						// 显示EDCBA
						this.letter.reverse();

						// 8 Vue中的set方法
						// set(要修改的对象, 索引值, 修改后的值)
						// 显示 bbb B C D E
						Vue.set(this.letter, 0, 'bbbb')

						// 注意:通过索引值,更改数组中的元素,这个不是响应式的
						// this.letter[0] = 'bbb';

						// 使用可变参数(...)的函数
						// function add(...num) {
						// 	// 打印输出[1, 2, 3, 4, 4, 5, 5]
						// 	console.log(num);
						// }
						// add(1, 2, 3, 4, 4, 5, 5);
					}
				}
			})
		</script>
	</body>
</html>
阶段案例(图书购物车)
<!DOCTYPE html>
<html lang="zh">
	<head>
		<meta charset="UTF-8">
		<meta name="viewport" content="width=device-width, initial-scale=1.0">
		<meta http-equiv="X-UA-Compatible" content="ie=edge">
		<title></title>
		<style type="text/css">
			table {
				border: 1px solid #e9e9e9;
				border-collapse: collapse;
				border-spacing: 0;
			}

			th,
			td {
				padding: 8px 16px;
				border: 1px solid #E9E9E9;
				text-align: center;
			}

			th {
				background-color: #7F7F7F;
				color: #5c6b77;
				font-weight: 600;
			}
		</style>
	</head>
	<body>
		<div id="app">
			<div v-if="books.length">
				<table>
					<thead>
						<tr>
							<th>编号</th>
							<th>书籍名称</th>
							<th>出版日期</th>
							<th>价格</th>
							<th>购买数量</th>
							<th>操作</th>
						</tr>
					</thead>
					<tbody>
						<tr v-for="(item, index) in books">
							<!-- 一次显示所有,不宜于做其他操作 -->
							<!-- <td v-for="value in item">{{ value }}</td> -->
							<td>{{ item.id }}</td>
							<td>{{ item.name }}</td>
							<td>{{ item.data }}</td>
							<!-- 1 使用toFixed直接保留小数 -->
							<!-- <td>{{ '¥' + item.price.toFixed(2) }}</td> -->
							<!-- 2 通过函数的封装调用保留小数 -->
							<!-- <td>{{ getFinalPrice(item.price) }}</td> -->
							<!-- 3 过滤器 -->
							<td>{{ item.price | getFinalPrice }}</td>
							<td>
								<button type="button" @click="increment(index)">+</button>
								{{ item.count }}
								<button type="button" @click="decrement(index)" :disabled="item.count <= 1">-</button>
							</td>
							<td>
								<button type="button" @click="removeHandel(index)">移出</button>
							</td>
						</tr>
					</tbody>
				</table>
				<h2>总价格:{{ totalPrice | getFinalPrice }}</h2>
			</div>
			<div v-else>
				<h2>购物车为空</h2>
			</div>

		</div>
		<script src="./node_modules/vue/dist/vue.js" type="text/javascript" charset="utf-8"></script>
		<script type="text/javascript">

		</script>
		<script type="text/javascript">
			new Vue({
				el: '#app',
				data() {
					return {
						books: [{
							id: 1,
							name: '《算法导论》',
							data: '2006-9',
							price: 85.00,
							count: 1
						}, {
							id: 2,
							name: '《计算机概论》',
							data: '2018-9',
							price: 35.00,
							count: 1
						}, {
							id: 3,
							name: '《网络技术与基础》',
							data: '2006-9',
							price: 84.00,
							count: 1
						}, {
							id: 4,
							name: '《编程珠玑》',
							data: '2008-9',
							price: 39.00,
							count: 1
						}, {
							id: 5,
							name: '《代码大全》',
							data: '2006-9',
							price: 85.00,
							count: 1
						}]
					}
				},
				computed: {
					totalPrice() {
						// 1 普通的for循环
						// let total = 0;
						// for (let i = 0; i < this.books.length; i++) {
						// 	total += this.books[i].price * this.books[i].count;
						// }
						// return total;

						// 2 es6中的for let in循环
						// let total = 0;
						// for (let i in this.books) {
						// 	// console.log(i);  i是数组的索引
						// 	total += this.books[i].price * this.books[i].count;
						// }
						// return total;

						// 3 es6中拿到数组中每一项的索引值
						// let total = 0;
						// for (let item of this.books) {
						// 	// item 是数组中每一项的值
						// 	// console.log(s);
						// 	total += item.price * item.count;
						// }
						// return total;

						// 高阶函数reduce
						return this.books.reduce(function(preVaule, book) {
							return preVaule + book.price * book.count;
						}, 0);
					}
				},
				methods: {
					// 保留小数  函数
					// getFinalPrice(price) {
					// 	return '¥' + price.toFixed(2)
					// }

					// 加法函数
					increment(index) {
						// console.log('increment',index);
						this.books[index].count++
					},
					// 减法函数
					decrement(index) {
						// console.log('decrement',index);
						this.books[index].count--
					},
					removeHandel(index) {
						this.books.splice(index, 1)
					}
				},
				// 过滤器
				filters: {
					getFinalPrice(price) {
						return '¥' + price.toFixed(2)
					}
				}
			})
		</script>
	</body>
</html>
高阶函数(filter,map,reduce)
- 去除所有小于100的数组
- 将所有小于100的数组转成: 全部乘以2
- 将所有new2Num的数字相加,得到最终的结果
普通js实现:
const num = [10, 20, 30, 40, 50, 200];
// 创建一个空数组
let newNum = [];
// 1 通过for循环将所有小于100的数据,添加到新数组中
for (let s of num) {
    if (s < 100) {
        newNum.push(s)
    }
}
// 创建一个空数组
let new2Num = [];
// 2 通过for循环遍历1中得到的小于100的数据,将1中的数组的每一项都乘以2
for (let n of newNum) {
	new2Num.push(n * 2);
}
console.log(new2Num);

// 3 遍历2中得到的数组,将数组中每项值相加
let total = 0;
for (let n of new2Num) {
	console.log(total += n);
}
通过高阶函数实现:
const num = [10, 20, 30, 40, 50, 200];
	// 高阶函数
	// 1 过滤
	// filter函数  必须返回一个布尔值
	// 当函数返回true时,函数内部会自动将这次回调的n加入到新的数组中
	// 当函数返回false时,函数内部会过滤掉不符合条件的n
	let newNum = num.filter(function(n) {
		// console.log(n); //filter函数会回调6次
		return n < 100;
	});
	console.log(newNum); //打印输出[10, 20, 30, 40, 50]

	// 2 map
	let new2Num = newNum.map(function(n) {
		return n * 2;
	});
	console.log(new2Num); //打印输出[20, 40, 60, 80, 100]

	// 3 reduce
	// 作用: 对数组中所有的值进行汇总
	// preVaule 上一次遍历返回的值
	// 第一次:preVaule: 0  n: 20
	// 第二次: preVaule: 第一次返回的值  n: 40
	let total = new2Num.reduce(function(preVaule, n) {
		return preVaule + n;
	}, 0);
	console.log(total);	// 打印输出300
简化高阶函数:
const num = [10, 20, 30, 40, 50, 200];
let total = num.filter(function(n) {
	return n < 100;
}).map(function() {
	return n * 2;
}).reduce(function(preVaule, n) {
	return preVaule + n;
}, 0);
console.log(total);
高阶函数和es6简化:
let total = num.filter(n => n < 100).map(n => n * 2).reduce((pre, n) => pre + n);
console.log(total);
v-mode(数据的双向绑定)
-
表单控件在实际开发中是非常常见的,特别是对于用户信息的提交,需要大量的表单
-
Vue中使用v-model指令来实现表单元素和数据的双向绑定
<div id="app">
	<input type="text" v-model="message" />
	<h2>{{ message }}</h2>

	<!-- v-model的实现原理 --><!-- v-on:input监听用户输入的事件 -->
	<!-- 1 v-bind绑定value属性 -->
	<!-- 2 v-on指令给当前元素绑定input事件 -->
	<input type="text" :value="name" @input="valueChange"/>
	<input type="text" :value="name" @input="name = $event.target.value"/>
	<h2>{{ name }}</h2>
</div>
<script src="./node_modules/vue/dist/vue.js" type="text/javascript" charset="utf-8"></script>
<script type="text/javascript">
	new Vue({
		el: '#app',
		data() {
			return {
				message: 'hello xiaochen',
				name: 'Heray'
			}
		},
		methods: {
			valueChange(event) {
				this.name = event.target.value;
			}
		}
	})
</script>
v-model:radio(单选框)
<div id="app">
	<label for="male">
		<!-- 单选按钮只能选择一个  添加name属性 或者 v-model属性-->
		<input type="radio" id="male" name="sex" value="男" v-model="sex">男
	</label>
	<label for="female">
		<input type="radio" id="female" name="sex" value="女" v-model="sex">女
	</label>
	<h2>你选择的性别是:{{ sex }}</h2>
</div>
<script src="./node_modules/vue/dist/vue.js" type="text/javascript" charset="utf-8"></script>
<script type="text/javascript">
	new Vue({
		el: '#app',
		data() {
			return {
				// 给sex添加值,让页面加载的时候默认选中男
				sex: '男'
			}
		}
	})
</script>
v-model:checkbox(复选框【单个复选框,多个复选框】)
<div id="app">
	<!-- 1 checkbox单选框 -->
	<label for="agreement">
		<input type="checkbox" id="agreement" v-model="isAgreement" />同意协议
	</label>
	<h2>你的选择是: {{ isAgreement }}</h2>
	<!-- 只有统一协议才能下一步,isAgreement为false时下一步按钮是禁用的状态 -->
	<button type="button" :disabled="!isAgreement">下一步</button>
	<hr />
	<input type="checkbox" value="篮球" v-model="hobbies">篮球
	<input type="checkbox" value="滑冰" v-model="hobbies">滑冰
	<input type="checkbox" value="街舞" v-model="hobbies">街舞
	<input type="checkbox" value="唱歌" v-model="hobbies">唱歌
	<input type="checkbox" value="滑板" v-model="hobbies">滑板
	<h2>你的爱好是:{{ hobbies }}</h2>
</div>
<script src="./node_modules/vue/dist/vue.js" type="text/javascript" charset="utf-8"></script>
<script type="text/javascript">
	new Vue({
		el: '#app',
		data() {
			return {
				// 单选框对应的是一个布尔值
				isAgreement: false,
				// 多选框对应的是一个数组
				hobbies: []
			}
		}
	})
</script>
v-model:select(一个,多个)
<div id="app">
	<!-- 1 选择一个 -->
	<select name="selected" v-model="fruit">
		<option value="苹果">苹果</option>
		<option value="香蕉">香蕉</option>
		<option value="梨子">梨子</option>
		<option value="樱桃">樱桃</option>
		<option value="草莓">草莓</option>
		<option value="车厘子">车厘子</option>
	</select>
	<h2>你喜欢的水果是:{{ fruit }}</h2>
	<hr />
	<!-- 2 选择多个 -->
	<select name="selected" v-model="fruits" multiple="multiple">
		<option value="苹果">苹果</option>
		<option value="香蕉">香蕉</option>
		<option value="梨子">梨子</option>
		<option value="樱桃">樱桃</option>
		<option value="草莓">草莓</option>
		<option value="车厘子">车厘子</option>
	</select>
	<h2>你喜欢的水果是:{{ fruits }}</h2>
</div>
<script src="./node_modules/vue/dist/vue.js" type="text/javascript" charset="utf-8"></script>
<script type="text/javascript">
	new Vue({
		el: '#app',
		data() {
			return {
				fruit:'草莓',
				fruits:[]
			}
		}
	})
</script>
值绑定
<div id="app">
	<label  v-for="(item, index) in hobbies" :for="index">
		<input type="checkbox"  :value="item" :id="index" v-model="hobbies">{{ item }}
	</label>
</div>
<script src="./node_modules/vue/dist/vue.js" type="text/javascript" charset="utf-8"></script>
<script type="text/javascript">
	new Vue({
		el: '#app',
		data() {
			return {
				hobbies: ['街舞', 'rapper', '滑板', '拉丁']
			}
		}
	})
</script>
修饰符
lazy修饰符:
- 默认情况下,v-model默认是在input时间中同步输入框的数据的
- 一般来说,就是一旦有数据发生改变对应的data中的数据就会自动发生改变
- lazy修饰符可以让数据在失去焦点或者回车时才会更新
number修饰符:
- 默认情况下,在输入框中无论我们输入的师叔祖还是字母,都会被当作字符串类型进行处理
- 但如果我们希望处理的是数字类型,那么最好直接将内容当作数字处理
- number修饰符可以让输入框中输入的内容自动转成数字类型
trim修饰符:
- 如果用户输入的内容首尾有跟多空格,通常我们希望去掉
- trim修饰符可以过滤内容左右两边的空格
<div id="app">
	<!-- 1 lazy修饰符 -->
	<!-- 在失去焦点和回车后更新绑定的数据 -->
	姓名:<input type="text" v-model.lazy="name"/>
	<h2>{{ name }}</h2>

	<!-- 2 number修饰符 -->
	<!-- 不管怎么输入,都只显示number类型的数据 -->
	<!-- <input type="number" v-model="age"/>输入的是数字,但是显示出来的数据是string类型的 -->
	年龄:<input type="text" v-model.number="age"/>
	<h2>{{ age }}-{{ typeof age }}</h2>

	<!-- 3 trim修饰符 -->
	<!-- 去除输入内容的前后空格 -->
	爱好:<input type="text" v-model.trim="hobby"/>
	<h2>{{ hobby }}</h2>
</div>
<script src="./node_modules/vue/dist/vue.js" type="text/javascript" charset="utf-8"></script>
<script type="text/javascript">
	new Vue({
		el: '#app',
		data() {
			return {
				name: 'xiaochen',
				age: 18,
				hobby: ''
			}
		}
	})
</script>
组件开发
什么组件化?
一个完成的页面分成很多个组件,每个组件都用于实现页面的一个功能块,每个组件又能进行细分
Vue组件化思想
- 它提供了一种抽象,让我们可以开发出一个个独立可复用的小组件来构造我们的应用
- 任何应用都会被抽象成一颗组件树
- 数据结构:数组/栈/堆/树结构
组件化思想的应用:
- 有了组件化的思想,我们在之后的开发中就要充分的利用它
- 尽可能的将页面拆分成一个个小的,可复用的组件
- 这样让我们的代码更加方便组织和管理,并且扩展性也更强
注册组件的基本步骤
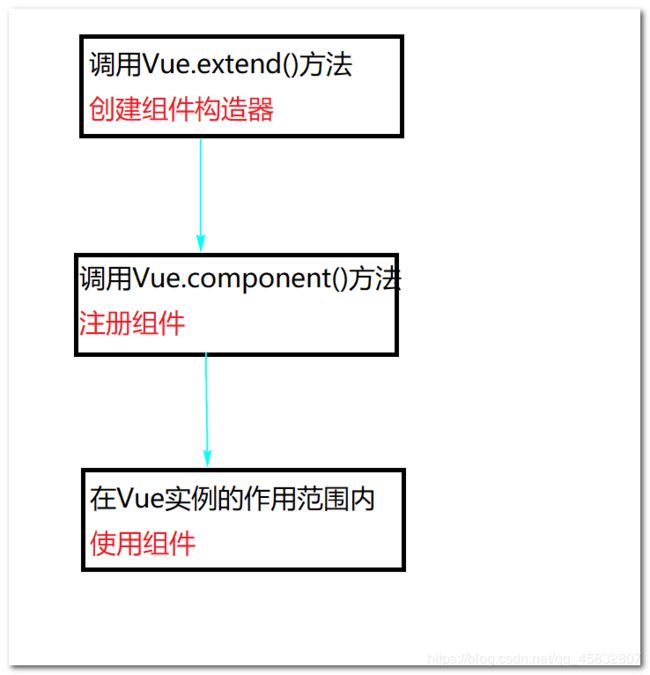
组件的使用分成三个步骤:
- 创建组件构造器
- 注册组件
- 使用组件
<div id="app">
	<!-- 3 使用组件 -->
	<my-info></my-info>
</div>
<script src="./node_modules/vue/dist/vue.js" type="text/javascript" charset="utf-8"></script>
<script type="text/javascript">
	// 1 创建组件构造器对象
	const cnp = Vue.extend({
		// 自定义组件的模板
        template: `

				标题
				内容
				尾部

		`
	})
	<!-- // 2 注册组件 -->
    //Vue.component('注册组件的标签名',组件构造器名)
	Vue.component('my-info',cnp)
	new Vue({
		el: '#app',
		data() {
			return {

			}
		}
	})
</script>
全局组件和局部组件
<div id="app">
	<!-- 3 使用全局组件 -->
	<my-info></my-info>
	<!-- 使用局部组件 -->
	<cpns></cpns>
</div>
<div id="app2">
	<!-- 使用全局组件 -->
	<my-info></my-info>
</div>
<script src="./node_modules/vue/dist/vue.js" type="text/javascript" charset="utf-8"></script>
<script type="text/javascript">
	// 1 创建组件构造器对象
	const cnp = Vue.extend({
		template: `

				标题
				内容
				尾部

		`
	})
	<!-- // 2 注册组件(全局组件,意味着可以在多个Vue的实力下面使用) -->
	Vue.component('my-info',cnp)
	new Vue({
		el: '#app',
		data() {
			return {

			}
		},
		<!-- 自定义局部组件,局部组件只能在挂载点范围之内使用 -->
		components: {
			<!-- cpns使用组件的标签名 -->
			cpns: cnp
		}
	})
	new Vue({
		el:'#app2'
	})
</script>
父组件和子组件
<div id="app">
<!-- <dad></dad> -->
<brother></brother>
</div>
<script src="./node_modules/vue/dist/vue.js" type="text/javascript" charset="utf-8"></script>
<script type="text/javascript">
// 第一个组件构造器
const dad = Vue.extend({
template:
`
头部
身体
脚部
`
})
<!-- // 第二个组件构造器 -->
const brother = Vue.extend({
template:
`
head
body
foot
注册组件的语法糖
<div id="app">
	<!-- 全局组件 -->
	<daD></daD>
	<!-- 局部组件 -->
	<cpn2></cpn2>
</div>
<script src="./node_modules/vue/dist/vue.js" type="text/javascript" charset="utf-8"></script>
<script type="text/javascript">
	// 注册全局组件
	const dad = Vue.component('dad', {
		template:
		`

				我是dad模板中全局组件的内容

		`
	});
	const app = new Vue({
		el: '#app',
		data() {
			return {

			}
		},
		components: {
			<!-- 注册局部组件 -->
			'cpn2': {
				template:
				 `

					我是dad模板中局部组件的内容

				`
			}
		}
	});
</script>
模板的分离写法
模板的分离写法:
<div id="app">
	<!-- 全局组件 -->
	<daD></daD>
	<!-- 局部组件 -->
	<cpn2></cpn2>
</div>

<!-- 1 通过script标签提取模板 -->
<!-- 注意类型必须是:text/x-template -->
<script type="text/x-template" id="dad">
	<div>
		<h2>我是dad模板中全局组件的内容</h2>
	</div>
</script>

<!-- 2 通过template标签 -->
<template id="cpn2">
	<div>
		<h2>我是dad模板中局部组件的内容</h2>
	</div>
</template>

<script src="./node_modules/vue/dist/vue.js" type="text/javascript" charset="utf-8"></script>
<script type="text/javascript">
	// 注册全局组件
	const dad = Vue.component('dad', {
		// 通过id引用模板
		template: `#dad`
	});
	const app = new Vue({
		el: '#app',
		data() {
			return {

			}
		},
		components: {
			<!-- 注册局部组件 -->
			'cpn2': {
				template:`#cpn2`
			}
		}
	});
</script>
组件可以访问Vue实例数据
- 组件是一个单独功能模块的封装:
- 这个模块有属于自己的HTML模板,也应该有属性自己的数据data
- 组件里面是不能访问vue实例里面的数据的。
组件数据的存放:
- 组件对象也有一个data属性(也可以有methods等属性)
- 只是这个data属性必须是一个函数
- 而且这个函数返回一个对象,对象内部保存着数据
<div id="app">
	<!-- 全局组件 -->
	<daD></daD>
	<!-- 局部组件 -->
	<cpn2></cpn2>
</div>

<!-- 1 通过script标签提取模板 -->
<!-- 注意类型必须是:text/x-template -->
<script type="text/x-template" id="dad">
	<div>
<h2>{{ message }}</h2>
</div>
</script>

<!-- 2 通过template标签 -->
<template id="cpn2">
	<div>
		<h2>{{ message }}</h2>
	</div>
</template>

<script src="./node_modules/vue/dist/vue.js" type="text/javascript" charset="utf-8"></script>
<script type="text/javascript">
	// 注册全局组件
	const dad = Vue.component('dad', {
		// 通过id引用模板
		template: `#dad`,
		data() {
			return {
				message: '我是dad模板中全局组件的内容'
			}
		}
	});
	const app = new Vue({
		el: '#app',
		data() {
			return {

			}
		},
		components: {
			<!-- 注册局部组件 -->
			'cpn2': {
				template: `#cpn2`,
				data() {
					return {
						message: '我是dad模板中局部组件的内容'
					}
				}
			}
		}
	});
</script>
组件中的数据存放为什么是一个函数(面试可能会问)
函数每次都会返回一个新的新的对象,产生不同的数据。
对象每次都作用在一个属性上,一个改变所有的都改变({}可能会相互影响)。
<div id="app">
	<cpn></cpn>
	<cpn></cpn>
</div>
<!-- 组件模板 -->
<template id="cpn">
	<div>
		<h2>当前计数:{{ num }}</h2>
		<button type="button" @click="increment">+</button>
		<button type="button" @click="decrement">-</button>
	</div>
</template>
<script src="./node_modules/vue/dist/vue.js" type="text/javascript" charset="utf-8"></script>
<script type="text/javascript">
	// 1 注册组件
	Vue.component('cpn', {
		template: `#cpn`,
		// data是一个函数,函数每次都会返回一个新的对象
		// 这样同时使用一个组件,点击一个组件,就不会改变其他组件的值

		// 如果data {} 返回的是一个对象,每次作用的都是一个同养的对象,一个改变其他的都改变
		// 使用{},会产生连锁反应
		data() {
			return {
				num: 0
			}
		},
		methods: {
			increment() {
				this.num++
			},
			decrement() {
				this.num--
			}
		}
	})
	const app = new Vue({
		el: '#app',
		data() {
			return {

			}
		}
	})
</script>
父子组件的通信
通信:相互交流,数据传递。在大组件(父组件)获取所有的后台数据,然后在传递给小组件(子组件),渲染到页面。
如何进行父子组件的通信?
- 通过props(是
properties属性的缩写)向子组件中传递数据 - 通过自定义事件向父组件发送消息
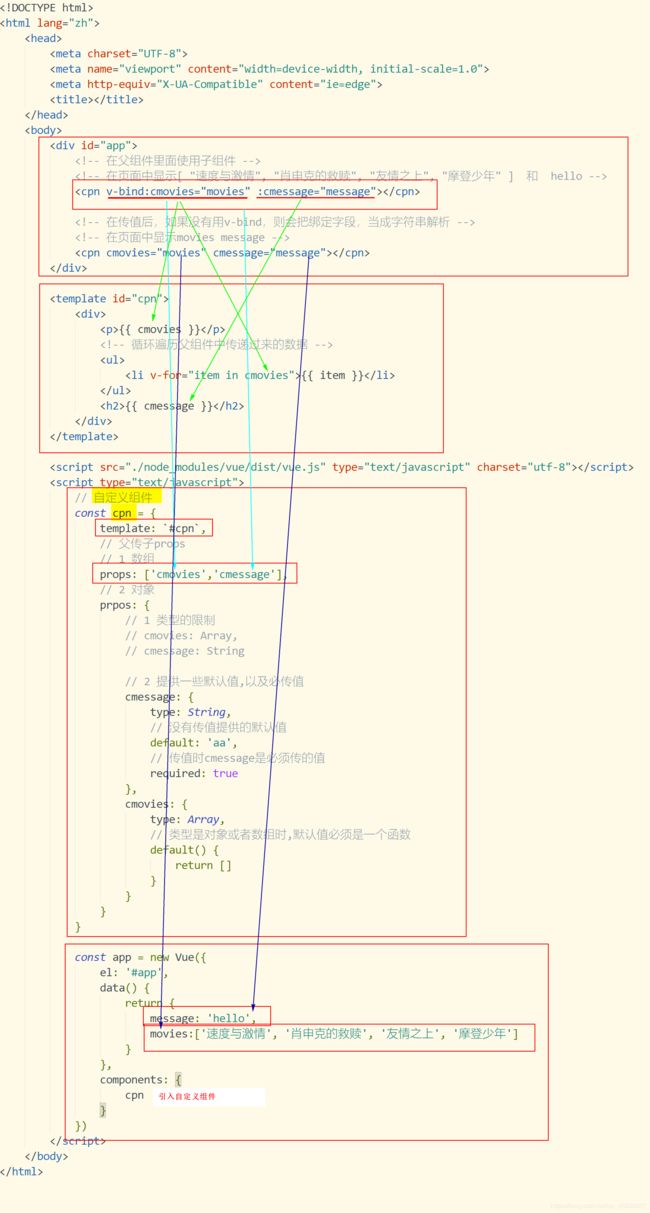
父传子props
<div id="app">
	<!-- 在父组件里面使用子组件 -->
	<!-- 在页面中显示[ "速度与激情", "肖申克的救赎", "友情之上", "摩登少年" ]  和  hello -->
	<cpn v-bind:cmovies="movies" :cmessage="message"></cpn>

	<!-- 在传值后,如果没有用v-bind,则会把绑定字段,当成字符串解析 -->
	<!-- 在页面中显示movies message -->
	<cpn cmovies="movies" cmessage="message"></cpn>
</div>

<template id="cpn">
	<div>
		<p>{{ cmovies }}</p>
		<!-- 循环遍历父组件中传递过来的数据 -->
		<ul>
			<li v-for="item in cmovies">{{ item }}</li>
		</ul>
		<h2>{{ cmessage }}</h2>
	</div>
</template>

<script src="./node_modules/vue/dist/vue.js" type="text/javascript" charset="utf-8"></script>
<script type="text/javascript">
	// 自定义组件
	const cpn = {
		template: `#cpn`,
		// 父传子props
		// 1 数组
		props: ['cmovies','cmessage'],
		// 2 对象
		prpos: {
			// 1 类型的限制
			// cmovies: Array,
			// cmessage: String

			// 2 提供一些默认值,以及必传值
			cmessage: {
				type: String,
				// 没有传值提供的默认值
				default: 'aa',
				// 传值时cmessage是必须传的值
				required: true
			},
			cmovies: {
				type: Array,
				// 类型是对象或者数组时,默认值必须是一个函数
				default() {
					return []
				}
			}
		}
	}

	const app = new Vue({
		el: '#app',
		data() {
			return {
				message: 'hello',
				movies:['速度与激情', '肖申克的救赎', '友情之上', '摩登少年']
			}
		},
		components: {
			cpn
		}
	})
</script>
props数据验证
验证支持的数据类型:
- String
- Number
- Boolean
- Array
- Object
- Date
- Function
- Symbol
- 自定义数据类型
Vue.component('my-component',{
    props: {
        //基础的类型检查(null,匹配任何数)
        propA: Number,
        //多个可能的类型
        propB: [String, Number],
        //必填的字符
        propC: {
            type: String,
            required: true
        },
        //带有默认值的数字
        propD: {
            type: Number,
            default: 100
        },
        // 带有默认值的对象
        propE: {
            type: Object,
            default() {
                // 返回一个默认值
                return { message:'hello' }
            }
        },
        // 自定义验证函数
        propF: {
            validator(value){
                //这个值必须匹配下列字符中的一个
                return ['success', 'warning', 'danger'].indexOf(value) !== -1
            }
        }
    }
})
自定义数据类型:
function Person(firstName, lastName){
    this.firstName = firstName
    this.lastName = lastName
}
Vue.component('blog-post', {
    props: {
        // 自定义数据类型
        author: Person
    }
})
props中的驼峰标识
在子组件中,props中的数据使用了驼峰命名,在父组件中使用必须去掉驼峰(遇到大写字母在前面加-分隔,然后将大写字母变成小写字母)
<div id="app">
	<!-- 子组件是在父组件中有使用的 -->
	<!-- 在子组件上绑定(v-bind)父组件传递过来的数据 -->
	<!-- v-bind不支持驼峰命名 -->
	<!-- <cpn :cinfo = "info"></cpn> -->

	<!-- props中绑定的数据是cInfo,使用了驼峰必须 -->
	<!-- 使用是必须将 cInfo  写成 c-info-->
	<!-- 遇到大写字母在前面加-,然后将其变成小写使用 -->
	<cpn :c-info = "info"></cpn>
</div>
<template id="cpn">
	<!-- 子组件的模板中有很多个标签,必须有一个跟标签将其包裹 -->
	<div>
		<!-- 使用父组件中传递过来的数据 -->
		<!-- <h2>{{ cinfo }}</h2> -->

		<!-- props中使用了驼峰 -->
		<!-- 在页面中显示 { "name": "萧辰", "age": 18, "hobbie": [ "街舞", "吉他", "滑板" ] } -->
		<h2>{{ cInfo }}</h2>
	</div>
</template>
<script src="./node_modules/vue/dist/vue.js" type="text/javascript" charset="utf-8"></script>
<script type="text/javascript">
	// 子组件
	const cpn = {
		template: `#cpn`,
		props: {
			// cinfo: {
			cInfo: {
				type:Object,
				default() {
					return {

					}
				}
			}
		}
	};
	// 父组件
	const app = new Vue({
		el: '#app',
		data() {
			return {
				info: {
					name: '萧辰',
					age: 18,
					hobbie: ['街舞', '吉他', '滑板']
				}
			}
		},
		components: {
			cpn
		}
	})
</script>
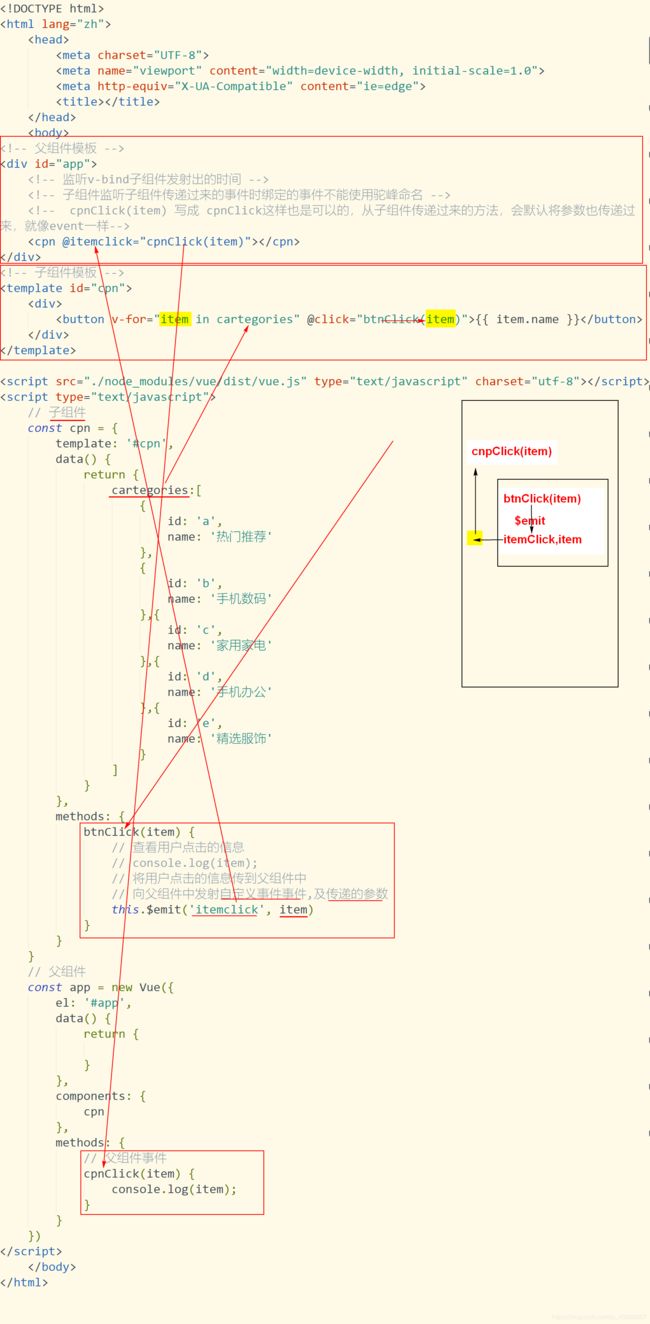
子组件向父组件中传递数据(自定义事件)
自定义事件的流程:
- 在子组件中,通过$emit()来触发时间
- 在父组件中,通过v-on来监听子组件事件
<!-- 父组件模板 -->
<div id="app">
	<!-- 监听v-bind子组件发射出的时间 -->
	<!-- 子组件监听子组件传递过来的事件时绑定的事件不能使用驼峰命名 -->
	<!--  cpnClick(item) 写成 cpnClick这样也是可以的,从子组件传递过来的方法,会默认将参数也传递过来,就像event一样-->
	<cpn @itemclick="cpnClick(item)"></cpn>
</div>
<!-- 子组件模板 -->
<template id="cpn">
	<div>
		<button v-for="item in cartegories" @click="btnClick(item)">{{ item.name }}</button>
	</div>
</template>

<script src="./node_modules/vue/dist/vue.js" type="text/javascript" charset="utf-8"></script>
<script type="text/javascript">
	// 子组件
	const cpn = {
		template: '#cpn',
		data() {
			return {
				cartegories:[
					{
						id: 'a',
						name: '热门推荐'
					},
					{
						id: 'b',
						name: '手机数码'
					},{
						id: 'c',
						name: '家用家电'
					},{
						id: 'd',
						name: '手机办公'
					},{
						id: 'e',
						name: '精选服饰'
					}
				]
			}
		},
		methods: {
			btnClick(item) {
				// 查看用户点击的信息
				// console.log(item);
				// 将用户点击的信息传到父组件中
				// 向父组件中发射自定义事件事件,及传递的参数
				this.$emit('itemclick', item)
			}
		}
	}
	// 父组件
	const app = new Vue({
		el: '#app',
		data() {
			return {

			}
		},
		components: {
			cpn
		},
		methods: {
			// 父组件事件
			cpnClick(item) {
				console.log(item);
			}
		}
	})
</script>
父子组件通信实例
<!DOCTYPE html>
<html lang="zh">
	<head>
		<meta charset="UTF-8">
		<meta name="viewport" content="width=device-width, initial-scale=1.0">
		<meta http-equiv="X-UA-Compatible" content="ie=edge">
		<title></title>
	</head>
	<body>
		<div id="app">
			<cpn :number1="num1" :number2="num2" @num1change="num1change" @num2change="num2change"></cpn>
		</div>
		<!-- 子组件模板 -->
		<template id="cpn">
			<div>
				<h2>props1:{{ number1 }}</h2>
				<h2>data:{{ cnumber1 }}</h2>
				<!-- <input type="text" v-model="cnumber1"/> -->
				<input type="text" :value="cnumber1" @input="num1Input" />
				<h2>props2:{{ number2 }}</h2>
				<h2>data:{{ cnumber2 }}</h2>
				<!-- <input type="text" v-model="cnumber2"/> -->
				<input type="text" :value="cnumber2" @input="num2Input" />
			</div>
		</template>
		<script src="./node_modules/vue/dist/vue.js" type="text/javascript" charset="utf-8"></script>
		<script type="text/javascript">
			const app = new Vue({
				el: '#app',
				data() {
					return {
						num1: 1,
						num2: 0
					}
				},
				methods: {
					num1change(value) {
						this.num1 = parseInt(value);
					},
					num2change(value) {
						this.num2 = parseInt(value);
					}
				},
				components: {
					cpn: {
						template: `#cpn`,
						props: {
							number1: Number,
							number2: Number
						},
						data() {
							return {
								cnumber1: this.number1,
								cnumber2: this.number2
							}
						},
						methods: {
							num1Input(event) {
								// 1 将input中的value赋值到cnumber1
								this.cnumber1 = event.target.value;

								// 2 为了让父组件可以修改值,发出一个事件
								this.$emit('num1change', this.cnumber1);

								// 3 同时修改cnumber2的值
								this.cnumber2 = this.cnumber1 * 100;
								this.$emit('num2change', this.cnumber2)
							},
							num2Input(event) {
								this.cnumber2 = event.target.value;
								this.$emit('num2change', this.cnumber2);

								// 3 同时修改cnumber2的值
								this.cnumber1 = this.cnumber2 / 100;
								this.$emit('num1change', this.cnumber1)
							}
						}
					}
				}
			})
		</script>
	</body>
</html>
父子组件的访问方式
父组件访问子组件 c h i l d r e n 或 children或 children或refs
-
$children 得到的是一个 数组
this.$children[].访问对象 -
$refs 得到的是一个 对象
this.$refs.添加ref的数值.访问对象 -
实例
<div id="app">
	<cpn></cpn>

	<cpn ref="aaa"></cpn>
	<button type="button" @click="btnClick">点我</button>
</div>
<template id="cpn">
	<div>
		我是子组件
	</div>
</template>
<script src="./node_modules/vue/dist/vue.js" type="text/javascript" charset="utf-8"></script>
<script type="text/javascript">
	new Vue({
		el: '#app',
		data() {
			return {

			}
		},
		methods: {
			btnClick() {
				// 1 通过$children去拿子组件中的值
				// // 拿到的子组件是一个数组类型的
				// // console.log(this.$children);
				// // 通过$children调用子组件的showMessage方法
				// // this.$children[0].showMessage();
				// // this.$children[0].name;
				// for (let c of this.$children) {
				// 	// 打印输出showMessage
				// 	c.showMessage();
				// 	// 打印输出xiaochen
				// 	console.log(c.name);
				// }

				// 2 通过$refs去拿子组件中的值
				// this.$refs默认是一个空对象
				console.log(this.$refs);
				// 要使用$refs取值,需要在标签上面添加ref属性,然后通过this.$refs.ref属性值拿值
				// 打印输出 showMessage
				this.$refs.aaa.showMessage();
				// 打印输出 xiaochen
				console.log(this.$refs.aaa.name);
			}
		},
		components: {
			cpn: {
				template: `#cpn`,
				data() {
					return {
						name: 'xiaochen'
					}
				},
				methods: {
					showMessage() {
						console.log('showMessage');
					}
				}
			}
		}
	})
</script>
子组件访问父组件 p a r e n t , parent, parent,root
-
$parent
this.$parent.访问父组件的属性 -
$root
// 访问根组件,Vue实例
this.$root
实例:
<div id="app">
	<cpn>
	</cpn>
</div>
<template id="cpn">
	<div>
		<h2>我是cpn组件</h2>
		<ccpn></ccpn>
	</div>
</template>
<template id="ccpn">
	<div>
		<h2>我是子组件</h2>
		<button @click="btnClick">按钮</button>
	</div>
</template>
<script src="./node_modules/vue/dist/vue.js" type="text/javascript" charset="utf-8"></script>
<script type="text/javascript">
	const app = new Vue({
		el: '#app',
		data() {
			return {

			}
		},
		components: {
			cpn: {
				template: `#cpn`,
				data() {
					return {
						name: '我是cpn组件的name'
					}
				},
				components: {
					ccpn: {
						template: `#ccpn`,
						methods: {
							btnClick() {
								// 1 访问父组件$parent
								// 打印出来是一个VueComponent对象
								console.log(this.$parent);
								// 打印输出 我是cpn组件的name
								console.log(this.$parent.name);

								// 2 访问根组件$root
								// 打印Vue 实例
								console.log(this.$root);
							}
						}
					}
				}
			}
		}
	})
</script>
插槽slot(组件化高级)
为什么使用组件的插槽:
- 为了让我们封装的组件更加具有扩展性
- 让使用者可以决定组件内部的一些内容到底展示什么
插槽的基本使用
使用slot插槽,占据位置,在使用的时候传入对应的值,然后传入的值自己会填补插槽占据的位置。
插槽的基本使用:
- 插槽的基本使用
- 插槽的默认值
- 如果有多个值,同时放入组件进行替换时,一起作为替换元素
<div id="app">
	<cpn></cpn>
	<hr />
	<cpn>
		<button type="button">点我</button>
	</cpn>
	<hr />
	<cpn><b>我是传入值</b></cpn>
</div>
<template id="cpn">
	<div>
		<h2>我是组件</h2>
		<slot></slot>
		<h5>content</h5>
		<!-- 给插槽添加一个默认值,调用的时候没有加别的参数,就使用默认值,有参数,就是用传递的值 -->
		<slot><button>我是插槽传递的默认值</button></slot>
	</div>
</template>
<script src="./node_modules/vue/dist/vue.js" type="text/javascript" charset="utf-8"></script>
<script type="text/javascript">
	const app = new Vue({
		el: '#app',
		data() {
			return {

			}
		},
		components: {
			cpn: {
				template: `#cpn`
			}
		}
	})
</script>
如何封装插槽
抽取共性,保留不同。
- 最好的方式就是将共性抽取到组件中,将不同暴露为插槽
- 一旦预留了插槽,就可以让使用者根据自己的需求,决定插槽中插入什么内容
- 是搜索框,还是文字,还是菜单,由调用者自己来决定
具名插槽
给插槽设置name值,然后使用的使用根据solt等于的name值进行替换。
<div id="app">
	<cpn>
		<!-- 替换name为center插槽 -->
		<h1 slot="center">标题</h1>
	</cpn>
</div>
<template id="cpn">
	<div>
		<slot name="left">
			<h2>我是左边插槽</h2>
		</slot>
		<slot name="center">
			<h2>我是中间插槽</h2>
		</slot>
		<slot name="right">
			<h2>我是右边插槽</h2>
		</slot>
	</div>
</template>
<script src="./node_modules/vue/dist/vue.js" type="text/javascript" charset="utf-8"></script>
<script type="text/javascript">
	const app = new Vue({
		el: '#app',
		data() {
			return {

			}
		},
		components: {
			cpn: {
				template: `#cpn`
			}
		}
	})
</script>
编译的作用域
父模板的所有东西都会在父级作用域内编译,子组件模板的所有东西都会在自己作用域内编译。
<div id="app">
	<!-- 这个是根据实例里面的isShow来决定的 -->
	<!-- 命令使用时不关心组件的位置,只关心作用域 -->
	<!-- 显示  app的data中的isShow是true -->
	<cpn v-show="isShow"></cpn>
</div>
<template id="cpn">
	<div>
		<h2>我是子组件</h2>
		<!-- 不显示 -->
		<!-- cpn组件中的isShow是false -->
		<button v-show="isShow"></button>
	</div>
</template>
<script src="./node_modules/vue/dist/vue.js" type="text/javascript" charset="utf-8"></script>
<script type="text/javascript">
	const app = new Vue({
		el: '#app',
		data() {
			return {
				isShow: true
			}
		},
		components: {
			cpn: {
				template: `#cpn`,
				data() {
					return {
						isShow: false
					}
				}
			}
		}
	})
</script>
作用域插槽
作用域插槽的目的就是:
父组件替换插槽的标签,但是内容由子组件来提供。
实例:
-
子组件中包括一组数据,比如:pLanguages[‘Javascript’, ‘Python’, ‘Swift’, ‘Go’, ‘C++’]
-
需要在多个界面进行展示:
- 某些界面是以水平方向——展示的
- 某些界面是以列表形式展示的
- 某些界面直接展示——一个数组
-
内容在子组件,希望父组件告诉我们如何展示?
- 利用slot插槽就可以了
<div id="app">
	<!-- 子组件默认展示 -->
	<cpn></cpn>

	<!-- 拿到子组件中的数据,然后在父组件中展示成不同的样式  -->
	<!-- 目的:获取子组件中的pLanguages -->
	<cpn>
		<template slot-scope="slot">
			<!-- 通过slot引用插槽对象 -->
			<!-- 通过slot.data     拿到的就是  子组件中传递的:data="pLanguages" -->
			<span v-for="item in slot.data">{{item}}  -</span>
			<div>{{ slot.data.join(' - ')}}</div>
		</template>
	</cpn>
</div>
<template id="cpn">
	<div>
		<!-- 这里data可以为任何值  -->
		<slot :data="pLanguages">
			<ul>
				<!-- 子组件展示 -->
				<li v-for="item in pLanguages">{{ item }}</li>
			</ul>
		</slot>
	</div>
</template>
<script src="./node_modules/vue/dist/vue.js" type="text/javascript" charset="utf-8"></script>
<script type="text/javascript">
	const app = new Vue({
		el: '#app',
		data() {
			return {
				isShow: true
			}
		},
		components: {
			cpn: {
				template: `#cpn`,
				data() {
					return {
						pLanguages: ['Javascript', 'Python', 'Swift', 'Go', 'C++']
					}
				}
			}
		}
	})
</script>
模块化开发
js原始功能:
- 做表单验证活动话
- 随着ajax的出现,前后端开始分离,为了应对代码量的与日俱增,将js分成多个js文件来编辑
- 但这种方式依然不能避免一些灾难性问题:
- 全局变量同名
- js文件过多,执行顺序的问题
- 解决:使用闭包()() ————》代码不可复用
- 将每一个js文件封装成一个闭包,在闭包中通过创建空对象,将使用的值存入空对象中,然后return回去
- 在别的js文件使用的时候,通过封装的闭包名.要使用的对象
常见的模块化规范:
CommonJS,AMD,CMD,也有ES6中的Modules
CommonJS只是一个规范,CommonJS的实现是node.js。
CommonJS
模块化的两个核心:导出(export)和导入(require)
CommonJS的导出:
moule.export = {
	name: 'xiaochen',
	doit(a, b) {
		return a + b;
	}
}
CommonJS的导入:
//CommonJS模块
let { name,doit } = require('moduleA');

//等同于
let m = require('moduleA');
let name = m.name;
...
ES6的模块化实现
export
export指令用于导出变量:
export let name = 'xiaochen'
export let age = 18
export let dream = 'free'
也可以:
let name = 'xiaochen'
let age = 18
let dream = 'free'

export {
	name, age, dream
}
导出函数和类:
export function sum(a, b) {
    return a + b;
}

export class Person {
    run() {
        console.log('想上学的第一天');
    }
}

import {sum, Person} from './a.js'
// 实例化类
const p = new Person();
// 调用类里面的函数
p.run();
export default:
某些情况下,一个模块包含某个功能,我们并不希望给这个功能命名,而且让导入这自己来命名
- 这个时候就可以使用
export default - 注意:export default 在同一个模块中,不允许同时存在多个
const time = '二零二零年四月七日'

// 1
export { time }
// 2
export const time = '二零二零年四月七日'
//要使用上面的数据
import {time} from 'a.js'

// 在一个js中文件中,只能有一个default导出
export default time
import t from 'a.js'
import
export指令导出了模块对外提供的接口后,我们就可以通过import命令来加载这个对应的模块了
-
首先我们需要在HTML代码中引入两个js文件,并且类型需要设置module
<script src = "info.js" type = "module"></script> <script src = "main.js" type = "module"></script> -
import指令用于导入模块内容,比如mian.js的代码
import {name, age, sex} from './info.js' console.log(name, age, sex); -
统一全部导入
import * as info from './info.js'
console.log(info.name);
webpack
认识webpack
什么是webpack?
官网:webpack.js.org
从本质上将,webpack是一个现代的JavaScript应用的静态模块打包工具。
- 静态
- 打包
和grunt/gulp的对比
- grunt/gulp的核心是Task
- 我们可以配置一系列的task,并且定义task要处理的事物(例如ES6,ts转换,图片的压缩,scss转化成css)
- 之后让grunt/gulp来依次执行这些task,而且让它流程自动化
- grunt/gulp也被称为前端自动化任务管理工具
- 什么时候用到grunt/gulp
- 如果工程模块依赖非常简单,甚至是没有用到模块化的概念
- 只要进行简单的合并,压缩,就使用grunt/gulp即可
- 但是如果整个项目使用了模块化管理,而且相互依赖非常强,我们就可以使用更加强大的webpack
- gulp和webpack的区别
- grunt/gulp更加强调的是前端流程的自动化,模块化不是它的核心
- webpack更加强调模块化开发管理,而文件压缩合并,预处理功能,是他附带的功能
webpack的安装
- webpack是基于node.js的
- node为了可以正常的运行执行很多代码面必须其中包含很多包
- 在安装node时,会自动安装npm(node package manager)
查看node版本:
node -v
全局安装webpack(这里我们先制定版本号3.6.0,因为vue cli2依赖该版本):
-
查看电脑中有没有安装过webpack
webpack --version 或者 webpack -v -
没有 安装
全局安装webpack:
npm install webpack@3.6.0 -g本地安装webpack:
--save-dev是开发时依赖【devDependencies】,项目打包后不需要继续使用npm install webpack@3.6.0 --save-dev
webpack的起步
文档解释:
| dist文件 | distribution(发布) |
|---|---|
| 文件 | 解释 |
| src文件 | 主要文件,一般项目的文件都写在src这个文件夹里面 |
打包:
// webpack  打包文件main.js的路径   打包成dist下面的bundle.js文件
// webpack在打包的时候会自动处理依赖文件
// 所以只需要打包入口文件就好了
webpack ./src/main.js ./dist/bundle.js
webpack的配置
配置webpack让项目在运行的时候,直接webpack就可以运行项目,不需要webpack ./src/main.js ./dist/bundle.js这样运行
步骤:
-
在项目文件中创建
webpack.config.js文件 -
给webpack.config.js添加配置
// path 依赖了node中的path包,所以要安装node中的所有依赖项 // npm init --yes 安装所有依赖包 // 就会去全局找path cost path = require('path'); module.exports = { // 入口 entry: './src/main/.js', // 出口 output: { // 路径 path 是绝对路径 // 动态获取路径 path: path.resolve(__dirname, 'dist'), // 文件名 bundle 打包 filename: 'bundle.js' } } -
pacjage.json中自定义启动
为了在命令行工具中能够 通过 npm run build 运行项目,在package.json文件的script脚本中添加依赖项
让我们在执行
npm run build命令的时候来package.json文件中找到webpack当在命令行工具中执行npm run build的时候相当于执行webpack命令,运行的时候num run build会先去查找本地的webpack,这样防止因webpack版本的问题而引发错误
"build": "webpack"通过
npm run build打包后的文件是全局的
loader的使用
-
loader是webpack中一个非常核心的概念
-
webpack用来做什么呢?
- 在我们之前的实例中,我们主要是用webpack来处理我们写的js代码,并且webpack会自动处理js之间相关的依赖
- 但是,在开发中我们不仅仅有基本的js代码处理,我们也需要加载css,图片,也包括一些高级的将ES6转成ES5的代码,将scss,less转成css,将.jsx,vue文件转成js文件等等。
- 对于webpack本身的能力来说,对于这些转化是不支持的
- 那怎么办呢?给webpack扩展对应的loader就可以了。
-
loader使用过程:
-
步骤一:通过npm安装需要使用的loader
-
css-loader
npm install --save-dev css-loader -
style-loader
npm install --save-dev style-loader
-
-
步骤二:在webpack.config.js中的modules关键字下进行配置
在module中css-loader只负责将css文件进行加载,style-loader将样式添加到DOM中
使用多个loader时,是从右向左
module: { rules: [ { test: /\.css$/ use: ['style-loader', 'css-loader'] } ] } -
步骤三:配置,也就是再次打包,npm run build
-
less文件处理–准备
要想使用less文件更改样式要安装less-loader:
npm install --save-dev less-loader less
在webpack.config.js文件中配置less:
// webpack.config.js
module.exports = {
    ...
    module: {
        rules: [{
            test: /\.less$/,
            use: [{
                loader: "style-loader" // creates style nodes from JS strings
            }, {
                loader: "css-loader" // translates CSS into CommonJS
            }, {
                loader: "less-loader" // compiles Less to CSS
            }]
        }]
    }
};
图片配置
下载url-loader:
npm install --save-dev url-loader
配置url-loader:
module.exports = {
  module: {
    rules: [
      {
        test: /\.(png|jpg|gif)$/,
        use: [
          {
            loader: 'url-loader',
            options: {
              // 当加载的图片,小于limit时,会将图片编译成base64字符串形式
              // 当加载的图片,大于limit时,会使用file-loader模块进行加载,通过webpack打包后会编译成base64字符串的形式
              limit: 8192	// 8192 8kb

              // 打包后webpack自动帮我们生成一个非常长的名字,但真是开发中,我们可能对打包图片的名字有一定的要求,比图将所有的图片放在一个文件夹中,跟图片原来的名称,同时也要防止重复
               // [name]:图片原来的名字   [hash:8]:哈希值保留8位  [ext]:图片的扩展名
               name: 'img/[name].[hash:8].[ext]'
            }
          }
        ]
      }
    ]
  }
}
安装file-loader:
npm install --save-dev file-loader
安装后,文档中使用的图片是打包后dist文件夹中的图片,
在webpack.config.js文件配置图片使用的路径:
在output中加入publicPath
output: {
    publicPath: 'dist/'
}
ES6语法处理
ES6的语法直接转成ES5,需要使用babel。
在webpack中直接使用babel对应的loader就可以了。
安装:
npm install --save-dev babel-loader@7 babel-core babel-preset-es2015
配置webpack.config.js文件:
env:environment环境的缩写。
module: {
  rules: [
    {
      test: /\.js$/,
      // exclude:排除
      // include:包含
      exclude: /(node_modules|bower_components)/,
      use: {
        loader: 'babel-loader',
        options: {
          presets: ['es2015']
        }
      }
    }
  ]
}
webpack中配置Vue
-
在项目中使用vue.js进行开发,那么必须对其有依赖,所以我们先要进行安装:
--save dev是开发时依赖,因为我们后续是在实际项目中使用vue的,所以并不是开发时依赖,使用--savenpm install vue --save // 简写 npm install vue -S -
使用vue进行开发
// 导入vue import Vue from 'vue' //使用 new Vue({ el: '#app', ... }) -
vue在发布的时候,发布了两个版本
-
runtime-only
- 代码中,不可以有任何的template
-
runtime-complier
- 代码中,可以有template,因为有complier可以用于编译template
-
要解决这个问题,只需要在webpack.config.js中配置
resolve: {
    // 文件引入时省略后缀名配置
    extensions: ['.js', '.css', '.vue'],
    // alias 别名
    alias: {
        // 如果导入vue后,去vue文件中去找vue.esm.js文件,这个文件中包含了complier
        'vue$':'vue/dist/vue.esm.js'
    }
}
-
el和template的区别,及vue文件的封装
-
template在解析的时候会替换el,再去修改html中的代码
-
但是如果将所有替换的代码都写在template里面,看着就很感觉很复杂,我们可以将template中的信息提取成一个组件
// ------------------------------2.app.js文件------------------------------------ // App对象中的代码可以封装到一个app.js文件里面 export default { template: `....`, data() { return { } } ... // 将所有的内容抽取到一个组件里面使用 } // -----------------------------3.创建App.vue文件-------------------------------- //让模板于组件分离 <template> <div> .... </div> </template> <script> export default { name: "App", data() { return { } } ... } </script> <style> //样式 </style> // ------------------------------1.main.js文件------------------------------------ //const App = { // template: // ` //// .... //// `, // data() { // return { // } // } // ... // 将所有的内容抽取到一个组件里面使用 //} // 引入App组件内容 //import App from './vue/app' import App from './vue/App.vue' new Vue({ el: '#app', template: '', components: { App // 在组件里面注册App } }) 但是在编译过程中不能识别App.vue文件,所以我们需要对vue文件进行一个封装,就要使用
vue-loader和vue-template-complier安装:
vue-loader让vue文件进行一个加载,vue-template-complier 对vue文件进行编译
npm install vue-loader vue-template-complier --save-dev配置:
{
    test: /\.vue$/,
    use: ['vue-loader']
}
因为vue-loader版本的原因,可能会报错,说
vue-loader was used without the corresponding plugin,在package.json文件中将vue-loader的版本改成^13.0.0(13到14版本之间),然后在命令行工具中执行npm install重新安装一下
plugin
- plugin是什么?
- plugin是插件的意思,通常是用于对某个现有的框架的进行扩展
- webpack中的插件,就是对webpack现有功能的各种扩展,比如打包优化,文件压缩等。
- loader和plugin的区别:
- loader主要用于转换某些类型的模块,它是一个转换器
- plugin是插件,它是对webpack本身的一个扩展,是一个扩展器。
- plugin的使用过程:
- 通过npm安装需要使用的plugins(某些webpack已经内置的插件不需要安装)
- 在webpack.config.js中的plugins中配置插件
添加版权的plugin
BannerPlugin,属于webpack自带的插件。
修改webpack.config.js的文件:
const path = require('path');
//导入webpack
const webpack = require('webpack');

modeule.exports = {
   ...
   plugins: [
        new webpack.BannerPlugin('最终版权归aaa所有')
   ]
}
重新打包:
npm run build/webpack
打包html的plugin
-
目前,我们的index.html页面存放在项目的根目录下
- 在真实发布项目的时候,发布的是dist文件夹中的内容,但是dist文件夹中如果没有index.html文件,那么打包的js文件也就没有意义了
- 所以我们需要将index.html文件打包到dist文件夹中,这个时候就可以使用HtmlWebpackPlugin插件
-
HtmlWebpackPlugin插件可以:
- 自动生成一个index.html文件(可以指定模板来生成)
- 将打包的js文件,自动通过script标签插入到body中
-
安装HtmlWebpackPlugin插件
npm install html-webpack-plugin --save-dev -
使用插件,修改webpack.config.js文件中plugins部分的内容
-
这里的template表示根据什么模板来生成index.html
-
另外我们需要删除之前在output中添加的publicPath属性
-
否则插入的script标签中的src可能会有问题
const path = require('path');
//导入webpack
const webpack = require('webpack');
// 导入HtmlWebpackPlugin插件
const HtmlWebpackPlugin = require('html-webpack-plugin');

modeule.exports = {
   ...
   plugins: [
        new webpack.BannerPlugin('最终版权归aaa所有'),
       	// 这样使用之后,就会在文件中的dist文件夹下面生成index.html文件
        new HtmlWebpackPlugin({
            // 让template根据index.html文件来生成index.html
            template: 'index.html'
        })
   ]
}
-
js压缩的Plugin
-
在项目发布之前,我们必须要对js等文件进行压缩处理
-
对js文件进行压缩,使用的是第三方插件
unlifyjs-webpack-plugin,并且版本号指定1.1.1,和cli2保持一致npm install uglifyjs-webpack-plugin@1.1.1 --save-dev
-
-
修改webpack.config.js文件,使用插件:
const path = require('path'); //导入webpack const webpack = require('webpack'); // 导入unlifyjs-webpack-plugin插件 // 在开发阶段不建议使用uglifyJsPlugin插件,代码在修改后不宜调试 const uglifyJsPlugin = require('unlifyjs-webpack-plugin'); module.exports = { ... plugins: [ new webpack.BannerPlugin('最终版权归aaa所有'), new uglifyJsPlugin() ] } -
查看打包后的bunlde.js文件,最后已经被压缩过了
搭建本地服务器
-
webpack提供了一个可选的本地服务器,这个本地服务器基于node.js搭建,内部使用express框架,可实现浏览器自动刷新显示修改后的结果。
-
不过它是一个单独的模块,在webpack中使用之前需要先安装
npm install --save-dev webpack-dev-server@2.9.1 -
devserver也是作为webpack中的一个选项,选项本身可以设置以下属性:
- contentBase:为那个文件提供本地服务,默认是根文件夹,我们这里要填写./dist
- port: 端口号
- inline:页面实时刷新
- historyApiFallback:在SPA页面中,依赖HTML5的history模式
-
webpack.config.js文件配置修改:
devServer: { contentBase: './dist', inline: true } -
我们还可以配置package.json中的script:
-
–open参数标识直接打开浏览器
"build": "webpack"
"dev": "webpack-dev-server --open"
-
配置完成后运行:
在命令窗口通过npm run dev运行
配置(webpack.config.js)结构分离
将开发时依赖和发布时依赖分离。
-
在主文件夹下创建build文件夹,在build文件夹下面创建
base.config.js(公共),prod.config.js(开发时依赖包)和dev.config.js(运行时依赖) -
安装
webpack-merge,将分离的文件进行合并npm install webpack-merge --save-dev -
使用
base.config.js中:
const path = require('path');
//导入webpack
const webpack = require('webpack');

modeule.exports = {
	// 入口
	entry: './src/main/.js',
	// 出口
	output: {
		// 路径  path  是绝对路径
		// 动态获取路径
		path: path.resolve(__dirname, 'dist'),
		// 文件名   bundle  打包
		filename: 'bundle.js'
	},
	module: {
		rules: [{
			test: /\.css$/
			use: ['style-loader', 'css-loader']
		}]
	},
	plugins: [
		new webpack.BannerPlugin('最终版权归aaa所有')
		new HtmlWebpackPlugin({
			// 让template根据index.html文件来生成index.html
			template: 'index.html'
		})
	]
}
prod.config.js中:
const uglifyJsPlugin = require('unlifyjs-webpack-plugin');

// 导入webpack-merge
const webpackMerage = require('webpack-merge');

//拿到baseConfig
const baseConfig = require('./base.config');

//将config文件合并导出
module.exports = webpackMerage(baseConfig, {
   ...
   plugins: [
        new webpack.BannerPlugin('最终版权归aaa所有'),
       	new uglifyJsPlugin()
   ]
})
dev.config.js中:
// 导入webpack-merge
const webpackMerage = require('webpack-merge');

//拿到baseConfig
const baseConfig = require('./base.config');

module.exports = webpackMerage(baseConfig,{
    devServer: {
    	contentBase: './dist',
    	inline: true
	}
})
最后在使用时候,将package.json文件中的build改为:
更改一下config的指向:
"build": "webpack --config ./build/prod.config.js",
"dev": "webpack-dev-server --open --config ./build/dev.config.js"
然后使用:
run run dev但是这样打包后的文件在build文件下面生成的dist文件夹里面,为了解决这个问题,就将base.config.js文件中output下的path改为:
path: path.resolve(__dirname, '../dist')
Vue cli脚手架详解
什么是Vue CLI
- CLI是Command-Line Interface,翻译为命令行界面,俗称脚手架
- Vue CLI是官方发布的vue.js项目脚手架
- 使用vue-cli可以快速搭建Vue开发环境及对应的webpack配置
Vue CLI使用前提-Node
脚手架应用于webpack,webpack基于node。
Vue CLI的使用
-
安装Vue脚手架,-g(global:全局的)
npm install -g @vue/cli -
注意:上面安装的是Vue CLI3的版本,如果需要想按照Vue CLI2的方式初始化项目是不可以的。
安装Vue CLI2:
npm install -g @vue/cli-init -
安装完成后,查看是否安装成功:
vue --version -
Vue CLI2初始化项目:
- vue init webpack my-project(项目名称)
-
Vue CLI3初始化项目
-
vue create my-project
chrome中的 v8引擎(使用c++实现,v8是开源的),将js代码直接编译成二进制代码,在浏览器中执行
js -》 浏览器
js -》字节码 -》浏览器
-
视频材料链接: https://pan.baidu.com/s/1dxV3TSKpHoFhZo-oM3stFg
提取码: epuk
