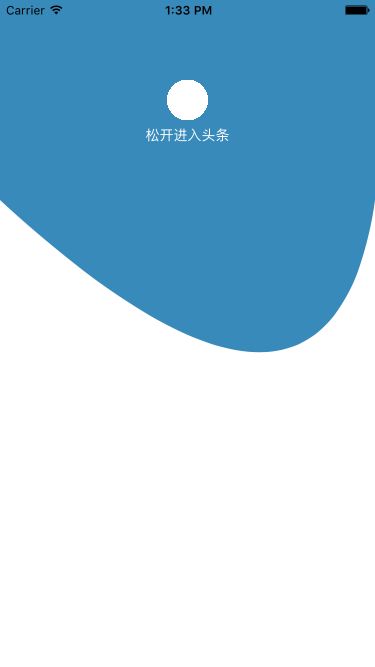
效果
实现思路
蓝色部分图形是一个CAShapeLayer,他的形状由UIBezierPath的路径组成的。
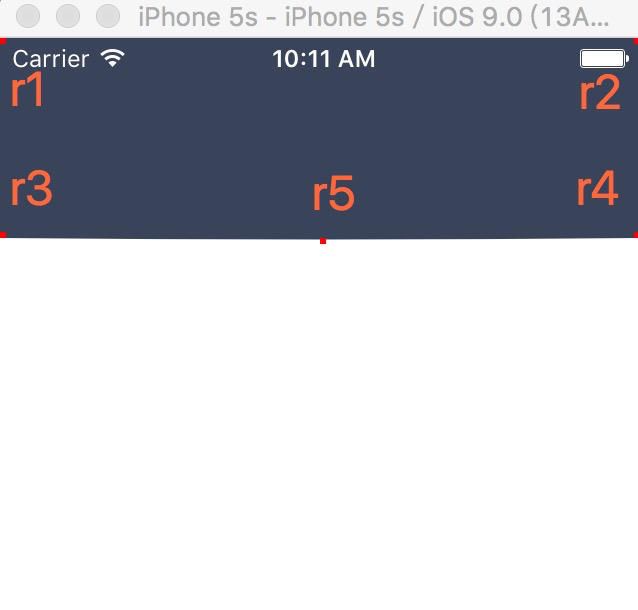
这个路径是由r1,r2,r3,r4,r5这5个红点确定的。其中r1,r2,r3,r4都是不动点,唯一可以动的是r5点。
根据上面的动态图可以看出,CAShapeLayer的形状是随着r5红点的移动而相应变化的,所以只要获得r5的坐标变化就可以用UIBezierPath做出相应的路径,然后就可以形成相应的形状。
代码
-
初始化CAShapeLayer
-(void)configShapeLayer
{
    //可变的shapeLayer
    _shapeLayer = [CAShapeLayer layer];
    _shapeLayer.fillColor = [UIColor colorWithRed:0.22 green:0.54 blue:0.73 alpha:1].CGColor;
    [self.layer addSublayer:_shapeLayer];

    //底部的圆形shapeLayer 开始时候是被遮挡住的

    _circleLayer = [CAShapeLayer layer];
    _circleLayer.fillColor = [UIColor whiteColor].CGColor;
    [self.layer addSublayer:_circleLayer];

   //顶部的圆形shapeLayer 用于遮挡底部
    _moveCircleLayer = [CAShapeLayer layer];
    _moveCircleLayer.fillColor = [UIColor colorWithRed:0.22 green:0.54 blue:0.73 alpha:1].CGColor;
    [self.layer addSublayer:_moveCircleLayer];

    //提示语
    _promptLabel = [[UILabel alloc] init];
    _promptLabel.text = @"松开进入头条";
    _promptLabel.frame = CGRectMake(0, MIN_HEIGHT/2+20, kWidth, 30);
    _promptLabel.textAlignment = NSTextAlignmentCenter;
    _promptLabel.font = [UIFont systemFontOfSize:14];
    _promptLabel.textColor = [UIColor whiteColor];
    _promptLabel.alpha = 0;
    [self addSubview:_promptLabel];

}
-
初始化r5点
-(void)configCurveView
{
    //可变化的点
    _curveX = kWidth/2.0;
    _curveY = MIN_HEIGHT;
    _curveView = [[UIView alloc] initWithFrame:CGRectMake(_curveX, _curveY, 0, 0)];
    [self addSubview:_curveView];

}
-
添加手势 & 计时器(CADisplayLink)
-(void)configAction
{

    _mHeight = 100;          //手势移动时相对高度
    _isAnimating = NO;       //是否处于动效状态
    _circleY = 0;


    //添加手势

    UIPanGestureRecognizer *pan = [[UIPanGestureRecognizer alloc] initWithTarget:self action:@selector(movePanAction:)];
    self.userInteractionEnabled = YES;
    [self addGestureRecognizer:pan];


    //CADisplayLink默认每秒运行60次 calculatePath计算出运行期间_curveView的坐标 ,从而确定_shaperLayer的形状
    //类似于NsTimer 简介 http://www.jianshu.com/p/72fedadf92e3
    _displayLink = [CADisplayLink displayLinkWithTarget:self selector:@selector(calculatePath)];
    [_displayLink addToRunLoop:[NSRunLoop currentRunLoop] forMode:NSDefaultRunLoopMode];
    _displayLink.paused = YES;

}
-
手势解析
- 手势移动时,r5点跟着手势移动,_shapeLayer根据r5的坐标来扩大自己的区域
- 手势结束时, r5通过UIView的动画方法来改变r5的坐标,同时_shapeLayer根据r5的坐标 缩小自己的区域 并最终返回原型
-(void)movePanAction:(UIPanGestureRecognizer *)pan
{
    if (!_isAnimating) {

        if (pan.state == UIGestureRecognizerStateChanged) {
            //手势移动时 _shapeLayer 跟着手势向下扩大区域

            CGPoint point = [pan translationInView:self];//在指定的坐标系下移动
            //这部分代码使 可以移动的点 随着手势走
            _mHeight = point.y + MIN_HEIGHT;
            _curveX = kWidth / 2.0 + point.x;
            _curveY = _mHeight > MIN_HEIGHT ? _mHeight : MIN_HEIGHT;
            _curveView.frame = CGRectMake(_curveX, _curveY, _curveView.frame.size.width, _curveView.frame.size.height);

            //设置圆弧的显示
            if (_mHeight >= MIN_HEIGHT && _mHeight < 1.5 * MIN_HEIGHT) {
                _circleY = (float)point.y * 2 / MIN_HEIGHT * 40;
                _promptLabel.alpha = (float)point.y * 2 / MIN_HEIGHT;
            }
            else if (_mHeight >= 1.5 * MIN_HEIGHT)
            {
                _circleY = 40;
                _promptLabel.alpha = 1.0;
            }
            //根据r5 的坐标,更新_shapeLayer形状
            [self updateShaperLayerPath];
        }
        else if (pan.state == UIGestureRecognizerStateCancelled || pan.state == UIGestureRecognizerStateEnded || pan.state == UIGestureRecognizerStateFailed){

            //手势结束时,_shaperLayer 返回原状并产生弹簧动效
            _isAnimating = YES;
            _displayLink.paused = NO; //开启displayLink ,会执行方法calculatePath
            //弹簧动效
            [UIView animateWithDuration:1.0 delay:0.0 usingSpringWithDamping:0.5 initialSpringVelocity:0 options:UIViewAnimationOptionCurveEaseOut animations:^{
                //曲线点(r5点)是一个view ,所以在block中有弹簧的效果.然后根据她的动态路径,在calculatepath 中计算弹性图形的形状
                _curveView.frame = CGRectMake(kWidth/2.0, MIN_HEIGHT, 3, 3);
                _circleY = 0;
                _promptLabel.alpha = 0;
            } completion:^(BOOL finished) {
                if (finished) {
                    _displayLink.paused = YES;
                    _isAnimating = NO;
                }
            }];

        }

    }
}
-
根据r5的位置,更新_shapeLayer的形状
-(void)updateShaperLayerPath
{
    UIBezierPath *tPath = [UIBezierPath bezierPath];
    //5个点
    //r1点
    [tPath moveToPoint:CGPointMake(0, 0)];
    //r2点
    [tPath addLineToPoint:CGPointMake(kWidth, 0)];

    //r4点
    [tPath addLineToPoint:CGPointMake(kWidth, MIN_HEIGHT)];

    [tPath addQuadCurveToPoint:CGPointMake(0, MIN_HEIGHT) controlPoint:CGPointMake(_curveX, _curveY)];
    [tPath closePath];

    _shapeLayer.path = tPath.CGPath;
    //月牙视图的下层图 开始被覆盖掉
    UIBezierPath *pPath = [UIBezierPath bezierPath];
   //center 圆弧的圆心 radius 半径 startAngle 其实的弧度 endAngle 结束的弧度 clockwise 顺时针 逆时针
    [pPath addArcWithCenter:CGPointMake(kWidth/2, MIN_HEIGHT/2) radius:10 + _circleY / 4 startAngle:0 endAngle:100 clockwise:1];

    _circleLayer.path = pPath.CGPath;

    //

    //月牙视图的上层图  用来覆盖白色的月牙 随着手势下滑 逐渐移开 ,呈现出月牙形状

    UIBezierPath * mPath = [UIBezierPath bezierPath];
    [mPath addArcWithCenter:CGPointMake(kWidth / 2, MIN_HEIGHT / 2 + _circleY) radius:10 + _circleY / 4 startAngle:0 endAngle:100 clockwise:1];
    _moveCircleLayer.path = mPath.CGPath;

}
-
计算弹簧的效果坐标
- (void)calculatePath
{
    // 由于手势结束时,r5执行了一个UIView的弹簧动画,把这个过程的坐标记录下来,并相应的画出_shapeLayer形状
    CALayer *layer = _curveView.layer.presentationLayer;
    _curveX = layer.position.x;
    _curveY = layer.position.y;

    [self updateShaperLayerPath];
}

