神经网络验证码识别
一、验证码识别原理分析
实质是计算机识别像素


二、流程
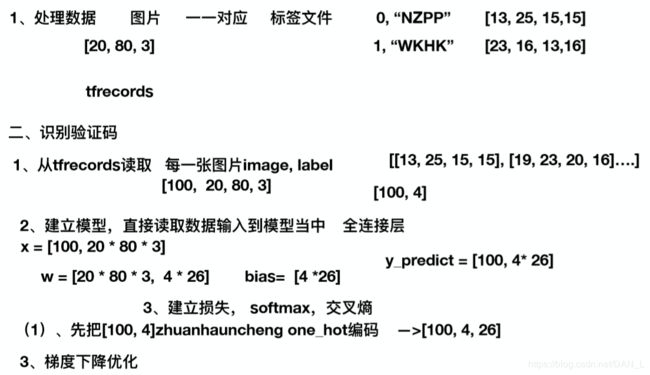
三、代码实现
import tensorflow as tf
FLAGS = tf.app.flags.FLAGS
tf.app.flags.DEFINE_string(‘captcha_dir’, ‘tfrecords/captcha.tfrecords’, ‘验证码数据的路径’)
tf.app.flags.DEFINE_integer(‘batch_size’, 100, ‘每批次训练的样本数’)
tf.app.flags.DEFINE_integer(‘label_num’, 4, ‘每个样本的目标值数量’)
tf.app.flags.DEFINE_integer(‘letter_num’, 26, ‘每个目标值取的字母的可能性个数’)
定义一个初始化权重的函数
def weight_variables(shape):
w = tf.Variable(tf.random_normal(shape=shape, mean=0, stddev=1.0))
return w
定义一个初始化偏置的函数
def bias_variables(shape):
b = tf.Variable(tf.constant(0.0, shape=shape))
return b
def read_and_decode():
“”"
读取验证码数据API
:return:image_batch, label_batch
“”"
# 1、构建文件队列
file_queue = tf.train.string_input_producer([FLAGS.captcha_dir])
# 2、构建阅读器,读取文件内容,默认一个样本
reader = tf.TFRecordReader()

# 读取内容
key, value = reader.read(file_queue)

# tfrecords格式example,需要解析
features = tf.parse_single_example(value, features={
    'image': tf.FixedLenFeature([], tf.string),
    'label': tf.FixedLenFeature([], tf.string)
})

# 解码内容,字符串内容
# 1、先解析图片的特征值
image = tf.decode_raw(features['image'], tf.uint8)
# 2、再解析图片的目标值
label = tf.decode_raw(features['label'], tf.uint8)
print(image, label)

# 改变形状
image_reshape = tf.reshape(image, [20, 80, 3])
label_reshape = tf.reshape(label, [4])
print(image_reshape, label_reshape)

# 进行批处理,每批次读取的样本数  100,也就是每次训练时候的样本
image_batch, label_batch = tf.train.batch([image_reshape, label_reshape], batch_size=FLAGS.batch_size,
                                          num_threads=1, capacity=FLAGS.batch_size)
print(image_batch, label_batch)
return image_batch, label_batch
def fc_model(image):
“”"
进行预测结果
:param image:100图片特征值[100, 20 * 80 * 3]
:return:y_predict预测值[100, 426]
“”"
with tf.variable_scope(‘model’):
# 将图片数据形状转换成二维的形状
image_reshape = tf.reshape(image, [-1, 20 * 80 * 3])
# 1、随机初始化权重偏置
# matrix [100, 20 * 80 * 3] * [20 * 80 * 3, 426] + [104] = [100, 4 * 26]
weights = weight_variables([20 * 80 * 3, 4 * 26])
bias = bias_variables([4 * 26])
    # 进行全连接层计算[100, 4 * 26]
    y_predict = tf.matmul(tf.cast(image_reshape, tf.float32), weights) + bias
return y_predict
def predict_to_onehot(label):
“”"
将读取文件当中的目标值转换成one-hot编码
:param label:
:return:one-hot
“”"
#进行one_hot编码转换,提供给交叉熵损失计算,准确率计算[100, 4, 26]
label_onehot = tf.one_hot(label, depth=FLAGS.letter_num, on_value=1.0, axis=2)
print(label_onehot)
return label_onehot
def captcharec():
“”"
验证码识别程序
:return:
“”"
# 1、读取验证码的数据文件 label_batch [100, 4]
image_batch, label_batch = read_and_decode()
# 2、通过输入图片特征数据,建立模型,得出预测结果
# 一层,全连接神经网络进行预测
# matrix [100, 20 * 80 * 3] * [20 * 80 * 3, 4*26] + [104] = [100, 4 * 26]
y_predict = fc_model(image_batch)
#[100,4 * 26]
print(y_predict)
#3、先把目标值转换成one-hot编码 [100,4,26]
y_true = predict_to_onehot(label_batch)
#4、softmax计算,交叉熵损失计算
with tf.variable_scope(‘soft_cross’):
#求平均交叉熵损失,y_true [100,4,26]----->[100, 4 * 26]
loss = tf.reduce_mean(tf.nn.softmax_cross_entropy_with_logits(
labels = tf.reshape(y_true, [FLAGS.batch_size, FLAGS.label_num * FLAGS.letter_num]),logits = y_predict))
#5、梯度下降优化损失
with tf.variable_scope(‘optimizer’):
train_op = tf.train.GradientDescentOptimizer(0.01).minimize(loss)
#6、求出样本的每批次预测的准确率 三维比较
with tf.variable_scope(‘acc’):
#比较每个预测值和目标值是否位置(4)一样 y_predict [100, 4 * 26]----->[100,4,26]
equal_list = tf.equal(tf.argmax(y_true, 2),
tf.argmax(tf.reshape(y_predict,[FLAGS.batch_size, FLAGS.label_num,FLAGS.letter_num]), 2))
accuracy = tf.reduce_mean(tf.cast(equal_list, tf.float32))
#定义一个初始化变量的op
init_op = tf.global_variables_initializer()

#开启会话训练
with tf.Session() as sess:
    sess.run(init_op)
    #定义线程协调器和开启线程(有数据在文件当中读取提供给模型)
    coord = tf.train.Coordinator()
    #开启线程去运行读取文件操作
    threads = tf.train.start_queue_runners(sess, coord=coord)
    #训练识别程序
    for i in range(5000):
        sess.run(train_op)
        print('第%d批次的准确率为:%f' % (i,accuracy.eval()))
    #回收线程
    coord.request_stop()
    coord.join(threads)
return None
if name == ‘main’:
captcharec()