Yolov3 训练自己的数据集 Pytorch 最简单 最少代码 最易调参
2020-3-11更新了接口和修改了示例代码,旧版本读者请注意异同,详细参考博文最后说明
目前烦恼
你是不是已经被网上繁琐的 Yolov3 训练自己数据集的教程搞晕了?
你是不是还在纠结 xxx.cfg 文件到底怎样改又或者网上参差不齐的训练代码难以调参?
如果你仅仅是为了追求工程上的快速搭建开发,这里使用基于Pytorch的第三方库 “芷山” (英文:zisan)来实现最快速的Yolov3训练自己数据集。
这里提供下地址:
zisan官网
zisan Yolov3训练自己数据集 实现文档
安装zisan包
可以参考官网文档:
Install and download weights
(假设你已经配置好了 Pytorch +CUDA+CUDNN)
Pytorch+CUDA+CUDNN配置教程
第一步:
安装zisan包,打开命令行输入:(提示缺哪些辅助库就自己安装哪些)
pip install zisan
第二步:
下载 Yolov3, Yolov3-tiny,Yolov3-spp 的权重文件
这里我们不需要到其他地方额外下载,官网上已经给出了配套的辅助文件,文件夹的名字不要修改,如果修改的话在后面使用的时候传参需要修改比较麻烦,我们按着最简单的步骤取完成即可。
百度云:https://pan.baidu.com/s/1qj-Lpe4OKV0L-w9uKO8EFw
提取码:x9wl
我们只需要完成 训练数据集的目标检测任务,只需要Yolov3的权重,找到 runBox.zip (475 MB)下载:
![]()
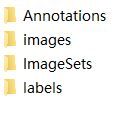
下载之后,解压如下目录:
![]()
此时,cfgs和weights文件夹是有权重和网络配置文件的,我们不要也不需要取改动它。
我们只需要在data文件夹里面放我们自己的数据即可。
数据集准备
这里实例使用红细胞数据集
下载地址:
链接: https://pan.baidu.com/s/1hYPFJH5XnRV0THV1pW5ALA
提取码: nlbq
数据集解压之后:

Annotations 文件夹放置的是xml标记文件,JPEGImages 文件夹放置的是 jpg图片
这时,我们无需做任何处理,只需要做两次傻瓜式复制即可:
第一步:把所有的xml文件复制到刚才的runBox/data/Annotations/ 里面
第二步:把所有的图片文件复制到刚才的runBox/data/images/里面
(这是data文件夹的目录,如果是你自己构造目录,睁大你的卡姿兰大眼睛,大小写分清楚!)

其余两个文件夹是空的,我们无需理会,但千万不要删除。
开始写 train.py
我们在runBox文件夹新建一个py文件
![]()
train.py:
from zisan.ObjDetect.Interface import ObjDetect_train, ObjDetect_Preprocess
import os
if __name__ == "__main__":
    pr=ObjDetect_Preprocess(classnames=['RBC'],currentpath='D:/xxx/runBox') # cuurentpath is needed, current path parameter is your runBox path
    trainModel=ObjDetect_train(currentpath='D:/xxx/runBox')
    trainModel.Run(cfg='yolov3-tiny.cfg',epochs=10)
接下来,python train.py 即可
如果你需要 调整训练参数,可以参考:
Package: ObjDetect
epochs: The times you loop training.
batch_size: The sum of once you
put into training. cfg: You can choose ‘yolov3-ting.cfg’,
‘yolov3-spp.cfg’ and ‘yolov3.cfg’, you must sure the weights folder
has the corresponding weight.
img_size: You can set as (height,width),
also like above 416 means (416,416)
resume: Due to the limitation of device resources, you may not be able to train too much data at a time. At this time, you can use resume to continue training for the weight of last cooling
num_workers: Multithreading, you must use main to use this nosave: if save each epoch weight
训练完毕,我们的训练出来的pth就放在weights文件夹里面,自行取用。
有两个weight :
last.pth
best.pth

zisan 还支持 Resume Training
我们只需要使用 resume=True 和把epoches 调大即可
if __name__ == "__main__":
    pr=ObjDetect_Preprocess(classnames=['RBC'],currentpath='D:/xxx/runBox') # cuurentpath is needed, it is your runBox path
    trainModel=ObjDetect_train(currentpath='D:/xxx/runBox')
    trainModel.Run(cfg='yolov3-tiny.cfg',epochs=20,resume=True)
开始写detect.py
同理,在runBox文件夹里面新建一个detect.py 文件:
![]()
detect.py
from zisan.ObjDetect.Interface import ObjDetect_detect, ObjDetect_train, ObjDetect_Preprocess
import os
import cv2
from skimage import io

if __name__ == "__main__":
    detectModel=ObjDetect_detect(cfg='yolov3-tiny.cfg',currentpath='D:/xxx/runBox') #Your runBox path is needed
    img=io.imread('D:/1.jpg')
    img=cv2.resize(img,(480,640)) # Here rechange for your train images set Height and width
    re,im0=detectModel.detect_from_RGBimg(img,is_showPreview=True)
	print(re) #re is a result list, item is dictionary and the format is: {'class':xx,'x0':xx,'x1':xx,'y0':xx,'y1':xx}
这里放上某一张的检测结果:

至此,已经完成所有的Yolov3 训练自己的数据集的任务了
附:zisan底层源码:
或许会有朋友觉得这种高度集成的工具没什么价值,其实zisan是我业余完成的一个工具包,也是里面有部分参考了开源的Pytorch Yolov3改写的版本,已经比其他社区参差不齐的代码好用了,我本意是做一个可以快速搭建CV开发的工具包,现在只完成了目标检测和对象语义分割的接口。
如果有兴趣的朋友可以到zisan 的Github上点个Star
邮箱:[email protected]
Github:zisan https://github.com/EpsilionJT/zisan
如果本文不够详细可以参见另外一篇Blog:
https://blog.csdn.net/rizero/article/details/104192332
2020-3-11更新补充:
关于部分读者不能成功运行的原因汇总:
(1)最好使用torch版本1.2,部分函数最新的1.4有可能出现兼容问题
(2)current_path参数目的是引入cfg文件和权重文件以及进行预处理,当时写接口的时候没能考虑到部分读者的python解释器是运行在虚拟路径的,我已经对博客和源码进行了修改,获取最新版本只需要重新pip就行了。
pip uninstall zisan
pip install zisan
(3)如果你实在无法传入绝对路径的话,可以尝试以下解决方案:
把
current_path = os.path.dirname(__file__)
改成:
current_path = os.getcwd()
(4)新的detect文件已经更新了,参见博客原文
zisan1.0.12更新说明:
- 新版本已经废除了detectFromFiles函数,建议使用detectFromRGB函数
- current_path参数指的你的runBox路径,博客原文已经修改
最后的话
为保证你的环境和你的数据等配置都不出问题,建议:先用本文的红细胞数据集训练和检测成功之后再尝试自己的数据集,只要按照一些照套就会避免很多问题的出现