2019独角兽企业重金招聘Python工程师标准>>> 
Struts2是个优秀的MVC框架。有人说java的框架是把简单的东西搞得复杂,而我不这样认为。学习框架之前可能会这样认为,学了之后就会感觉框架当然是在简化问题,否则也不会有这么多人用了。本文介绍如何用eclipse如何创建一个Struts2基于注解的登陆验证动态网页工程。通俗的说来,我们用浏览器发送一个请求到服务器,服务器验证通过则进入欢迎页,否则给出错误提示。
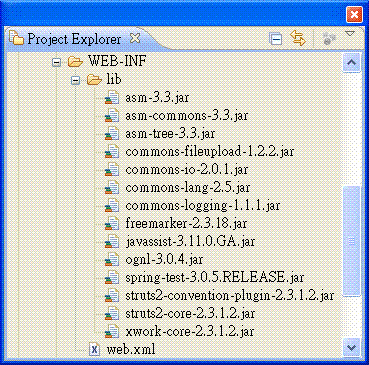
在eclipse中新建名为Struts2Demo项目,要在项目中使用Struts2框架,先要下载Struts2的相关jar包,在本站可以很容易搜索到。然后把需要的jar包添加到项目的lib目录中。项目各文件结构如下图:

为了使项目支持Struts2框架,配置web.xml文件:
		struts2
		org.apache.struts2.dispatcher.ng.filter.StrutsPrepareAndExecuteFilter


		struts2
		/*
再配置struts.xml文件,此文件一定要位于src文件目录下,否则配置无效。我做此项目时由于此文件没放在src目录下,而是放在了action所在的包中,导致一直运行不出来,浪费的半天时间。 struts.xml内容如下:
再看用户的请求页面:
<%@ page language="java" contentType="text/html; charset=GBK"
	pageEncoding="GBK"%>

<%@taglib uri="/struts-tags" prefix="s"%>


Welcome User

上面的页面中form的action为welcome意思是页面提交到名为welcome页面或action处理。产后的Url请求为http://localhost:8080/Struts2Demo/welcome。然后我们创建一个处理此请求的action。
package org.sunhing.actions;

import org.apache.struts2.convention.annotation.Action;
import org.apache.struts2.convention.annotation.Result;
import com.opensymphony.xwork2.ActionSupport;
@Action(value="/welcome",results={
		@Result(name = "success", location = "/welcome.jsp"),
		@Result(name = "input", location = "/index.jsp")}
)
public class Welcome extends ActionSupport{
	private static final long serialVersionUID = 1L;
	private String userName;
	private String message;

	public String execute() {
		setMessage("Hello " + getUserName());
		return SUCCESS;
	}

	@Override
	public void validate() {
		if("".equals(userName)){
			addFieldError("userName", "用户名不能为空!");
		}
	}

	public void setUserName(String userName) {
		this.userName = userName;
	}

	public void setMessage(String message) {
		this.message = message;
	}

	public String getUserName() {
		return userName;
	}

	public String getMessage() {
		return message;
	}
}
以上代碼中的注解:
@Action(value="/welcome",results={ @Result(name = "success", location = "/welcome.jsp"), @Result(name = "input", location = "/index.jsp")} )
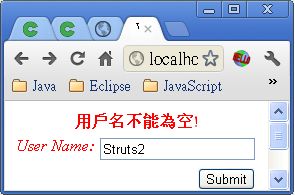
意思即为当我们的请求为/weclome(写全了为http://localhost:8080/Struts2Demo/welcome)时此请求交给此action处理。当上面的validate函数中校验有错误时会返回"input",此时Struts2找到要跳转的jsp页面index.jsp,如下左图。
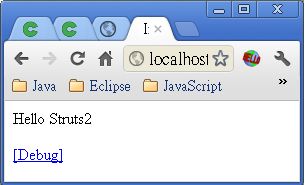
若校验通过则跳转到welcome.jsp,如上右图。下面是welcome.jsp页面代码:
<%@ page language="java" contentType="text/html; charset=GBK"
	pageEncoding="GBK"%>

<%@taglib uri="/struts-tags" prefix="s"%>


Insert title here
总结一下,Struts2为我们封装了很多常用的功能,避免了我们“重复造轮子”。
- 请求参数的自动获取。我们要做的是保证表单与要处理的action中的属性名一致即可(准确的说只需保持与属性对应getXXX()方法中的XXX一致即可)。
- 页面的自动跳转。 ActionSupport类已经为我们封装了大量常用的方法,继承此类后我们可以直接调用此类的很多方法,完成我们需要的功能。
- 提供