OkHttp源码那些事儿
目录
- OkHttp基本使用
- 基本使用
- get请求
- 异步请求
- 同步请求
- post之媒体类型
- 拦截器
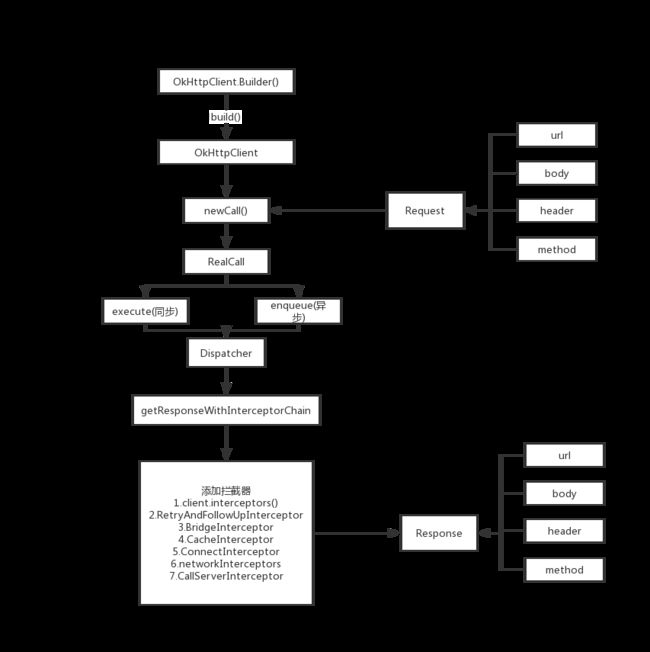
- 总体流程图
- 源码解读
- OkHttpClient.Builder
- build()
- HttpClient.newCall(Request request)
- RealCall
- enqueue
- execute
- getResponseWithInterceptorChain
- Dispatcher
- 同步
- executed
- finished
- 异步
- enqueue
- promoteAndExecute
- AsyncCall.executeOn
- AsyncCall.execute
- RealInterceptorChain.proceed
- 下集预告
OkHttp基本使用
这里不会细讲OKHttp的基本使用,但是会挑一些重点讲讲,毕竟满大街的OkHttp详细使用太多。
基本使用
get请求
异步请求
String url = "http://wwww.baidu.com";
OkHttpClient okHttpClient = new OkHttpClient();
final Request request = new Request.Builder()
        .url(url)
        .get()//默认就是GET请求,可以不写
        .build();
Call call = okHttpClient.newCall(request);
call.enqueue(new Callback() {
    @Override
    public void onFailure(Call call, IOException e) {
        Log.d(TAG, "onFailure: ");
    }

    @Override
    public void onResponse(Call call, Response response) throws IOException {
        Log.d(TAG, "onResponse: " + response.body().string());
    }
});
很明显的步骤
- 先是构建OkHttpClient对象
- 创建请求体Request
- 通过okhttpclient#newCall方法,传入请求体返回一个Call对象。
- 在通过Call#enqueue方法异步执行,回调响应数据
同步请求
String url = "http://wwww.baidu.com";
OkHttpClient okHttpClient = new OkHttpClient();
final Request request = new Request.Builder()
        .url(url)
        .build();
final Call call = okHttpClient.newCall(request);
new Thread(new Runnable() {
    @Override
    public void run() {
        try {
            Response response = call.execute();
            Log.d(TAG, "run: " + response.body().string());
        } catch (IOException e) {
            e.printStackTrace();
        }
    }
}).start();
前三个步骤和异步get是一致的,不过同步的回调是调用Call#execute方法,由于主线程不能执行耗时操作,所以该次请求一定要放到子线程中。
其实纵观全部请求,都是用Request来描述请求体,不管你是get,post,表单也罢,都通通过Request来描述请求的数据,在通过OkHttpClient#newCall方法返回一个Call对象,从而选择异步/同步方式去获取数据,同样的解读源码也是这样的流程。
post之媒体类型
post为我们提供了很多请求方式,比如说提交String,提交流,提交文件,提交图片,提交表单等等,咱们都可以通过Request的post方法去实现,先来看看一个例子
MediaType mediaType = MediaType.parse("text/x-markdown; charset=utf-8");
String requestBody = "I am Jdqm.";
Request request = new Request.Builder()
        .url("https://api.github.com/markdown/raw")
        .post(RequestBody.create(mediaType, requestBody))
        .build();
OkHttpClient okHttpClient = new OkHttpClient();
okHttpClient.newCall(request).enqueue(new Callback() {
    @Override
    public void onFailure(Call call, IOException e) {
        Log.d(TAG, "onFailure: " + e.getMessage());
    }

    @Override
    public void onResponse(Call call, Response response) throws IOException {
        Log.d(TAG, response.protocol() + " " +response.code() + " " + response.message());
        Headers headers = response.headers();
        for (int i = 0; i < headers.size(); i++) {
            Log.d(TAG, headers.name(i) + ":" + headers.value(i));
        }
        Log.d(TAG, "onResponse: " + response.body().string());
    }
});
上述代码,描述的是post提交String,重点是RequestBody,RequestBody是用来构建复杂的结构体,要搭配MediaType(也叫媒体类型)来描述响应/请求body的内容类型的,其实对应的就是请求头里的Content-Type。
我们来看看RequestBody几种构建方法如下图

第一个参数MediaType其实是描述所要发送数据类型,指的就是第二个参数。如当我们要发送String的类型数据的时候,那么就要设置text/x-markdown; charset=utf-8。那么问题来了这么多类型,那么对应的MediaType有哪些呢?
- text/html:HTML格式
- text/pain:纯文本格式
- image/jpeg:jpg图片格式
- application/json:JSON数据格式
- application/octet-stream:二进制流数据(如常见的文件下载)
- application/x-www-form-urlencoded:form表单encType属性的默认格式,表单数据将以key/value的形式发送到服务端
- multipart/form-data:表单上传文件的格式
所以在面试的时候,会被问道媒体类型是什么?主要是什么用的?上诉讲解希望可以帮到你。
拦截器
拦截器在Okhttp中是一个很重要的成员,当然在源码讲解的过程过一定会引出他。对于我们开发而言,我们可以利用拦截器是拦截发送的请求,和拦截接受的结果。比如一个电商类项目,我们可以通过在header头里的cookie中添加登录成功后然后的token,可以通过拦截器去统一处理添加。再或者通过拦截器去统一提前处理返回的错误码。
不妨看看下面案例,通过拦截器去拦截请求
public class LoggingInterceptor implements Interceptor {

    @Override
    public Response intercept(Chain chain) throws IOException {


        Request request = chain.request();
        if (BuildConfig.DEBUG) {
            Log.i("HttpLog", String.format("发送请求 %s on %s%n%s",
                    request.url(), chain.connection(), request.headers()));
        }
        Request.Builder requestBuilder = request.newBuilder()
                .header("cookie", "userToken=" + SharedPreferencesManager.getInstance().getUserTken()); // <-- this is the important line

        Request request1 = requestBuilder.build();
        return chain.proceed(request1);
    }
}
我们既可以通过该拦截器去输出每次请求的日志,并且统一在header头中添加cookie,来保留当前用户的登录状态来通知后台。
chain.proceed这一句很重要,表示发起该次请求,因为chain.proceed返回的是一个Respose对象,也就是说在该代码之前的所有操作都是在准备阶段,所以我们可以通过chain.proceed返回的Respose去获取响应的数据。那么我们在上诉代码中进行修改。
public class LoggingInterceptor implements Interceptor {

    @Override
    public Response intercept(Chain chain) throws IOException {


        Request request = chain.request();
        if (BuildConfig.DEBUG) {
            Log.i("HttpLog", String.format("发送请求 %s on %s%n%s",
                    request.url(), chain.connection(), request.headers()));
        }
        Request.Builder requestBuilder = request.newBuilder()
                .header("cookie", "userToken=" + SharedPreferencesManager.getInstance().getUserTken()); // <-- this is the important line

        Response response = chain.proceed(request);
        return logForResponse(response);
    }

       private Response logForResponse(Response response)
    {
        try
        {
            //===>response log
            Log.e(tag, "========response'log=======");
            Response.Builder builder = response.newBuilder();
            Response clone = builder.build();
            Log.e(tag, "url : " + clone.request().url());
            Log.e(tag, "code : " + clone.code());
            Log.e(tag, "protocol : " + clone.protocol());
            if (!TextUtils.isEmpty(clone.message()))
                Log.e(tag, "message : " + clone.message());
                ResponseBody body = clone.body();
                if (body != null)
                {
                    MediaType mediaType = body.contentType();
                    if (mediaType != null)
                    {
                        Log.e(tag, "responseBody's contentType : " + mediaType.toString());
                        if (isText(mediaType))
                        {
                            String resp = body.string();
                            Log.e(tag, "responseBody's content : " + resp);
                            body = ResponseBody.create(mediaType, resp);
                            return response.newBuilder().body(body).build();
                        } else
                        {
                            Log.e(tag, "responseBody's content : " + " maybe [file part] , too large too print , ignored!");
                        }
                    }
            }
            Log.e(tag, "========response'log=======end");
        } catch (Exception e)
        {
            e.printStackTrace();
        }
        return response;
    }
}
那么logForResponse里,就是来解析响应的数据。
总体流程图
源码解读
按照上面的总体流程图的步骤,我们来解读源码
OkHttpClient.Builder
首先我们可以看到源码OkHttpClient的构造其实是一个Builder模式,有的人说为什么我还可以new 一个OkHttpClient
 public OkHttpClient() {
    this(new Builder());
  }
其实内部还是构建默认的Builder,再调用Builder的构造函数,去构建一个默认的OkHttpClient。
通过Builder,我们可以去配置自己所需要的OkHttpClient.Builder。
   OkHttpClient.Builder httpBuilder = new OkHttpClient.Builder()
                            .readTimeout(3, TimeUnit.SECONDS)//读操作超时时间
                            .connectTimeout(DEFAULT_TIMEOUT, TimeUnit.SECONDS) //设置连接超时 30秒
                            .writeTimeout(3, TimeUnit.MINUTES)//写操作 超时时间
                            .addInterceptor(new LoggingInterceptor("libode", true))//添加请求拦截
                            .retryOnConnectionFailure(true);//重连机制
build()
    public OkHttpClient build() {
      return new OkHttpClient(this);
    }
通过builder.build(),去生成一个OkHttpClient对象。
HttpClient.newCall(Request request)
Request这里不再做讲解,主要就是来构建请求体,具体的使用在上面的基本方法中也进行讲解。
OkHttpClient.java
  @Override public Call newCall(Request request) {
    return RealCall.newRealCall(this, request, false /* for web socket */);
  }

RealCall.java
  static RealCall newRealCall(OkHttpClient client, Request originalRequest, boolean forWebSocket) {
    // Safely publish the Call instance to the EventListener.
    RealCall call = new RealCall(client, originalRequest, forWebSocket);
    call.eventListener = client.eventListenerFactory().create(call);
    return call;
  }
跟随流程图,下一步就是将构建好的Request传入OkHttpClient.newCall方法。我们可以看到newCall方法实际上内部是去调用RealCall.newRealCall,从源码中可以看到就是去构建一个RealCall对象。
- eventListener表示监听网络请求状态
比如 eventListener.callFailed请求失败,eventListener.callStart开始请求
RealCall
RealCall主要提供我们两个方法execute和enqueue去发起请求。来看看源码中都干了什么见不得人的事情
enqueue
该方法表示发起一个异步请求
 @Override public void enqueue(Callback responseCallback) {
    synchronized (this) {
      if (executed) throw new IllegalStateException("Already Executed");
      executed = true;
    }
    captureCallStackTrace();
    eventListener.callStart(this);
    client.dispatcher().enqueue(new AsyncCall(responseCallback));
  }
从代码的层面上到时很清晰
- 显示判断executed,判断是否已经执行完该请求,执行完则抛异常
- 回调eventListtener.callStart
- 给OkHttpClient的Dispatcher添加一个AsyncCall任务
AsyncCall是RealCall的一个内部类,AsyncCall是继承NamedRunnable,是一个子线程。
看enqueue方法,最后的实现是交给Dispatcher。
execute
该方法表示发起一个同步请求
 @Override public Response execute() throws IOException {
    synchronized (this) {
      if (executed) throw new IllegalStateException("Already Executed");
      executed = true;
    }
    captureCallStackTrace();
    timeout.enter();
    eventListener.callStart(this);
    try {
      client.dispatcher().executed(this);
      Response result = getResponseWithInterceptorChain();
      if (result == null) throw new IOException("Canceled");
      return result;
    } catch (IOException e) {
      e = timeoutExit(e);
      eventListener.callFailed(this, e);
      throw e;
    } finally {
      client.dispatcher().finished(this);
    }
  }
- 先通过executed判断是否执行过,若执行过则抛异常
- 通过timeout 去设置超时
- 通过eventListener回调callStart
- 将当前任务通过executed添加到dispatcher中
- getResponseWithInterceptorChain()添加所有的拦截器很重要
- 然后返回结果,若异常这回调失败
- 最后调用dispatcher的finished方法。
getResponseWithInterceptorChain
  Response getResponseWithInterceptorChain() throws IOException {
    // Build a full stack of interceptors.
    List interceptors = new ArrayList<>();
    interceptors.addAll(client.interceptors());
    interceptors.add(retryAndFollowUpInterceptor);
    interceptors.add(new BridgeInterceptor(client.cookieJar()));
    interceptors.add(new CacheInterceptor(client.internalCache()));
    interceptors.add(new ConnectInterceptor(client));
    if (!forWebSocket) {
      interceptors.addAll(client.networkInterceptors());
    }
    interceptors.add(new CallServerInterceptor(forWebSocket));

    Interceptor.Chain chain = new RealInterceptorChain(interceptors, null, null, null, 0,
        originalRequest, this, eventListener, client.connectTimeoutMillis(),
        client.readTimeoutMillis(), client.writeTimeoutMillis());

    return chain.proceed(originalRequest);
  }
该方法是去添加所有的拦截器,包括自己自定义的拦截器和一些默认的拦截器。
- client.interceptors()
表示通过在OkHttpClient.Builder添加的拦截器 - retryAndFollowUpInterceptor
表示负责请求失败重试以及重定向 - BridgeInterceptor
负责把用户发起的请求发送到服务器,把服务器的响应转化成用户友好的响应 - CacheInterceptor
负责读取缓存、更新缓存 - ConnectInterceptor
负责和服务器建立连接 - networkInterceptors
配置OkHttpClient设置的 - CallServerInterceptor
负责想服务器发送请求数据,从服务器读取响应数据
有一个拦截器要强调一下就是BridgeInterceptor,它帮我们做了一件事情Gzip压缩,可以大大减小通讯的数据量,所以用OkHttp可以说也是一种网络请求的优化
那么有人会问为什么异步请求enqueue的源码却没看到拦截器的配置?不要着急,enqueue的调用过程也会去配置拦截器只不过不在这段代码中。所以真正的实现还需要继续看Dispatcher。
Dispatcher
Dispatcher是要是一个控制、分发请求任务的。先来看看Dispatcher的一些重要属性
public final class Dispatcher {
  private int maxRequests = 64;
  private int maxRequestsPerHost = 5;
  private @Nullable Runnable idleCallback;

  /** Executes calls. Created lazily. */
  private @Nullable ExecutorService executorService;

  /** Ready async calls in the order they'll be run. */
  private final Deque readyAsyncCalls = new ArrayDeque<>();

  /** Running asynchronous calls. Includes canceled calls that haven't finished yet. */
  private final Deque runningAsyncCalls = new ArrayDeque<>();

  /** Running synchronous calls. Includes canceled calls that haven't finished yet. */
  private final Deque runningSyncCalls = new ArrayDeque<>();
- maxRequests 表示最大并发请求数
- maxRequestsPerHost 表示每个主机最大请求数
- executorService 为一个线程池
- readyAsyncCalls 表示异步的等待执行的任务队列
- runningAsyncCalls 表示异步正在执行的任务队列
- runningSyncCalls 表示同步正在执行的任务队列
知道这些基本且重要的信息,便于我们分析流程。从逻辑的复杂程度,我们先来分析execute中被调用的executed和finished方法。
同步
executed
 synchronized void executed(RealCall call) {
    runningSyncCalls.add(call);
  }
该方法就是把任务添加到runningSyncCalls队列中
finished
  void finished(RealCall call) {
    finished(runningSyncCalls, call);
  }

  private  void finished(Deque calls, T call) {
    Runnable idleCallback;
    synchronized (this) {
      if (!calls.remove(call)) throw new AssertionError("Call wasn't in-flight!");
      idleCallback = this.idleCallback;
    }

    boolean isRunning = promoteAndExecute();

    if (!isRunning && idleCallback != null) {
      idleCallback.run();
    }
  }
finished(Deque calls, T call)需要传两个参数,第一个表示正在执行的任务队列,第二个参数表示具体队列,那么finished方法主要做的就是在队列中移除一执行玩的队列
异步
RealCall.enqueue方法涉及到Dispatcher.enqueue()方法并且传入了一个AsyncCall对象,AsyncCall是一个实现Runnable的一个RealCall内部类。
enqueue
 void enqueue(AsyncCall call) {
    synchronized (this) {
      readyAsyncCalls.add(call);
    }
    promoteAndExecute();
  }
就是将异步任务添加到准备队列中,然后调用promoteAndExecute方法
promoteAndExecute
private boolean promoteAndExecute() {
    assert (!Thread.holdsLock(this));

    List executableCalls = new ArrayList<>();
    boolean isRunning;
    synchronized (this) {
      for (Iterator i = readyAsyncCalls.iterator(); i.hasNext(); ) {
        AsyncCall asyncCall = i.next();

        if (runningAsyncCalls.size() >= maxRequests) break; // Max capacity.
        if (runningCallsForHost(asyncCall) >= maxRequestsPerHost) continue; // Host max capacity.

        i.remove();
        executableCalls.add(asyncCall);
        runningAsyncCalls.add(asyncCall);
      }
      isRunning = runningCallsCount() > 0;
    }

    for (int i = 0, size = executableCalls.size(); i < size; i++) {
      AsyncCall asyncCall = executableCalls.get(i);
      asyncCall.executeOn(executorService());
    }

    return isRunning;
  }
主要来看看遍历方法
- 遍历所有准备执行的任务队列及runningAsyncCalls队列
- 判断准备队列是否超过最大并发请求数
- 判断是否超过最大主机的最大请求数
- 接着移除当前任务
- 然后将该任务添加到AsyncCall队列中也就是executableCalls
- 将该任务添加到执行队列中runningAsyncCalls
- 最后遍历去执行executableCalls
看到这里大致流程其实已经清晰了,但是异步的流程中,我们似乎还没有看到设置拦截器的部分。我们来看看 asyncCall.executeOn(executorService());这一步代码asyncCall的executeOn方法。
AsyncCall.executeOn
  void executeOn(ExecutorService executorService) {
      assert (!Thread.holdsLock(client.dispatcher()));
      boolean success = false;
      try {
        executorService.execute(this);
        success = true;
      } catch (RejectedExecutionException e) {
        InterruptedIOException ioException = new InterruptedIOException("executor rejected");
        ioException.initCause(e);
        eventListener.callFailed(RealCall.this, ioException);
        responseCallback.onFailure(RealCall.this, ioException);
      } finally {
        if (!success) {
          client.dispatcher().finished(this); // This call is no longer running!
        }
      }
    }
executeOn方法传入的是一个线程池,通过线程池去执行当前任务—> executorService.execute(this);也就是这一行代码,当前任务又是AsyncCall,自然而然就找到AsyncCall.execute方法
AsyncCall.execute
    @Override protected void execute() {
      boolean signalledCallback = false;
      timeout.enter();
      try {
        Response response = getResponseWithInterceptorChain();
        if (retryAndFollowUpInterceptor.isCanceled()) {
          signalledCallback = true;
          responseCallback.onFailure(RealCall.this, new IOException("Canceled"));
        } else {
          signalledCallback = true;
          responseCallback.onResponse(RealCall.this, response);
        }
      } catch (IOException e) {
        e = timeoutExit(e);
        if (signalledCallback) {
          // Do not signal the callback twice!
          Platform.get().log(INFO, "Callback failure for " + toLoggableString(), e);
        } else {
          eventListener.callFailed(RealCall.this, e);
          responseCallback.onFailure(RealCall.this, e);
        }
      } finally {
        client.dispatcher().finished(this);
      }
    }
然后就可以看到久违的getResponseWithInterceptorChain方法去设置拦截器,然后进行一系列的成功失败回调。
其实我们可以看到设置完拦截器,其实就等于完成了一次请求,因为chain.proceed();方法返回的是一个Response,前面分析一大堆其实都是在讲解同步或异步任务的分发以及流程。从getResponseWithInterceptorChain方法得知,最后是执行RealInterceptorChain.proceed方法
那么我们来看看到底又干了什么不为人知的事情
RealInterceptorChain.proceed
 @Override public Response proceed(Request request) throws IOException {
    return proceed(request, streamAllocation, httpCodec, connection);
  }

  public Response proceed(Request request, StreamAllocation streamAllocation, HttpCodec httpCodec,
      RealConnection connection) throws IOException {
    //表示将要获取的拦截器索引的判断
    //如果索引值大于等于拦截器列表大小,就抛出异常,因为后续会出现数组越界的异常
    if (index >= interceptors.size()) throw new AssertionError();

     // 记录本方法调用次数
    calls++;

 // 如果已经为该Request创建了stream,就不再继续创建了
    // If we already have a stream, confirm that the incoming request will use it.
    if (this.httpCodec != null && !this.connection.supportsUrl(request.url())) {
      throw new IllegalStateException("network interceptor " + interceptors.get(index - 1)
          + " must retain the same host and port");
    }

// 如果已经为该Request创建了stream,那该方法只能调用一次
    // If we already have a stream, confirm that this is the only call to chain.proceed().
    if (this.httpCodec != null && calls > 1) {
      throw new IllegalStateException("network interceptor " + interceptors.get(index - 1)
          + " must call proceed() exactly once");
    }

// 创建新的拦截器链对象,并将index索引+1
    // Call the next interceptor in the chain.
    RealInterceptorChain next = new RealInterceptorChain(interceptors, streamAllocation, httpCodec,
        connection, index + 1, request, call, eventListener, connectTimeout, readTimeout,
        writeTimeout);
        //获取拦截器
    Interceptor interceptor = interceptors.get(index);
    //执行拦截器的intercept方法获取结果,并将新的拦截器链对象传入
    Response response = interceptor.intercept(next);

    // Confirm that the next interceptor made its required call to chain.proceed().
    if (httpCodec != null && index + 1 < interceptors.size() && next.calls != 1) {
      throw new IllegalStateException("network interceptor " + interceptor
          + " must call proceed() exactly once");
    }

    // Confirm that the intercepted response isn't null.
    if (response == null) {
      throw new NullPointerException("interceptor " + interceptor + " returned null");
    }

    if (response.body() == null) {
      throw new IllegalStateException(
          "interceptor " + interceptor + " returned a response with no body");
    }

    return response;
  }
看到这里大家一定很蒙圈,到底在说什么?回过头来去看看getResponseWithInterceptorChain方法在构建RealInterceptorChain是传了什么参数

咱们的注意点在第一个参数和第五个参数,分别表示拦截器的列表,和将要后去拦截器索引也就是index。
那么回过头来,抛开一切就只看这一段代码
    RealInterceptorChain next = new RealInterceptorChain(interceptors, streamAllocation, httpCodec,
        connection, index + 1, request, call, eventListener, connectTimeout, readTimeout,
        writeTimeout);
    Interceptor interceptor = interceptors.get(index);
    Response response = interceptor.intercept(next);
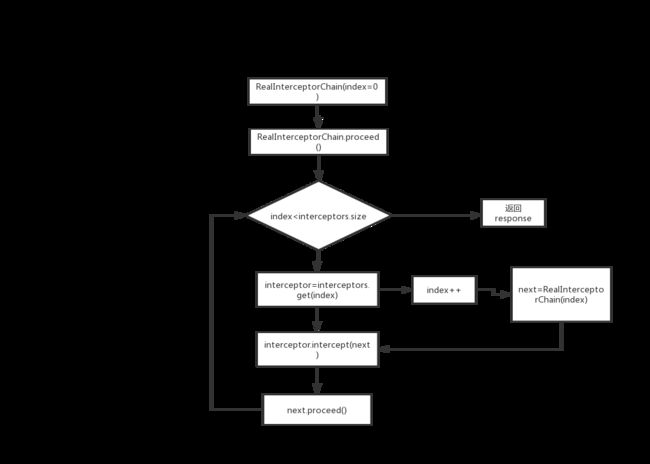
这段代码怎么理解?大家还有印象吗,上面讲过自定义拦截器,最终实现的方法是在intercept(Chain chain),并且最后return chain.proceed(request);此时的request就是RealInterceptorChain,等于是调用RealInterceptorChain.proceed方法。
其实这一段代码是一个循环,这一段的代码的目的是通过RealInterceptorChain中介,去依次按照顺序去执行拦截器的intercept去实现拦截器的意思。附上一张流程图会更加清楚
至于其他拦截器的具体实现这里就不做分析,那么整个OkHttp的流程就这么轻松+愉快的解决了。
下集预告
主要从两个方向分析
1.view的四个构造方法
2.view和viewgroup的绘制流程分析