论23种设计模式在Android源码中的应用--单例模式
概念
单例模式就是整个系统有且只有一个唯一的对象,单例模式思想相对比较简单,但是确保整个系统有且只有一个对象,需要注意几个点:
- 构造函数必须是private;
- 通过一个静态方法返回单例类对象;
- 在多线程下注意单例模式的创建;
- 确保单例类对象在反系列化时不会重新构建对象;
单例模式从实现角度来分可以分:饿汉式单例和懒汉式单例,先看一下它们的实现:
package com.ailian.designpattern.singletonpattern;

/**
* 饿汉式
*/
public class EagerSingleton {

    private static final EagerSingleton eagerSingleton = new EagerSingleton();

    private EagerSingleton() {
    }

    public static EagerSingleton newInstance() {
        return eagerSingleton;
    }

}
package com.ailian.designpattern.singletonpattern;
/**
* 双重检查锁定
* 懒汉式
*/
public class LazySingleton {

    private static LazySingleton lazySingleton;

    private LazySingleton() {
    }

    public static LazySingleton newInstance() {
        if (lazySingleton == null) {
            synchronized (LazySingleton.class) {
                if (lazySingleton == null){//双重检查锁定
                lazySingleton = new LazySingleton();
                }
            }
        }
        return lazySingleton;
    }

}
从上面单例模式的两种方式可以看出
- 饿汉式式在类加载的时候就初始化了对象,所有要提醒占用系统的资源,而懒汉式是在使用对象的时候进行初始化;
- 我们同时发现懒汉式,使用了synchronized两次lazySingleton == null判断,这时防止在多线程调用过程中有可能产生多个
LazySingleton对象:
1、synchronized同步锁,防止不同线程同时调用new方法创建实例;
2、两次lazySingleton == null判断,想象一下,如果没有第一次的lazySingleton == null判断,则每次调用newInstance都会判断同步锁,消耗性能;而如果没有第二次lazySingleton == null判断,则依然有可能出现多个实例被创建,只要两个线程同时判断出第一次的lazySingleton == null为true,则会出现多个对象被创建;
Android源码中单例模式的运用
我们先看这样段代码
WindowManager wm = (WindowManager) context.getSystemService(Context.WINDOW_SERVICE);WindowManager是Framework层的管理类是全局唯一的,显然它使用到就是单例模式,像这样的管理类Android系统的还有很多比如:ActivityManager、PackageManager、TelephonyManager、NotificationManager、WindowManagerService等等,我们这边通过分析WindowManager来分析系统是如何使用的。
getSystemService的方法是Context中定义的:
public abstract class Context{
    //省略其他抽象方法的定义
    public abstract  java.lang.Object getSystemService(java.lang.String name);

}
Context只是定义了一个抽象方法,它的实现是ContextImpl中
/**
* Common implementation of Context API, which provides the base
* context object for Activity and other application components.
*/
class ContextImpl extends Context {
    @Override
    public Object getSystemService(String name) {
        return SystemServiceRegistry.getSystemService(this, name);
    }
}
ContextImpl是通过SystemServiceRegistry这个对象获取到的我们在来看看SystemServiceRegistry中getSystemService的实现:
final class SystemServiceRegistry {
private static final HashMap> SYSTEM_SERVICE_FETCHERS = new HashMap>();

    /**
    * Gets a system service from a given context.
    */
    public static Object getSystemService(ContextImpl ctx, String name) {
        ServiceFetcher fetcher = SYSTEM_SERVICE_FETCHERS.get(name);
        return fetcher != null ? fetcher.getService(ctx) : null;
    }
}
看到这里就有意思了,这里有一个ServiceFetcher,这个是SystemServiceRegistry的一个内部类,看看它的源码定义:
/**
* Base interface for classes that fetch services.
* These objects must only be created during static initialization.
*/
static abstract interface ServiceFetcher {
    T getService(ContextImpl ctx);
}


/**
* Override this class when the system service constructor needs a
* ContextImpl and should be cached and retained by that context.
*/
static abstract class CachedServiceFetcher implements ServiceFetcher {
    private final int mCacheIndex;
    public CachedServiceFetcher() {
        mCacheIndex = sServiceCacheSize++;
    }
    @Override
    @SuppressWarnings("unchecked")
    public final T getService(ContextImpl ctx) {
        final Object[] cache = ctx.mServiceCache;
        synchronized (cache) {
            // Fetch or create the service.
            Object service = cache[mCacheIndex];
            if (service == null) {
            try {
                service = createService(ctx);
                cache[mCacheIndex] = service;
                } catch (ServiceNotFoundException e) {
                    onServiceNotFound(e);
                }
            }
            return (T)service;
        }
    }
    public abstract T createService(ContextImpl ctx) throws ServiceNotFoundException;

}
到这里一切都水落石出了,首先getService方法会从cache中获取,如果获取不到则会调用createService(ctx)创建一个实例,最终返回唯一的实例对象,为了解决多线程中有可能有多个实例被创建,这里使用了synchronized,跟我们上面讲的懒汉式单例模式是一致的;
到这里WindowManager的单例模式获取过程就分析完了,但是呢,我们看看上面的createService方法是个抽象方法,我们并没有看到它的具体实现啊,我们来继续分析,既然ServiceFetcher是从SystemServiceRegistry的一个HashMap静态常量SYSTEM_SERVICE_FETCHERS中获取的,那我们一步一步看这个常量是何时如何添加进去的
final class SystemServiceRegistry {
private static final HashMap> SYSTEM_SERVICE_FETCHERS = new HashMap>();

    /**
    * Statically registers a system service with the context.
    * This method must be called during static initialization only.
    */
    private static  void registerService(String serviceName, Class serviceClass,        ServiceFetcher serviceFetcher) {
        SYSTEM_SERVICE_NAMES.put(serviceClass, serviceName);
        SYSTEM_SERVICE_FETCHERS.put(serviceName, serviceFetcher);
    }
}
同样是在SystemServiceRegistry这个类中有一个registerService方法,对SYSTEM_SERVICE_FETCHERS注册HashMap键值对,截个图来粗略的看一下这个registerService被调用的数量
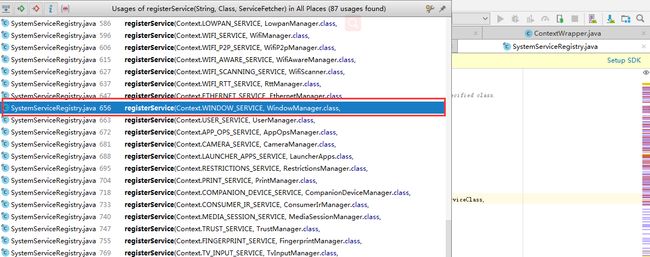
从上图可以看到总共有87个调用,其中我们也找到了我们的WindowManager注册过程
final class SystemServiceRegistry {
private static final HashMap> > SYSTEM_SERVICE_FETCHERS = new HashMap<String, ServiceFetcher>>();
registerService(Context.WINDOW_SERVICE, WindowManager.class,
new CachedServiceFetcher() {
@Override
public WindowManager createService(ContextImpl ctx) {
return new WindowManagerImpl(ctx);
}});
}
} 在这里我们终于看到了createService的具体实现,这里就是WindowManager的创建方式,最终重建的是WindowManager的一个实现类WindowManagerImpl(cts);
我们再来总结一下整个过程:
- 通过Context调用getSystemService方法时,其实调用的是ContextImpl的getSystemService方法;
- ContextImpl的getSystemService方法会调用SystemServiceRegistry的getSystemService(this, name)方法;
- SystemServiceRegistry的getSystemService(this, name)方法会先从一个静态HashMap先获取ServiceFetcher;
- 在获取ServiceFetcher后去获取WindowManager,如果获取不到则创建一个WindowManager;
单例模式的适用场景
- 需要频繁的进行创建和销毁的对象;
- 创建对象时耗时过多或者耗费内存资源过多,而且经常使用的对象;
- 工具管理类对象;
- 频繁访问数据库或者文件的对象;
单例模式的优缺点
优点:
- 减少内存消耗,使用单例模式就是为了减少实例的创建,而每创建一个实例都意味者内存的消耗、性能的开销;
- 单例模式可以避免对资源的重复占用,比如对一个文件的操作,如果使用了单例模式,则说明每次只有一个实例对其进行读写操作,避免了对同一个文件的同时读写操作;
缺点:
- 单例模式不符合面向对象的开闭原则,因为如果需要扩展则必须在当前对象中进行修改;
- 容易发生内存泄漏,因为单例对象持有对Context的引用,所有我们传递Context给单例对象时最好使用ApplicationContext;