input子系统三 input系统启动和EventHub数据读取
一、框架介绍
由下图可以看出,在系统服务启动时会通过InputManager启动InputReader和InputDispatcher,创建EventHub对象,当kernel层向dev节点中写入数据时,EventHub会读出数据,经过InputReader处理后,通过InputDispatcher发送给系统服务,或者其他需要使用的应用程序,后面将分为三部分分析,一为input子系统的启动;二为input子系统的在framework中的数据获取;三为数据的处理和传输。
二、input系统启动分析
1、Android系统的服务基本都是从systemServer启动的,同样Input系统也是从systemserver启动的,首先创建InputManagerService对象,为这个对象设置与WindowManagerService相关的回调函数,然后调用InputManagerService的start函数。
./frameworks/base/services/java/com/android/server/SystemServer.java
ServiceManager.addService(Context.WINDOW_SERVICE, wm);
ServiceManager.addService(Context.INPUT_SERVICE, inputManager);
Trace.traceEnd(Trace.TRACE_TAG_SYSTEM_SERVER);
inputManager.setWindowManagerCallbacks(wm.getInputMonitor());
inputManager.start();./frameworks/base/services/core/java/com/android/server/input/InputManagerService.java
public InputManagerService(Context context) {
this.mContext = context;
this.mHandler = new InputManagerHandler(DisplayThread.get().getLooper());
mUseDevInputEventForAudioJack =
context.getResources().getBoolean(R.bool.config_useDevInputEventForAudioJack);
Slog.i(TAG, "Initializing input manager, mUseDevInputEventForAudioJack="
+ mUseDevInputEventForAudioJack);
mPtr = nativeInit(this, mContext, mHandler.getLooper().getQueue());//通过JNI调用nativeInit来启动native层的input系统
LocalServices.addService(InputManagerInternal.class, new LocalService());
}./frameworks/base/services/core/jni/com_android_server_input_InputManagerService.cpp
static jlong nativeInit(JNIEnv* env, jclass /* clazz */,
jobject serviceObj, jobject contextObj, jobject messageQueueObj) {
sp messageQueue = android_os_MessageQueue_getMessageQueue(env, messageQueueObj);
if (messageQueue == NULL) {
jniThrowRuntimeException(env, "MessageQueue is not initialized.");
return 0;
}
//NativeInputManager,使用messageQueue意味着java和native层的消息传输使用同一个messageQueue
NativeInputManager* im = new NativeInputManager(contextObj, serviceObj,
messageQueue->getLooper());
im->incStrong(0);
return reinterpret_cast(im);//将新建的NativeInputManager强制转换返回给应用层的mPtr
} ./frameworks/base/services/core/jni/com_android_server_input_InputManagerService.cpp
NativeInputManager::NativeInputManager(jobject contextObj,
jobject serviceObj, const sp& looper) :
mLooper(looper), mInteractive(true) {
JNIEnv* env = jniEnv();
mContextObj = env->NewGlobalRef(contextObj);
mServiceObj = env->NewGlobalRef(serviceObj);
{
AutoMutex _l(mLock);
mLocked.systemUiVisibility = ASYSTEM_UI_VISIBILITY_STATUS_BAR_VISIBLE;
mLocked.pointerSpeed = 0;
mLocked.pointerGesturesEnabled = true;
mLocked.showTouches = false;
}
mInteractive = true;
//创建EventHub用户数据读取
sp eventHub = new EventHub();
//InputManager用于创建和管理InputReader和InputDispatcher线程
mInputManager = new InputManager(eventHub, this, this);
} InputManager::InputManager(
const sp& reader,
const sp& dispatcher) :
mReader(reader),
mDispatcher(dispatcher) {
initialize();
}
void InputManager::initialize() {
mReaderThread = new InputReaderThread(mReader);
mDispatcherThread = new InputDispatcherThread(mDispatcher);
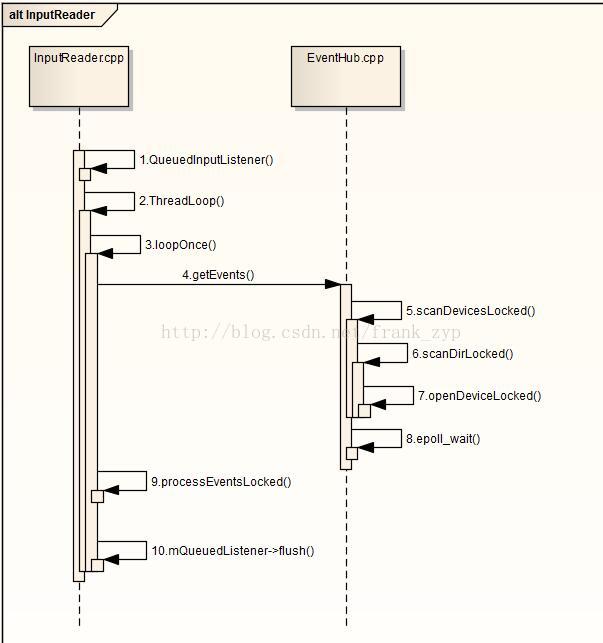
} 到这里input相关的对象都已创建成功最后执行start方法让对象都运行起来,到这里整个的input系统都已运行起来,第一部分就介绍完毕,下面用UML图分析大体流程:
InputReader::InputReader(const sp& eventHub,
        const sp& policy,
        const sp& listener) :
        mContext(this), mEventHub(eventHub), mPolicy(policy),
        mGlobalMetaState(0), mGeneration(1),
        mDisableVirtualKeysTimeout(LLONG_MIN), mNextTimeout(LLONG_MAX),
        mConfigurationChangesToRefresh(0) {
	//创建mQueuedListener
    mQueuedListener = new QueuedInputListener(listener);
    { // acquire lock
        AutoMutex _l(mLock);
        ALOGD("InputReader:: InputReader lock " );
        refreshConfigurationLocked(0);
        updateGlobalMetaStateLocked();
    } // release lock
    ALOGD("InputReader:: InputReader unlock " );
}
bool InputReaderThread::threadLoop() {
mReader->loopOnce();
return true;
}void InputReader::loopOnce() {
int32_t oldGeneration;
int32_t timeoutMillis;
bool inputDevicesChanged = false;
Vector inputDevices;
{
......
//(1)从EventHub中读取数据并存放在mEventBuffer中,返回数据数目count
size_t count = mEventHub->getEvents(timeoutMillis, mEventBuffer, EVENT_BUFFER_SIZE);
{ // acquire lock
AutoMutex _l(mLock);
mReaderIsAliveCondition.broadcast();
if (count) {
processEventsLocked(mEventBuffer, count);//(2)对获取的数据进行处理
}
} // release lock
......
// Send out a message that the describes the changed input devices.
if (inputDevicesChanged) {
mPolicy->notifyInputDevicesChanged(inputDevices);
}
//(3)对数据进行处理并发送给InputDispatcher
mQueuedListener->flush();
} (1)从EventHub从读取数据
EventHub主要的功能是主动监视Input驱动的变化,包含打开设备、事件读取和等待部分,其中等待部分是通过Linux的epoll机制来实现的,epoll机制简单地说就是高效的I/O多路复用机制,其中在getEvents函数中,首先检查是否要重新reopen所有的input device设备,然后检查是否有待关闭的input设备。如果这是第一次调用getEvents函数,则需要调用scanDevicesLocked函数去扫描/dev/input目录下的设备文件并打开这些设备,最后将设备加入到epoll的监视队列中:
size_t EventHub::getEvents(int timeoutMillis, RawEvent* buffer, size_t bufferSize) {
    ALOG_ASSERT(bufferSize >= 1);

    AutoMutex _l(mLock);

    struct input_event readBuffer[bufferSize];

    RawEvent* event = buffer;//存放数据的数据类型为RawEvent
    size_t capacity = bufferSize;
    bool awoken = false;
    for (;;) {
        nsecs_t now = systemTime(SYSTEM_TIME_MONOTONIC);
		......
        if (mNeedToScanDevices) {
            mNeedToScanDevices = false;
            scanDevicesLocked();//打开设备,添加移除设备等
            mNeedToSendFinishedDeviceScan = true;
        }

        //开始读取事件
        bool deviceChanged = false;
        while (mPendingEventIndex < mPendingEventCount) {
            const struct epoll_event& eventItem = mPendingEventItems[mPendingEventIndex++];
            if (eventItem.data.u32 == EPOLL_ID_INOTIFY) {
                if (eventItem.events & EPOLLIN) {
                    mPendingINotify = true;
                } else {
                    ALOGW("Received unexpected epoll event 0x%08x for INotify.", eventItem.events);
                }
                continue;
            }
            Device* device = mDevices.valueAt(deviceIndex);
            if (eventItem.events & EPOLLIN) {
				//读取事件,将数据存放在readBuffer中
                int32_t readSize = read(device->fd, readBuffer,
                        sizeof(struct input_event) * capacity);
                if (readSize == 0 || (readSize < 0 && errno == ENODEV)) {
                    // Device was removed before INotify noticed.

                    deviceChanged = true;
                    closeDeviceLocked(device);
                } else if (readSize < 0) {
                    if (errno != EAGAIN && errno != EINTR) {
                        ALOGW("could not get event (errno=%d)", errno);
                    }
                } else if ((readSize % sizeof(struct input_event)) != 0) {
                    ALOGE("could not get event (wrong size: %d)", readSize);
                } else {
                    int32_t deviceId = device->id == mBuiltInKeyboardId ? 0 : device->id;
					//在设备上产生的事件的个数
                    size_t count = size_t(readSize) / sizeof(struct input_event);
                    for (size_t i = 0; i < count; i++) {
                        struct input_event& iev = readBuffer[i];
						//产生这个事件对应的设备的ID,与具体的硬件无关,其数值和设备打开的顺序有关
                        event->deviceId = deviceId;
                        event->type = iev.type;	//设置事件类型,对应kernel中report事件的类型
                        event->code = iev.code;//事件对应的事件码
                        event->value = iev.value;//事件的内容
                        event += 1;
                        capacity -= 1;
                    }
                    if (capacity == 0) {
                        // The result buffer is full.  Reset the pending event index
                        // so we will try to read the device again on the next iteration.
                        mPendingEventIndex -= 1;
                        break;
                    }
                }
            } else if (eventItem.events & EPOLLHUP) {
                ALOGI("Removing device %s due to epoll hang-up event.",
                        device->identifier.name.string());
                deviceChanged = true;
                closeDeviceLocked(device);
            } else {
                ALOGW("Received unexpected epoll event 0x%08x for device %s.",
                        eventItem.events, device->identifier.name.string());
            }
        }
        int pollResult = epoll_wait(mEpollFd, mPendingEventItems, EPOLL_MAX_EVENTS, timeoutMillis);//对文件描叙符阻塞操作

        acquire_wake_lock(PARTIAL_WAKE_LOCK, WAKE_LOCK_ID);
        mLock.lock(); // reacquire lock after poll, must be after acquire_wake_lock
    }

    // All done, return the number of events we read.
    return event - buffer;
}void EventHub::scanDevicesLocked() {
status_t res = scanDirLocked(DEVICE_PATH);
if(res < 0) {
ALOGE("scan dir failed for %s\n", DEVICE_PATH);
}
if (mDevices.indexOfKey(VIRTUAL_KEYBOARD_ID) < 0) {
createVirtualKeyboardLocked();
}
}status_t EventHub::scanDirLocked(const char *dirname)
{
char devname[PATH_MAX];
char *filename;
DIR *dir;
struct dirent *de;
dir = opendir(dirname);//dirname = /dev/input
if(dir == NULL)
return -1;
strcpy(devname, dirname);
filename = devname + strlen(devname);
*filename++ = '/';
while((de = readdir(dir))) {//拼接成input/dev/event0-5
if(de->d_name[0] == '.' &&
(de->d_name[1] == '\0' ||
(de->d_name[1] == '.' && de->d_name[2] == '\0')))
continue;
strcpy(filename, de->d_name);
openDeviceLocked(devname);
}
closedir(dir);
return 0;
}status_t EventHub::openDeviceLocked(const char *devicePath) {
...
InputDeviceIdentifier identifier;
//打开设备
int fd = open(devicePath, O_RDWR | O_CLOEXEC);
// 获取设备的名字,如果成功获取到设备的名字,把它存入InputDeviceIdentifier中
if(ioctl(fd, EVIOCGNAME(sizeof(buffer) - 1), &buffer) < 1) {
//fprintf(stderr, "could not get device name for %s, %s\n", devicePath, strerror(errno));
} else {
buffer[sizeof(buffer) - 1] = '\0';
identifier.name.setTo(buffer);
}
...
//构造EventHub所需要的对象Device,这里的fd是刚刚打开的设备的文件描述符
int32_t deviceId = mNextDeviceId++;//从这里可以看出,deviceId是与设备无关的,和打开顺序有关
Device* device = new Device(fd, deviceId, String8(devicePath), identifier);
// 测试设备能够产生的事件的类型,这些事件类型在前文中已经说到过。这里就是Android支持的事件类型,是Kernel的一个子集
ioctl(fd, EVIOCGBIT(EV_KEY, sizeof(device->keyBitmask)), device->keyBitmask);
ioctl(fd, EVIOCGBIT(EV_ABS, sizeof(device->absBitmask)), device->absBitmask);
ioctl(fd, EVIOCGBIT(EV_REL, sizeof(device->relBitmask)), device->relBitmask);
ioctl(fd, EVIOCGBIT(EV_SW, sizeof(device->swBitmask)), device->swBitmask);
ioctl(fd, EVIOCGBIT(EV_LED, sizeof(device->ledBitmask)), device->ledBitmask);
ioctl(fd, EVIOCGBIT(EV_FF, sizeof(device->ffBitmask)), device->ffBitmask);
ioctl(fd, EVIOCGPROP(sizeof(device->propBitmask)), device->propBitmask);
...
//根据前面获取到的设备属性,检测设备是鼠标,键盘,手柄等,然后把这些信息继续存入Device
if (test_bit(BTN_MOUSE, device->keyBitmask)
&& test_bit(REL_X, device->relBitmask)
&& test_bit(REL_Y, device->relBitmask)) {
device->classes |= INPUT_DEVICE_CLASS_CURSOR;
}
......
status_t keyMapStatus = NAME_NOT_FOUND;
if (device->classes & (INPUT_DEVICE_CLASS_KEYBOARD | INPUT_DEVICE_CLASS_JOYSTICK)) {
// Load the keymap for the device.
keyMapStatus = loadKeyMapLocked(device);//获取kl文件键值
}
...
//将Device对象加入到mDevices数组和mOpeningDevices中
addDeviceLocked(device);
return 0;
}您的支持是对博主最大的鼓励,感谢您的认真阅读。
本文无所谓版权,欢迎转载。


