Android中自定义控件的测量及布局
很久都没有写博客了,今天有时间写点东西。上篇blog主要是用到了自定义控件的绘制方法,接下来说一下,自定义控件的车辆和布局方法。首先我们来自己实现一个Linearlayout控件。
如下图所示:
上图,是自定义的一个ViewGroup,模拟线性布局的效果,里面装载了三个Textview,很直观吧。好的,我们知道,要实现布局控件,一般我们会继承自ViewGroup。然后重写三个方法就可以了,onSizeChanged(),根据字面意思,当尺寸改变的时候,调用的方法,当然,我们界面第一次启动,或者从新打开的时候,都会调用这个方法。
onMeasure(),测量。主要是对控件测量高度,宽度。用的。
onLayout().布局,我们平时用的线性、相对、帧布局。都是在这个方法里面来操作子View的排布。从而达到其效果。
接下来,我们开始,创建工程,写一个类继承viewgroup,定义变量。
//父控件的宽度
int layoutWidth;
//父控件的高度
int layoutHeight;
需要重写如下几个方法:
@Override
protected void onMeasure(int widthMeasureSpec, int heightMeasureSpec) {
        // 不能删除,用于父控件测量用
        super.onMeasure(widthMeasureSpec, heightMeasureSpec);
}
@Override
protected void onLayout(boolean changed, int l, int t, int r, int b) {
    }

@Override
    protected void onSizeChanged(int w, int h, int oldw, int oldh) {
        super.onSizeChanged(w, h, oldw, oldh);
}
在onSizeChanged()中我们先得到父控件的大小如下:
@Override
    protected void onSizeChanged(int w, int h, int oldw, int oldh) {
        super.onSizeChanged(w, h, oldw, oldh);
        layoutHeight = h;
        layoutWidth = w;
        Log.w("renk", "onSizeChanged");
    }
然后我们开始最重要的测量工作,
@Override
    protected void onMeasure(int widthMeasureSpec, int heightMeasureSpec) {
        // 不能删除,用于父控件测量用
        super.onMeasure(widthMeasureSpec, heightMeasureSpec);
        Log.w("renk", "onMeasure");
        int childViewCount = this.getChildCount();
        for (int i = 0; i < childViewCount; i++) {
    View childView = this.getChildAt(i);
    int width = MeasureSpec.getSize(widthMeasureSpec);
widthMeasureSpec = MeasureSpec.makeMeasureSpec(width,
                    MeasureSpec.AT_MOST);
        int height =MeasureSpec.getSize(heightMeasureSpec);
    heightMeasureSpec =MeasureSpec.makeMeasureSpec(height,
                    MeasureSpec.AT_MOST);
    //测量后让子View获得宽高
    childView.measure(widthMeasureSpec, heightMeasureSpec);
        }
    }
这里需要说一下,MeasureSpec.AT_MOST是一种显示模式(mode)。mode共有三种情况,分别为MeasureSpec.UNSPECIFIED,MeasureSpec.EXACTLY,MeasureSpec.AT_MOST。
MeasureSpec.EXACTLY是精确尺寸,当我们将控件的layout_width或layout_height指定为具体数 时如andorid:layout_width=”90dp”,或者为Match_PARENT是,都是控件大小已经确定的情况,都是精确尺寸。
MeasureSpec.AT_MOST是最大尺寸,当控件的layout_width或者layout_height指定为WRAP_CONTENT时,控件大小一般随着控件的子空间或内容进行变化,此时控件尺寸只要不超过父控件允许的最大尺寸即可。因此,此时的mode是AT_MOST,size给出了父控件允许的最大尺寸。
MeasureSpec.UNSPECIFIED是未指定尺寸,这种情况不多,一般都是父控件是AdapterView,通过measure方法传入的模式。
可以调用setMeasuredDimenson方法,将View的高度和宽度传入,设置子View实际的大小,告诉父控件需要多大的空间放置子View。
当然有时候,我们也看得到在测量方法里面做一个判断如:
//测量模式
int mode=MeasureSpec.getMode(heightMeasureSpec);
//判断模式
//AT_MOST是一种测量模式:控件的大小可以和父容器一样大
if (mode==MeasureSpec.AT_MOST)
    {
        int imageWidth=view.getWidth();
        int imageHeight=view.getHeight();
        //设置控件的大小是图片的大小
        setMeasuredDimension(imageWidth, imageHeight);
    }
或者
//测量模式
int mode=MeasureSpec.getMode(heightMeasureSpec);
//判断模式
//EXACTLY也是一种测量模式:控件的大小固定的,或者说是写死的。
if (mode==MeasureSpec.EXACTLY)
    {
        int imageWidth=500;
        int imageHeight=500;
        //设置控件的大小是图片的大小
        setMeasuredDimension(imageWidth, imageHeight);
    }
好了,各子View的尺寸也设置好了,接下来我们就可以布局了。我们知道LinearLayout布局就是一个接一个横向堆,或者纵向堆。现在实现纵向布局,横向是一个道理。
    @Override
    protected void onLayout(boolean changed, int l, int t, int r, int b) {
        // 模拟实现linearLayout
        Log.w("renk", "onLayout");
        int top = 0;
        int childCount = this.getChildCount();
        // 指定子控件如何显示
        for (int i = 0; i < childCount; i++) {
            View childView = this.getChildAt(i);
            // getWidth()是在控件显示出来才能用
            // getMeasuredWidth()是在控件没有显示出来也能用
            int width = childView.getMeasuredWidth();
            int height = childView.getMeasuredHeight();
            Log.w("renk", "第"+i+"个的"+"高度:"+height );
            //起点为屏幕左上角
            childView.layout(0, top, width, top + height);
            top += height;
        }
    }
如果想实现FrameLayout布局那同样我们只需要更改一下参数设置就可以了
注意的是,布局的排布都是从屏幕的左上角为起点。坐标(0,0)开始
@Override
    protected void onLayout(boolean changed, int l, int t, int r, int b) {
        // 模拟实现FrameLayout
        Log.w("renk", "onLayout");
        int childCount = this.getChildCount();
        // 指定子控件如何显示
        for (int i = 0; i < childCount; i++) {
            View childView = this.getChildAt(i);
            // getWidth()是在控件显示出来才能用
            // getMeasuredWidth()是在控件没有显示出来也能用
            int width = childView.getMeasuredWidth();
            int height = childView.getMeasuredHeight();
            Log.w("renk", "第"+i+"个的"+"高度:"+height );
            childView.layout(0, 0, width, height);
        }
    }
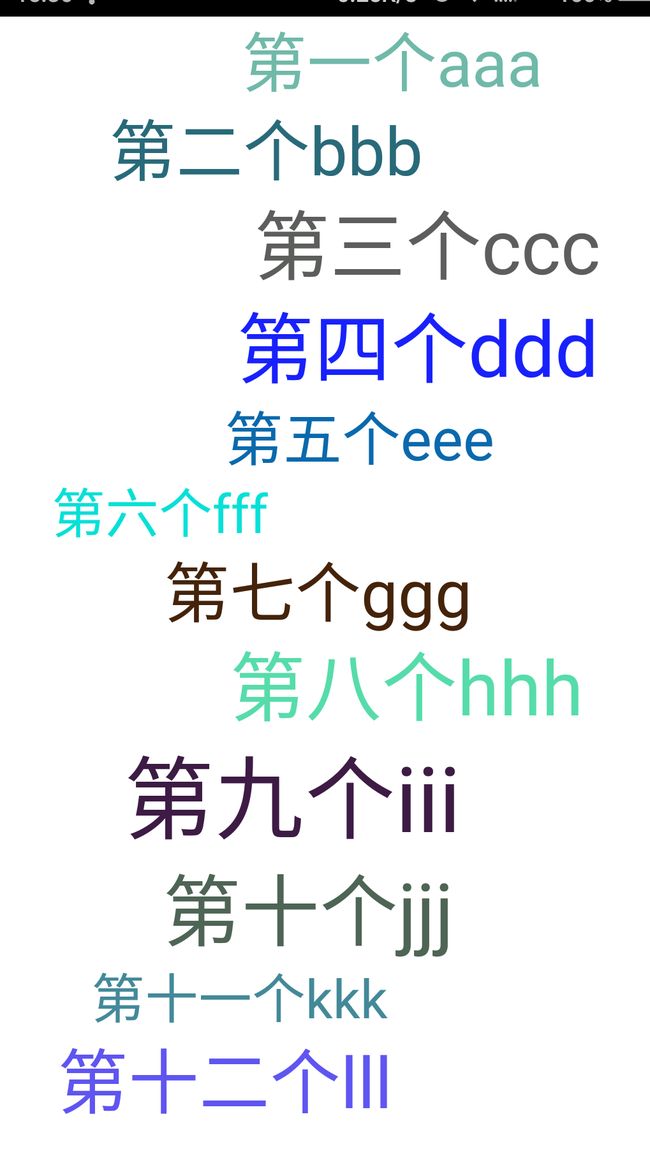
好了,通过上面的知识点,自定义控件的基本测量和布局我们就知道了,然后,我就再来学点深入一点的自定义控件。自定义随机显示控件,模仿marginLeft为子控件设置边距,先看图:

同样我们继承ViewGroup,然后重写构造方法,初始化参数。
Random random = new Random();
 int ranColor = 0xff000000 | random.nextInt(0x0077ffff);
String[] texts = { "第一个aaa", "第二个bbb", "第三个ccc", "第四个ddd", "第五个eee","第六个fff", "第七个ggg", "第八个hhh", "第九个iii", "第十个jjj", "第十一个kkk","第十二个lll" };
 int height, width;
public KeyWords(Context context) {
    super(context);
    //动态生成TextView
    newTextView(texts);
    setBackgroundColor(Color.WHITE);
}
上面代码中调用了动态生成多个TextView 的方法。重写三个方法
@Override
    protected void onSizeChanged(int w, int h, int oldw, int oldh) {
        super.onSizeChanged(w, h, oldw, oldh);
        height = h;
        width = w;
        Log.w("onSizeChanged", "heigh:" + height + " width:" + width);
    }

@Override
    protected void onMeasure(int widthMeasureSpec, int heightMeasureSpec) {
        super.onMeasure(widthMeasureSpec, heightMeasureSpec);
        int count = getChildCount();
        for (int i = 0; i < count; i++) {
            TextView tv = (TextView) getChildAt(i);
            int width = MeasureSpec.getSize(widthMeasureSpec);
            widthMeasureSpec = MeasureSpec.makeMeasureSpec(width,
                    MeasureSpec.AT_MOST);
            int height = MeasureSpec.getSize(heightMeasureSpec);
            heightMeasureSpec = MeasureSpec.makeMeasureSpec(height,
                    MeasureSpec.AT_MOST);
            tv.measure(widthMeasureSpec, heightMeasureSpec);
        }
    }

@Override
    protected void onLayout(boolean changed, int l, int t, int r, int b) {
        int count = getChildCount();
        int x = 0, y = 0, left = 0, sum = 0, top = 0;
        int viewTop = 2;
        for (int i = 0; i < count; i++) {
            TextView tv = (TextView) getChildAt(i);
            //随机生成左边距,类似与marginleft的大小
            left = random.nextInt(400) + random.nextInt(100);
            int viewWidth = tv.getMeasuredWidth();
            int viewHeight = tv.getMeasuredHeight();
            //判断文本大小加上左边距大小是否超出了屏幕的宽度
            if ((left + viewWidth) <= width) {
                tv.layout(left, viewTop, left + viewWidth, viewTop + viewHeight);
                viewTop += viewHeight;
            } else {
            //超出屏幕宽度,下一行显示
                left = width - viewWidth;
                tv.layout(left, viewTop, left + viewWidth, viewTop + viewHeight);
                viewTop += viewHeight;
            }
        }
    }
与上面,设置左边距的方法类似,可以让我们也可以设置右边距,这样我们也可以模拟出,Relativelayout布局,可以自己动手试试。下面就是动态添加控件方法
    void newTextView(String[] names) {
        for (int i = 0; i < names.length; i++) {
            //随机颜色
            int ranColor = 0xff000000 | random.nextInt(0x0077fcdf);
            tv.setTextColor(ranColor);
            tv.setText(names[i]);
            Log.w("newTextView", "name:" + names[i]);
            //随机字体大小
            tv.setTextSize(random.nextFloat() * 18f + 16 + random.nextInt(20));
            //设置textview的宽高,为自适应
            LayoutParams params = new LayoutParams(LayoutParams.WRAP_CONTENT,
                    LayoutParams.WRAP_CONTENT);
            tv.setLayoutParams(params);
            //添加
            addView(tv);
        }
    }
值得注意的是,每动态添加一个View时,父控件就会调用onlayout方法。进行重新布局。同时,onsizechange()方法也会调用。
好了,今天要说的控件测量和布局就讲完了。六一节就要到了,提前祝大家节日快乐,哈哈!永远年轻。若有不足之处,还望指教!
最后是全部代码。
public class KeyWords extends ViewGroup {

    Random random = new Random();
    // int ranColor = 0xff000000 | random.nextInt(0x0077ffff);
    String[] texts = { "第一个aaa", "第二个bbb", "第三个ccc", "第四个ddd", "第五个eee",
            "第六个fff", "第七个ggg", "第八个hhh", "第九个iii", "第十个jjj", "第十一个kkk",
            "第十二个lll" };
    int height, width;

    public KeyWords(Context context) {
        super(context);
        newTextView(texts);
        setBackgroundColor(Color.WHITE);
    }

    @Override
    protected void onLayout(boolean changed, int l, int t, int r, int b) {
        int count = getChildCount();
        int x = 0, y = 0, left = 0, sum = 0, top = 0;
        int viewTop = 2;
        for (int i = 0; i < count; i++) {
            TextView tv = (TextView) getChildAt(i);
            left = random.nextInt(400) + random.nextInt(100);
            int viewWidth = tv.getMeasuredWidth();
            int viewHeight = tv.getMeasuredHeight();
            if ((left + viewWidth) <= width) {
                tv.layout(left, viewTop, left + viewWidth, viewTop + viewHeight);
                viewTop += viewHeight;
            } else {
                left = width - viewWidth;
                tv.layout(left, viewTop, left + viewWidth, viewTop + viewHeight);
                viewTop += viewHeight;
            }
        }
    }

    @Override
    protected void onMeasure(int widthMeasureSpec, int heightMeasureSpec) {
        super.onMeasure(widthMeasureSpec, heightMeasureSpec);
        int count = getChildCount();
        for (int i = 0; i < count; i++) {
            TextView tv = (TextView) getChildAt(i);
            int width = MeasureSpec.getSize(widthMeasureSpec);
            widthMeasureSpec = MeasureSpec.makeMeasureSpec(width,
                    MeasureSpec.AT_MOST);
            int height = MeasureSpec.getSize(heightMeasureSpec);
            heightMeasureSpec = MeasureSpec.makeMeasureSpec(height,
                    MeasureSpec.AT_MOST);
            tv.measure(widthMeasureSpec, heightMeasureSpec);
        }
    }

    void newTextView(String[] names) {
        for (int i = 0; i < names.length; i++) {
            TextView tv = new TextView(getContext());
            int ranColor = 0xff000000 | random.nextInt(0x0077fcdf);
            tv.setTextColor(ranColor);
            tv.setText(names[i]);
            Log.w("newTextView", "name:" + names[i]);
            tv.setTextSize(random.nextFloat() * 18f + 16 + random.nextInt(20));
            LayoutParams params = new LayoutParams(LayoutParams.WRAP_CONTENT,
                    LayoutParams.WRAP_CONTENT);
            tv.setLayoutParams(params);
            addView(tv);
        }
    }

    @Override
    protected void onSizeChanged(int w, int h, int oldw, int oldh) {
        super.onSizeChanged(w, h, oldw, oldh);
        height = h;
        width = w;
        Log.w("onSizeChanged", "heigh:" + height + " width:" + width);
    }

    int x = 0, y = 0;

    @Override
    public boolean onTouchEvent(MotionEvent event) {
        switch (event.getAction()) {
        case MotionEvent.ACTION_DOWN:
            x = (int) event.getX();
            y = (int) event.getY();
            break;

        case MotionEvent.ACTION_UP:
            if (x - event.getX() > 20) {
                postInvalidate();
            }
            break;
        }
        return true;
    }
}