Android 自定义控件-星级评分
在学习自定义控件时需要一些例子来练练手,本文这个控件就是在这种环境下产生的(可能有BUG);
这个控件设计的特点:
1,可以任意修改星星数量
2,可以星星大小会随控件大小而缩小,在控件足够大的情况可以任意设置星星大小
3,滑动监听,根据滑动距离选择星级
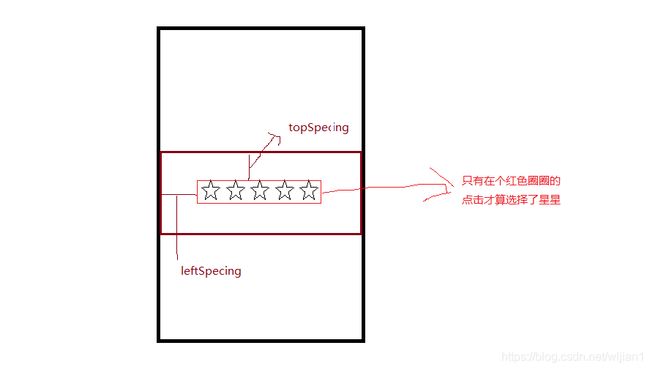
4,可以设置星星之间的间距和左右间距
第一步:
初始化星星图片,随便设置星星的默认宽高
private void init() {
        mPaint = new Paint();
        star = BitmapFactory.decodeResource(getResources(), R.drawable.icon_evaluate_star);
        starPressed = BitmapFactory.decodeResource(getResources(), R.drawable.icon_evaluate_star_pressed);
        starWidth = star.getWidth();
        starHeight = star.getHeight();
    }
第二步:
重写onMeasure方法,在这里说一下onMeasure方法的两个参数:
widthMeasureSpec和heightMeasureSpec:分别 代表了View宽高的:大小模式和大小数值
一个int 类型怎么能代表两个东西呢, 系统时这样规定的,采用最高两位表示模式,如下图:
最高位00表示:MeasureSpec.UNSPECIFIED : 表示在XML 中使用wrap_centent
最高位01表示:MeasureSpec.EXACTLY: 表示在XML 中使用 xxdp
最高位11表示:MeasureSpec.AT_MOST:表示在XML 中使用 match_parent
然后代码中的逻辑: 计算使用默认值时需要的实际宽高,在判断控件是否指定宽高 是的再判断是否大于实际需要宽高 小于就按比例缩小,大于就按居中显示 把多余的宽高都加左右/上下间距里具体代码,代码备注的已经很详细了
    @Override
    protected void onMeasure(int widthMeasureSpec, int heightMeasureSpec) {
        super.onMeasure(widthMeasureSpec, heightMeasureSpec);
        int widthMode = MeasureSpec.getMode(widthMeasureSpec);
        mWidth = MeasureSpec.getSize(widthMeasureSpec);
        //
        // 实际所需要的宽 = 星星的宽 * 星星数量 + 星星之间的间距 * 间距数  + 左右间距
        float totalWidthSpacing = (starCount - 1) * spacing + leftSpacing + rightSpacing; // 总的间距
        float width = starWidth * starCount + totalWidthSpacing;
        switch (widthMode) {
            case MeasureSpec.AT_MOST:
            case MeasureSpec.EXACTLY:
                // 当实际所需的宽 大于控件所设定的宽时   应该按比例缩小实际所需要宽来满足控件所给宽
                if (width > mWidth) {
                    // 计算比例
                    float scale = mWidth / width;
                    starWidth = starWidth * scale;
                    spacing = spacing * scale;
                    leftSpacing = leftSpacing * scale;
                    rightSpacing = rightSpacing * scale;

                } else {

                    // 如果实际所需宽小于 控件所给宽  那就加大左右间距  尽量保持居中效果

                    float diff = width - mWidth;

                    leftSpacing = leftSpacing + diff / 2;

                    rightSpacing = rightSpacing + diff / 2;

                }

                // 重新计算
                totalWidthSpacing = (starCount - 1) * spacing + leftSpacing + rightSpacing; // 总的间距
                width = starWidth * starCount + totalWidthSpacing;
                mWidth = (int) (width + totalWidthSpacing);
                break;
            case MeasureSpec.UNSPECIFIED:
                // 未指定的情况下 我就安实际所需宽高来 做控件宽高

                mWidth = (int) width;

                break;
        }

        int heightMode = MeasureSpec.getMode(heightMeasureSpec);
        mHeight = MeasureSpec.getSize(heightMeasureSpec);
        // 实际所需高
        float height = starHeight + topSpacing + bottomSpacing;
        switch (heightMode) {
            case MeasureSpec.AT_MOST:
            case MeasureSpec.EXACTLY:
                // 当控件指定高时  尽可能满足指定的高
                if (height > mHeight) {
                    // 当实际所需高大于指定高时  按比例缩小实际所需高
                    float scale = mHeight / height;
                    starHeight = starHeight * scale;
                    topSpacing = topSpacing * scale;
                    bottomSpacing = bottomSpacing * scale;
                } else {
                    // 实际所需高小于指定高时  将多余的都加到 上下间距
                    float diff = mHeight - height;
                    topSpacing = topSpacing + diff / 2;
                    bottomSpacing = bottomSpacing + diff / 2;

                }
                // 重新计算高
                mHeight = (int) (starHeight + topSpacing + bottomSpacing);
                break;
            case MeasureSpec.UNSPECIFIED:
                // 未指定的情况下 我就安实际所需宽高来 做控件宽高
                mHeight = (int) height;
                break;
        }

        // 设置宽高
        setMeasuredDimension(mWidth, mHeight);


    }
第三步 画星星 在上面我已经初始化星星的Bitmap了
重写onDraw 方法 有starCount 来决定画星星的数量 再由星级来决定画什么样的星星。
再计算星星该画在什么位置 计算方式都在代码里里 也有详细的备注
这个主要说明一下 canvas.drawBitmap(bitmap, src, dst , mPaint); 这方法
第一个参数: 表示需要画的图
第二个参数:表示图片需要绘制的区域,可以参数可以为空, 表示绘制这张图片
第三个参数:表示图片应该被绘制在画布的什么区域,不能为空
第四个蚕食:画笔, 可以为空。
    @Override
    protected void onDraw(Canvas canvas) {
        super.onDraw(canvas);

        for (int i = 0; i < starCount; i++) {
            Bitmap bitmap = star;
            if (i < level) {
                bitmap = starPressed;
            }
            // 表示图片需要绘制区域
            Rect src = new Rect(0, 0, bitmap.getWidth(), bitmap.getHeight());
            // 表示图片应该被绘制在的区域
            RectF dst = new RectF();
            dst.top = topSpacing ;
            dst.left = leftSpacing + (starWidth + spacing) * i;
            dst.right = dst.left + starWidth;
            dst.bottom = dst.top + starWidth;

            canvas.drawBitmap(bitmap, src, dst, mPaint);
        }

    }
第四步 重写onTouchEvent() 方法
这个说明一下 当我们手指触摸屏幕时有三种情况:
手指按下:MotionEvent.ACTION_DOWN.
手指滑动:MotionEvent.ACTION_MOVE.
手指带起:MotionEvent.ACTION_UP.
这就是我们点击屏幕时三种动作。
在这里我先划分点击有效区域,在有效距离内再根据x值除于星星的宽加星星之间的间距来知道点击了那个星星
最后再加个判断只有当星级发生改变的时候才重绘控件。因为在onTouchEvent方法执行次数太多,避免没必要的重绘
    @Override
    public boolean onTouchEvent(MotionEvent event) {
        int oldLevel = level;
        switch (event.getAction()) {
            case MotionEvent.ACTION_DOWN: // 手指按下
                break;
            case MotionEvent.ACTION_MOVE: // 手指滑动
                float x = event.getX();
                float y = event.getY();
                // 当点击区域在  星星所在区域时 才点击有效
                if (y > topSpacing && y < topSpacing + starHeight) {
                    // 根据点击位置确实星级
                    if (x < leftSpacing ) {
                        // 小于左边距 表示没有点到一个星星
                        level = 0;
                    } else {
                        // 只要左边距肯定已经点到星星了  除于星星宽个间距即知道点击了那个星星
                        level = (int) ((x - leftSpacing) / (starWidth + spacing)) + 1;
                        Log.e("AAA—>", "onTouchEvent: " + level );
                        if (oldLevel != level) {
                            // 只有当星级发生改变时才去刷新布局 不做没必要刷新
                            if (onLevelChangeListener != null) {
                                onLevelChangeListener.levelChange(level);
                            }
                            postInvalidate();
                        }
                    }
                }

                break;
            case MotionEvent.ACTION_UP: // 手指抬起
                break;
        }

        return true;
    }
由于本人水平有限,文笔也比较糙,不喜勿喷。
源代码

